Alcatel-Lucent 7750 SR-Series routers do not contain a boot EEPROM. The boot loader code is loaded from the boot.ldr file. The BOF file performs the following tasks:
A:SR-45# show bof
===============================================================================
BOF (Memory)
===============================================================================
primary-image cf3:/4.0.R20
primary-config cf3:/ospf_default.cfg
addres 138.120.189.53/24 active
static-route 138.120.0.0/16 next-hop 138.120.189.1
static-route 172.0.0.0/8 next-hop 138.120.189.1
autonegotiate
duplex full
speed 100
wait 3
persist on
console-speed 115200
===============================================================================
A:SR-45#
The BOF should be on the same drive as the boot loader file. If the system cannot load or cannot find the
BOF then the system checks whether the boot sequence was manually interrupted. The system prompts for a different image and configuration location.
Hit a key within 3 seconds to change boot parms...
You must supply some required Boot Options. At any prompt, you can type:
"restart" - restart the query mode.
"reboot" - reboot.
"exit" - boot with with existing values.
Press ENTER to begin, or 'flash' to enter firmware update...
Software Location
-----------------
You must enter the URL of the TiMOS software.
The location can be on a Compact Flash device,
or on the network.
Here are some examples
cf3:/timos1.0R1
ftp://user:passwd@192.168.xx.xxx/./timos1.0R1
tftp://192.168.xx.xxx/./timos1.0R1
The existing Image URL is 'ftp://vxworks:vxw0rks@192.168.xx.xxx/./rel/0.0/xx'
Press ENTER to keep it.
Software Image URL:
Using: 'ftp://vxworks:vxw0rks@192.168.xx.xxx/./rel/0.0/xx'
Configuration File Location
---------------------------
You must enter the location of configuration
file to be used by TiMOS. The file can be on
a Compact Flash device, or on the network.
Here are some examples
cf1:/config.cfg
ftp://user:passwd@192.168.xx.xxx/./config.cfg
tftp://192.168.xx.xxx/./config.cfg
The existing Config URL is 'cf3:/config.cfg'
Press ENTER to keep it, or the word 'none' forno Config URL.
Config File URL:
Using: 'cf3:/config.cfg'
Network Configuration
---------------------
You specified a network location for either the
software or the configuration file. You need to
assign an IP address for this system.
The IP address should be entered in standard
dotted decimal form with a network length.
example: 192.168.xx.xxx/24
The existing IP address is 192.168.xx.xxx/20. Press ENTER to keep it.
Enter IP Address:
Using: 192.168.xx.xxx/20
The existing Active IP address is 192.168.xx.xxx/20. Press ENTER to keep it.
Enter Active IP Address:
Using: 192.168.xx.xxx/20
The existing Standby IP address is 192.168.xx.xxx/20. Press ENTER to keep it.
Enter Standby IP Address (Type 0 ifno ne desired):
Using: 192.168.xx.xxx/20
Would you like to add a static route? (yes/no) y
Static Routes
-------------
You specified network locations which require
static routes to reach. You will be asked to
enter static routes until all the locations become
reachable.
Static routes should be entered in the following format:
prefix/mask next-hop ip-address
example: 192.168.xx.xxx/16 next-hop 192.168.xx.xxx
Enter route: 1.x.x.0/24 next-hop 192.168.xx.xxx
OK
Would you like to add another static route? (yes/no) n
New Settings
------------
primary-image ftp://vxworks:vxw0rks@192.168.xx.xx/./rel/0.0/xx
primary-config cf3:/config.cfg
address 192.168.xx.xx/20 active
primary-dns 192.168.xx.xx
dns-domain xxx.xxx.com
static-route 1.x.x.0/24 next-hop 192.168.xx.xxx
autonegotiate
duplex full
speed 100
wait 3
persist off
Do you want to overwrite cf3:/bof.cfg with the new settings? (yes/no): y
Successfully saved the new settings in cf3:/bof.cfg
|
•
|
When the SF/CPM is installed and power to the chassis is turned on, the 7750 SR OS7750 SR OS MG software automatically begins the boot sequence.
|
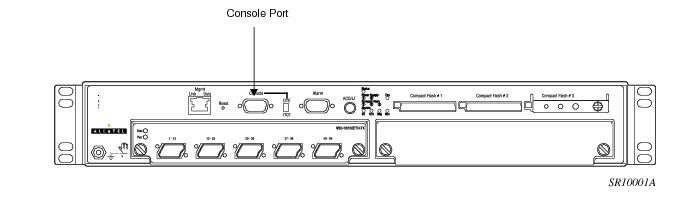
Figure 10 displays an example of the Console port on a 7750 SR-1 front panel.
A:ALA-1>bof# show bof
==================================================================
Memory BOF
==================================================================
no autonegotiate
duplex full
speed 100
address 10.10.xx.xx/20 active
wait 3
primary-image cf3:\both.tim
primary-config cf3:\test123.cfg
primary-dns 192.168.xx.xx
persist on
dns-domain test.alcatel.com
==================================================================
A:ALA-1>bof#
Use one of the following CLI commands to display the current configuration. The detail option displays all default values. The
index option displays only the persistent indices. The
info command displays context-level information.
A:7750-3>admin# display-config
# TiMOS B-1.0.Ixxx - Copyright (c) 2000-2007 Alcatel, Inc.
# Built on Tues Jan 21 21:39:07 2007 by builder in /rel1.0/xx/panos/main
# Generated WED Jan 31 06:15:29 2007 UTC
exit all
configure
#--------------------------------------------------
echo "System Configuration"
#--------------------------------------------------
system
name "7750-3"
contact "Fred Information Technology"
location "Bldg.1-floor 2-Room 201"
clli-code "abcdefg1234"
coordinates "N 45 58 23, W 34 56 12"
ccm 1
exit
snmp
exit
login-control
idle-timeout 1440
motd text "7750-3"
exit
time
sntp
shutdown
exit
zone UTC
exit
thresholds
rmon
exit
exit
exit...
...
#--------------------------------------------------
echo "Redundancy Configuration"
#--------------------------------------------------
redundancy
synchronize boot-env
exit
...exit all
# Finished FRI Nov 21 15:06:16 2008 UTC
A:7750#
If you modify a configuration file, the changes remain in effect only during the current power cycle unless a save command is executed. Changes are lost if the system is powered down or the router is rebooted without saving.
|
•
|
The detail option adds the default parameters to the saved configuration.
|
|
•
|
The index option forces a save of the index file.
|
Example:
A:
ALA-1# bof
A:
ALA-1>bof# save cf3:
A:
ALA-1>bof#
Example:
A:
ALA-1# admin save cf3:\test123.cfg
Saving config.# Saved to cf3:\test123.cfg
... complete
A:
ALA-1#
NOTE: If the
persist option is enabled and the
admin save file-url command is executed with an FTP path used as the
file-url parameter, two FTP sessions simultaneously open to the FTP server. The FTP server must be configured to allow multiple sessions from the same login, otherwise, the configuration and index files will not be saved correctly.
You can delete specific BOF parameters. The no form of these commands removes the parameter from configuration. The changes remain in effect only during the current power cycle unless a
save command is executed. Changes are lost if the system is powered down or the router is rebooted without saving.
Example:
A:ALA-1# bof
A:ALA-1>bof# save cf3:
A:ALA-1>bof#
Example:
A:ALA-1# bof
A:ALA-1>bof# save cf3:
A:ALA-1>bof#
Example:
A:ALA-1>admin# save cf3:\testABC.cfg
Saving config.# Saved to cf3:\testABC.cfg
... complete
A:ALA-1#
When an admin>reboot command is issued, routers with redundant
CPM are rebooted as well as the IOM
s. Changes are lost unless the configuration is saved. Use the
admin>save file-url command to save the current configuration. If no command line options are specified, the user is prompted to confirm the reboot operation.
Example:
A:ALA-1>admin# reboot
A:DutA>admin# reboot
	All rights reserved. All use is subject to applicable
	license agreements.
	....