To manage the display of listed information

Purpose

Perform this procedure to configure and save display preferences for list forms. You can resize and rearrange the sequence of columns, and remove columns that are not required. You can sort lists based on a selected column (attribute), and choose to display objects in ascending or descending order.

You can save listed information to a file; see To save listed information to a file.

The following table describes the order in which different types of data are sorted from the top of the column to the bottom, based on the direction of the arrow in the column header.

Table 1-4: Sorting listed information

Entry type

Down arrow (Descending)

Up arrow (Ascending)

Numbers only

Sorted from the lowest number to the highest number

Sorted from the highest number to the lowest number

Letters

Sorted left to right, character by character, in alphabetical order

Sorted left to right, character by character, in reverse alphabetical order

Alphanumeric

Sorted left to right, character by character, in the following order: from 0 to 9, then in alphabetical order

Sorted left to right, character by character, in the following order: in reverse alphabetical order, then from 9 to 0

Alphanumeric for IP Address fields 1

Addresses are sorted first by type, then alphanumerically from the lowest to the highest number. For example, IPv4, IPv6 and DNS, in the following order:

  • 2.1.1.1

  • 10.2.2.2

  • 21.2.1.1

  • 21.10.1.1

  • 14:C8AA:0:0:0:0:0:EA

  • 24AA:C8:0:0:0:0:0:EA

Addresses are sorted first by type, then alphanumerically from the highest to the lowest number. For example, DNS address, IPv6, IPv4 in the following order:

  • 24AA:C8:0:0:0:0:0:EA

  • 14:C8AA:0:0:0:0:0:EA

  • 21.10.1.1

  • 21.2.1.1

  • 10.2.2.2

  • 2.1.1.1

Special characters

Sorted left to right, character by character.

The following characters are sorted in the following order before numbers, and uppercase and lowercase letters in a list: (space) ! # $ % & ‘ ( ) * + , . /

The following characters are sorted in the following order after numbers in a list, but before uppercase and lowercase letters: : ; < = > ? @

The following characters are sorted in the following order after numbers, and uppercase and lowercase letters in a list: { | } ~

Sorted left to right, character by character.

The following characters are sorted in the following order before numbers, and uppercase and lowercase letters in a list: ~ } | {

The following characters are sorted in the following order before numbers in a list, but after uppercase and lowercase letters: @ ? > = < ; :

The following characters are sorted in the following order after numbers, and uppercase and lowercase letters in a list: / . , + * ) ( ‘ & % $ # ! (space)

Blanks

Blank entries are placed first at the top of the list.

Blank entries are placed last at the bottom of the list.

Notes:
  1. Sorting on an IP Address field may cause performance issues when the NFM-P database is under heavy load.

The following figure describes the features of a list form.

Figure 1-12: List elements
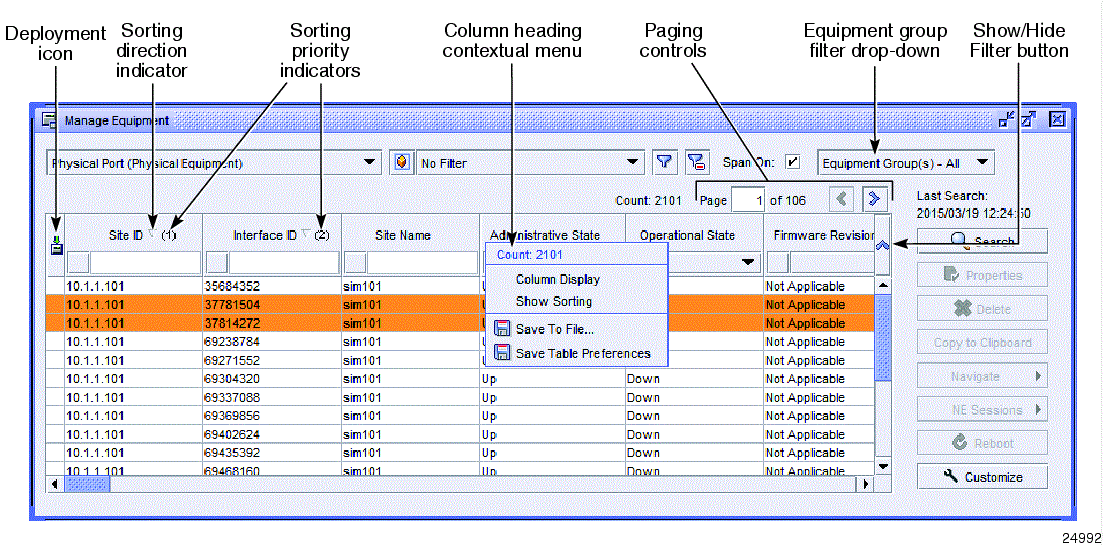
List elements
Steps
 

Open a list form and choose an object type. The columns specific to the object type are displayed.


Configure column display preferences. Perform any of the following:

  1. Remove columns.

    1. Right-click on any column heading and choose Column Display. The Column Display form opens.

    2. In the Displayed on Table panel, select one or more columns to remove.

    3. Click on the left arrow to move the selected items to the Available for Table panel.

      Dimmed items cannot be moved.

      There must be at least one item in the Displayed on Table panel.

    4. Save your changes and close the form.

  2. Add columns.

    1. Right-click on any column heading and choose Column Display. The Column Display form opens.

    2. In the Available for Table panel, select one or more columns to add.

    3. Click on the right arrow to move the selected items to the Displayed on Table panel.

    4. Save your changes and close the form.

  3. Rearrange the left-to-right sequence of columns.

    Use this feature to place important information in the first few columns of the table, or to place related columns side by side.

    1. Right-click on any column heading and choose Column Display. The Column Display form opens.

    2. In the Displayed on Table panel, select the name of one or more columns to rearrange.

    3. Click on the up or down arrows to move the selected items. The top-to-bottom sequence of the items reflects the left-to-right sequence of the columns in the list table.

    4. Save your changes and close the form.

    Alternatively, you can change the sequence of columns by clicking and dragging on a column heading.

  4. Resize columns. Hover over the vertical line between two columns, then click and drag when the arrows appear.


Configure a filter if required and click Search to generate a list.

The total number of listed items is indicated by the Count value displayed on the form and in the contextual menu for column headings.


Hide the simple search fields in the column headings. Click on the Show/Hide Filter button.


Navigate multiple pages.

When a list uses multiple pages, the paging controls are available. Click on the paging arrows to move forward or backward one page at a time, or enter a page number to jump to a specific page. The page number and total page count are shown on the form.

You can specify a user preference for the number of items to display on a page; see To configure NFM-P user preferences .


Configure sorting preferences.

Lists are sorted top-to-bottom based on selected column attributes. You can display sorted results in ascending or descending order; see Table 1-4, Sorting listed information . When no column is explicitly selected for sorting, the first column at the left of the table is used.

Perform one of the following:

  1. Sort a list using a single column.

    1. Click on the column heading. The list is sorted based on the values for the selected attribute.

    2. Click on the column heading to reverse the sorting direction (ascending or descending).

  2. Sort using multiple columns.

    When a sort using a single column produces many items that all have the same value for the selected attribute, you can refine the sort by choosing additional columns. The priority order for the columns is indicated by a number in parentheses in the column heading.

    1. Right-click on any column heading and choose Show Sorting. The Show Sorting form opens.

    2. In the Used for Sorting panel, select any column names that are not required for sorting and click on the left arrow to move the selected items.

    3. In the Available for Sorting panel, select the column names to be used for sorting and click on the right arrow. The selected items appear in the Used for Sorting panel.

    4. In the Used for Sorting panel, click on the items and use the up and down arrows to arrange them in the required priority order.

      The sorting priority decreases from top to bottom; the item at the top of the panel has priority (1).

    5. Click to select Sort Ascending or Sort Descending; see Table 1-4, Sorting listed information . The selected column headings display numbers in parentheses to show the sorting priority.

    6. Close the form.

    Alternatively, you can click on a column heading to select the priority (1) attribute, then Ctrl-click on additional column headings to further refine the sort. Priority is based on the order in which the columns are clicked. Press Ctrl-click on an already selected (numbered) column heading to reverse the sorting direction (ascending or descending).

    You can navigate quickly through a long sorted list using the first character of the column that has sorting priority (1). Click in the list, then type a letter or number. The first item that begins with that letter or number in the priority (1) column is selected in the list.


Save your column display and sorting preferences.

  1. Right-click on any column heading and choose Save Table Preferences.

  2. Confirm the action. The configured display preferences are applied whenever you open a list table for the same object type.

End of steps