Preconfiguration
|
| |
|
1 | Before you begin, you must have:
|
Configuration
|
| |
|
2 |
Choose Policies→QoS→SROS QoS→Scheduler→Scheduler from the NFM-P main menu. The manage scheduler policies form opens.
|
3 |
Click Create. The scheduler policy create form opens.
|
4 |
Configure the parameters. Set the displayed name to High QoS.
|
5 |
Click on the Schedulers tab.
|
6 |
Click Create. The scheduler entry form opens.
|
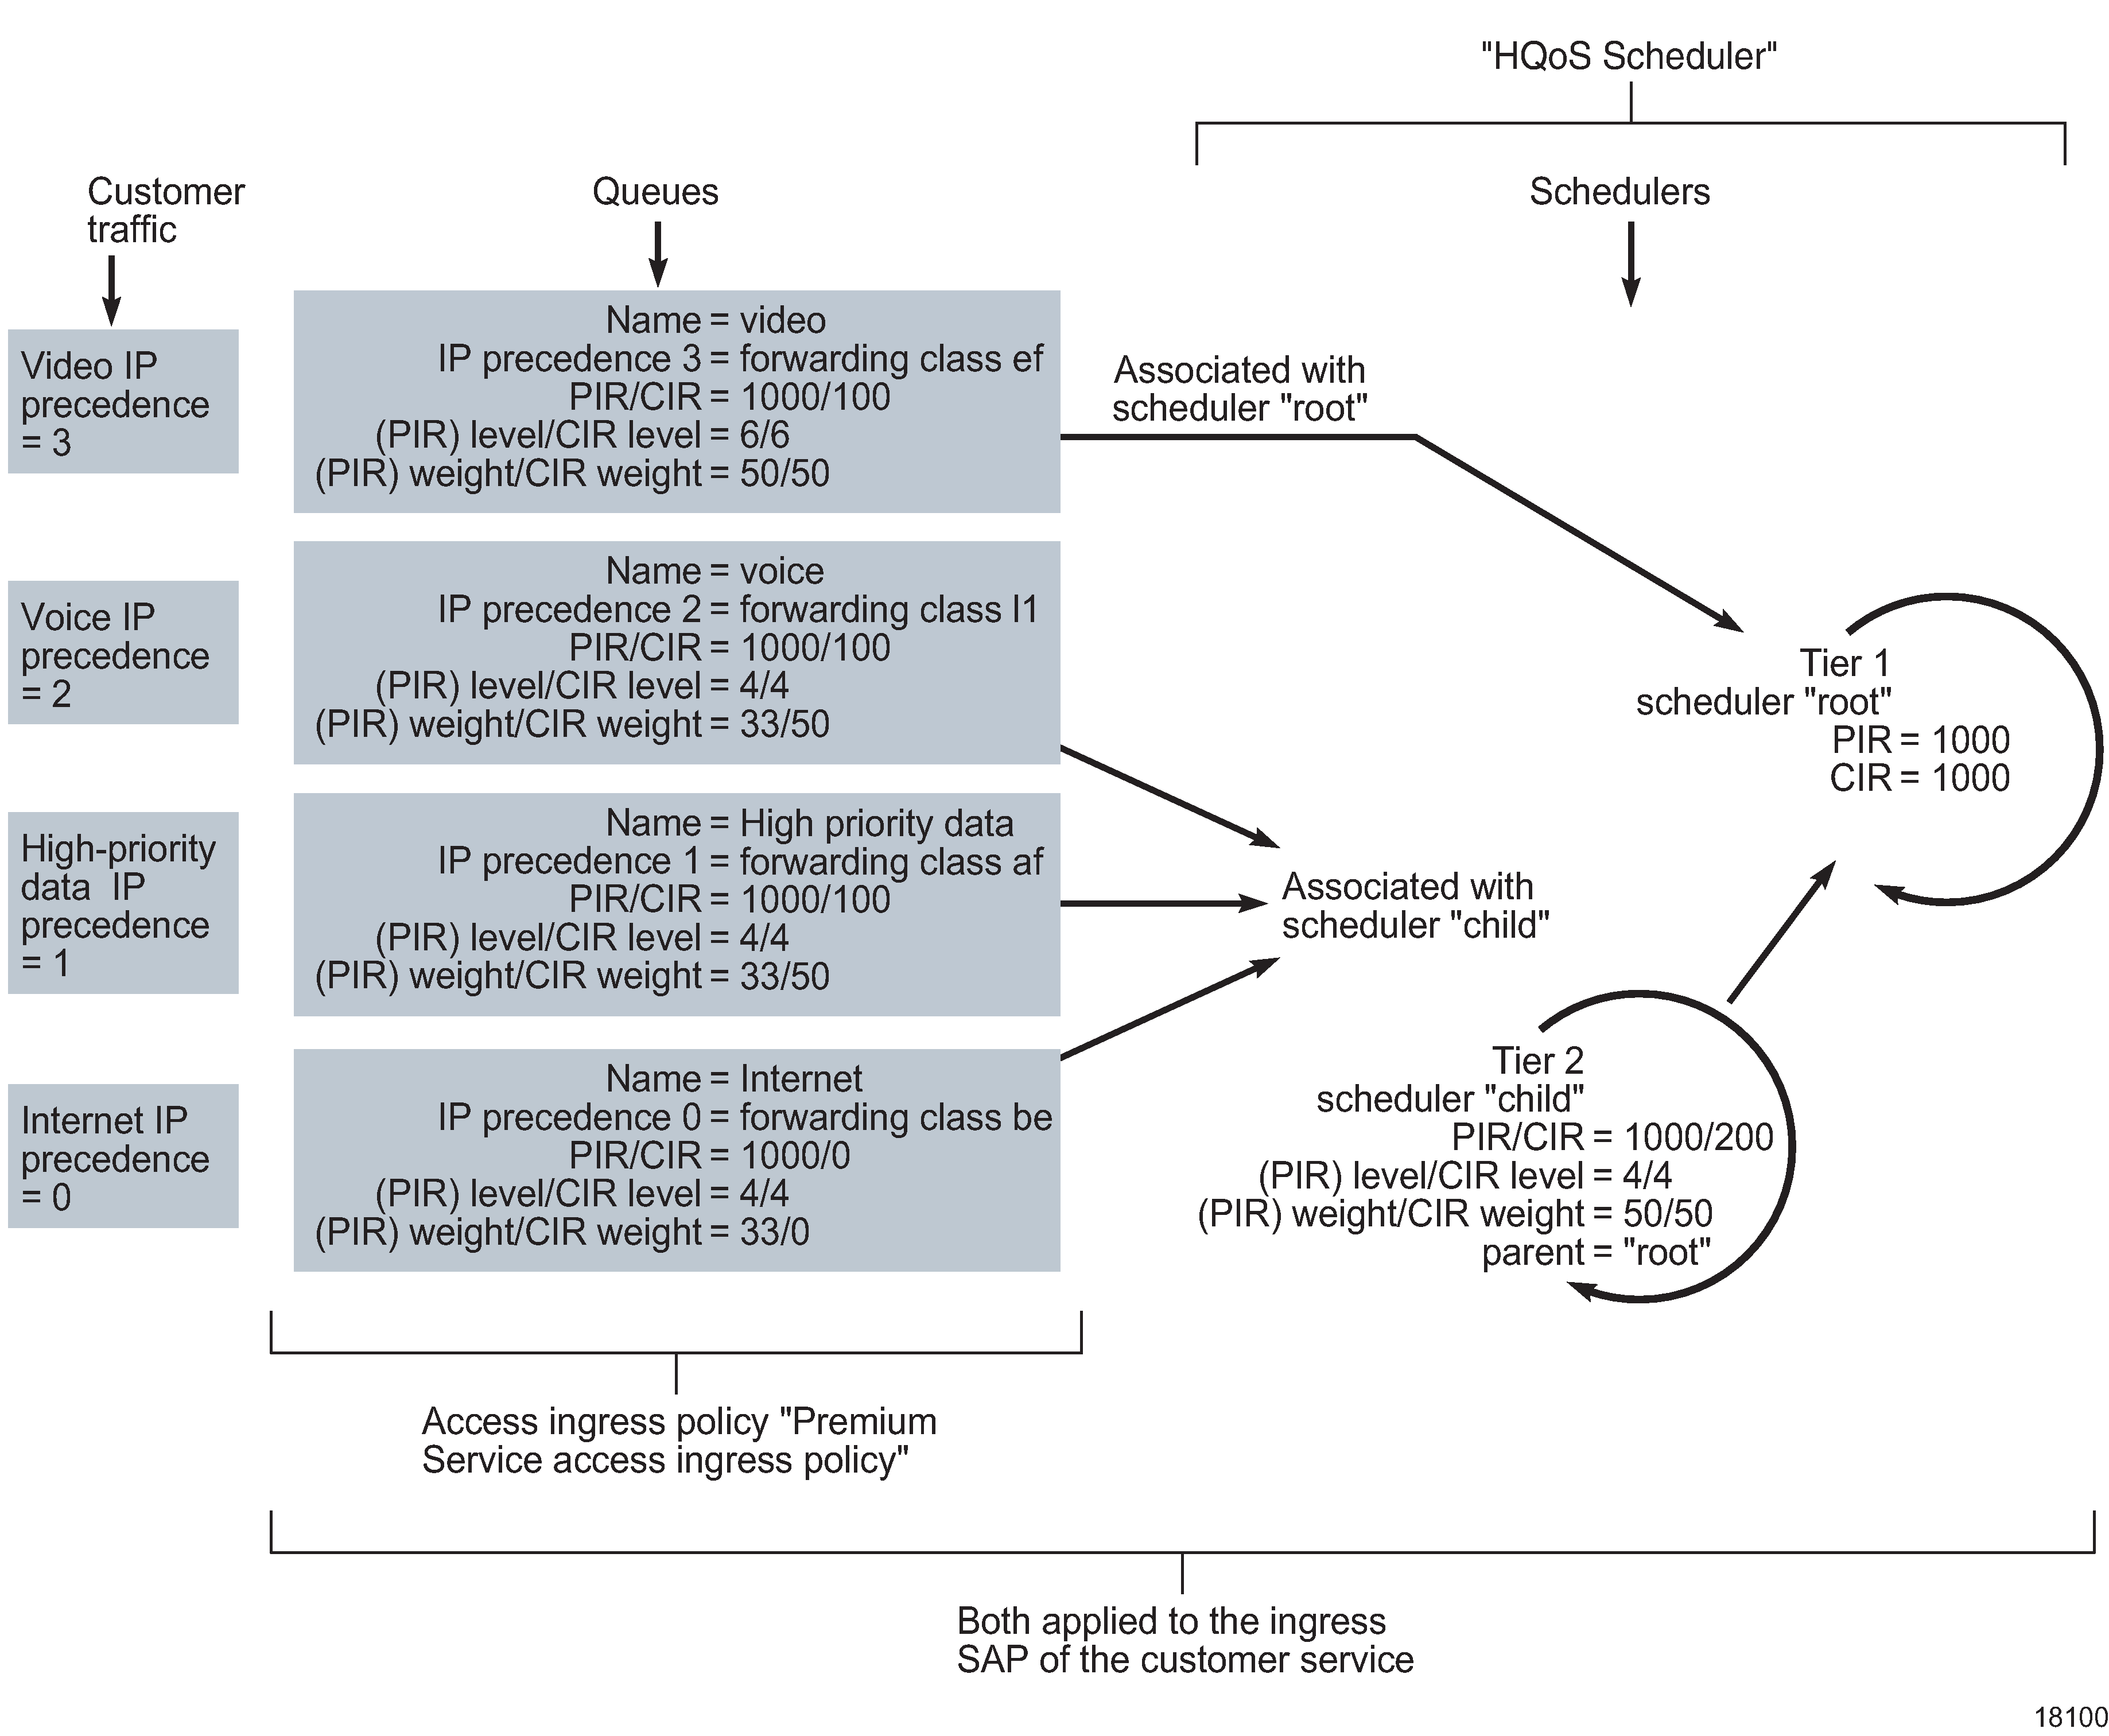
7 | Create a root, tier 1 scheduler entry.
-
Configure the parameters.
-
Displayed name to root
-
tier to 1
-
Summed CIR to false
-
PIR (kbps) to 1000
-
CIR (kbps) to 1000
-
Click OK. The root scheduler appears in the list of scheduler entries.
|
8 | Create a child, tier 2 scheduler entry.
-
Click Create.
- Configure the parameters.
-
Displayed name to child
-
tier to 2
-
Summed CIR to false
-
PIR (kbps) to 1000
-
CIR (kbps) to 200
-
Parent scheduler to root, using the Select button to choose root from the list.
-
Level (PIR level) to 4
-
Weight (PIR weight) to 50
-
CIR Level to 4
-
CIR Weight to 50
-
Click OK. The child scheduler appears in the list of scheduler entries.
|
9 |
Click Apply.
|
10 |
Close the Scheduler form.
|
11 |
Choose Policies→QoS→SROS QoS→Access Ingress→SAP Access Ingress from the NFM-P main menu. The SAP Access Ingress Policies form opens.
|
12 |
Click Create. The SAP Access Ingress Policy, Global Policy [Create] form opens.
|
13 |
Configure the parameters. Set the displayed name to Premium service access ingress policy.
|
14 |
Click on the Queues tab. Create four queues. For this sample, default queue 1 is modified, and three new queues are added. The default multicast queue 11 is unchanged.
|
15 | Select queue 1 from the list.
-
Click on the Properties button. The queue 1 edit form opens.
- Configure the parameters.
-
Displayed Name to Internet
-
Scheduler to child by using the Select button and choosing child from the list
-
Level (PIR level) to 4
-
CIR Level to 4
-
Weight (PIR weight) to 33
-
CIR Weight to 0
-
Click on the CIR/PIR tab.
- Configure the parameters.
-
Click OK.
|
16 | Add queue 2.
-
Click Create. The queue create form opens.
- Configure the parameters.
-
ID to 2
-
Displayed Name to High-priority traffic
-
Scheduler to child by using the Select button and choosing child from the list
-
Level (PIR level) to 4
-
CIR Level to 4
-
Weight (PIR weight) to 33
-
CIR Weight to 50
-
Click on the CIR/PIR tab.
- Configure the parameters.
-
Click OK. The queue is added to the list.
|
17 | Add queue 3.
-
Click Create. The queue create form opens.
- Configure the parameters.
-
Click on the CIR/PIR tab.
- Configure the parameters.
-
Click OK. The queue is added to the list.
|
18 | Add queue 4.
-
Click Create. The queue create form opens.
- Configure the parameters.
-
Click on the CIR/PIR tab.
- Configure the parameters.
-
Click OK. The queue is added to the list.
|
19 |
Click Apply to save the changes. Confirm the action.
|
20 | Associate each queue with a forwarding class.
-
Click on the Forwarding Classes tab.
-
Click Create. The forwarding class create form opens.
- Configure the parameters.
-
Click OK. Confirm the action.
-
Click Create. The forwarding class create form opens.
- Configure the parameters.
-
Click OK. Confirm the action.
-
Click Create. The forwarding class create form opens.
- Configure the parameters.
-
Click OK. Confirm the action.
-
Click Create. The forwarding class create form opens.
- Configure the parameters.
-
Click OK. Confirm the action.
|
21 |
Click Apply. Confirm the action.
|
22 |
Associate the IP precedence bits of the incoming customer traffic with the forwarding class. The forwarding class is already associated with a queue. For this sample, IP precedence bits are used to associate different types of traffic with the forwarding class. You could classify traffic other ways, for example, based on filters for IP address or DSCP marking.
-
Click on the Precedence tab.
-
Click Create. The precedence create form opens.
- Configure the parameters to associate IP precedence 0 (Internet traffic from the customer site) with forwarding class be (the be forwarding class is associated with queue 1)
-
Precedence is 0
-
Forwarding Class is be
-
Click OK. Confirm the action. The association between precedence 0 and the be forwarding class is added to the list.
-
Click Create. The precedence create form opens.
- Configure the parameters to associate IP precedence 1 (high-priority data traffic from the customer site) with forwarding class af (the af forwarding class is associated with queue 2)
-
Precedence is 1
-
Forwarding Class is af
-
Click OK. Confirm the action. The association between precedence 1 and the af forwarding class is added to the list.
-
Click Create. The precedence create form opens.
- Configure the parameters to associate IP precedence 2 (voice traffic from the customer site) with forwarding class l1 (the l1 forwarding class is associated with queue 2):
-
Precedence is 2
-
Forwarding Class is l1
-
Click OK. Confirm the action. The association between precedence 2 and the l1 forwarding class is added to the list.
-
Click Create. The precedence create form opens.
- Configure the parameters to associate IP precedence 3 (video traffic from the customer site) with forwarding class ef (the ef forwarding class is associated with queue 3)
-
Precedence is 3
-
Forwarding Class is ef
-
Click OK. Confirm the action. The association between precedence 3 and the ef forwarding class is added to the list.
|
23 |
Click Apply. Confirm the action.
|
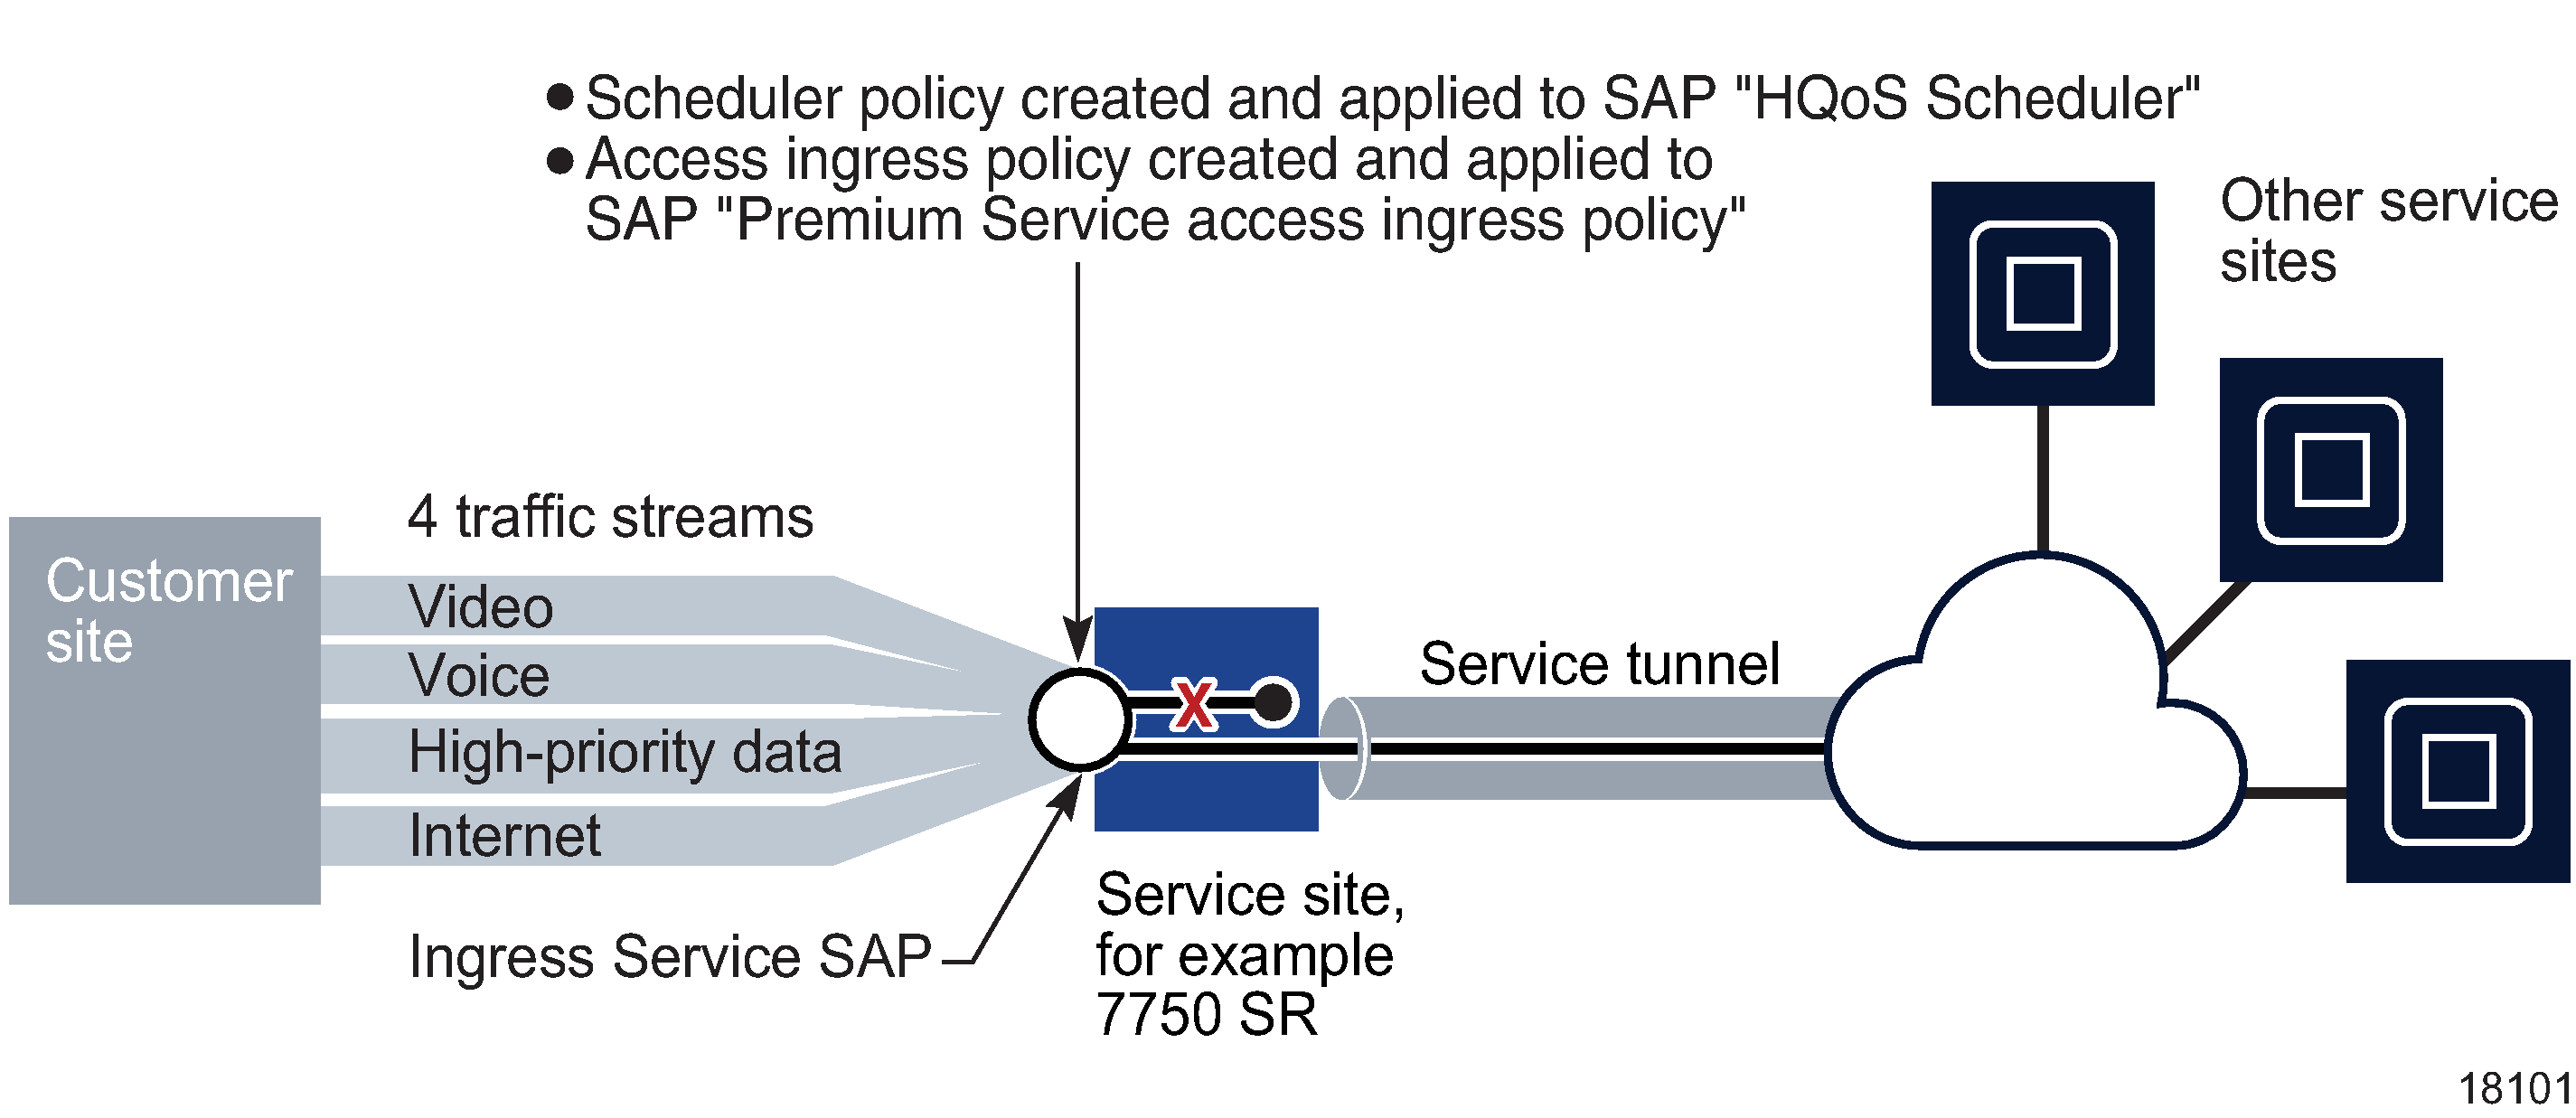
24 | Associate a service SAP with the created High QoS scheduler and the created Premium service access ingress policy. There are many ways to associate policies with L2 or L3 interfaces used as service SAPs, for example, from the service creation form or the port properties form. This sample modifies an existing L2 interface for an existing VPLS.
-
Choose Manage→Service→Services from the NFM-P main menu. The manage services form opens.
-
Set the filters and click on the Search button. A list of filtered services appears.
-
Select the service and click on the Properties button. The service form opens.
-
Click on the L2 Access Interfaces tab.
-
Choose an interface and click on the Properties button. The L2 interface edit form opens.
-
Click on the QoS tab.
-
Configure the parameter. Use the Select button to set the Ingress Policy to Premium service access ingress policy. The policy ID and displayed name appear.
-
Click on the Schedulers tab.
-
Configure the parameter. Use the Select button to set the Ingress Scheduler to High QoS. The displayed name appears.
-
Click Apply to save the changes. Confirm the action. |

