Deploying IMPACT using Umbrella Chart
IMPACT IoT uses a single chart that contains all the resources required by the application such as deployments, services, config-maps and so on to install its components, which is called as an Umbrella Chart. This Umbrella Chart contains IMPACT Mobile, IMPACT IoT and adapter(s) installer components.
The installation is protocol-specific and each microservice takes care of its own schema.
- LWM2M
- MQTT
- MQTT-SN
- HTTP
- OneM2M
Installing individual components within IMPACT IoT
The override values.yaml file contains a section for each of the dependent components of IMPACT
IoT, for example, impact-dc, lwm2mserver,
jsms. To install each of these components separately, set the
parameter of the component which has to be installed as enabled=True in the
override values.yaml file. While, the rest of the components can be set as
enabled=False.
Refer to Sample values.yaml file for LWM2M deployment for the complete list of parameters.
Installation
Perform the following steps:
- Download the artifacts:
Download the following dependent components artifacts from the location where the software bits are placed. For more information, contact Nokia Global Services Center.
- Redis
- Cassandra
- MariaDB
- RabbitMQ
- NGINX
- Prometheus
- Grafana
- Install the required supporting charts:
Execute the following commands to install the dependent components:
helm3 install impact-citm -f <override file path> impact-citm-ingress-1911.0*.tgz --debug
helm3 install impact-crmq -f <override file path> impact-crmq-1911.0*.tgz --debug
helm3 install impact-ccas-dse -f <override file path> impact-ccas-dse-1911.0*.tgzz --debug
helm3 install impact-cmdb -f <override file path> impact-cmdb-1911.0*.tgz --debug
Optionally, install Prometheus and Redis.
helm3 install impact-cpro -f <override file path> impact-cpro-1911.0*.tgz --debug helm3 install impact-crdb-redisio -f <override file path> impact-crdb-1911.0*.tgz --debug - Installing IMPACT IoT.
Before proceeding with the installation, a deployment-specific values override yaml file must be created. This file must contain the necessary configuration, for example, the license keys, deployment-specific host names and so on.
Note: In IMPACT IoT, the JKS file is stored in IMPACT IoT component.For more information on user registration using enterprise CA or self-signed CA, see the section User registration using enterprise CA or self-signed CA..
For more information on how to enable JKS, see Sample values.yaml file in this document.
To install IMPACT IoT, set the relevant components to enabled.
-
impact-dc:
  enabled: true
  license: ""
impact-dm:
  enabled: true
  http:
    rcs_public_host: 'bcmt-2061-bcmt-edge-01'
    ssl_redirect: true
    public_host: 'bcmt-2061-bcmt-edge-01'
  rbac:
    enabled: true
  monitoring:
    prometheus:
      enabled: true
For more information, see Sample values.yaml file.
- Installing LWM2M componentTo deploy LWM2M, the following components must be installed.
-
impact-dm
-
impact-dc
-
lwm2mserver
To deploy LWM2M, the following optional components can be installed.-
jsms
-
smsconnector
-
impactbilling
-
impactsubscriptionrepo
-
sgiserver
The following is an example overridevalues.yaml file in which LWM2M deployment is enabled.Note: If JSMS is not used for message delivery, enable the parameter smsconnector in values.yaml file to configure the SMS Gateway you are using.smsconnector: enabled: trueoverridevalues.yaml file
lwm2mserver:
  enabled: true
  logLevel: "DEBUG"
#########keyspace for LwM2M #####
  cassandra:
    keyspace: "lwm2mjp"
    username: "impcasfeb"
    password: "motive"
  config:
    lwm2m:
      LWM2M_NO_SEC_REG_URL: "11.11.11.11:11111"
      LWM2M_PSK_REG_URL: "11.11.11.11:11111"
      LWM2M_REGISTRATION_URI: "11.11.11.11:11111"
      LWM2M_CLIENT_ACTIVE_DURATION: 30
      LWM2M_KICK_INSTANCE: 0
    californium:
      ACK_TIMEOUT: 4000
      ACK_RANDOM_FACTOR: 1.5
      ACK_TIMEOUT_SCALE: 2.0
      MAX_RETRANSMIT: 6
      NSTART: 1
      PROBING_RATE: 1.0
      EXCHANGE_LIFETIME: 247000
      NON_LIFETIME: 145000
      MAX_TRANSMIT_WAIT: 93000
      PREFERRED_BLOCK_SIZE: 512
      MAX_MESSAGE_SIZE: 1024
      BLOCKWISE_STATUS_LIFETIME: 300000
      MAX_RESOURCE_BODY_SIZE: 8192
Note: For the list of parameters that are supported per component, refer to the relevant component values.yaml file. -
- Once the overridevalues.yaml file is configured as per your
requirement, execute the following
command:
helm3 install impact impact -f ./overridevalues.yaml --debug
Result: After the above procedure is executed successfully, the following components will be deployed:
- impact-dm
- impact-dc
- lwm2mserver
-
lwm2m:
-
CDP_USER: "superadmin"
-
CDP_PASS: "superadmin"
-
-
smsconnector:
-
dlr.CDP_USER: "superadmin"
-
dlr.CDP_PASS: "superadmin"
-
-
mqttsnadapter:
-
CDP_USER: "superadmin"
-
CDP_PASS: "superadmin"
-
-
agensterver, apiserver and onem2m:
-
dmUser: superadmin
-
dmPassword: superadmin
-
-
mqttadapter:
-
CDP_USER: "cdpuser"
-
CDP_PASS: "cdpPass"
-
-
cigserver:
-
CDP_USER: "cdpuser"
-
CDP_PASS: "cdpPass"
-
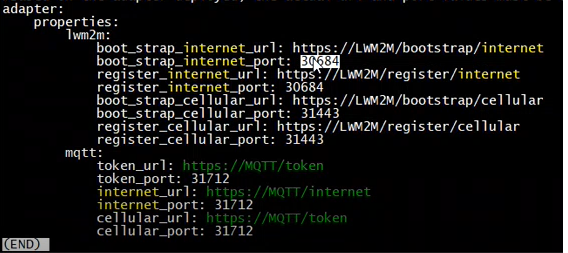
Setting the URLs of the Protocol adapters
During the deployment or upgrade, the ports and protocol URLs specific to the adapters must
be set under adapter:properties of the values.yaml
file.
A sample snapshot is given below:

These URLs can be viewed on IMPACT Console under the Settings > Adapter URLs menu. For more information, see IMPACT Console Guide