Label assignments to fabric intent elements
You can assign labels from the Label Factory to various fabric elements. You can assign Nokia pre-defined labels, user-configured labels, or a combination of both. Labels can be assigned to a specific fabric intents, or to specific elements within each intent.
Multiple labels can be associated with a single fabric element. They can also be applied to real or planned nodes in a fabric.
After a label has been assigned to a fabric element, you can also remove it.
Assigning labels to a fabric intent
Follow this procedure to assign labels found in the Label Factory to a specific fabric intent.
-
Click the main menu
 , then select Fabric
Intents.
, then select Fabric
Intents.
- Open a fabric intent.
-
On the High Level Intent panel, click
 from under the Labels
header.
from under the Labels
header.
Figure 1. Assigning a label to a fabric intent 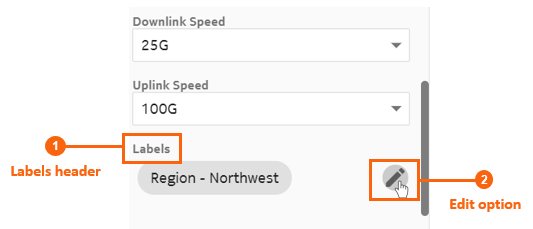
-
From the list of labels, choose one or more labels to assign to the fabric
intent. Click
 from the left end of the row for each label you want to add.
- Click SAVE.
Assigning a label to a specific node in a fabric intent
-
Click the main menu , then select Fabric
Intents.
- Open a fabric intent.
-
Right-click a node in the cable diagram.
You may have to expand a cluster to find a specific node.
-
Select Edit Labels.
Figure 2. Assigning a label to a specific node 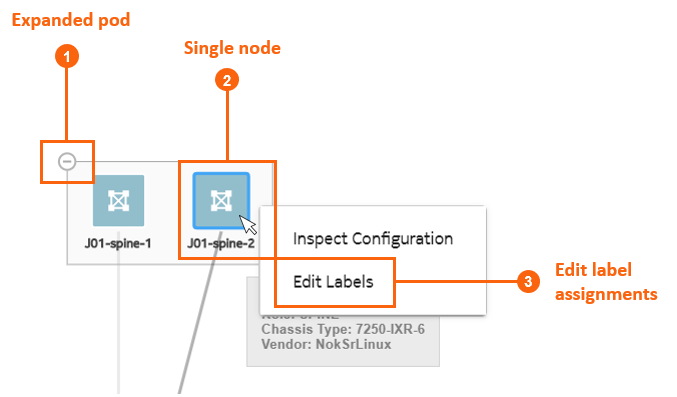
-
From the list of labels, choose one or more labels to assign to the fabric
intent. Click the from the left end of the row for each label you want to add.
- Click SAVE.
Assigning labels to a fabric link
-
Click the main menu , then select Fabric
Intents.
- Open a fabric intent.
- Select Fabric Links from the drop-down list.
-
For a specific fabric link, click the
 options menu at the right end of the row.
- Select Edit Labels.
-
From the list of labels, choose one or more labels to assign to the
fabric link. Click from the left end of the row for each
label you want to add.
- Click SAVE.
Assigning labels to an edge link interface
You can assign labels from the Label Factory to specific edge link interfaces or LAGs within a fabric intent. Edge link interfaces must be labeled using the "Edge-Link" label key. You can create specific labels for edge link interfaces, apply the labels, then reference these labeled items when creating a workload VPN intent sub-interface via the label assignment.
To assign a label to an edge link interface, you must first deploy the fabric intent.
Follow this procedure to assign a label to an edge link interface:
-
Click the main menu , then select Fabric
Intents.
- Open a fabric intent.
- Select Edge-Links from the drop-down list.
-
For a specific item in the list, click the
options menu at the right end of the row.
- Select Edit Labels.
-
From the list of labels, choose one or more labels to assign to the
edge link port. Click from the left end of the row for each
label you want to add.
Only labels with the "Edge-Link" label key are displayed.
- Click SAVE.
Removing a label assigned to a fabric intent
-
Click the main menu , then select Fabric
Intents.
- Open a fabric intent.
-
On the High Level Intent panel, click from the
Labels section.
The Label Picker form opens. The currently assigned labels are displayed in the top of the form.
-
From the assigned labels displayed, click the
 next to the label
you want to remove from the fabric intent.
You can do this for one or more labels.
next to the label
you want to remove from the fabric intent.
You can do this for one or more labels. - Click SAVE.
Removing a label assigned to a node in a fabric intent
-
Click the main menu , then select Fabric
Intents.
- Open a fabric intent.
- Right-click a node in the cable diagram.
-
Select Edit Labels.
The Label Picker form opens. The assigned labels are displayed in the top of the form.
-
From the assigned labels displayed, click the next to the label
you want to remove from the fabric intent.
You can do this for one or more labels.
- Click SAVE.
Removing a label assigned to a fabric link
-
Click the main menu , then select Fabric
Intents.
- Open a fabric intent.
- Select Fabric Links from the drop-down list.
-
For a specific fabric link, click the
options menu at the right end of the row.
-
Select Edit Labels.
The Label Picker form opens. The currently assigned labels are displayed in the top of the form.
-
From the assigned labels displayed, click the next to
one or more labels you want to remove from the fabric link.
- Click SAVE.
Removing a label assigned to an edge link interface
-
Click the main menu , then select Fabric
Intents.
- Open a fabric intent.
- Select Edge-Links from the drop-down list.
-
For a specific item in the list, click the
options menu at the right end of the row.
-
Select Edit Labels.
The Label Picker form opens. The currently assigned labels are displayed in the top of the form.
-
From the assigned labels displayed, click the next to
one or more labels you want to remove from the edge link port.
- Click SAVE.