Network resources
The Network Resources page of the Fabric Services System UI allows you to create and manage the set of IP pools and Autonomous System numbers (ASNs) available for use by fabric intents within a region.
- System IP pools
- Inter Switch Link (ISL) IP pools
- Out of Band Management IP poolNote: The option to configure Out of Band Management IP pools is only available if you configured your region to use an internal DHCP server.
- Autonomous System pools
From the Network Resources page you can configure additional IP address pools. These additional pools are also associated with the region, and can be assigned to any fabric intent you create within the region.
From the same page you can view the set of available pools, including the default pool that is configured as part of the region. You can also modify and delete these pools, subject to some restrictions.
Despite this, there cannot be any overlapping management IP CIDR blocks across the IP management pools of all regions.
Overlapping IP pools and backbone fabrics
Every Management IP pool must be unique and must not overlap with any other Management IP pool. The Fabric Services System checks each Management IP pool that you create to ensure that it does not overlap with any other.
- System IP pools
- ISL pools
Such overlapping pools can generally coexist without any issue. But when creating a backbone fabric, be sure to select only a non-overlapping System IP pool and a non-overlapping ISL pool.
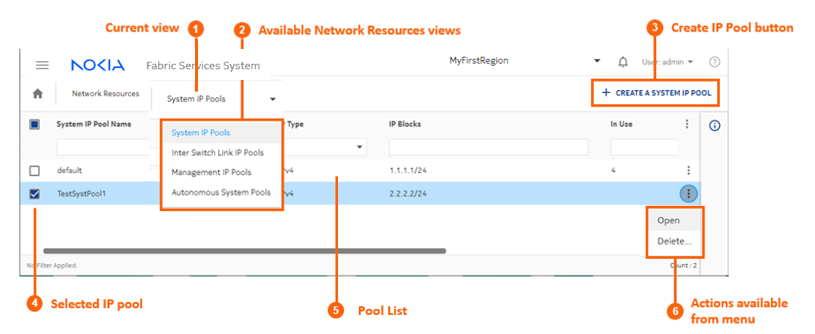
The Network Resources page
- review already-configured IP pools or ASN value ranges
- add new IP pools or ASN value ranges
- modify existing IP pools or ASN value ranges (with some restrictions)
- delete existing IP pools or ASN value ranges (with some restrictions)
| # | Description |
|---|---|
| 1 | Current view: of the available views from this page, this identifies the view currently displayed. |
| 2 | Available views: several different views available from this page
allow you to interact with different IP pools:
|
| 3 | The Create IP Pool action button allows you to create an IP pool of the type matching the current view. |
| 4 | Any selected IP pools of the current type display a check here. |
| 5 | The pool list displays information about each pool:
|
| 6 | Actions available from menu: you can perform one of the available actions on the currently selected IP pool or pools. |
Network Resource properties
The Network Resources page allows you to configure a set of IP pools (or in the case of AS pools, numeric values) available to all fabric intents created within the associated region.
- System IP Pools
- Inter Switch Link IP Pools
- Management IP Pools
- Autonomous System Pools
| Property |
Description |
|---|---|
| System IP Pool | Pool name: provides the name by which this pool will appear and be selected. |
| Description: optionally, describes the nature of the pool. | |
| IP Type: set as "IPv4" and cannot be changed. | |
|
IP Blocks: Contains one or more CIDR blocks representing IP addresses that can be used for the system IP address or router ID for fabric nodes. Enter these blocks using CIDR notation; for example, 192.0.2.0/24. If you need more IP addresses for devices in your fabrics than the current CIDR blocks support, you can modify the pool to add more CIDR blocks to the System IP pool. |
|
| Inter Switch Link IP Pool | Pool name: specifies the name by which this pool will appear and be selected. |
| Description: optionally, describes the pool. | |
| IP Type: set as "IPv4" and cannot be changed. | |
| IP Blocks: Contains one or more CIDR blocks
representing IP addresses that can be assigned to inter-switch links
between devices in fabric intents throughout this region. Enter these
blocks using CIDR notation. For example: 192.0.2.0/24. Note: Each link within a fabric intent requires two
IP addresses from this block; one for each endpoint. If you create a fabric intent that requires more links than are available with the current pool, fabric generation fails. The event log for the fabric intent indicates that there are insufficient IP addresses for the required links, and shows the number of addresses required versus the number available. If you need more IP addresses available to your fabrics than the current CIDR blocks support, you can modify the pool to add more CIDR blocks and thereby support additional links. |
|
| Management IP Pool | Pool name: specifies the name by which this pool will appear and be selected. |
| Description: optionally, describes the pool. | |
| IP Type: identifies the type of IP addresses
included in the IP pool. For the Management IP pool, you can set this
value to either IPv4 or IPv6. Note: If you are
using IPv6 management pools, a Router Advertisement daemon must be
present on the IPv6 network. This function is not handled by the
Fabric Services System itself. |
|
| CIDR Blocks: Contains a CIDR block
representing the IP addresses that will be assigned to the management
interfaces of devices. Enter these blocks using CIDR notation for either
IPv4 or IPv6, depending on your selection. Note: From the set of IP addresses within the specified CIDR block, two
are reserved for use by the system to represent the network IP
address and the broadcast address. These are unavailable for the
out-of-band management IP pool. If you need more links in your fabrics than the CIDR blocks you specified here support, you can modify the region to add more CIDR blocks to this pool. Note: When you
create individual CIDR blocks within a Management IP pool, the
IsManaged property is enabled by default. This setting indicates
that these IP addresses should be managed directly by the Fabric
Services System. If you are creating a fabric consisting of nodes managed by some process external to the Fabric Services System ("unmanaged nodes"), you must create a CIDR block of IP addresses intended for use by those unmanaged nodes; and for that block, you must disable the IsManaged property. |
|
| Autonomous System Pools | Contains a set of Autonomous System Numbers (ASNs) consisting of multiple blocks of numbers. ASNs are used to uniquely identify a network with a unique routing policy. The ASN must be unique so that IP address blocks appear to originate from a unique location to which BGP can determine a route. The single pool of numbers is assigned the label "default", and this cannot be altered.Within the pool, you can define one or more blocks of contiguous ASNs by providing a start and end number for each block. ASNs can be any number from 0 to 4294967295. Blocks of numbers within the same pool cannot contain overlapping values. As one block of ASNs is exhausted, the system begins assigning values from whichever remaining, unexhausted block contains the highest available values. Even if some numbers from the first block become available, the system continues allocating numbers from this second block until the second block is exhausted. Then the system again looks for the block with the highest available values from which to allocate new ASNs, and so on. |
| Pool name: specifies the name by which this pool will appear and be selected. | |
| Description: optionally, describes the pool. | |
| Start: specifies the lowest permissible value in a range of a single block of ASNs. | |
| End: specifies the highest permissible value within a block of ASNs. |
Creating IP and Autonomous System pools
- System IP pools
- Inter Switch Link (ISL) IP pools
- Out of Band Management IP pool
- Autonomous System pools
-
Click the
 menu.
menu.
- Select Network Resources.
- Use the Region Selector at the top of the page to select the region whose IP pools you want to work with.
- From the View drop-down, select the type of IP pool you are going to create. The System IP Pool view is selected by default.
-
Click the +CREATE A <pool type> POOL button, where
<pool type> is the pool type for the currently selected view.
Note: The option to configure Out of Band Management IP pools is only available if you configured your region to use an internal DHCP server. If you did not, the CREATE A MANAGEMENT IP POOL link is inactive.
-
Enter values for the following parameters as described in Network Resource properties:
- <pool type> Pool Name
- Description
- IP Type (either IPv4 or IPv6; configurable for Management IP pools only)
- Choose one of the following:
-
Configure the System IP pool or ISL pool by creating one or more blocks of IP
addresses:
- Click the +ADD button.
- Enter an IP address block in CIDR notation. For example: 192.0.2.0/24.
- Click ADD.
- Repeat step 8 until you have created all of the required IP address blocks.
- Go to step 16.
-
Configure the Management IP pool by creating one or more blocks of IP
addresses:
- Click the +ADD button.
- If you are creating a pool for use by unmanaged nodes (nodes that are not managed by the Fabric Services System), disable the Is Managed property. Otherwise, leave this property enabled.
- Enter an IP address block in CIDR notation. For example: 192.0.2.0/24.
- Enter a Gateway IP address.
- Click ADD.
- Repeat step 11 until you have created all of the required IP address blocks.
- Go to step 16.
-
Configure one or more Autonomous System pools by doing the following:
- Click the +ADD button.
- Configure a Start value.
- Configure an End value.
- Click SAVE.
- Repeat step 14 until you have created all of the required ASN blocks.
-
Click CREATE.
The new pool is added to the system.
Managing Network Resources pools
- You cannot delete a pool if it is currently in use. To see whether a pool is in use, check the In Use column in the list of pools on the Network Resources page.
- You cannot delete a block within a pool if it is in use.
-
Begin by accessing the appropriate pool within the Network Resources
page:
-
Click the menu.
-
Click the
- Choose the action you want to perform:
-
To view details about an individual pool, do the following:
-
Select a row from the list of configured pools of the selected type and
click
 at the end of the row.
- Select Open.
-
Select a row from the list of configured pools of the selected type and
click
-
To modify a pool, do the following:
-
Select a row from the list of configured pools of the selected type and
click at the end of the row.
-
Select a row from the list of configured pools of the selected type and
click
-
To delete a pool, do the following:
Note: You cannot delete a pool if it is currently in use.
-
Find the pool in the list and click at the end of the row.
- Select Delete....
- Click OK in the confirmation form.
-
Find the pool in the list and click