Procedure 11-6: Establish 802.1q mode Ethernet service on established packet ring (UPSR)
 Overview
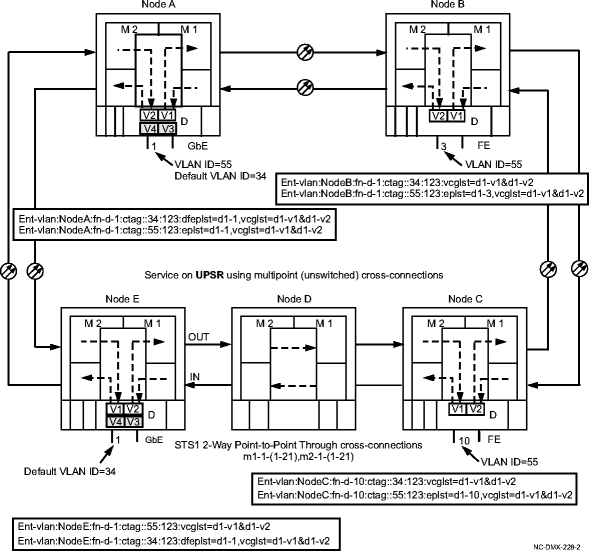
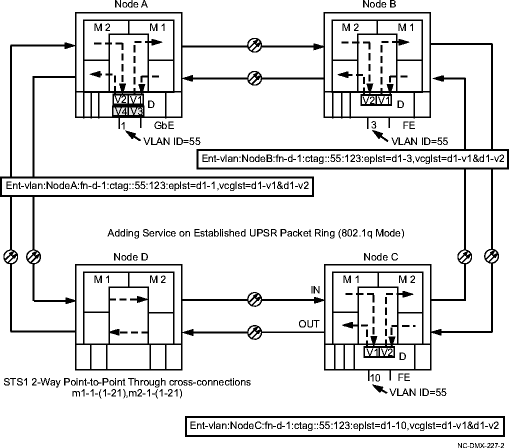
This procedure provides an example for configuring Ethernet service using the 802.1q tagging mode on an established packet ring. See Figure 11-5, Example 1 service on UPSR using 802.1q tagging mode and Figure 11-6, Example 2 service on UPSR using 802.1q tagging mode for examples.
This procedure uses TL1 commands and specific WaveStar® CIT menu selections to illustrate the detailed provisioning parameters. If you prefer, you can use the Data Provisioning Wizard to perform the provisioning in this procedure. From the System View menu, select Configuration → Ethernet Service to invoke the wizard.
Important!
The packet ring must already be established on the UPSR before continuing. This procedure assumes the packet ring is established with the necessary tagging modes, virtual switch IDs, cross-connections, and spanning tree groups established. See Procedure 11-5: Establish Ethernet packet ring on a UPSR.
On connected Gigabit Ethernet devices with autonegotiation turned on/enabled, if transmission is interrupted in one direction of transmission on a Gigabit Ethernet device, then transmission will also be disabled in the other direction. For example, if one fiber in a transmit/receive pair is cut, then one-way transmission on the other fiber can be maintained only if autonegotiate is turned off/disabled and the link state is forced good at the transmit source equipment.
 Before you begin
Prior to performing this procedure, refer to Before you begin and Required equipment in this chapter and you must have complete work instructions for this procedure that detail:
Steps
Use this procedure as an example for configuring Ethernet service on a UPSR protected packet ring using the 802.1q tagging mode. See Figure 11-5, Example 1 service on UPSR using 802.1q tagging mode and Figure 11-6, Example 2 service on UPSR using 802.1q tagging mode for examples.
1 |
Use the WaveStar® CIT to log in to one of the terminating nodes, if not already performed. Reference: Procedure 14-2: Connect Personal Computer (PC) and establish WaveStar® CIT session | ||
2 |
On the System View menu, select Administration → OSI Routing Map or Administration → OSI Neighbor Map to retrieve a node-to-node listing of every node in the network. Important! If a drawing of the network is not provided with the work instructions, it is recommended that you draw a simple diagram of the ring (indicating node-to-node connections) and list each node's TID. Result: The OSI Routing Map or OSI Neighbor Map window opens. | ||
3 |
Verify that the system configuration is the same as specified on your work instructions. | ||
4 |
From your work instructions, determine the terminating nodes, circuit packs, LAN ports, virtual switch ID, and VLAN IDs associated with the service being established. | ||
5 |
After the VLAN ID for customer untagged frames is assigned and service is established in the 802.1q mode, changing the VLAN ID may affect service. If the VLAN IDs are different, service will be affected. When the VLAN ID for customer untagged frames is changed at one point in the network, the VLAN ID must be changed at all points. ASSIGN VLAN IDs TO ESTABLISH SERVICE Use the TL1 ent-vlan command to assign the default VLAN ID for customer untagged frames or the customer VLAN ID for tagged frames to the associated LAN ports and VCG WAN ports. Or, select Configuration → Data → Create VLAN command from the CIT System View menu. For example, see Figure 11-5, Example 1 service on UPSR using 802.1q tagging mode. Important! When configuring a multipoint service in 802.1q mode, if spanning tree BPDUs from a customer are to be transported across the network, then the same default VLAN must be assigned to all ports associated with the multipoint service. Reference: In Figure 11-5, Example 1 service on UPSR using 802.1q tagging mode, assume a GbE circuit pack is installed in Function slot d-1 at Node A using LAN port 1. Assume FE circuit packs are installed in Function slot d-1 at Node B (using LAN port 3) and at Node C (using LAN port 10). Assume the packet ring has already been established. Note that a service has been established between Node C, Node B, and Node A for customer tagged frames using a VLAN ID of 55. | ||
6 |
PROVISION LAN PORTS Use the TL1 ed-eport command to provision the LAN port parameters, or select Configuration → Equipment from the System View menu, expand the details for the circuit pack, highlight the LAN port, then click Select. Provision the parameters as required. Reference: Procedure 11-11: Provision Ethernet LAN port parameters | ||
7 |
PROVISION VCGS Use the ed-vcg TL1 command to provision the WAN (VCG) port parameters, or select Configuration → Equipment from the System View menu, expand the details for the circuit pack, highlight the VCG port, then click Select. Provision the parameters as required. Reference: Procedure 11-12: Provision Ethernet VCG parameters End of steps |
Figure 11-5: Example 1 service on UPSR using 802.1q tagging mode

Figure 11-6: Example 2 service on UPSR using 802.1q tagging mode
