Procedure 6-5: Replace high-speed main OLIU circuit pack
 Overview
Use this procedure to replace a high-speed OC-12/OC-48/OC-192 OLIU circuit pack that is installed in a main slot (M1 or M2).
Important!
The OLIU circuit packs in the Main slots must both have the same optical line rate and VT cross-connect size. If the circuit packs in the Main slots have different optical line rates or VT cross-connect sizes, the system reports an unexpected CP type alarm and service may be impacted.
Important!
If responses are not correct when replacing the main OLIU circuit pack, check the connections. If the connections are correct, replace the circuit pack with the wrong response. (The red FAULT LED normally flashes when an OLIU circuit pack is monitored and there is no signal present.)
If both the original OLIU circuit pack and the replacement OLIU circuit pack fail when no other transmission circuit packs are installed in the shelf, replace the SYSCTL circuit pack. Refer to Procedure 6-10: Upgrade or replace SYSCTL (LNW2) circuit pack.
 Required equipment
In addition to the equipment listed in Required equipment, the following equipment is also required:
Use only Alcatel-Lucent Approved Class 1 SFP/XFP transceivers. Refer to the list of pluggable transmission modules in Procedure 6-8: Replace pluggable transmission module.
Refer to the Alcatel-Lucent 1665 Data Multiplexer (DMX) Installation Manual, 365-372-304, as required, when removing and/or installing pluggable transmission modules.
 Before you begin
Prior to performing this procedure:
-
Refer to Laser safety and Electrostatic discharge information in Chapter 1, Safety.
-
Obtain the work instructions for this procedure. It is especially important to know desired wavelengths and enhanced mode requirements (12 STS-1s) when applicable.
-
If required, ensure that the correct pluggable transmission modules are available for replacement.
-
Ensure that correct OC-12/48/192 OLIU circuit packs are available for installation.
The OLIU circuit packs in Main slots must have the same size VT cross-connect fabric. For example, the LNW27 and LNW29 OC-48 OLIU circuit packs have full (up to 48 STS-1s) VT mapping; therefore, they can be used together in the Main slots. If the circuit packs in the Main slots have different VT cross-connect fabric sizes, the system reports an unexpected CP type alarm.
The following is a list of Main OLIU circuit packs grouped by switch fabric:-
OC-12 OLIUs with 12 STS-1 switch fabric: LNW48 LNW50 LNW54 LNW203
-
OC-48 OLIUs with 12 STS-1 switch fabric: LNW26B (jumper set to enhanced) LNW28 (jumper set to enhanced) LNW77 (jumper set to enhanced) LNW121B—LNW159B (jumper set to enhanced)
LNW26B, LNW28, LNW77, LNW121B—LNW159B OC-48 OLIUs with 6 STS-1 switch fabric (jumper set to normal) are not supported in Release 6.0.
The LNW26B, LNW28, LNW77, and LNW121B-159B OLIU circuit packs are DA’ed and are no longer available.
-
OC-48 OLIUs with 48 STS-1 switch fabric: LNW27 LNW29 LNW32 LNW76 LNW202 LNW221—LNW259
-
OC-192 OLIUs with 48 STS-1 switch fabric: LNW56 LNW57 LNW58 LNW60 LNW502 LNW523 LNW527 LNW554 LNW555
-
Very Large Fabric OC-192 OLIUs with 192 STS-1 switch fabric: LNW59
-
Very Large Fabric multirate OC-3/12/48 OLIUs with 192 STS-1 switch fabric: LNW82
-
Very Large Fabric multirate OC-48/192 OLIUs with 192 STS-1 switch fabric: LNW504
-
Important!
The Very Large Fabric LNW59 and LNW82 circuit packs are only compatible with the Alcatel-Lucent 1665 DMX High Capacity Shelf (DMX-HC-20A, DMX-HC-30A, or DMX-HC-30A-CE Shelf Type). The Standard Alcatel-Lucent 1665 DMX Shelf does not support LNW59 and LNW82 circuit packs. If LNW59 and LNW82 circuit packs are installed in the Standard Alcatel-Lucent 1665 DMX Shelf, the system will not recognize the circuit pack as an allowable type.
To determine the shelf type, select View → Equipment, highlight Shelf, and click Select to obtain the shelf details.
Steps
Complete the following steps to replace an OLIU circuit pack in M1 or M2.
1 |
From the System View menu, select View → Timing/Sync and select the System Timing tab. The Active Circuit Pack item reads either main-1 or main-2. | ||||||
2 |
Is the OLIU circuit pack that you wish to replace the active circuit pack?
| ||||||
3 |
Is the Alcatel-Lucent 1665 DMX shelf line timed from the main OLIU that you are replacing?
| ||||||
4 |
From the System View menu, select View → Timing/Sync and click the System Timing tab. | ||||||
5 |
Is system autoreconfiguration enabled?
| ||||||
6 |
From the System View menu, select Configuration → Timing/Sync and click the System Timing tab. Select Enable in the Synchronization Autoreconfiguration field. Click OK. Important! Enable synchronization autoreconfiguration before removing the active circuit pack to ensure synchronization reference protection switching. If synchronization autoreconfiguration is disabled, and the active circuit pack is removed, the system enters holdover. | ||||||
7 |
Prepare to remove the circuit pack:
Result: If the circuit pack is the active circuit pack for transmission and timing, the system performs an automatic protection switch and subsequent transmission hits (less than 60 ms) will occur. | ||||||
8 |
Remove the optical cables from the pack. | ||||||
9 |
Important! The LNW59 OC-192 OLIU circuit pack may be equipped with up to two pluggable transmission modules. However, pluggable transmission modules are not required when the LNW59 OC-192 OLIU circuit pack is used in headless, optics-free, switch applications. The LNW82 OLIU circuit pack may be equipped with a mix of up to eight OC-3/12/48 pluggable transmission modules. However, pluggable transmission modules are not required when the LNW82 OLIU circuit pack is used in headless, optics-free, switch applications. The LNW202 OC-48, LNW203 OC-12, and LNW502 OC-192 OLIU circuit packs may be equipped with one pluggable transmission module. The LNW504 OLIU circuit pack may be equipped with up to four OC-192 pluggable transmission modules or up to three OC–192 pluggable transmission modules and up to four OC-48 pluggable transmission modules. However, pluggable transmission modules are not required when the LNW504 OLIU circuit pack is used in headless, optics-free, switch applications. If required, remove any pluggable transmission modules from the OLIU circuit pack . Reference: Procedure 6-8: Replace pluggable transmission module | ||||||
10 |
Pull the locking levers to disengage the circuit pack from the backplane connector and draw the circuit pack out of the Main Slot. | ||||||
11 |
Important! Pluggable transmission modules are shipped with a dust cover installed into the optical ports to maintain cleanliness during storage and/or transportation. It is recommended that the dust cover be kept in place to maintain cleanliness until the optical fiber is connected. With proper care and handling, cleaning the pluggable transmission modules should not be necessary. If required, clean the pluggable transmission module. Reference: Procedure 6-12: Clean optical pluggable transmission module | ||||||
12 |
Important! The LNW121B-159B OLIU circuit packs are DA’ed and are no longer available. Are you replacing an LNW121B-159B or LNW221-259 OLIU circuit pack?
| ||||||
13 |
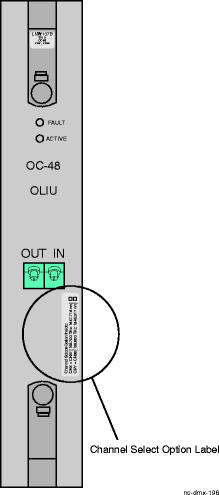
From your work orders, determine the wavelength that you wish to set on the LNW121B-LNW159B or LNW221-LNW259 circuit pack. Use the Channel Select Option Label on the faceplate of the circuit pack to determine the correct channel. Example: From the Channel Select Option Label on the faceplate of the LNW137B ( Figure 6-8, Channel select option label on LNW137B), we determine that for the desired CH37 wavelength (193.700 THz; 1547.715 nm), we must select CH X. Figure 6-8: Channel select option label on LNW137B | ||||||
14 |
If you are installing an...
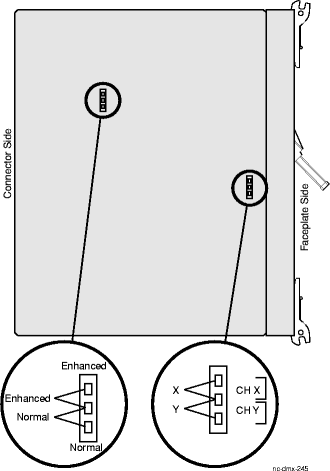
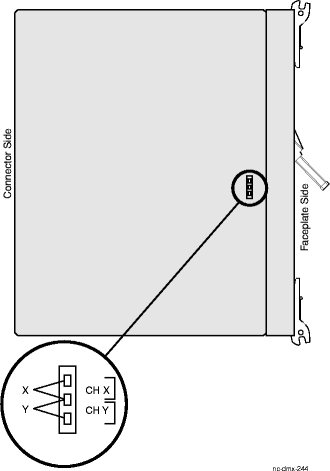
Figure 6-9: Jumper settings for LNW121B-159B
Figure 6-10: Jumper settings for LNW221-259 | ||||||
15 |
Using an erasable marker or pencil, check the appropriate box on the Channel Select Option Label ( Figure 6-8, Channel select option label on LNW137B) that corresponds to your jumper setting. Important! This label is the only means available to identify the wavelength selected when the pack is fully-seated and/or in-service. | ||||||
16 |
Important! The LNW26B, LNW28, LNW77, and LNW121B-159B OLIU circuit packs are DA’ed and are no longer available. Are you installing an LNW26B, LNW28, LNW77, LNW121B-159B OLIU circuit pack?
| ||||||
17 |
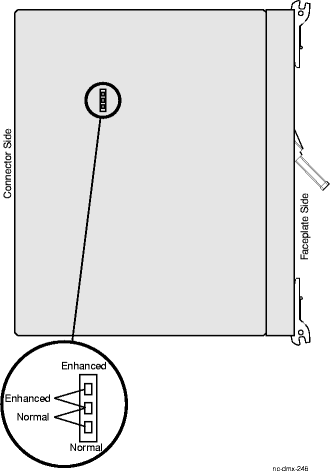
Set the enhanced/normal jumper on your circuit pack to Enhanced (switch fabric can cross-connect VT across any 12 STS-1s). Normal (switch fabric can cross-connect VT across any 6 STS-1s) is not supported in Release 6.0. See Figure 6-11, Jumper settings for enhanced mode. Figure 6-11: Jumper settings for enhanced mode | ||||||
18 |
Seat the replacement OLIU circuit pack in the vacant slot (M1 or M2) by applying steady pressure to both faceplate latches. Result: For non-VLF OLIU circuit packs, the FAULT LED lights for approximately 20 seconds then goes off, indicating successful installation. For VLF OLIU circuit packs, the FAULT LED lights for approximately 10 minutes then goes off, indicating successful installation. MJ or MN and NE alarm LEDs on the SYSCTL circuit pack light when an OLIU circuit pack is installed. (Firmware updates may take place that add additional wait time.) Select View → Refresh System View and the circuit pack appears in the WaveStar® CIT System View indicating successful installation. | ||||||
19 |
Important! The LNW59 OC-192 OLIU circuit pack may be equipped with up to two pluggable transmission modules. However, pluggable transmission modules are not required when the LNW59 OC-192 OLIU circuit pack is used in headless, optics-free, switch applications. The LNW82 OLIU circuit pack may be equipped with a mix of up to eight OC-3/12/48 pluggable transmission modules. However, pluggable transmission modules are not required when the LNW82 OLIU circuit pack is used in headless, optics-free, switch applications. The LNW202 OC-48, LNW203 OC-12, and LNW502 OC-192 OLIU circuit packs may be equipped with one pluggable transmission module. The LNW504 OLIU circuit pack may be equipped with up to four OC-192 pluggable transmission modules or up to three OC–192 pluggable transmission modules and up to four OC-48 pluggable transmission modules. However, pluggable transmission modules are not required when the LNW504 OLIU circuit pack is used in headless, optics-free, switch applications. If required, install the pluggable transmission modules. Reference: Procedure 6-8: Replace pluggable transmission module | ||||||
20 |
Measure the optical receive power of the receive fiber using an optical power meter. Select the appropriate LBO to attenuate the receive signal to the middle of the allowable optical receive power range. (Refer to the Alcatel-Lucent 1665 Data Multiplexer (DMX) Applications and Planning Guide, 365-372-300 for the SONET optical specifications of the replacement circuit pack.) | ||||||
21 |
Ensure all optical fiber connectors and couplings are properly cleaned on the replacement OLIU circuit pack. Important! Signal performance may be degraded if the connections and couplings are not cleaned properly. Reference: Procedure 6-11: Clean optical fibers, dual LC adapters and LC lightguide buildouts (LBOs) | ||||||
22 |
Reconnect the optical cables. Result: FAULT LED goes off. | ||||||
23 |
From the System View menu, click the Alarm List button to obtain an NE Alarm List. Verify that no alarms are present for the installed circuit pack. If required, refer to the appropriate procedure to clear any alarms. | ||||||
24 |
From the System View menu, use View → Equipment to access the circuit pack/port parameters for the circuit pack just installed and verify that the parameters are intact. If required, refer to the appropriate procedure in the Alcatel-Lucent 1665 Data Multiplexer (DMX) User Operations Guide, 365-372-301 to change any circuit pack/port parameters. End of steps |