Procedure 12-8: Upgrade or replace SYSCTL (LNW2) circuit pack
 Overview
Use this procedure to upgrade/replace a SYSCTL (LNW2) circuit pack in an in-service shelf.
If you wish to upgrade an LNW1 to an LNW2, you must use either Procedure 2-4: Upgrade software generic via FTAM or Procedure 2-5: Upgrade software generic via FTP.
Important!
Performing this procedure under the following scenarios may cause transmission losses and/or require a restore from a remote backup file.
 Required equipment
|
NOTICE Service-disruption hazard |
Failure to equip the expected circuit packs in the shelf and clear any circuit pack-related alarms before replacing the SYSCTL circuit pack can result in a loss of transmission. If this occurs, you can recover transmission by equipping the expected circuit packs and restoring the database.
Equip an expected circuit pack in every slot for which there is an expected circuit pack type.
If the network element is reporting any CP removed, CP not allowed, or Unexpected CP type alarms, do NOT replace the SYSCTL circuit pack.
 Before you begin
Prior to performing this procedure:
-
Refer to Electrostatic discharge in Chapter 1, Safety.
-
Ensure that a SYSCTL circuit pack is available for replacement.
-
Restoring the network element database may be service-affecting. If provisioning changes were made after the last backup files were created, examine the security log and use the appropriate WaveStar® CIT commands to manually apply the recent provisioning changes to the just-restored database.
Important!
If you wish to upgrade an LNW1 to an LNW2, you must use either Procedure 2-4: Upgrade software generic via FTAM or Procedure 2-5: Upgrade software generic via FTP.
Steps
Complete the following steps to replace an LNW2 SYSCTL with an LNW2 SYSCTL.
1 |
Do you wish to use the upgrade/replace your LNW2 SYSCTL by replacing NVMs or by using Maintenance Mode Wizard (FTP or FTAM)?
| ||||||||
2 |
Connect the cross-over LAN cable from the Network Interface Card (NIC) on the PC to the front LAN port on the SYSCTL circuit pack faceplate and establish a WaveStar® CIT session. (When TCP/IP is enabled on the rear LAN port J17 IAO LAN, OSI is disabled.) Start the WaveStar® CIT software on the PC by double-clicking on the WaveStar® CIT icon on your desktop and login (if necessary). Refer to Procedure 14-2: Connect Personal Computer (PC) and establish WaveStar® CIT session. Result: The Network View appears. | ||||||||
3 |
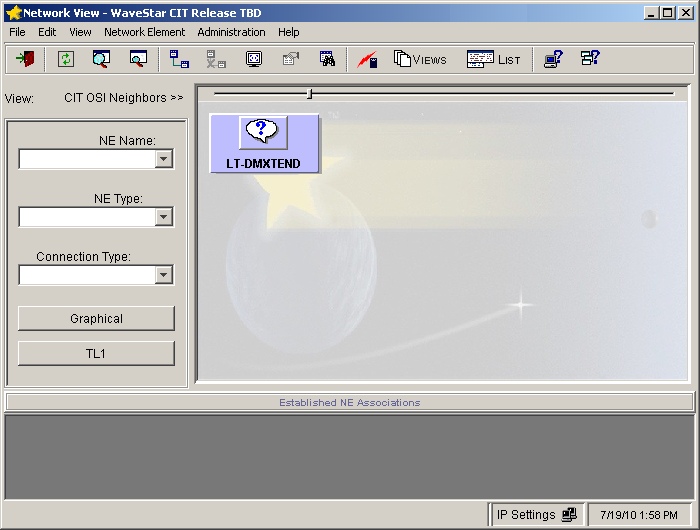
From the View: pull-down menu, select CIT OSI Neighbors. Important! This View: is not the menu bar item View → ...; it is located above the NE Name pull-down menu. Result: The CIT OSI neighbor(s) are automatically detected. If you were previously logged in to the NE and/or you do not see your NE, from the Network View, select View → Refresh OSI View. Figure 12-1: CIT OSI neighbor | ||||||||
4 |
In the Network View, right-click the NE icon that was detected (default TID is LT-DMXtend, your TID may be different), and select Graphical Using → OSI from the resulting menu. Result: The System Type Selection window appears. | ||||||||
5 |
In the System Type Selection window, select DMXtend and click OK. Result: The NE Login Dialog window appears. | ||||||||
6 |
In the NE login window, login to the shelf using your user ID and password. Click OK. | ||||||||
7 |
Would you prefer to use FTAM or FTP to continue with the SYSCTL replacement?
End of steps |