What is the map layout?
Introduction
The Map Layout function lets administrators specify a common map layout with global location information for NEs and routers, for use in NSP map views.
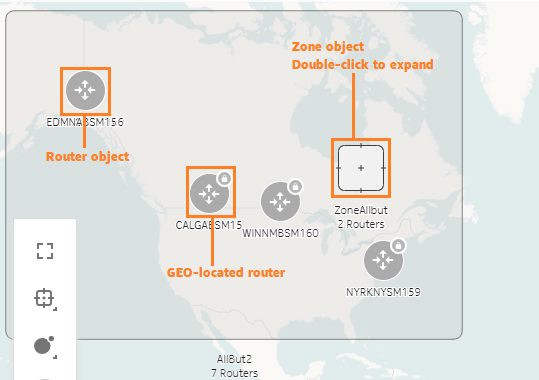
In the physical map layer, NEs are grouped into geographical regions and zones that are organized against a map background. In the IGP layer, routers are similarly grouped into regions and zones against the same map background. The map can be zoomed out to the regional or continental level, or zoomed in to the city street level, providing precise information about network equipment locations.
The IGP map layer is initially created the first time you select the IGP layer in the Map Layout. It is created based on information derived from the physical layer. Routers in a newly-created IGP layer have corresponding NEs at the same location in the physical layer. Regions and zones in a newly-created IGP layer have corresponding regions and zones at the same location in the physical layer. The regions and zones in the initially-generated IGP layer cannot be deleted and the routers in these regions and zones cannot be excluded. In cases where a router has discovered a subnet, the subnet object is placed in the same region as its designated router. The physical layer must be configured before you can create an IGP layer.
Once the IGP layer is created, you can create additional regions and zones in the IGP layer that do not have corresponding regions and zones in the physical layer. Similarly, you can add routers without corresponding NEs to regions in the IGP layer.
Figure 3-1: Map Layout with regions
Use the controls on the map palette to adjust the behaviour and appearance of the map and objects.
When objects share the same physical location, the map shows a multi-layered icon shaded in blue. To see the co-located objects individually, drag them off of the multi-layered icon.
Table 3-1: Map Palette controls
Regions
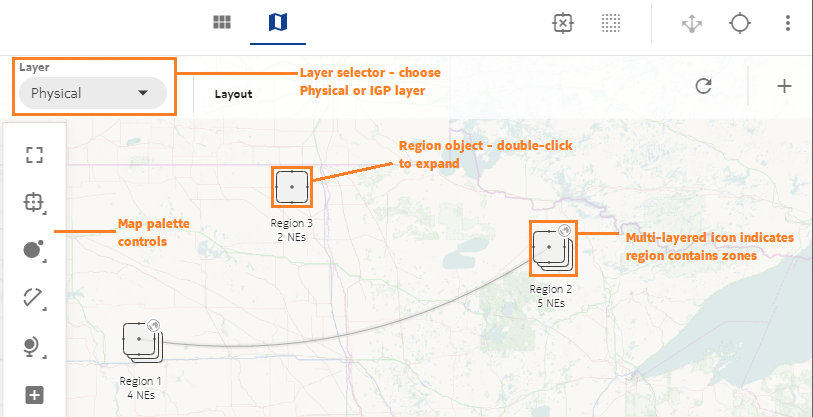
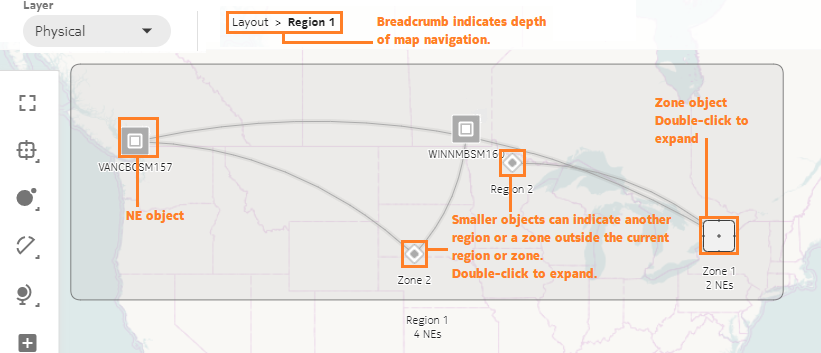
A region is the basic organizational object of a map layout. The layout must contain at least one region, in which NEs/routers are placed. Typically, a region would represent an organizational area of network equipment. Double-clicking a region on the map layout displays its contained NEs/routers and nested zones. Double-clicking a nested zone within a region displays its contained NEs/routers and further-nested zones. Right-clicking a region object and choosing the Back To menu option takes you up one level in the map hierarchy.
NEs and routers must be assigned to a region to appear on the map layout. NEs and routers that are not assigned to a region can be manually assigned to one.
Figure 3-2: Exploring region contents - physical layer
Figure 3-3: Exploring region contents - IGP layer

Right-click on a region to do the following:
-
Open expands the region to display its NEs/routers and zones
-
Review open the region in a configuration form in which you can view the contents of the region
-
Edit open the region in a configuration form in which you can add or remove NEs/routers from the region
-
Delete removes the region from the map layout, along with all contained NEs/routers and zones
Zones
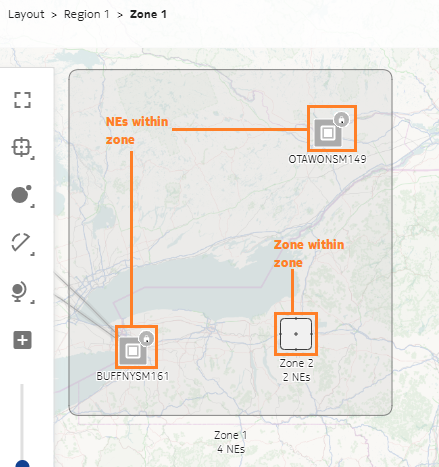
A region may contain more NEs/routers than can manageably fit on the map layout; for example, in a densely-populated area. You can organize the map layout by sub-grouping the NEs/routers into zones. You can add zones to a region and you can add zones within zones. Double-clicking a zone displays its contained NEs/routers and nested zones. Right-clicking a zone object and choosing the Back To menu option takes you up one level in the map hierarchy.
Figure 3-4: Exploring zone contents - physical layer

Right-click on a zone to do the following:
-
Rename opens a configuration form in which you can change the zone name
-
Cut removes the zone from the map and places it on the clipboard. Right-click at another location and choose Paste to place the zone.
-
Delete removes the zone from the map layout, and places all contained NEs/routers in the current Zone or Region
Import regions and zones from NFM-P
You can choose an option to import NFM-P equipment groups to automatically create regions and zones. Equipment group hierarchies and layout information are imported from NFM-P and converted into regions on the map layout. Any nested equipment groups from NFM-P become zones in the map layout.
Import NE location information from NFM-P
You can choose an option to import your NEs’ stored GEO location information. Information from either the Coordinates field or the Latitude/Longitude In Degrees fields is used to establish the geographical location of imported NEs.
The following examples reflect the types of supported latitude/longitude string formats:
You can enable GEO positioning for the map layout after it is created; see How do I enable GEO positioning for NEs and routers?.

