Creating and starting a vSIM VM on a VMware ESXi host
Creating and starting an integrated model vSIM VM on a VMware host
This chapter provides instructions on deploying integrated model vSIM VMs on VMware ESXi hosts using the vSphere Web Client only. Techniques for deploying VMs on ESXi hosts using other options (for example, vSphere Windows client, direct ESXi shell access) are beyond the scope of this guide.
-
Connect to the vCenter Server over HTTP and log in from the VMware
vCenter Single Sign-On window, as shown in VMware vCenter Single Sign-On, by doing the following:
- Enter the username.
- Enter the password you set during installation.
Figure 1. VMware vCenter Single Sign-On 
-
Click Login.
The vSphere Web Client dashboard is displayed, as shown in the following figure.
Figure 2. vSphere Web Client dashboard 
-
From the Navigator panel, choose
Home→Hosts and Clusters, as shown
in the following figure.
Figure 3. Home menu 
-
Select and deploy your OVF template, using the following steps:
-
Select the Deploy OVF Template option, as shown
in the following figure.
Figure 4. Actions menu 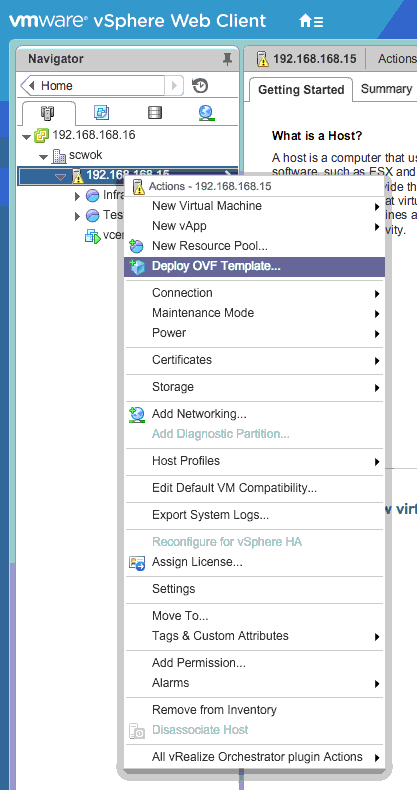
-
Select the Deploy OVF Template option, as shown
in the following figure.
-
The Deploy OVF Template window is displayed with the
Select source option selected, as shown in the
following figure.
Figure 5. Deploy OVF Template 
-
Specify the location of the vSIM OVA archive file (sros-vm.ova), using the
following steps:
-
Select the Local file option button to browse
for and retrieve a local file.
The following figure shows an example selection using the Local file option.
Figure 6. Select the local file 
-
Select the Local file option button to browse
for and retrieve a local file.
-
From the Review details panel, select the
Accept extra configuration options check box, as
shown in Review details.
Note: This selection allows you to accept the additional configuration options in the vSIM OVA archive file that are not available in the standard VMware OVA templates.
Figure 7. Review details 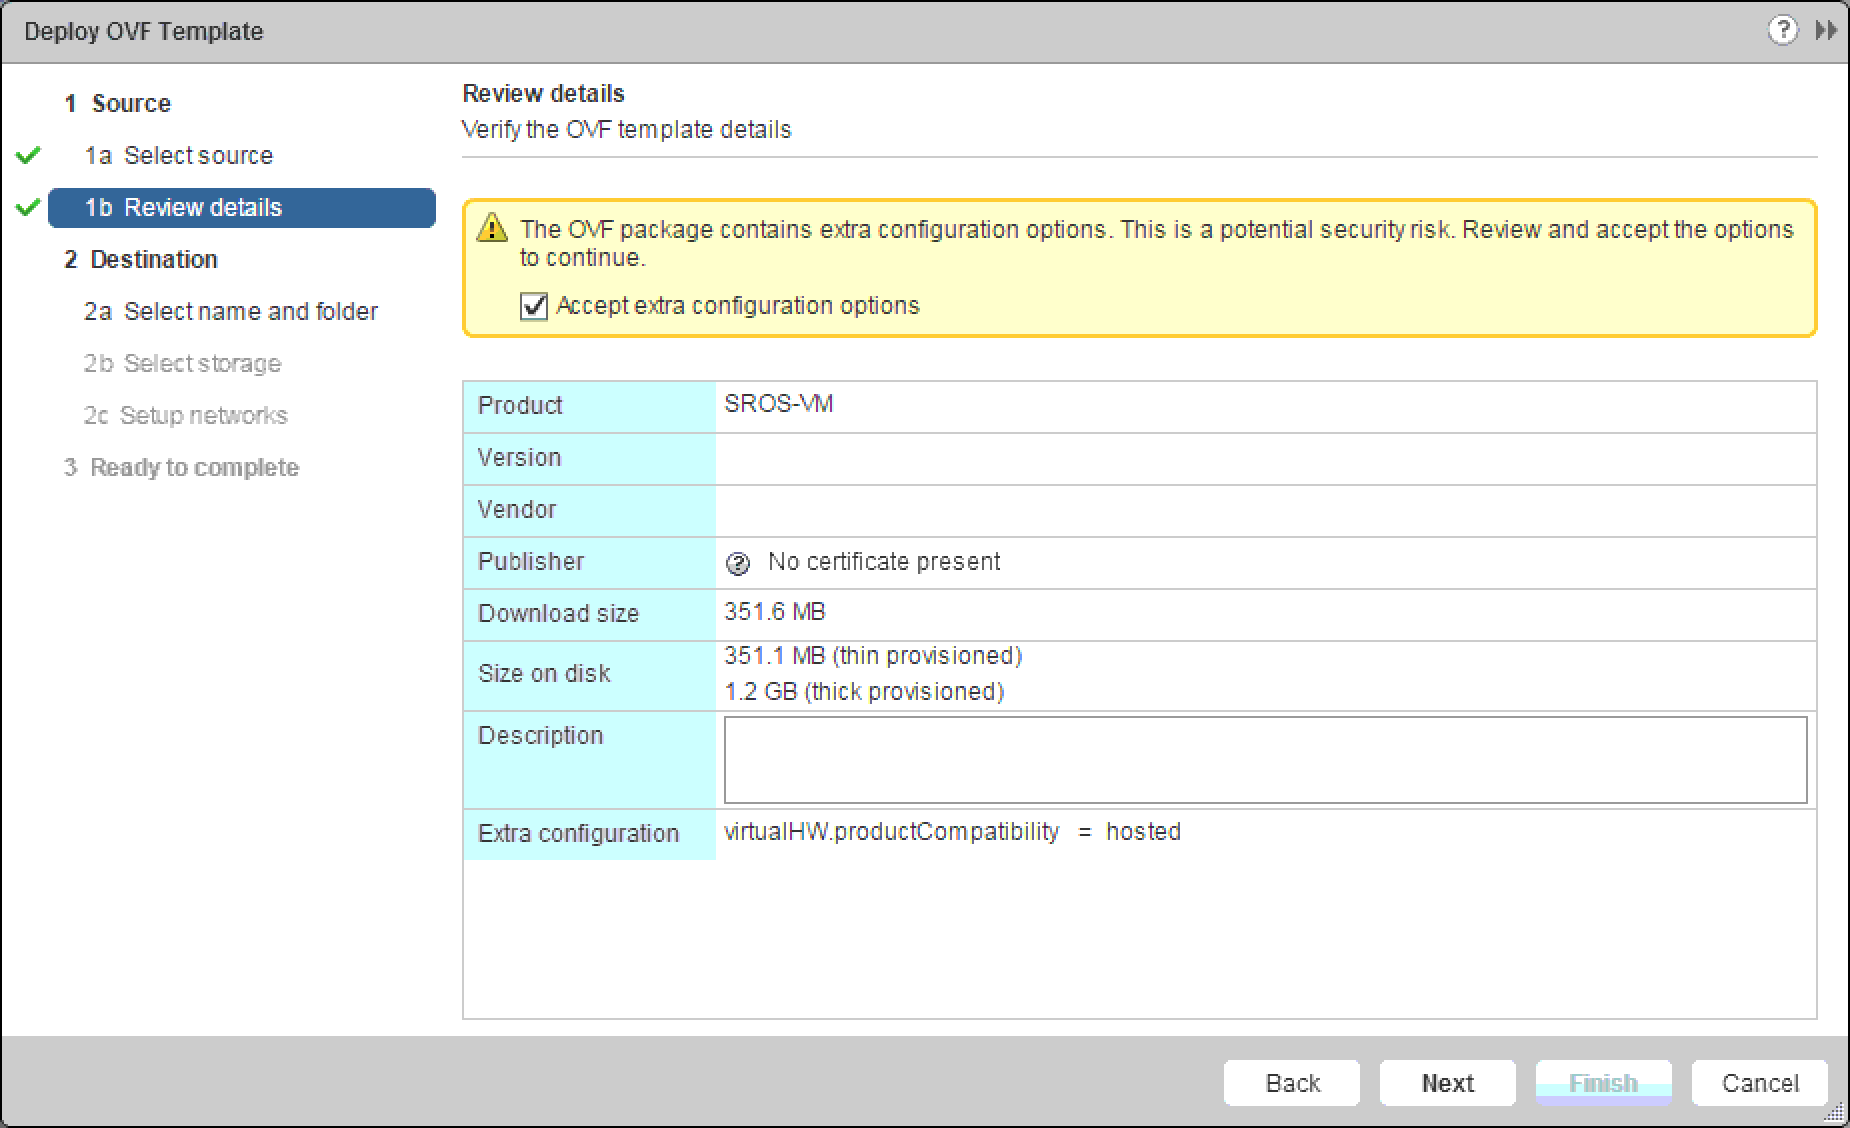
- Click Next to advance to the Select name and folder option.
-
From the Select name and folder panel, use the following
steps to specify a name and location for the deployed OVF template:
-
From the Select storage panel, select the storage location
for the deployed template, as shown in Select the storage location , using the following steps:
- Select a virtual disk format.
- Select a VM storage policy.
- Click Next to advance to the Setup networks option.
For more information about the virtual disk format for your configuration, go to www.vmware.com.
Figure 8. Select the storage location 
-
From the Setup networks panel, configure the network
interfaces for the vSIM VM, as shown in the example in Configure the network interfaces.
By default, the vSIM created from the supplied OVF template is deployed with four network interfaces: breth0, breth1, breth2, and breth3. For example, breth0 is the first guest interface and maps to the A/1 management port of CPM A, and so on. See 7750 SR-1, 7750 SR-1s, 7250 IXR-R6, 7250 IXR-ec vSIM interface mapping and Guest vNIC mapping in vSIM VMs for the mapping of the vNIC interfaces to SR OS interfaces, which is performed independently of the hypervisor.
Figure 9. Configure the network interfaces 
- Click Next to advance to the Ready to complete option.
-
Review the vSIM VM settings.
Note: Ensure that the Power on after deployment check box is not selected.
-
Click Finish to deploy the vSIM VM.
The Recent Tasks panel on the dashboard displays the status of the vSIM deployment, as shown in the following figure.
Figure 10. vSIM VM deployment status 
-
Configure the memory and resource allocation for the vSIM VM, using the
following steps:
-
In the Navigator panel, locate the newly deployed
vSIM, as shown in the following figure.
Figure 11. Navigator 
-
In the Navigator panel, locate the newly deployed
vSIM, as shown in the following figure.
-
Configure a serial port to obtain console connectivity to the vSIM, using the
following steps:
-
Configure the serial port, as required.
The example configuration shown in Serial port configuration enables console access to the vSIM via Telnet by routing TCP port 12050 on the ESXi host to the serial port on the vSIM. Other methods are available but are not documented here.
Figure 12. Serial port configuration 
-
Configure the serial port, as required.
-
Add and modify the vSIM configuration parameters, using the following
steps:
-
Click the Add Row button to add a machine.id
setting.
Add a machine.id setting and set its value to the SMBIOS text string appropriate for the VM. See Sysinfo for more information.
Example machine.id setting shows an example vSIM in an integrated model deployment emulating a 7750 SR-1s chassis. The example machine.id setting is as follows:
TIMOS:address=192.168.169.200/23@active
									address=192.168.169.201@standby
									license-file=ftp://user:password@192.168.169.110/license.txt
									slot=A chassis=SR-1s card=cpm-1s
								mda/1=s36-100gb-qsfp28
Figure 13. Example machine.id setting 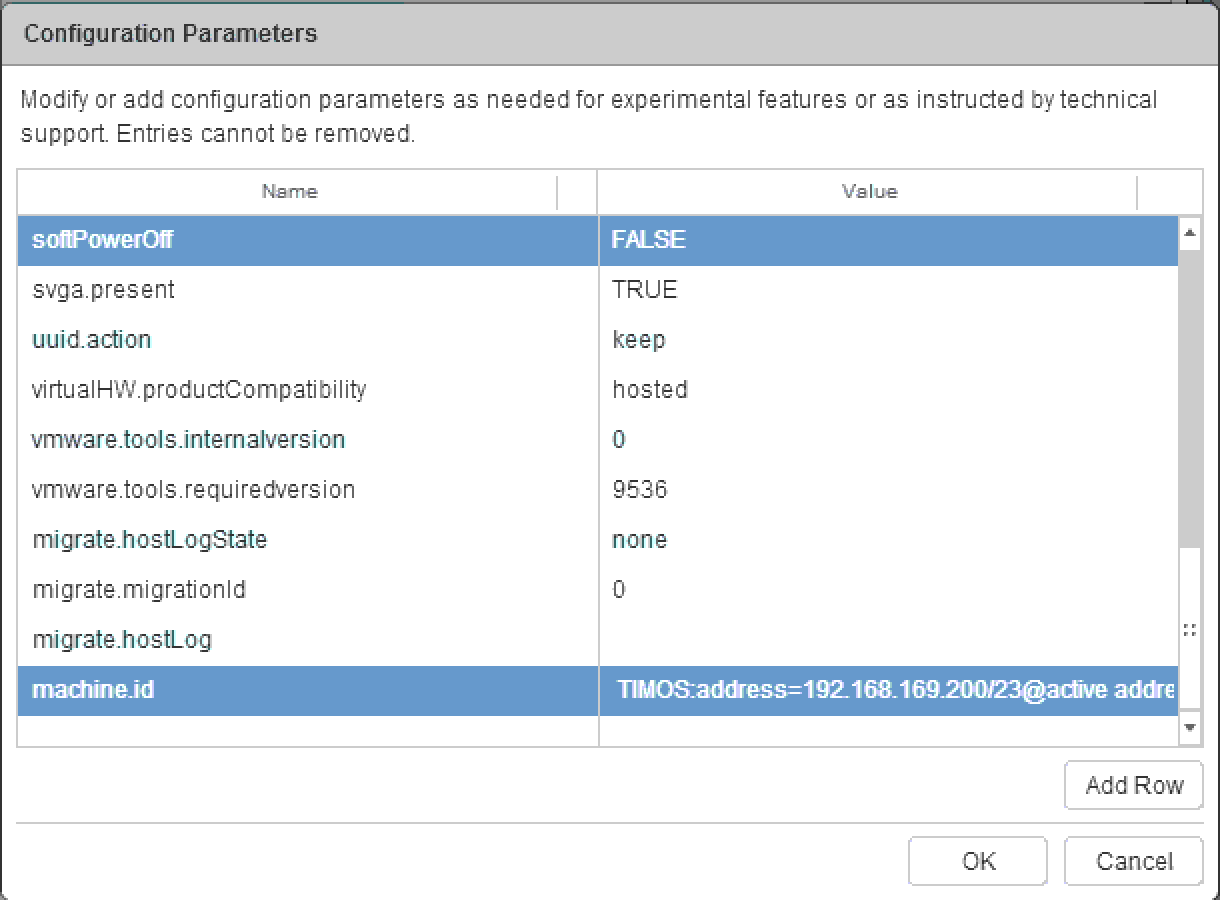
-
Click the Add Row button to add a machine.id
setting.
- From the Edit Settings window, click OK to finish the vSIM VM configuration.
- From the Recent Tasks panel, check the status of the vSIM VM reconfiguration.
-
Start the vSIM, using the following steps:
-
Optionally connect to the console by using Telnet to connect to the ESXi host
(in this example, 192.168.168.15) on the TCP port number you defined earlier (in
this example, 12050).
The TIMOS login screen is displayed when the vSIM is up and running successfully.
-
Log in using the following credentials:
-
login – admin
-
password – admin
SR OS commands can now be issued as normal.
-