gRPC
gRPC is a modern, open-source, high-performance Remote Procedure Call (RPC) framework that can run in any environment. In SR OS, this framework is used to implement the gRPC server, which can then be used for configuration management or telemetry.
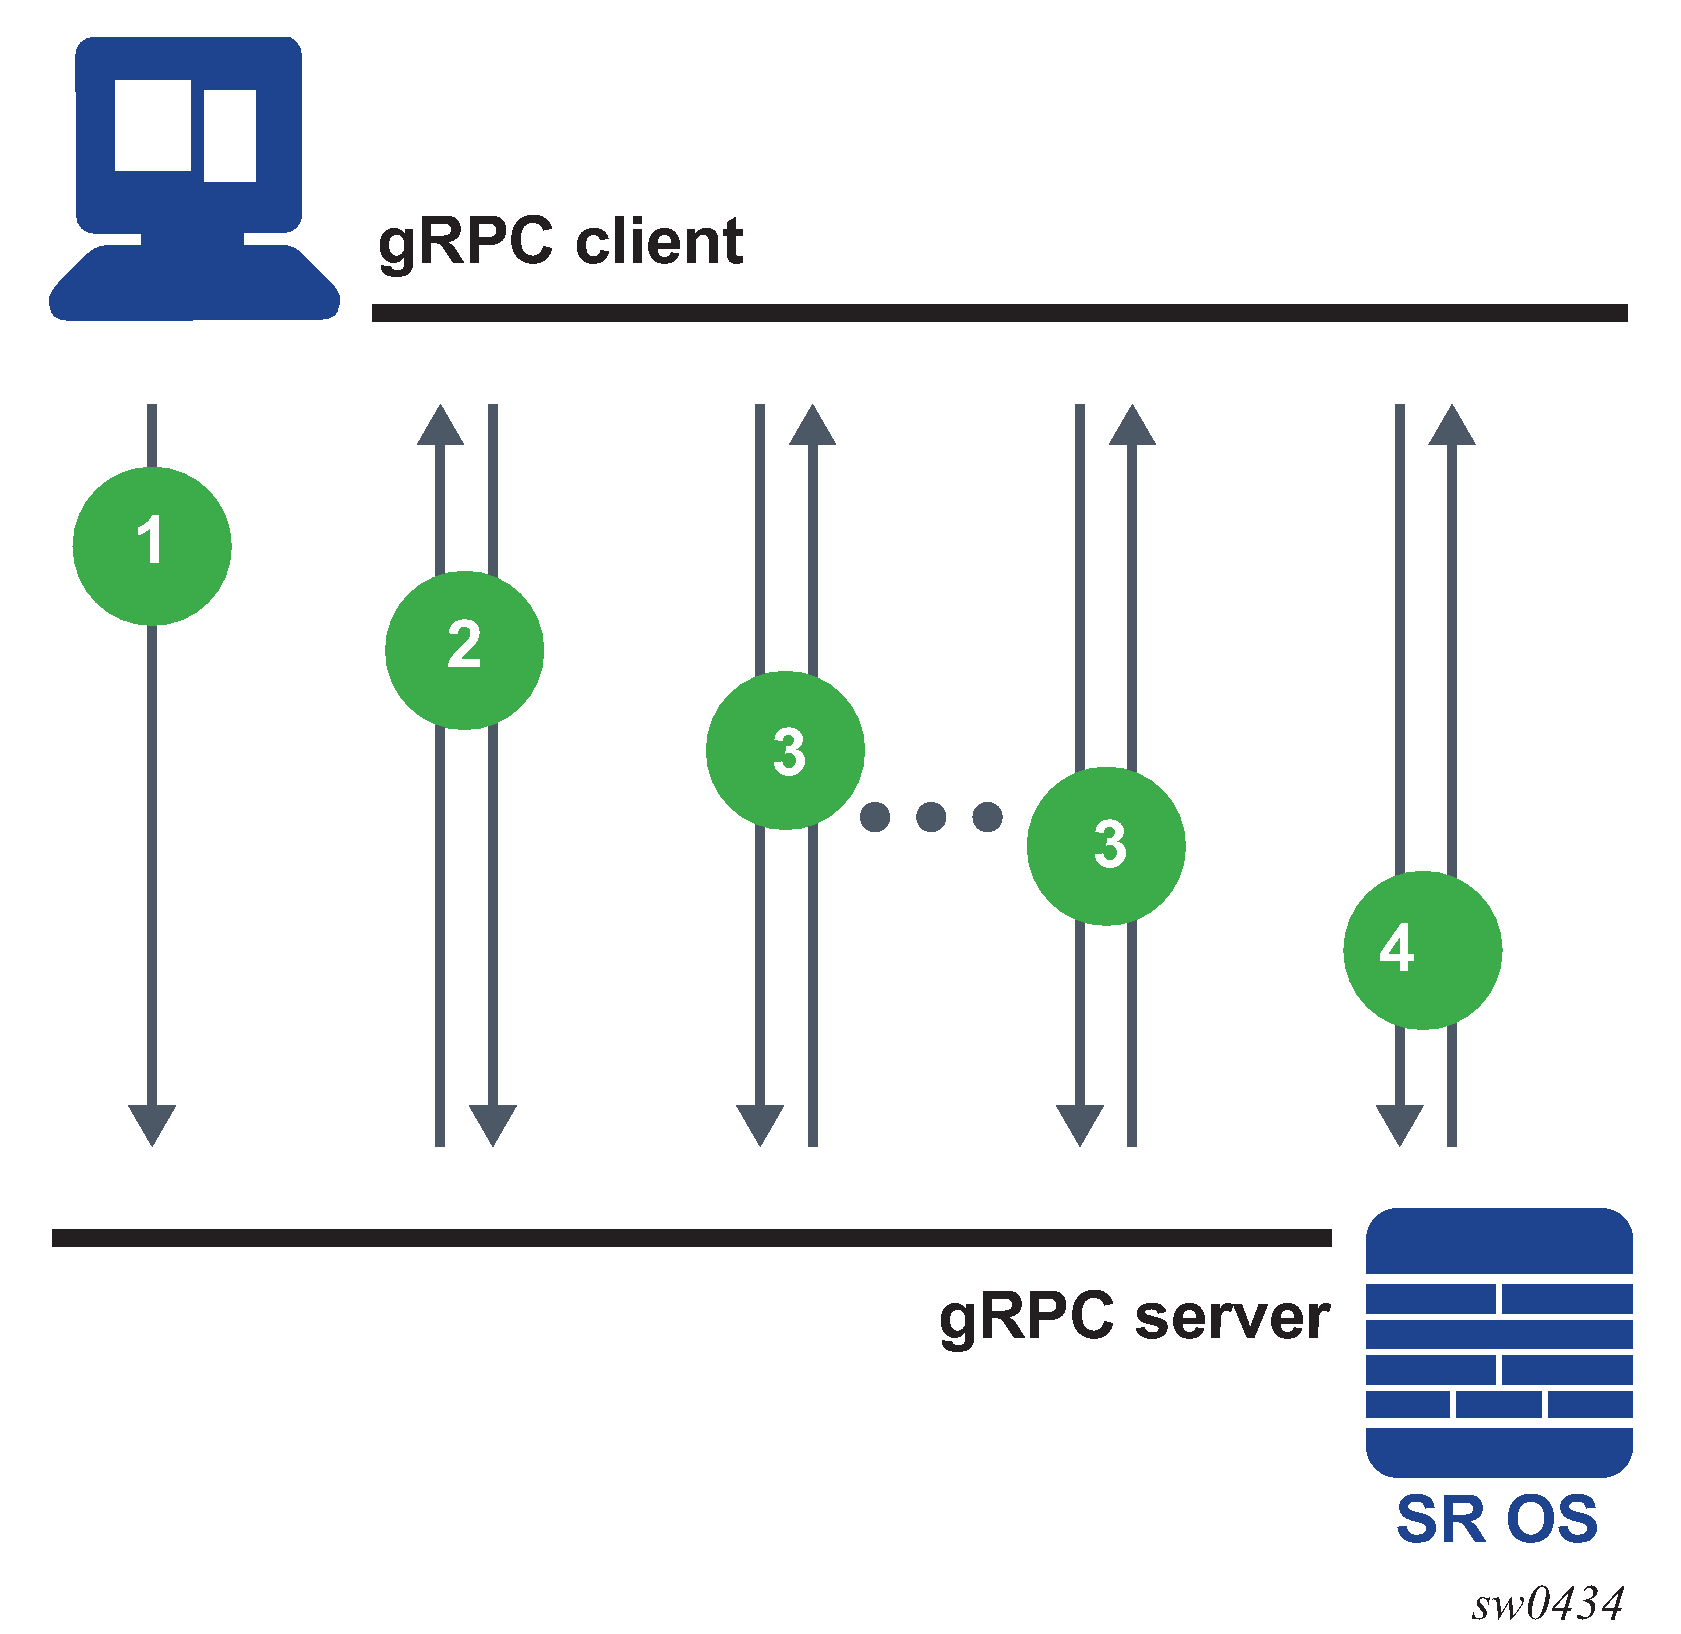
The gRPC transport service uses HTTP/2 bidirectional streaming between the gRPC client (the data collector) and the gRPC server (the SR OS device). A gRPC session is a single connection from the gRPC client to the gRPC server over a TCP or TLS port.
The gRPC service runs on port 57400 by default in SR OS. Use the following command to configure the TCP listening port, if required.
configure system grpc listening-port-
There is a maximum of eight concurrent gRPC sessions for all of the gRPC clients.
-
There is a maximum of 225 concurrent gRPC channels for all of the gRPC clients.
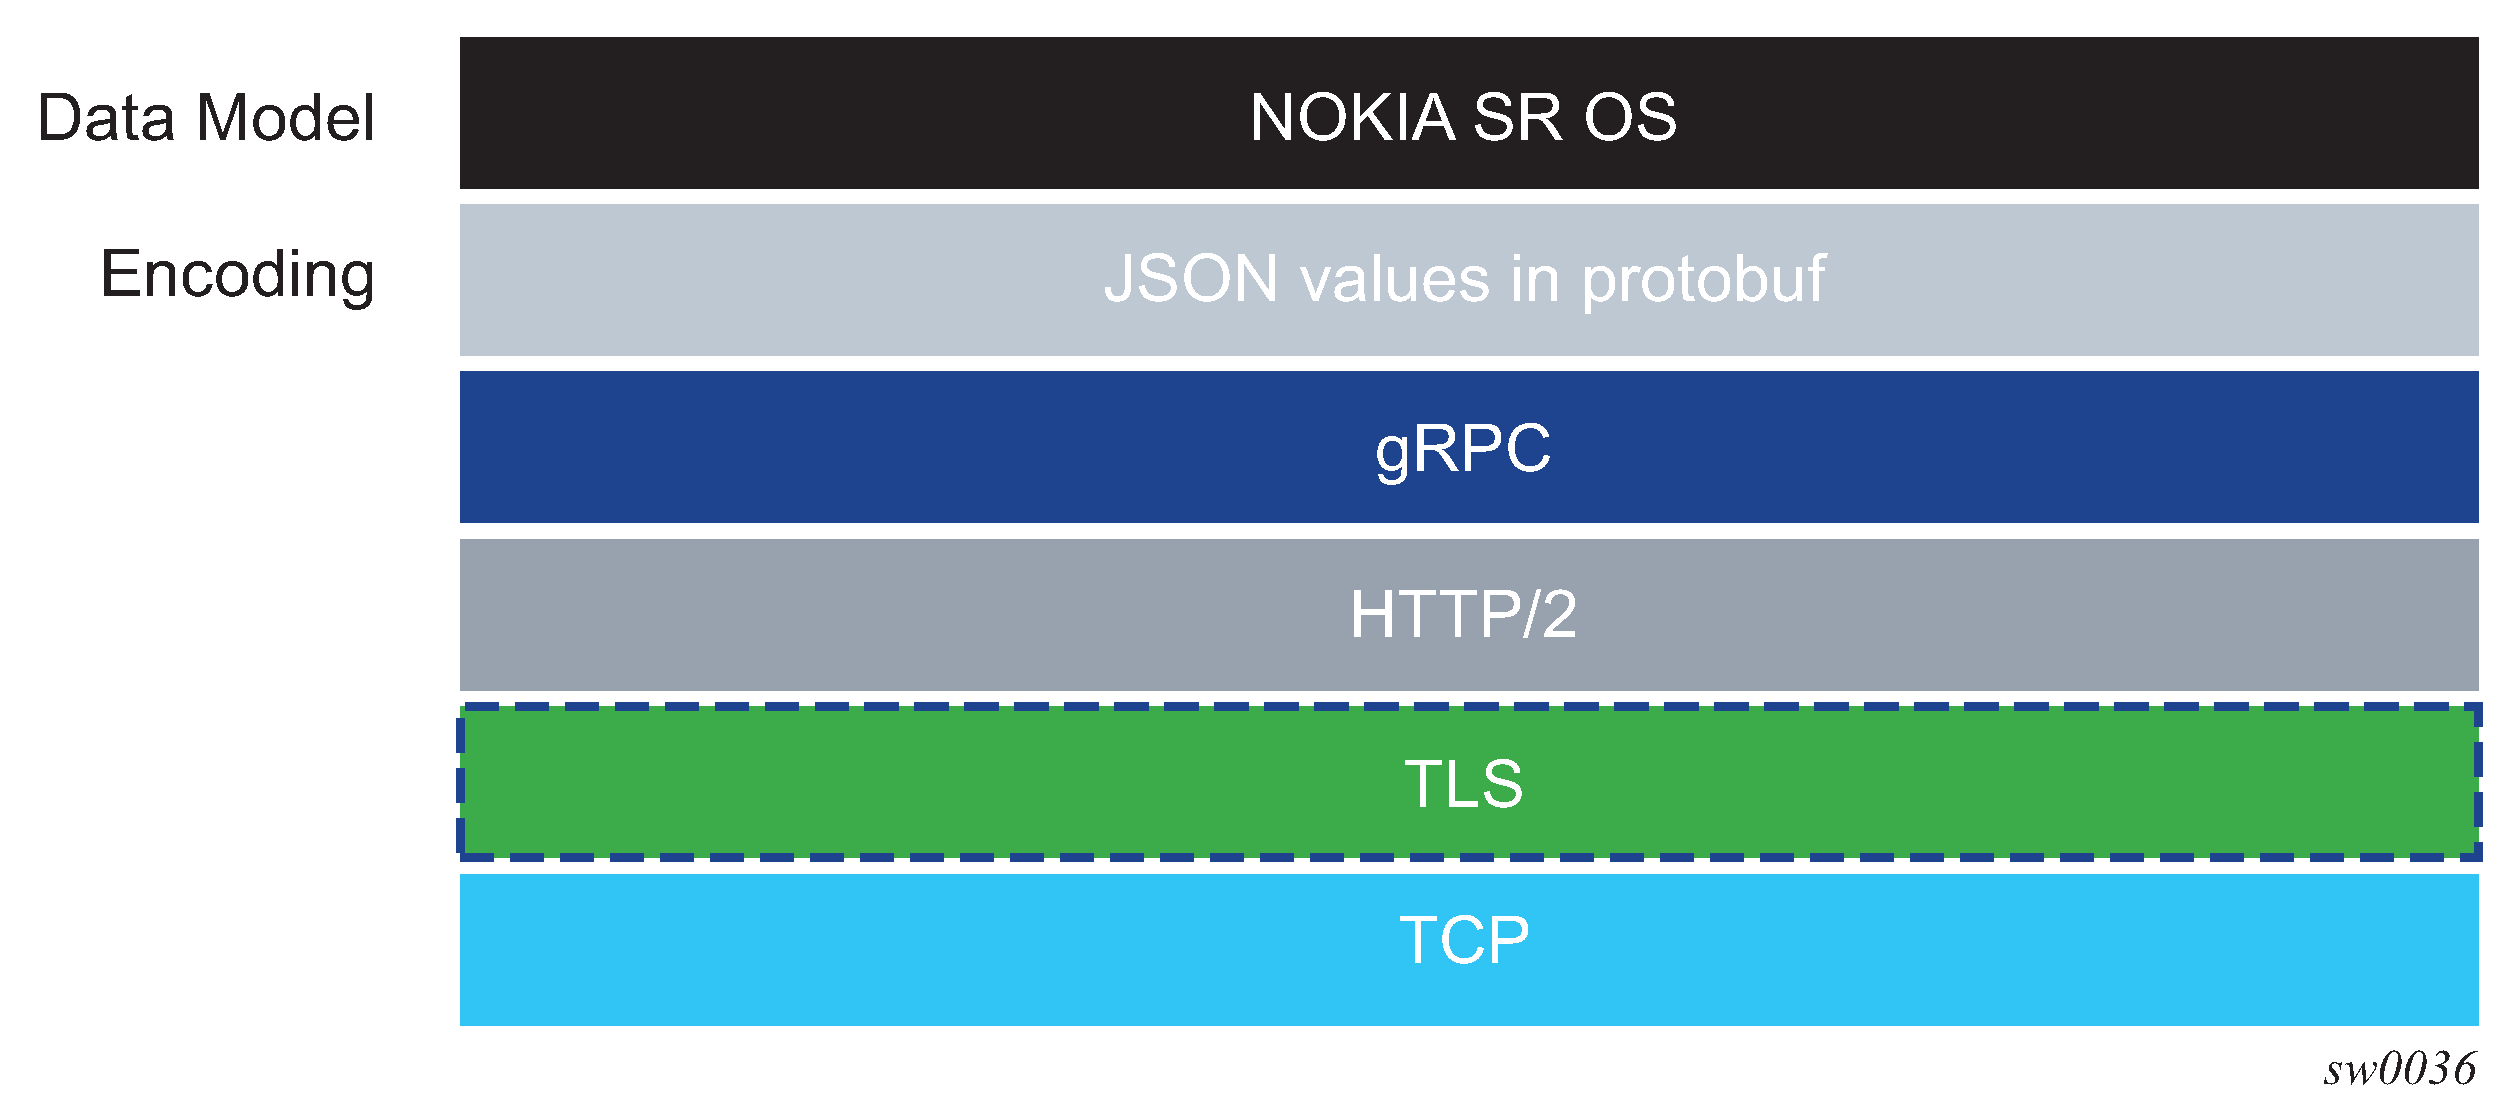
The following figure shows the gRPC protocol stack.
Security aspects
This section describes the security aspects associated with gRPC.
TLS-based encryption
The gRPC server on the SR OS can operate in the following modes:
-
without TLS encryption
-
with TLS encryption
configure system security pki ca-profile revocation-check crl-optionalBefore a gRPC connection comes up without TLS, the following conditions must be met:
-
no TLS server profile is assigned to the gRPC server
-
the following command is configured
configure system grpc allow-unsecure-connection
The following summarizes the process of encryption:
-
The gRPC session must be in an encrypted state.
-
If the gRPC client and server are unable to negotiate an encrypted gRPC session, the gRPC session fails and the gRPC server sends an error.
-
Fallback from an encrypted to an unencrypted gRPC session is not allowed.
For information about how to configure TLS with gRPC, see the TLS chapter.
Certificate revocation check with TLS
For TLS, the following command option is supported for a Certificate Authority (CA) certificate:
configure system security pki ca-profile revocation-check crl-optionalThe optional configuration can be extended for end entity (EE) certificates by using the following command (the default value is revoked). This command applies when the revocation status of a certificate cannot be determined because of an invalid CRL. A CRL can be invalid because it is missing, expired, or corrupted.
configure system security tls client-tls-profile status-verify default-resultThe status-verify command allows users to override the recommended revocation check policy, when applicable.
See Certificate revocation check for more information.
Authentication
The gRPC users can be authenticated using the local user database, RADIUS, or TACACS+.
When using the local user database, the access grpc statement must be included in the user configuration.
- RADIUS
Use the following commands to configure the access grpc statement and ensure that radius use-default-template is enabled (or the RADIUS server must send the Timetra-Access VSA with a value that includes gRPC access):
- MD-CLI
configure system security aaa user-template user-template-name radius-default configure system security aaa user-template access grpc true configure system security aaa remote-servers radius use-default-template - classic
CLI
configure system security user-template radius_default
configure system security user-template access grpc
configure system security radius use-default-template
- MD-CLI
- TACACS+
Use the following commands to configure the access grpc statement and ensure that tacplus use-default-template is enabled:
- MD-CLI
configure system security aaa user-template user-template-name tacplus-default configure system security aaa user-template access grpc true configure system security aaa remote-servers tacplus use-default-template - classic
CLI
configure system security user-template tacplus_default
configure system security user-template access grpc
configure system security tacplus use-default-template
- MD-CLI
User authentication is based on following principles:
Each RPC sent by the gRPC client carries a username and password.
For the first RPC in the gRPC session, the gRPC server tries to authenticate the user using the specified authentication order, such as using the local user database, RADIUS, or TACACS+.
For example, if TACACS+ is first in the authentication order, the gRPC server sends a request to the TACACS+ server to authenticate the gRPC user.
For the subsequent RPCs on that same authenticated gRPC session, the username and password are re-authenticated only if changed.
When no username and password are provided with the RPC, the gRPC server returns an error.
If the RPC user is changed, any active subscriber RPCs on that same gRPC session are terminated by the gRPC server.
If the RPC password is changed, the active gRPC session continues to exist until a different username and password is sent in a subsequent RPC, or the gRPC session is terminated.
Each message is carried over a gRPC session that was previously encrypted; the session is not re-encrypted.
SR OS device authentication is based on the following principles:
-
The gRPC clients do not share gRPC sessions. Each gRPC client starts a separate gRPC session.
-
When a gRPC session is established, the gRPC server certificates are verified by the gRPC client to ensure that every gRPC server is authenticated by the gRPC client.
-
If gRPC is shut down on the gRPC server and a gRPC client is trying to establish a gRPC session, the gRPC client gets an error for every RPC sent.
-
If gRPC is shut down on the gRPC server and a gRPC session is established, all active RPCs are gracefully terminated and an error is returned for every active RPC.
gNMI service
The gRPC Network Management Interface (gNMI) is a gRPC based protocol for network management functions, such as changing the configuration of network elements and retrieving state information. In addition, gNMI provides functionality necessary for supporting telemetry. The gNMI service is specified in the OpenConfig forum.
gNMI service definitions
The SR OS gRPC server supports gNMI version 0.8.0, and, in particular, the following RPC operations:
-
Capability RPC
-
Get/Set RPC
-
Subscribe RPC
-
Publish RPC
As in NETCONF RPCs, gNMI RPCs that are sent to the SR OS system are logged in security log and they are marked as authorized or unauthorized, and include information such as username, time, RPC type, and IP address of the client.
Capability discovery
In gNMI service, the client discovers the capabilities of the gRPC server through a Capability-Discovery RPC, which consists of ‟CapabilityRequest” and ‟CapabilityResponse” messages.
During this message exchange, the gRPC server informs the client about following attributes:
-
supported gNMI version
-
supported models
-
supported encodings
The SR OS server announces the supported models based on the configuration in the following context.
configure system management-interface yang-modulesThe supported models includes the Nokia YANG or OpenConfig (OC) models.
The advertised module names and organizations are as follows:
-
nokia-conf, org = "Nokia"
-
nokia-state, org = "Nokia"
-
openconfig, org = "OpenConfig working group" (as specified by the 'organization' in the YANG models)
-
version - the version number is be defined as follows:
-
for Nokia YANG models, the version number corresponds to an SR OS release number, for example, "16.0.R1"
-
for OC YANG models, the version number corresponds to a version number defined in "oc-ext:openconfig-version" that is included in the respective YANG models
-
for OC-YANG models, including Nokia deviations, the version number corresponds to an SR OS release number, for example, "16.0.R1"
-
The following is an example of a ‟Capabilities Response Message”:
Going to send message of type gnmi.CapabilityResponse:
 .gnmi_version: 0.4.0
 .supported_encodings (1):
  .encoding: 0 = JSON
 .supported_models (47):
  { .name: 'nokia-conf', .organization: 'Nokia', .version: '16.0.R1' }
  { .name: 'nokia-state', .organization: 'Nokia', .version: '16.0.R1' }
  { .name: 'openconfig-
bgp', .organization: 'OpenConfig working group', .version: '4.0.1' }
<snip>
  { .name: 'nokia-sr-openconfig-if-ethernet-deviations', .organization: 'Nokia',
.version: '16.0.R1' }
  { .name: 'nokia-sr-openconfig-if[[-ip-deviations', .organization: 'Nokia',
.version: '16.0.R1'..."
gNMI encoding
SR OS supports multiple encoding formats for gNMI operations. The selected encoding format determines how data is serialized and exchanged between the gRPC client and the server.
Encoding support by RPC type
The following table lists the encoding formats supported for gNMI RPC type.
| RPC type | JSON | JSON-IETF | PROTO | BYTES |
|---|---|---|---|---|
|
Get |
Yes |
Yes |
No |
No |
|
Set |
Yes |
Yes |
No |
No |
|
Subscribe |
Yes |
Yes |
Yes |
Yes |
For Get and Set operations, use JSON or JSON-IETF
encoding in the request. BYTES and PROTO encoding formats are not supported for
configuration operations, and display an error if specified.
For Subscribe operations, all encoding formats are supported, providing
flexibility for telemetry use cases.
configure system grpc gnmi proto-versionWhen the version is set to "latest", the encoding formats are interpreted according to gNMI specification v0.8.0. When the version is set to "v0.7.0", the v0.7.0 specification is applied.
TypedValue field mapping
The following table lists the protobuf fields in the gNMI TypedValue message that are
populated in Subscribe RPC responses based on the encoding type and
proto-version settings. This table applies only to Subscribe RPC
operations. See Encoding support by RPC type for Get and
Set RPC operations.
| YANG data type | TypedValue field | JSON | JSON-IETF | PROTO (latest) | PROTO (v0.7.0) | BYTES (latest) | BYTES (v0.7.0) |
|---|---|---|---|---|---|---|---|
|
Binary |
bytes_val = 5 |
✓ |
✓ |
✓ |
✓ |
✓ |
✓ |
|
Bits |
string_val = 1 |
✓ |
✓ |
✓ |
✓ |
✓ |
✓ |
|
Boolean |
bool_val = 4 |
✓ |
✓ |
✓ |
✓ |
✓ |
✓ |
|
decimal64 |
double_val = 14 |
✓ |
✓ |
✓ |
— |
✓ |
decimal_val (deprecated) |
|
Empty |
bool_val = 4 |
✓ |
✓ |
✓ |
✓ |
✓ |
✓ |
|
enumeration |
string_val=1 |
✓ |
✓ |
✓ |
✓ |
✓ |
✓ |
|
Identityref |
string_val=1 |
✓ |
✓ |
✓ |
✓ |
✓ |
✓ |
|
instance-identifier |
string_val=1 |
✓ |
✓ |
✓ |
✓ |
✓ |
✓ |
|
int8, int16, int32, int64 |
int_val = 2 |
✓ |
✓ |
✓ |
✓ |
✓ |
✓ |
|
Leafref |
type of referenced leaf |
✓ |
✓ |
✓ |
✓ |
✓ |
✓ |
|
String |
string_val = 1 |
✓ |
✓ |
✓ |
✓ |
✓ |
✓ |
|
uint8, uint16, uint32, uint64 |
uint_val = 3 |
✓ |
✓ |
✓ |
✓ |
✓ |
✓ |
|
Union |
type of active union member |
✓ |
✓ |
✓ |
✓ |
✓ |
✓ |
|
leaf-list |
leaflist_val = 8 |
— |
— |
✓ |
✓ |
✓ |
✓ |
|
JSON representation |
json_val = 10 |
✓ |
— |
— |
— |
— |
— |
|
JSON_IETF representation |
json_ietf_val = 11 |
— |
✓ |
— |
— |
— |
— |
|
Protobuf binary |
proto_bytes = 13 |
— |
— |
— |
— |
✓ |
✓ |
✓indicates the field is used for that encoding or proto-version combination.—indicates the field is not used for that encoding or proto-version combination.- The configure system grpc gnmi proto-version command determines the behaviour for PROTO and BYTES encoding formats.
- When proto-version is set to
latest, the gNMI v0.8.0 specification is applied. - When proto-version is set to
v0.7.0, the gNMI v0.7.0 specification is applied. - Fields
float_val (6)anddecimal_val (7)are deprecated in favor ofdouble_val (14). - JSON encoding uses the
json_valfield, and JSON-IETF uses thejson_ietf_valfield. - For leaf-lists, JSON, and JSON-IETF encode as JSON arrays within
json_valorjson_ietf_valvalues. - Fields
ascii_val (12)andany_val (9)are not suppored.
PROTO encoding
The gRPC server performs PROTO encoding, which encodes the values of the leaf as typed values. See TypedValue field mapping, for a mapping of YANG types to TypedValues defined in the gNMI specification (v0.8.0), and the mapping across all proto-version configurations.
TypeValue and protobuf fields
The TypedValue field indicates the protobuf used for each data type.
- YANG type
binaryuses thebytes_valfield - YANG type
stringuses thestring_valfield - YANG type
decimal64uses thedouble_valfield - YANG type
int8/int16/int32/int64uses theint_valfield
BYTES encoding
The BYTES encoding uses the binary encoding format for both path and value to increase the
efficiency of telemetry data transfer. The YANG files are encoded in
protobuf format, where each path is encoded as a binary index.
The protobuf-encoded YANG files are distributed with the SR OS software or found on GitHub repository. The PROTO definitions of the YANG model are specifically generated for each software release; backward compatibility is not supported.
To retrieve decoding information for PROTO encoding, the gNMI client can use the
Get RPC to request a path with origin
gnmi.schemas. The path must be either a root path
gnmi.schemas:/, or a specific path such as
gnmi.schemas:/protobuf-typemap, as described in the
protobuf-vals.md file published on GitHub (May 2018).
Get RPC request and response
The following example shows the Get RPC request and response:
Received message of type gnmi.GetRequest:
.type: 0 = ALL
.encoding: 4 = JSON_IETF
.prefix: /
.path (1):
  .path: gnmi.schemas:/
"
Going to send message of type gnmi.GetResponse:
.notification (1):
  .timestamp: 1616677860728392525
  .update (1):
   .path: gnmi.schemas:/protobuf-typemap
   .val.value = json_ietf_val: {
    "gnmi-protobuf-encoding:origin": [
        {
            "name": "",
            "container": [
                {
                    "path": "/",
                    "message-name": "proto.nokia.net/Nokia.SROS.root"
                }
            ]
        }
Get/Set RPC
Information is retrieved from the NE using GET RPC messages, which consist of ‟GetRequest” and ‟GetResponse” messages. The client asks for information by specifying the following:
a set of paths
All rules to a path definition apply, as specified in the gNMI specification.
type
Consists of configuration, state, or operational data.
encoding
This is in accordance with the server advertisement during capability discovery.
use_models
This message is ignored.
See Encoding support by RPC type for information about supported encodings for
Get and Set operations.
The ‟GetResponse” message size is limited to 100 MB. If the limit is exceeded, the SR OS gRPC server responds with an error message.
The Set gRPC message is used to modify the information in an NE element. This
gRPC supports the following transactions:
delete
replace
update
With a gNMI Set RPC, SR OS checks
the YANG tree and authorizes all configuration changes.
When a container is deleted, the child containers in the hierarchy that are authorized for deletion are deleted along with their content. The children containers that are not authorized for deletion are retained. For example, upon deletion of configure system, configure system security is not deleted because the deletion of that child container is not authorized.
For example, when a user is not authorized to change the access li definition, but attempts to change it for another user who already has access li, SR OS allows that action because there is no change in value.
Subscribe RPC
The Subscribe RPC is part of the telemetry support in gNMI.
The gRPC client sends a Subscribe RPC that contains a "SubscribeRequest" message
to the gRPC server, and initiates a subscription. A prefix can be specified in the
"SubscribeRequest". If a prefix is present, it is prepended to every path to provide a
full path.
A subscription contains the following information:
List of one or more paths with the following conditions:
A path represents the data tree as a series of repeated strings and elements. Each element represents a data tree node name and its associated attributes.
A path must be syntactically valid within the set of schema modules that the gRPC server supports.
The path list cannot be modified during the lifetime of the subscription.
If the subscription path is to a container node, all child leafs of that container node are subscribed to.
Any specified path must be unique within the list; paths cannot be repeated within the list. An error is returned if the same path is used more than once in a single subscription.
A specified path does not need to pre-exist within the current data tree on the gRPC server. If a path does not exist, the gRPC server continues to monitor for the existence of the path. Assuming that the path exists, the gRPC server transmits telemetry updates.
The gRPC server does not send data for a non-existent path; for example, if a path is non-existent at the time of subscription creation or if the path was deleted after the subscription was established.
- The maximum number of paths for all subscriptions is 14400. A path using a wildcard is considered a single path.
- Encoding where subscribe operations support JSON, JSON-IETF, BYTES, and PROTO encodings. See gNMI encoding for information about encoding support and TypedValue field mapping.
Subscription mode of one of the following types:
ONCE mode
The server returns only one notification containing all the information to which the client has subscribed. In general, use telemetry to retrieve large amounts of information from the NE: ‟SubscribeRequest” message with ONCE subscription type.
ON_CHANGE mode
The server returns notifications only when the value of the subscribed field changes. See ON_CHANGE subscription mode for more information.
SAMPLE mode
The gRPC server sends notifications at the specified sampling interval. The first notification is sent at the next sampling interval, not immediately.
TARGET_DEFINED mode
This type means ON_CHANGE for all states that support ON_CHANGE notifications and SAMPLE mode for all other objects in the YANG tree.
- A sample interval for each path:
- If a sample interval of less than 1 s is specified, the gRPC server returns an error.
- If the sample interval is set to 0, the default value of 10 s is used.
- A sample interval is specified in nanoseconds (10 000 000 000 by default).
When a subscription is successfully initiated on the gRPC server, ‟SubscribeResponse” messages are sent from the gRPC server to the gRPC client. The ‟SubscribeResponse” message contains update notifications about the subscription path list.
An update notification contains the following:
a timestamp of the statistics collection time, in nanoseconds
a prefix
If a prefix is present, it is logically appended to the start of every path to provide the full path.
-
The presence of a prefix in the ‟SubscribeResponse” message is not related to the presence of a prefix in the original ‟SubscribeRequest” message. The prefix in the ‟SubscribeResponse” message is optimized by the gRPC server.
a list of updates (path and value pairs)
A path represents the data tree path as a series of repeated strings or elements, where each element represents a data tree node name and its associated attributes. See Schema paths for more information.
The ‟TypedValue” message represents the value of the data tree node, where the encoding is ‟JSON”, ‟JSON_IETF”, ‟Bytes, or ‟Protobuf” depending on the information in the ‟SubscribeRequest” message.
Multiple notification messages can be combined in a single ‟SubscribeResponse” message. This bundling minimizes overhead, which improves the efficiency of telemetry data transport; however, this may delay some notifications, and timestamps may be less accurate. The following commands control message bundling:
max-time-granularity
This parameter controls the maximum time during which notifications can be bundled.
max-msg-count
This parameter controls the maximum number of notifications that can be bundled.
A synchronization response notification is sent once, after the gRPC server sends all updates for the subscribed-to paths. The synchronization response must be set to ‟true” for the gRPC client to consider that the stream has synced one time. A synchronization response is used to signal the gRPC client that it has a full view of the subscribed-to data.
The gRPC server sends an error, if required. The error contains a description of the problem.
- MD-CLI
configure system security aaa management-interface output-authorization telemetry-data - classic
CLI
configure system security management-interface output-authorization telemetry-data
ON_CHANGE subscription mode
The SR OS supports ON_CHANGE subscription mode. This subscription mode indicates that notification messages are sent as follows:
after the ‟SubscriptionRequest” message is received
every time the corresponding leaf value is changed
The notification message, as a response to an ON_CHANGE subscription, always contains the new value of the corresponding leaf, as defined in the gNMI specification.
The ON_CHANGE subscription is supported for all configuration leafs as well as for selected state leafs. Use the following command to display all state leafs supporting the ON_CHANGE subscription.
tools dump system telemetry on-change-pathsON_CHANGE subscription is accepted for all valid paths. The server sends ON_CHANGE notifications only for leafs within the specified subtree that support ON_CHANGE notifications.
Publish RPC
With dial-out telemetry, where the SR OS node is the gRPC client instead of the gRPC server, the SR OS node sends a Publish RPC with a ‟SubscribeResponse” message to the gRPC server. See Dial-out telemetry for more information.
Because the current gnmi.proto definition does not support dial-out mode, a protobuf definition is introduced, with a separate gRPC service, as follows:
NOKIA-DialOut.proto
      option (dialout_service) = 0.1.0
      service gMIDialOut {
              rpc Publish(stream SubscribeResponse) returns (stream PublishResponse)
      }
      message PublishResponse {
      }
The preceding proto file definition reuses the ‟SubscribeResponse” message defined for dial-in telemetry, in accordance with the gNMI specification.
Schema paths
Telemetry subscriptions include a set of schema paths to identify which data nodes are of interest to the collector.
The paths in Telemetry Subscribe RPC requests follow the basic conventions described in the OpenConfig gnmi-path-conventions.md published on github.com (version 0.4.0, published June 21, 2017).
A path consists of a set of path segments, often shown with a ‟/” character as a delimiter.
/configure/router[router-name=Base]/interface[interface-name=my-interface1]/descriptionThese paths are encoded as a set of individual string segments in gnmi.proto (without any ‟/” characters).
["configure", "router[router-name=Base]", "interface[interface-name=my-interface1]", "description"]A path selects an entire subtree of the data model and includes all descendants of the node indicated in the path. The following table describes the types of schema paths that are supported in SR OS telemetry.
| Path example | Description |
|---|---|
|
/configure/router[router-name=Base]/interface[interface-name=abc] |
Selects all config leafs of interface abc and all descendants |
|
/configure/router[router-name=Base]/interface[interface-name=abc]/description |
Selects only the description leaf of interface abc |
|
/state/router[router-name=Base]/interface[interface-name=*] |
Selects all state information for all base router interfaces using a wildcard in a single segment of a path |
|
/configure/router[router-name=Base]/interface[interface-name=*]/description |
Selects all state information for all base router interfaces using a wildcard in a single segment of a path |
|
/configure/router[router-name=Base]/interface/description |
Applies to all RPCs. Selects the entire list to account for absent list keys. It is equivalent to /configure/router[router-name=Base]/interface[interface-name=*]/description |
|
/ |
The root path. This selects all config and state data from all models (in all namespaces) supported on the router. Encoded as ‟” in gRPC/gPB. |
|
/state/... |
Not supported. Equivalent to /state/ |
|
/* |
Expands one level of a specified subtree schema. |
The following list describes telemetry paths that are supported in SR OS:
-
Wildcards in multiple segments of a path are supported.
For example: /state/card[slot-number=*]/mda[mda-slot=*]
-
The following wildcards are supported in the schema.
-
Specifying ‟/…” wildcard expands to multiple element levels in a path.
-
Specifying ‟/*” wildcard expands to only one level in a path.
-
-
Wildcards for entire path segments are supported as follows:
-
For example: ‟/state/card/.../oper-state” expands to following paths
/state/card[slot-number=*]/hardware-data/oper-state
/state/card[slot-number=*]/mda[mda-slot=*]/hardware-data/oper-state
/state/card[slot-number=*]/mda[mda-slot=*]/flex[group-index=*]/oper-state
-
For example: ‟/state/card/*/oper-state” expands to following path
/state/card[slot-number=*]/hardware-data/oper-state
-
-
The paths with wildcards are expanded when a subscription is activated; this applies to dynamic and persistent subscriptions. In some cases, it is possible that a single path with wildcards can be expanded across both Nokia and Openconfig YANG models. However, this occurs only if both model types are enabled. If only one type is enabled, the path is expanded only within the enabled model. If the other type is enabled later, it is necessary to reset all subscriptions, which ensures that the expansion includes the newly enabled model type.
The following list describes telemetry paths that are not supported in SR OS.
-
If a wildcard is used for any key of a list, a wildcard must be used for all the keys of that list. In a single path segment, all keys must either have specific values, or all keys must have wildcards. A mix of wildcards and specific values for different parts of a list key is not supported.
For example:
Supported:
/a/b[key1=*][key2=*]/c[key1=foo]
/a/b[key1=foo][key2=bar]/c[key1=*]
Not supported:
/a/b[key1=foo][key2=*]
-
Functions such as ‟current()” and ‟last()”, and mathematical operators, such as stat<5 or octets>3 are not supported in paths. The ‟|” (OR operator, used to select multiple paths) is not supported.
gNMI service use cases
The gNMI service can be used for the following:
Telemetry
NE Configuration Management
Telemetry
Telemetry is a network monitoring and fault management framework. Telemetry is driven by the need to use fresh data obtained from the network to make fast networking decisions, such as traffic optimization and preventive troubleshooting.
Dial-in telemetry
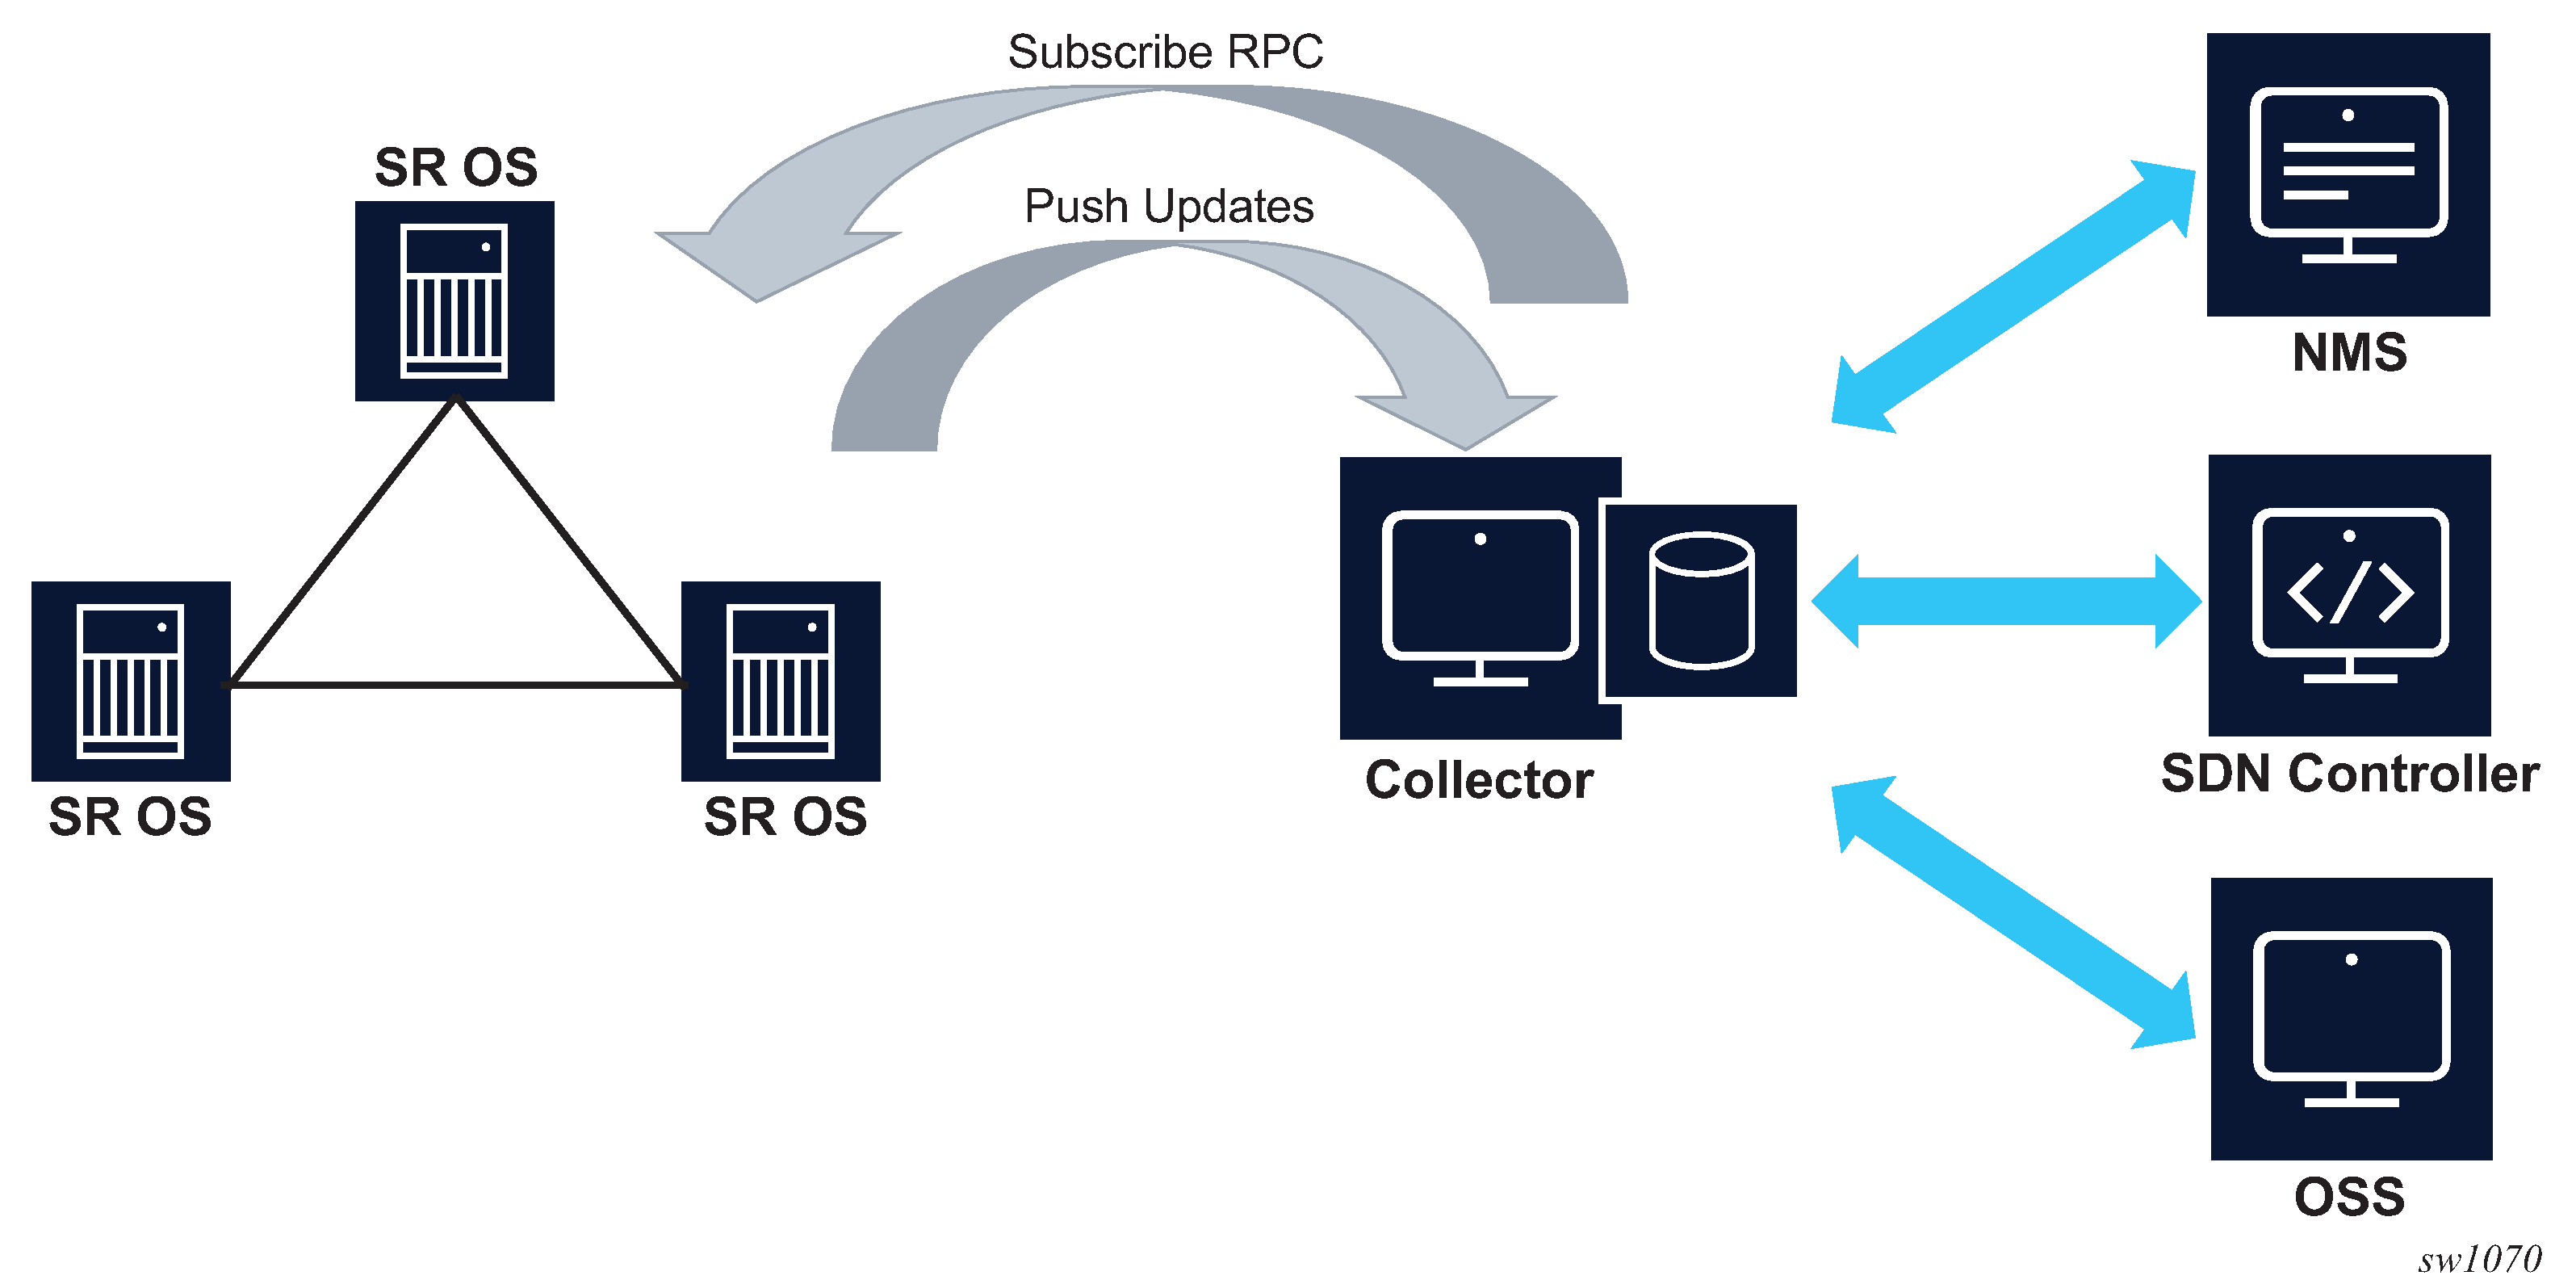
When the data collector initiates the gRPC connection, the SR OS node assumes the role of the gRPC server and the collector is the client. This is referred to as dial-in telemetry, where the SR OS node pushes data to the receiver (collector). The following figure shows the telemetry session initiated from the collector to the SR OS node via the Subscribe RPC.
Authorization checks are not performed by default for telemetry data. All configuration and state elements are available to authenticated telemetry subscriptions, with the exception of LI (Lawful Intercept) configuration and state elements, which are authorized separately based on the LI authorization configuration. Use the following command to control telemetry data authorization:
- MD-CLI
configure system security aaa management-interface output-authorization telemetry-data - classic
CLI
configure system security management-interface output-authorization telemetry-data
Dynamic subscriptions
Dynamic subscriptions are created by the collector using the Subscribe RPC. These subscriptions are removed as soon as the gRPC session terminates. Dynamic subscriptions are currently supported only in dial-in mode.
Dial-in telemetry examples
This section contains examples of telemetry subscription requests and responses. The following examples are dumps of protobuf messages from a Python API. Formats may vary across different implementations.
Subscribe to a single path
2017-06-05 17:06:13,189 - SENT::SubscribeRequest
subscribe {
  subscription {
    path {
      element: "state"
      element: "router[router-instance=Base]"
      element: "interface[interface-name=test]"
      element: "statistics"
      element: "ip"
      element: "in-packets"
    }
    mode: SAMPLE
    sample_interval: 10000000000
  }
}
2017-06-05 17:06:13,190 - RCVD::SubsribeResponse
2017-06-05 17:06:23,492 - RCVD::Subscribe
2017-06-05 17:06:23,492 - update {
  timestamp: 1496675183491595139
  prefix {
    element: "state"
    element: "router[router-instance=Base]"
    element: "interface[interface-name=test]"
    element: "statistics"
    element: "ip"
  }
  update {
    path {
      element: "in-packets"
    }
    val {
      json_val: ‟‟0””
    }
  }
}
2017-06-05 17:06:23,494 - RCVD::Subscribe
2017-06-05 17:06:23,494 - sync_response: true
2017-06-05 17:06:33,589 - RCVD::Subscribe
2017-06-05 17:06:33,589 - update {
  timestamp: 1496675213491595139
  prefix {
    element: "state"
    element: "router[router-instance=Base]"
    element: "interface[interface-name=test]"
    element: "statistics"
    element: "ip"
  }
  update {
    path {
      element: "in-packets"
    }
    val {
      json_val: ‟‟28””
  }
}
...
Subscribe to a single path with wildcard
2017-06-05 17:08:29,055 - SENT::SubscribeRequest
subscribe {
  subscription {
    path {
      element: "state"
      element: "router[router-instance=Base]"
      element: "interface[interface-name=*]"
      element: "statistics"
      element: "ip"
      element: "in-packets"
    }
    mode: SAMPLE
    sample_interval: 30000000000
  }
}
2017-06-05 17:08:29,056 - RCVD::SubsribeResponse
2017-06-05 17:08:59,133 - RCVD::Subscribe
2017-06-05 17:08:59,133 - update {
  timestamp: 1496675339132056575
  prefix {
    element: "state"
    element: "router[router-instance=Base]"
    element: "interface[interface-name=system]"
    element: "statistics"
    element: "ip"
  }
  update {
    path {
      element: "in-packets"
    }
    val {
      json_val: ‟‟0””
    }
  }
}
2017-06-05 17:08:59,135 - RCVD::Subscribe
2017-06-05 17:08:59,135 - update {
  timestamp: 1496675339133006678
  prefix {
    element: "state"
    element: "router[router-instance=Base]"
    element: "interface[interface-name=to_node_B]"
    element: "statistics"
    element: "ip"
  }
  update {
    path {
      element: "in-packets"
    }
    val {
      json_val: ‟‟0””
    }
  }
}
2017-06-05 17:08:59,135 - RCVD::Subscribe
2017-06-05 17:08:59,135 - update {
  timestamp: 1496675339133006678
  prefix {
    element: "state"
    element: "router[router-instance=Base]"
    element: "interface[interface-name=to_node_D]"
    element: "statistics"
    element: "ip"
  }
  update {
    path {
      element: "in-packets"
    }
    val {
      json_val: ‟‟0””
    }
  }
}
2017-06-05 17:08:59,136 - RCVD::Subscribe
2017-06-05 17:08:59,136 - sync_response: true
2017-06-0517:09:29,139 - RCVD::Subscribe
2017-06-0517:09:29,139 - update {
  timestamp: 1496682569121314
  prefix {
    element: "state"
    element: "router[router-instance=Base]"
    element: "interface[interface-name=system]"
    element: "statistics"
    element: "ip"
  }
  update {
    path {
      element: "in-packets"
    }
    val {
      json_val: ‟‟0””
    }
  }
}
2017-06-05 17:09:29,142 - RCVD::Subscribe
2017-06-05 17:09:29,142 - update {
  timestamp: 1496682569124342
  prefix {
    element: "state"
    element: "router[router-instance=Base]"
    element: "interface[interface-name=to_node_B]"
    element: "statistics"
    element: "ip"
  }
  update {
    path {
      element: "in-packets"
    }
    val {
      json_val: ‟‟0””
    }
  }
}
2017-06-05 17:09:29,145 - RCVD::Subscribe
2017-06-05 17:09:29,145 - update {
  timestamp: 1496682569127344
  prefix {
    element: "state"
    element: "router[router-instance=Base]"
    element: "interface[interface-name=to_node_D]"
    element: "statistics"
    element: "ip"
  }
  update {
    path {
      element: "in-packets"
    }
    val {
      json_val: ‟‟0””
    }
  }
}
...
Subscribe to more than one path
2017-01-24 12:54:18,228 - SENT::SubscribeRequest
subscribe {
  subscription {
    path {
      element: "state"
      element: "router[router-instance=Base]"
      element: "interface[interface-name=to_node_B]"
    }
    mode: SAMPLE
    sample_interval: 30000000000
  }
  subscription {
    path {
      element: "state"
      element: "router[router-instance=Base]"
      element: "mpls"
      element: "statistics"
      element: "lsp-egress-stats[lsp-name=lsp_to_dest_f]"
    }
    mode: SAMPLE
    sample_interval: 30000000000
  }
}
Subscribe to a list with wildcard
2017-01-24 13:45:30,947 - SENT::SubscribeRequest
subscribe {
  subscription {
    path {
      element: "state"
      element: "router[router-instance=Base]"
      element: "interface[interface-name=*]"
    }
    mode: SAMPLE
    sample_interval: 30000000000
  }
}
Subscribe to path where the object did not exist before subscription
2017-01-24 13:53:50,165 - SENT::SubscribeRequest
subscribe {
  subscription {
    path {
      element: "state"
      element: "router[router-instance=Base]"
      element: "interface[interface-name=to_node_B]"
    }
    mode: SAMPLE
    sample_interval: 30000000000
  }
}
2017-01-24 13:53:50,166 - RCVD::SubsribeResponse
2017-01-24 13:54:20,169 - RCVD::Subscribe
2017-01-24 13:54:20,169 - sync_response: true
2017-01-24 13:54:50,174 - RCVD::Subscribe
2017-01-24 13:54:50,174 - update {
  timestamp: 1485262490169309451
  prefix {
    element: "state"
    element: "router[router-instance=Base]"
    element: "interface[interface-name=to_node_B]"
  }
  update {
...
  }
}
Subscribe to a path where the object existed before subscription and was then deleted after subscription
2017-01-24 14:00:41,292 - SENT::SubscribeRequest
subscribe {
  subscription {
    path {
      element: "state"
      element: "router[router-instance=Base]"
      element: "interface[interface-name=to_node_B]"
    }
    mode: SAMPLE
    sample_interval: 30000000000
  }
}
2017-01-24 14:00:41,294 - RCVD::SubsribeResponse
2017-01-24 14:01:11,295 - RCVD::Subscribe
2017-01-24 14:01:11,295 - update {
  timestamp: 1485262871290064704
  prefix {
    element: "state"
    element: "router[router-instance=Base]"
    element: "interface[interface-name=to_node_B]"
  }
  update {
...
  }
}
2017-01-24 14:01:11,359 - RCVD::Subscribe
2017-01-24 14:01:11,359 - sync_response: true
2017-01-24 14:01:41,293 - RCVD::Subscribe
2017-01-24 14:02:11,296 - RCVD::Subscribe
Dial-out telemetry
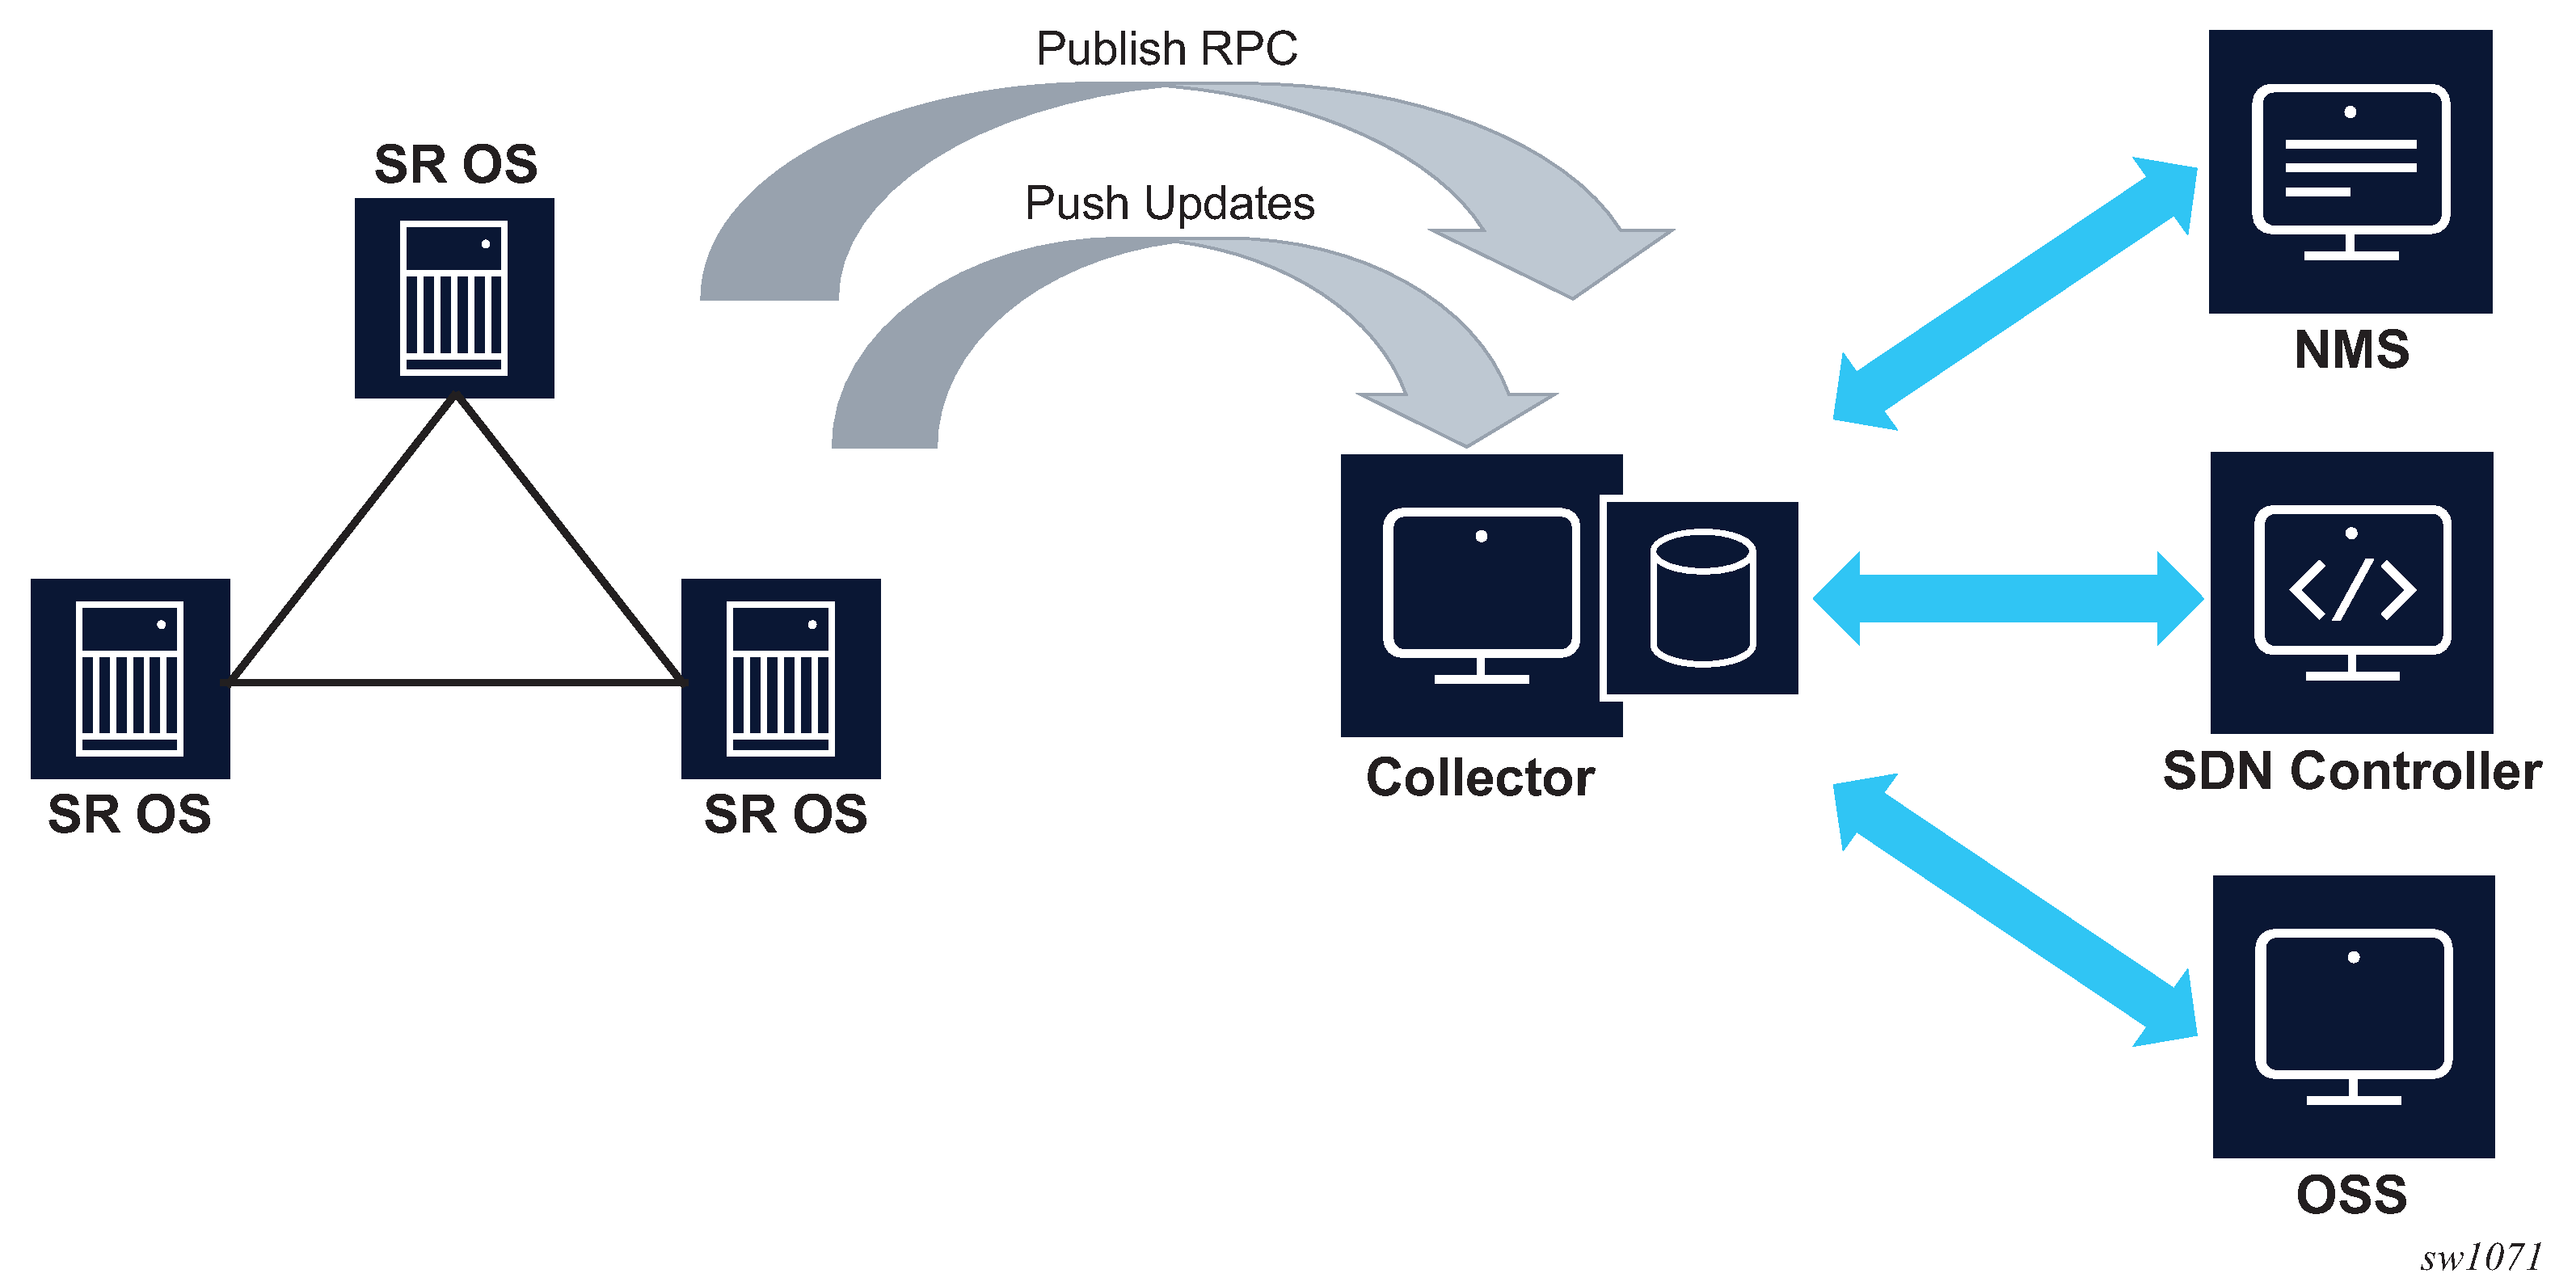
When the SR OS node initiates the gRPC connection, the SR OS node assumes the role of the gRPC client. This is referred to as dial-out telemetry. The following figure shows the telemetry session initiated from the SR OS node to the collector via a Publish RPC.
Persistent subscriptions
Persistent subscriptions are configured on the SR OS node and they are not cleared when the gRPC session terminates. Persistent subscriptions are supported only in dial-out mode.
A persistent subscription associates one or more paths with corresponding destinations via sensor groups and a local user for data authorization.
Every subscription has an associated administrative state as well as an operational state. If a connection is lost, the operational state goes down. If the collector does not receive the data but the SR OS appears to have a connection and the subscription is up, the connection can be reset by setting the administrative state down and then back up.
Destinations are defined in the form of destination groups. A destination group supports up to four destinations, where the destinations are served in a round-robin fashion. SR OS attempts to connect the first destination, and if successful, the telemetry data is sent to that destination. If the connection to the first destination fails (initially or during operation), SR OS attempts to connect or reconnect to the second destination, if it is configured. All configured destinations and local addresses should be reachable in the specified routing instances.
When the SR OS node initiates the gRPC connection via the Publish RPC, it includes the subscription name and the configured system name in the metadata. The collector can use this information to associate individual notification messages with the node and subscription.
Modifying any parameter of the active subscription causes the SR OS node to close the gRPC connection before attempting a reconnection.
When a gRPC connection is lost, the SR OS node continually attempts to establish a new session with the collector.
QoS marking
The QoS marking of the IP packets carrying notifications can be configured under persistent subscription. IP packets to a specified destination are marked according to the configuration of the first subscription opened to the destination. This DSCP marking is maintained, regardless of any configuration changes, as long as the dial-out connection to the specified destination is open. If the destination is disconnected for any reason, the DSCP marking must be redefined when the connection is reestablished.
Configuring dial-out telemetry
The dial-out telemetry configuration process includes the following elements:
- telemetry-default-user
The telemetry default user specifies the local user for output authorization. This local user must have the following permissions:
- Access to gRPC enabled in the user profile
- A local command authorization profile with match and action accept entries to control access to specific subscription paths, or a default-action of permit-all if access to all paths should be permitted
-
sensor group
The sensor group specifies one or more schema paths in XPath format from which data is streamed to the collector.
-
destination group
The destination group specifies the destination addresses (and ports) that the router uses to send the telemetry data.
-
persistent subscription
The persistent subscription associates a sensor group with a destination group and specifies streaming parameters for the telemetry data. For example, the subscription mode can be specified (ON_CHANGE, SAMPLE, or TARGET_DEFINED) for the subscription.
Dial-out telemetry can be configured via the MD-CLI or the classic CLI. For more information about using the MD-CLI, see the 7450 ESS, 7750 SR, and 7950 XRS MD-CLI User Guide. For more information about the MD-CLI configuration commands, see the 7450 ESS, 7750 SR, 7950 XRS, and VSR MD-CLI Command Reference Guide.
For more information about the classic CLI configuration commands, see the 7450 ESS, 7750 SR, 7950 XRS, and VSR Classic CLI Command Reference Guide and the 7450 ESS, 7750 SR, 7950 XRS, and VSR Clear, Monitor, Show, and Tools CLI Command Reference Guide.
The following example shows a dial-out telemetry configuration. The
path must be enclosed in quotation marks (") when it includes a
list key, for example "/state/router[router-name=Base]".
MD-CLI
[ex:/configure system security user-params local-user user "grpc"]
A:admin@node-2# info
    password "$2y$10$f7ZHZbD6BSu/CwX0a8eeo.i3p1NkPiIyHS8c/96j12bg2kce2yle2"
    access {
        grpc true
    }
    console {
        member ["grpc"]
    }

[ex:/configure system security aaa local-profiles profile "grpc"]
A:admin@node-2# info
    default-action deny-all
    entry 5 {
        match "state router interface statistics ip"
        action permit
    }

[ex:/configure system security aaa management-interface output-authorization]
A:admin@node-2# info
    telemetry-default-user "grpc"

[ex:/configure system telemetry]
A:admin@node-2# info
    destination-group "quick_cfg_dg_1" {
        description "Destination Group 1"
        allow-unsecure-connection
        destination 192.168.65.5 port 40001 {
            router-instance "Base"
        }
        destination 192.168.65.5 port 40002 {
            router-instance "Base"
        }
    }
    persistent-subscriptions {
        subscription "quick_cfg_sub_1" {
            admin-state enable
            description "Subscription 1"
            sensor-group "quick_cfg_sg"
            mode sample
            sample-interval 1234
            destination-group "quick_cfg_dg_1"
            local-source-address 192.168.3.4
            originated-qos-marking cp19
            encoding bytes
        }
    }
    sensor-groups {
        sensor-group "quick_cfg_sg" {
            description "Sensor Group"
            path "/state/router[router-name=Base]/interface[interface-name=test]/
statistics/ip" {
            }
        }
    }
classic CLI
A:node-2>config>system>security>user# info
----------------------------------------------
                password "$2y$10$f7ZHZbD6BSu/CwX0a8eeo.i3p1NkPiIyHS8c/96j12bg2kce2yle2"
                access grpc
                console
                    no member "default"
                    member "grpc"
                exit
----------------------------------------------

A:node-2>config>system>security>profile# info
----------------------------------------------
                default-action deny-all
                entry 5
                    match "state router interface statistics ip"
                    action permit
                exit
----------------------------------------------

A:node-2>config>system>security>management-interface>output-authorization# info
----------------------------------------------
                    telemetry-default-user "grpc"
----------------------------------------------

A:node-2>config>system>telemetry# info
----------------------------------------------
            destination-group "quick_cfg_dg_1" create
                description "Destination Group 1"
                allow-unsecure-connection
                tcp-keepalive
                    shutdown
                exit
                destination 192.168.65.6 port 40001 create
                    router-instance "Base"
                exit
                destination 192.168.65.5 port 40002 create
                    router-instance "Base"
                exit
            exit
            sensor-groups
                sensor-group "quick_cfg_sg" create
                    description "Sensor Group"
                    path "/state/router[router-name=Base]/interface[interface-name=test]/statistics/ip" create
                    exit
                exit
            exit
            persistent-subscriptions
                subscription "quick_cfg_sub_1" create
                    description "Subscription 1"
                    destination-group "quick_cfg_dg_1"
                    encoding bytes
                    mode sample
                    sample-interval 1234
                    sensor-group "quick_cfg_sg"
                    local-source-address 192.168.3.4
                    originated-qos-marking "cp19"
                    no shutdown
                exit
            exit
----------------------------------------------
Use the following command to show the telemetry persistent subscription for "quick_cfg_sub_2".
show system telemetry persistent subscription "quick_cfg_sub_2"===============================================================================
Telemetry persistent subscription
===============================================================================
Subscription Name : quick_cfg_sub_2
Administrative State : Enabled
Operational State : Up
Subscription Id : 198
Description :
Sensor Group : quick_cfg_sg_2
Destination Group : quick_cfg_dg_2
Path Mode : sample
Sample Interval : 1000 ms
Encoding : bytes
===============================================================================
Use the following command to show the telemetry persistent subscription paths for "quick_cfg_sub_2".
show system telemetry persistent subscription "quick_cfg_sub_2" paths===============================================================================
Telemetry persistent subscriptionrsistent# subscription "quick_cfg_sub_2" paths
===============================================================================
Subscription Name : quick_cfg_sub_1nt# subscription "quick_cfg_sub_2" paths
Administrative State : Enabled
Operational State : Up
Subscription Id : 198
Description :
Sensor Group : quick_cfg_sg_2
Destination Group : quick_cfg_dg_2
Path Mode : sample
Sample Interval : 1000 ms
Encoding : bytes
-------------------------------------------------------------------------------
Paths
-------------------------------------------------------------------------------
Path : /state
Finished Samples : 178
Deferred Samples : 402
Total Collection Time : 405223 ms
Min Collection Time : 2021 ms
Avg Collection Time : 2276 ms
Max Collection Time : 2956 ms
-------------------------------------------------------------------------------
No. of paths : 1
===============================================================================Use the following command to show the telemetry persistent subscription destinations for "quick_cfg_sub_2".
show system telemetry persistent subscription "quick_cfg_sub_2" destinations===============================================================================
Telemetry persistent subscription
===============================================================================
Subscription Name : quick_cfg_sub_2
Administrative State : Enabled
Operational State : Up
Subscription Id : 198
Description :
Sensor Group : quick_cfg_sg_2
Destination Group : quick_cfg_dg_2
Path Mode : sample
Sample Interval : 1000 ms
Encoding : bytes
-------------------------------------------------------------------------------
Destinations
-------------------------------------------------------------------------------
Destination : 192.168.65.1
Port : 40001
Operational State : Down
Last Oper Down Reason : MINOR: TELEMETRY #2353: RPC refused by peer
Last Oper Change : 2020/04/06 21:19:29
Connection Attempts : 22
Notification Count : 0
Total Notification Co*: 2315653
-------------------------------------------------------------------------------
Destination : 192.168.65.1
Port : 40002
Operational State : Up
Last Oper Down Reason : MINOR: TELEMETRY #2356: Canceled by config change
Oper Router Instance : management
Last Oper Change : 2020/04/06 21:19:30
Connection Attempts : 22
Notification Count : 3783151
Total Notification Co*: 5034573
-------------------------------------------------------------------------------
No. of destinations : 2
* indicates that the corresponding row element may have been truncated.
===============================================================================
Configuration management via NMS
The following figure shows NMS configuration and information retrieval using the gNMI service.
In the context of gNMI, every Set RPC appears as an single commit operation, regardless of the number of paths included in the message. Nokia and OpenConfig models are supported by gNMI Get or Set RPCs.
The following are examples of the Get RPC and Set RPC commands, including the response messages from the gRPC server.
Get RPC command
gNMI_rpc - INFO - SENT::GetRequest GET140550212650064
path {
  elem {
    name: "configure"
  }
  elem {
    name: "system"
  }
  elem {
    name: "location"
  }
}
type: CONFIG
2017-12-06 12:17:28,639 - gMI_rpc - INFO -
 RCVD::GetResponse GET140550212650064
notification {
  timestamp: 1512559048634751055
  update {
  path {
    elem {
      name: "configure"
    }
    elem {
      name: "system"
    }
    elem {
      name: "location"
    }
  }
  val {
    json_val: "zurich"
  }
 }
}
Set RPC command
 gNMI_rpc - DEBUG - SENT::SetRequest
prefix {
}
update {
  path {
    elem {
      name: "configure"
    }
    elem {
      name: "system"
    }
 }
 val {
   json_val: {"location": "zurich"}
 }
}
gMI_rpc - DEBUG - RCVD::SetResponse
prefix {
}
response {
  path {
    elem {
      name: "configure"
    }
    elem {
      name: "system"
    }
  }
  op: UPDATE
}
gNOI services
The gRPC Network Operations Interface (gNOI) defines a set of gRPC-based micro-services for executing operational commands on network devices. This includes the gNOI CERT service, which provides certificate management. The individual RPCs and messages that perform the operations required for certificate management on the node are defined in the Git repository hosting service (GitHub).
Certificate management for TLS connections
This section describes the gNOI services certificates for managing secure Transport Layer Security (TLS) connections.
The SR OS supports the following RPCs for managing certificates for secure TLS connections:
RPC GetCertificates
RPC CanGenerateCSR
RPC Rotate
RPC Install
RPC RevokeCertificates
RPC GetCertificates
RPC GetCertificates provide information to the controller about all active certificates on the server (SR OS node). The following figure shows the message flow.
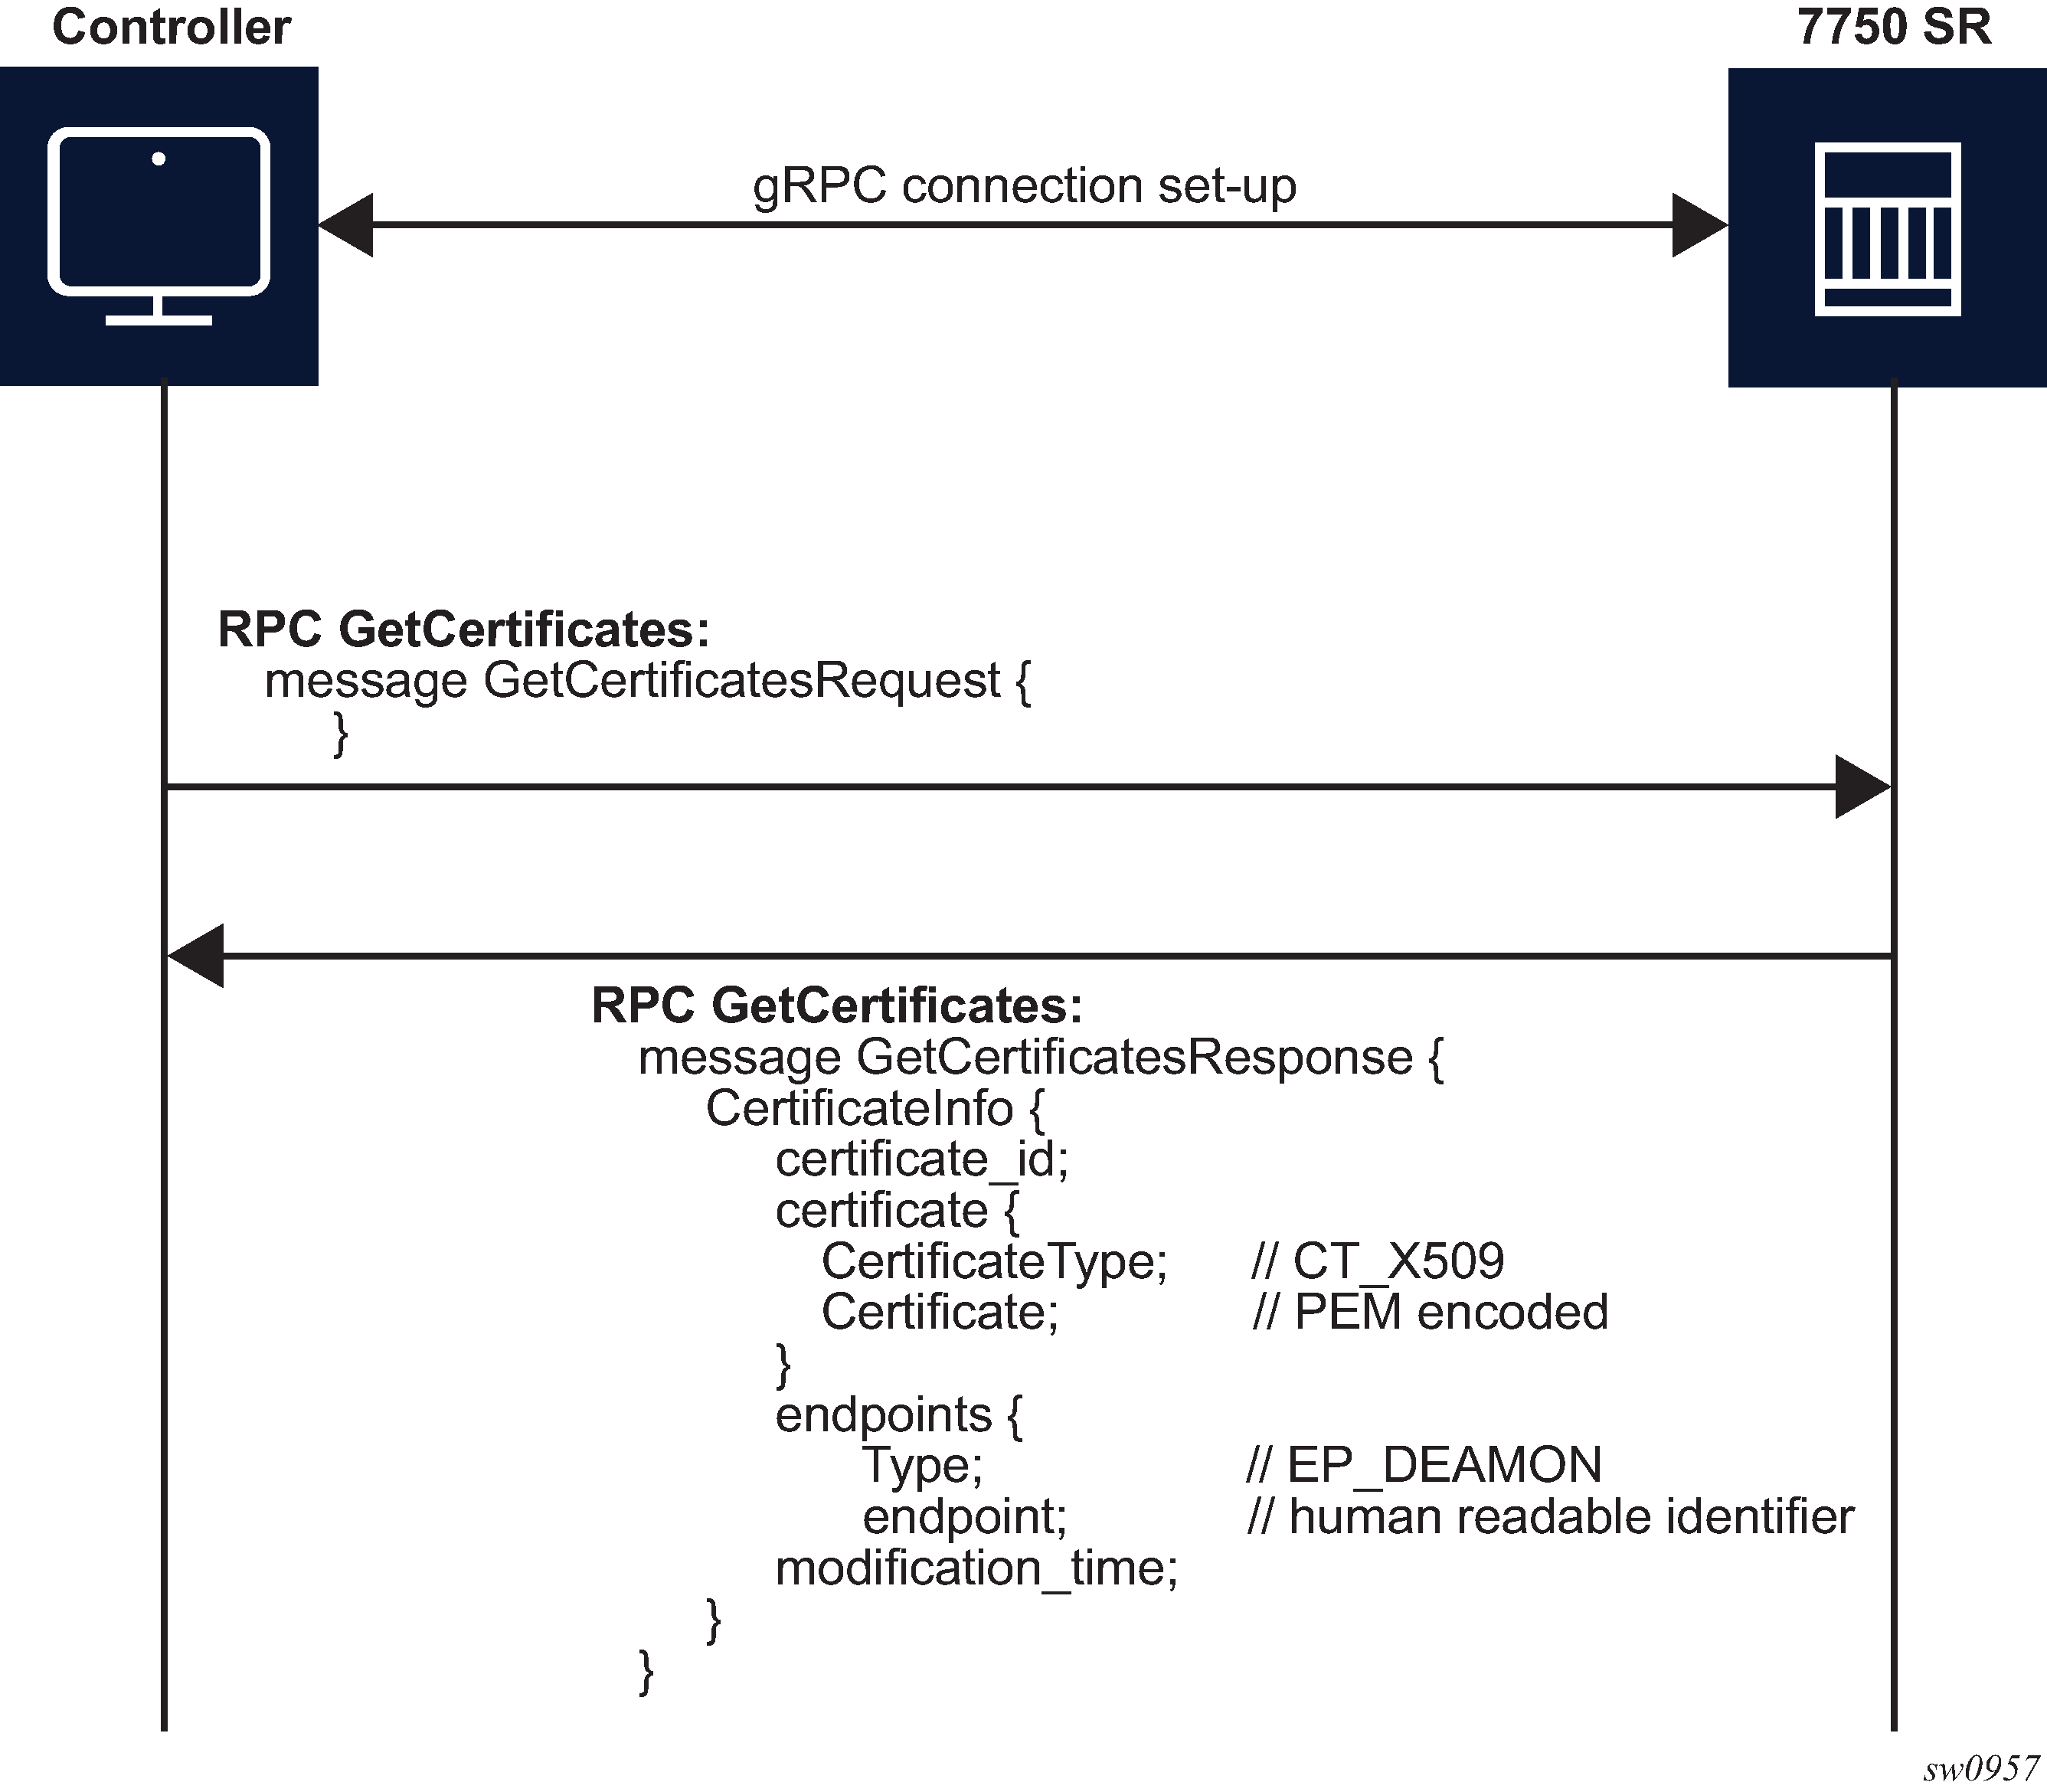
The RPC GetCertificates messages include a GetCertificateRequest and a GetCertificateResponse message. The GetCertificatesResponse message shown in the preceding figure includes the following information:
certificate_id
The SR OS uses a certificate filename as the certificate ID.
CertificateType
This is always set to X509 because it is the only type that the SR OS supports.
endpoint
Indicates the CERT profiles in the SR OS node that use this certificate; if multiple CERT profiles use the certificate, the names are concatenated with the separation character ‟/”.
RPC CanGenerateCSR
The RPC CanGenerateCSR message can be used to determine whether the gRPC server (SR OS node) can generate a Certificate Signing Request (CSR). It is a simple request and response operation, as shown in the following figure.
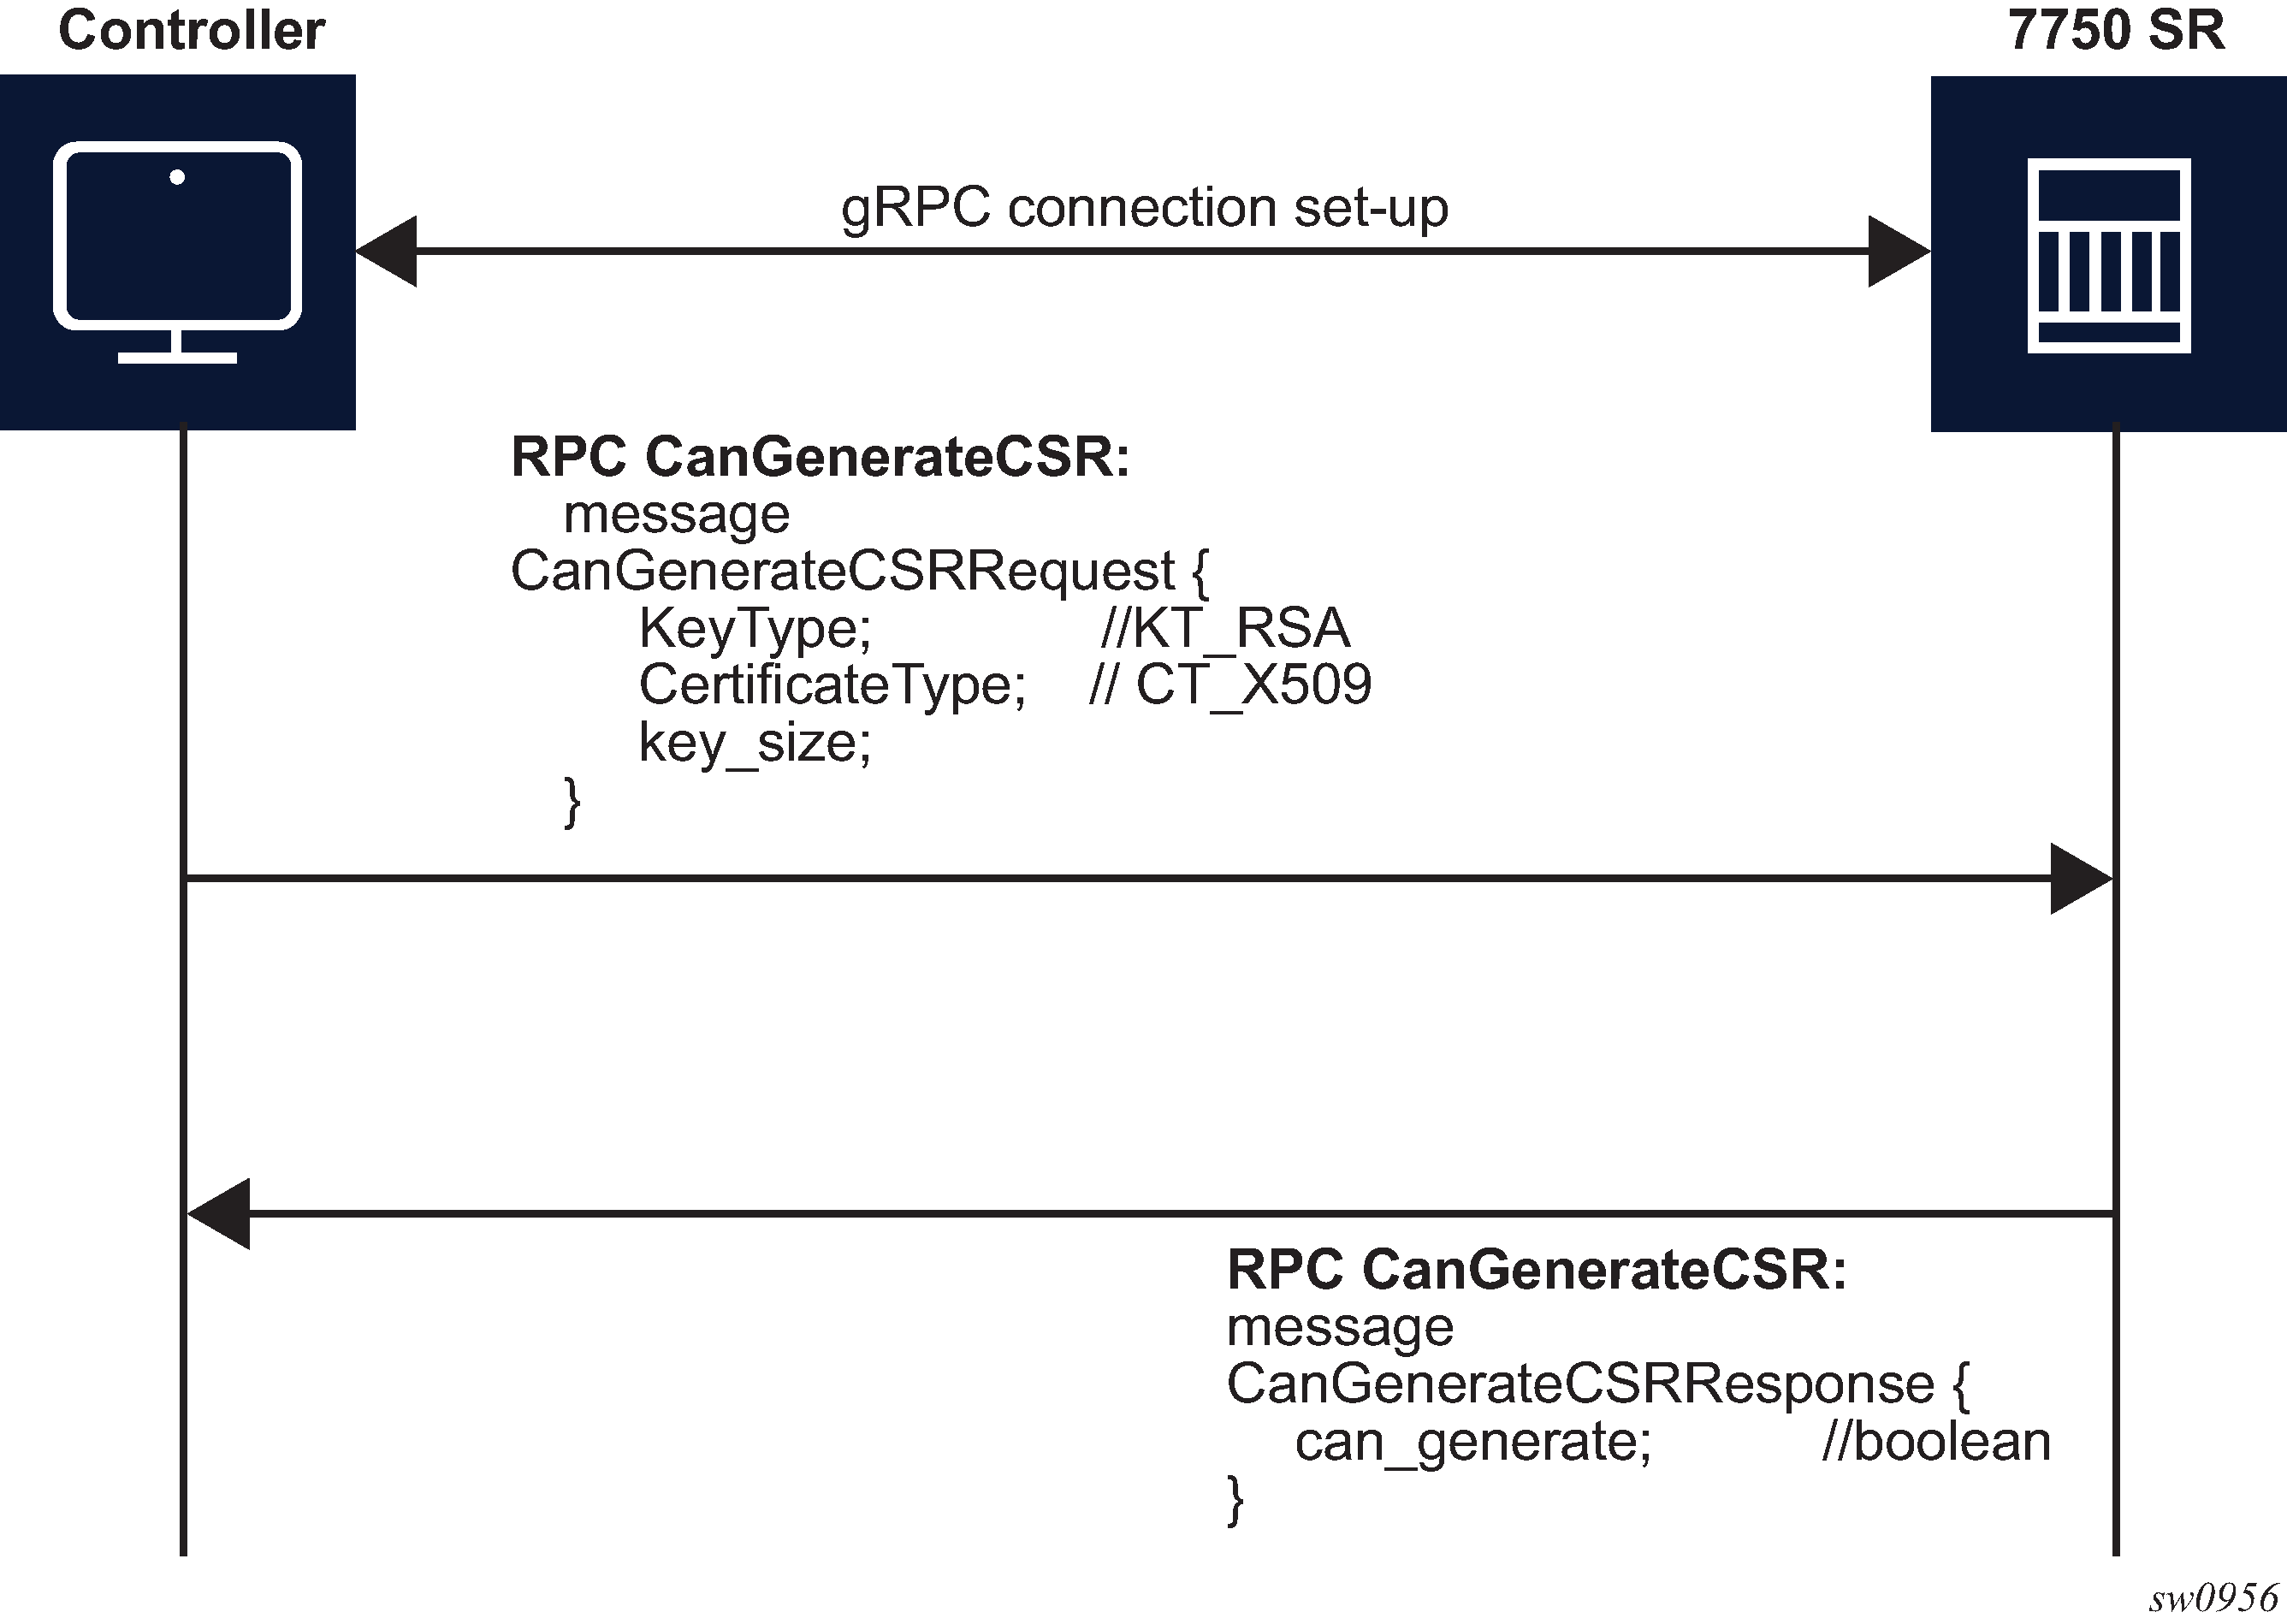
The SR OS supports only RSA keys and X509 certificates, so it responds positively only when those values are present in the respective fields. The key size must be between 512 and 8192. In all other cases, the SR OS responds negatively to the CanGenerateCSRRequest message.
RPC Rotate
RPC Rotate allows the controller to rotate an active certificate on the server. After the rotation is completed, a new certificate can be used without affecting existing TLS connections.
The following cases are supported for a certificate rotation:
-
server capable of generating a CSR (see RPC Rotate message flow for CSRs generated on the SR OS node)
-
server not capable of generating a CSR (see RPC Rotate message flow when CSRs are not generated on the SR OS node)
The SR OS supports both scenarios, although it is assumed that in most cases the CSR is generated on SR OS node.
The following steps apply to both scenarios:
Generate the CSR.
Sign the CSR by the Certificate Authority (CA).
Load the new certificate on the server.
Verify the new certificate by creating a new connection.
Finalize by confirming that the new certificate is being used.
After the RPC Rotate is completed, all new connections use new keys.
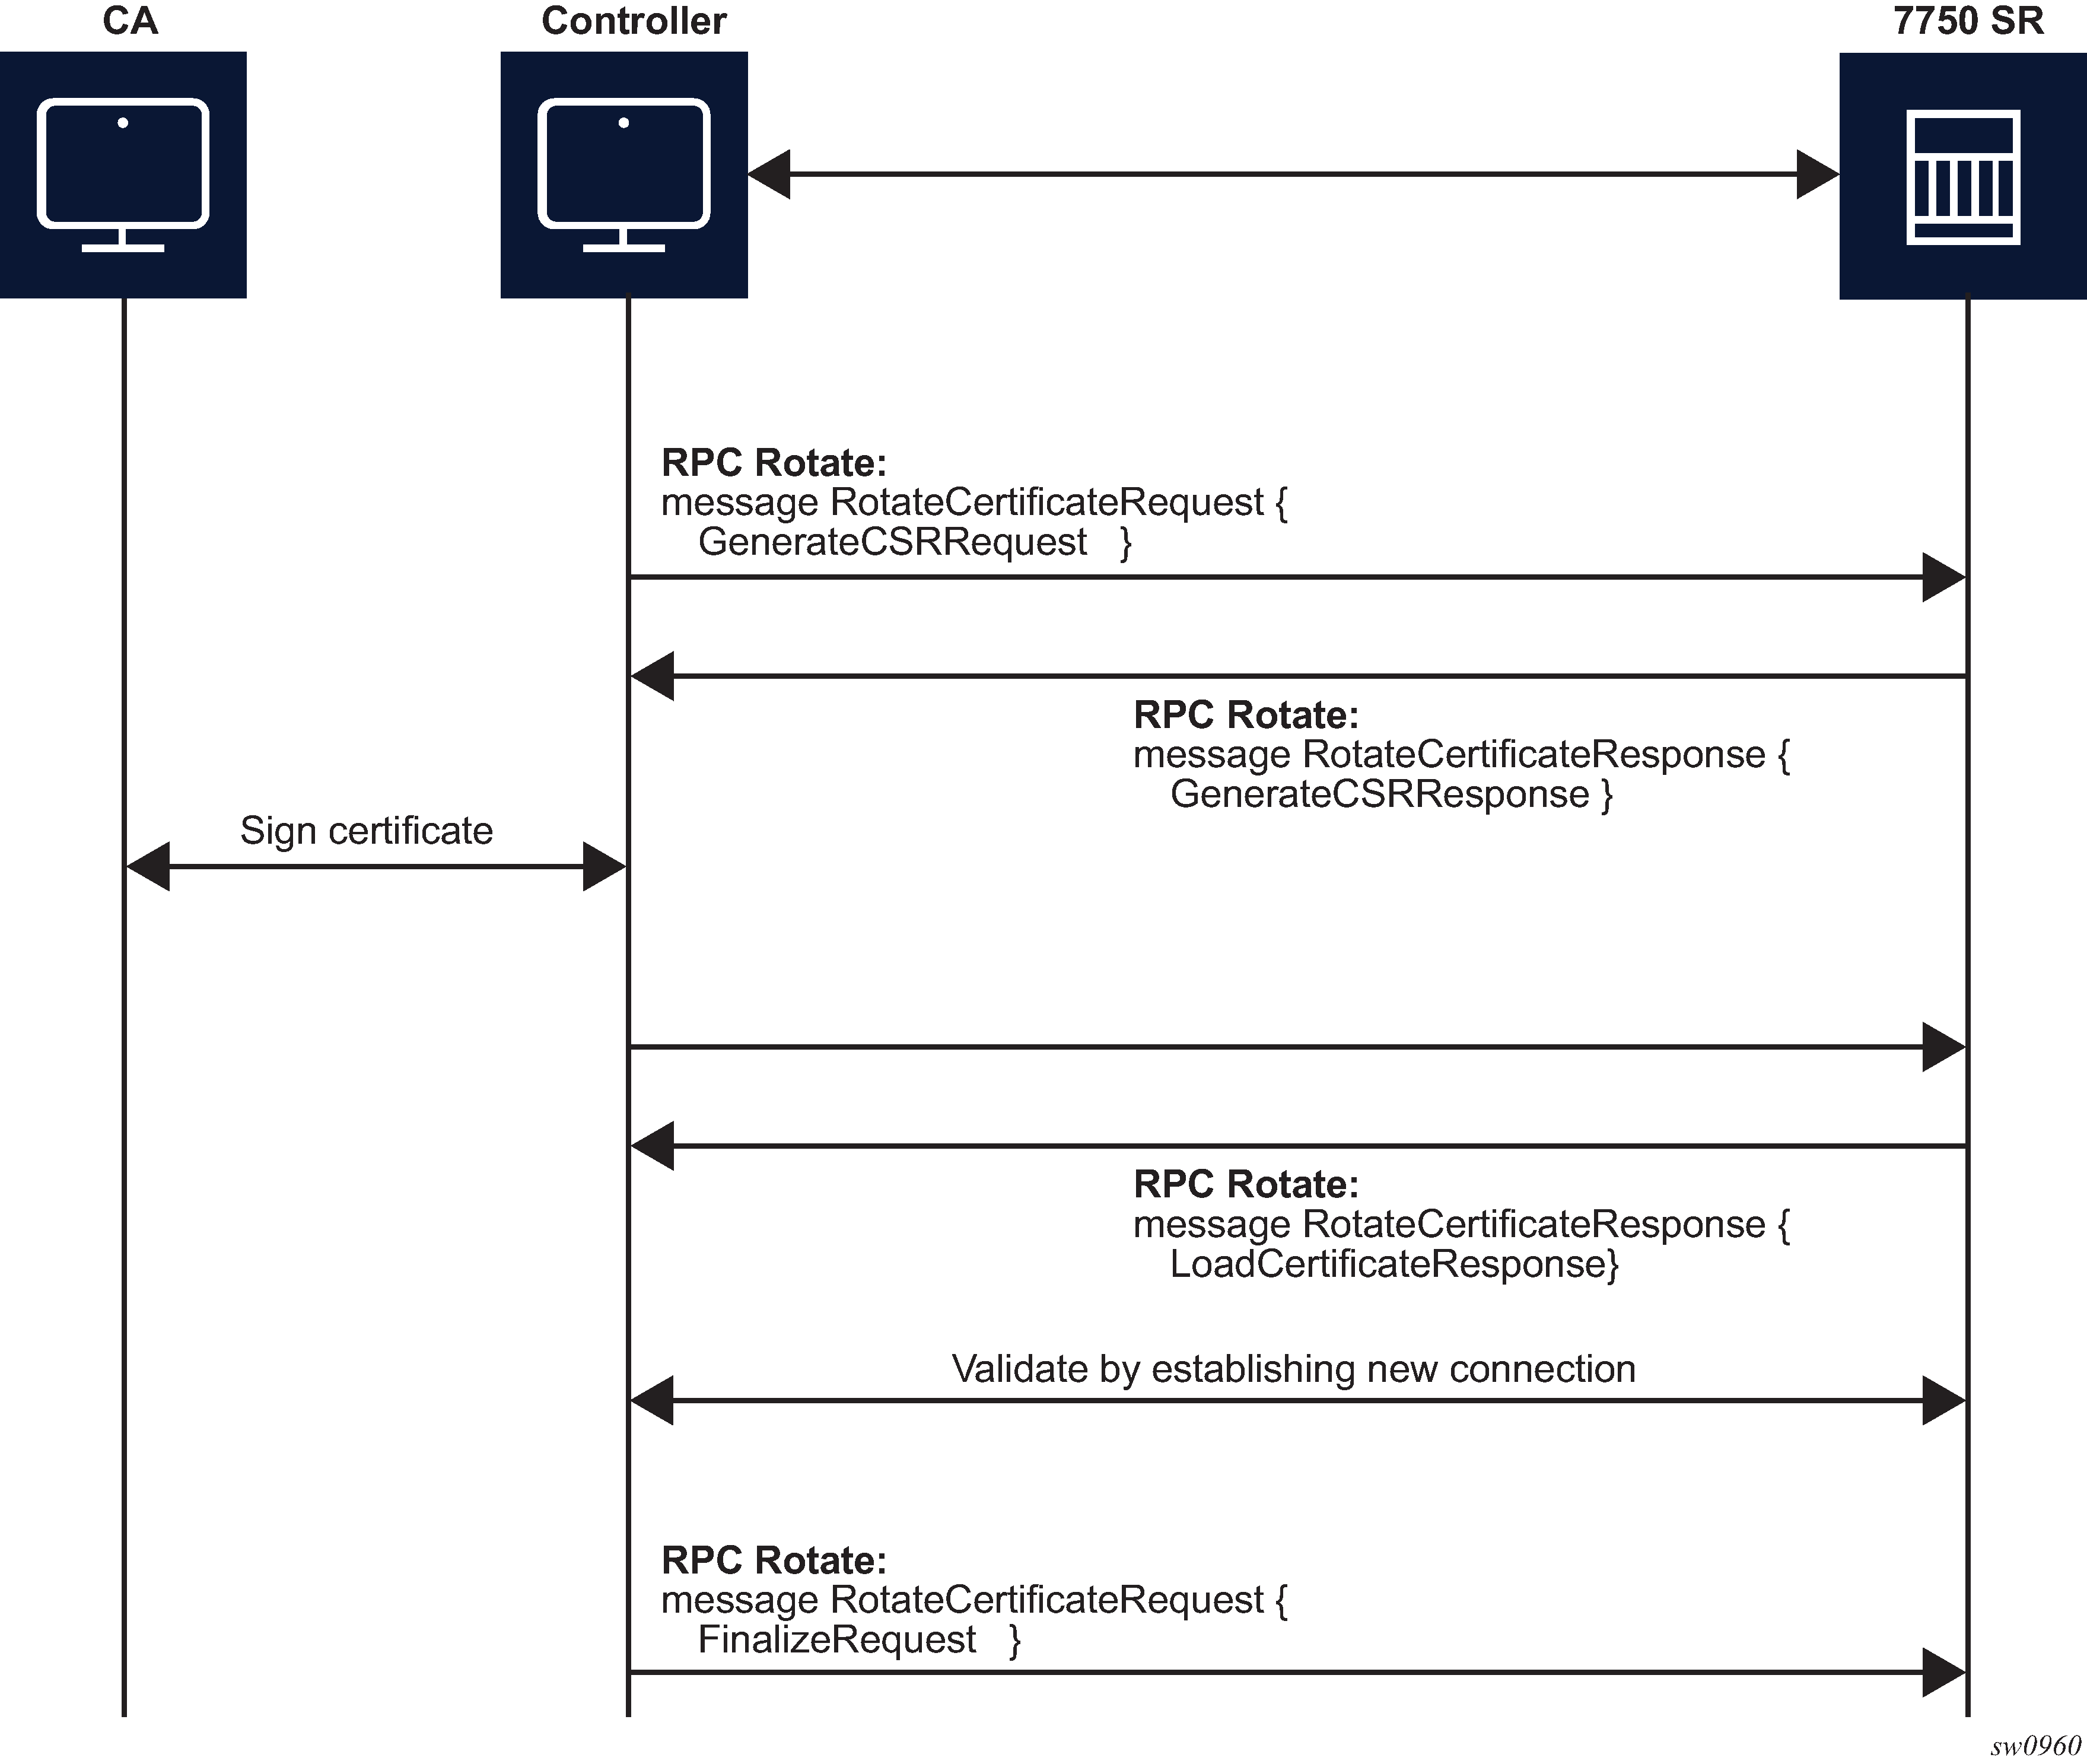
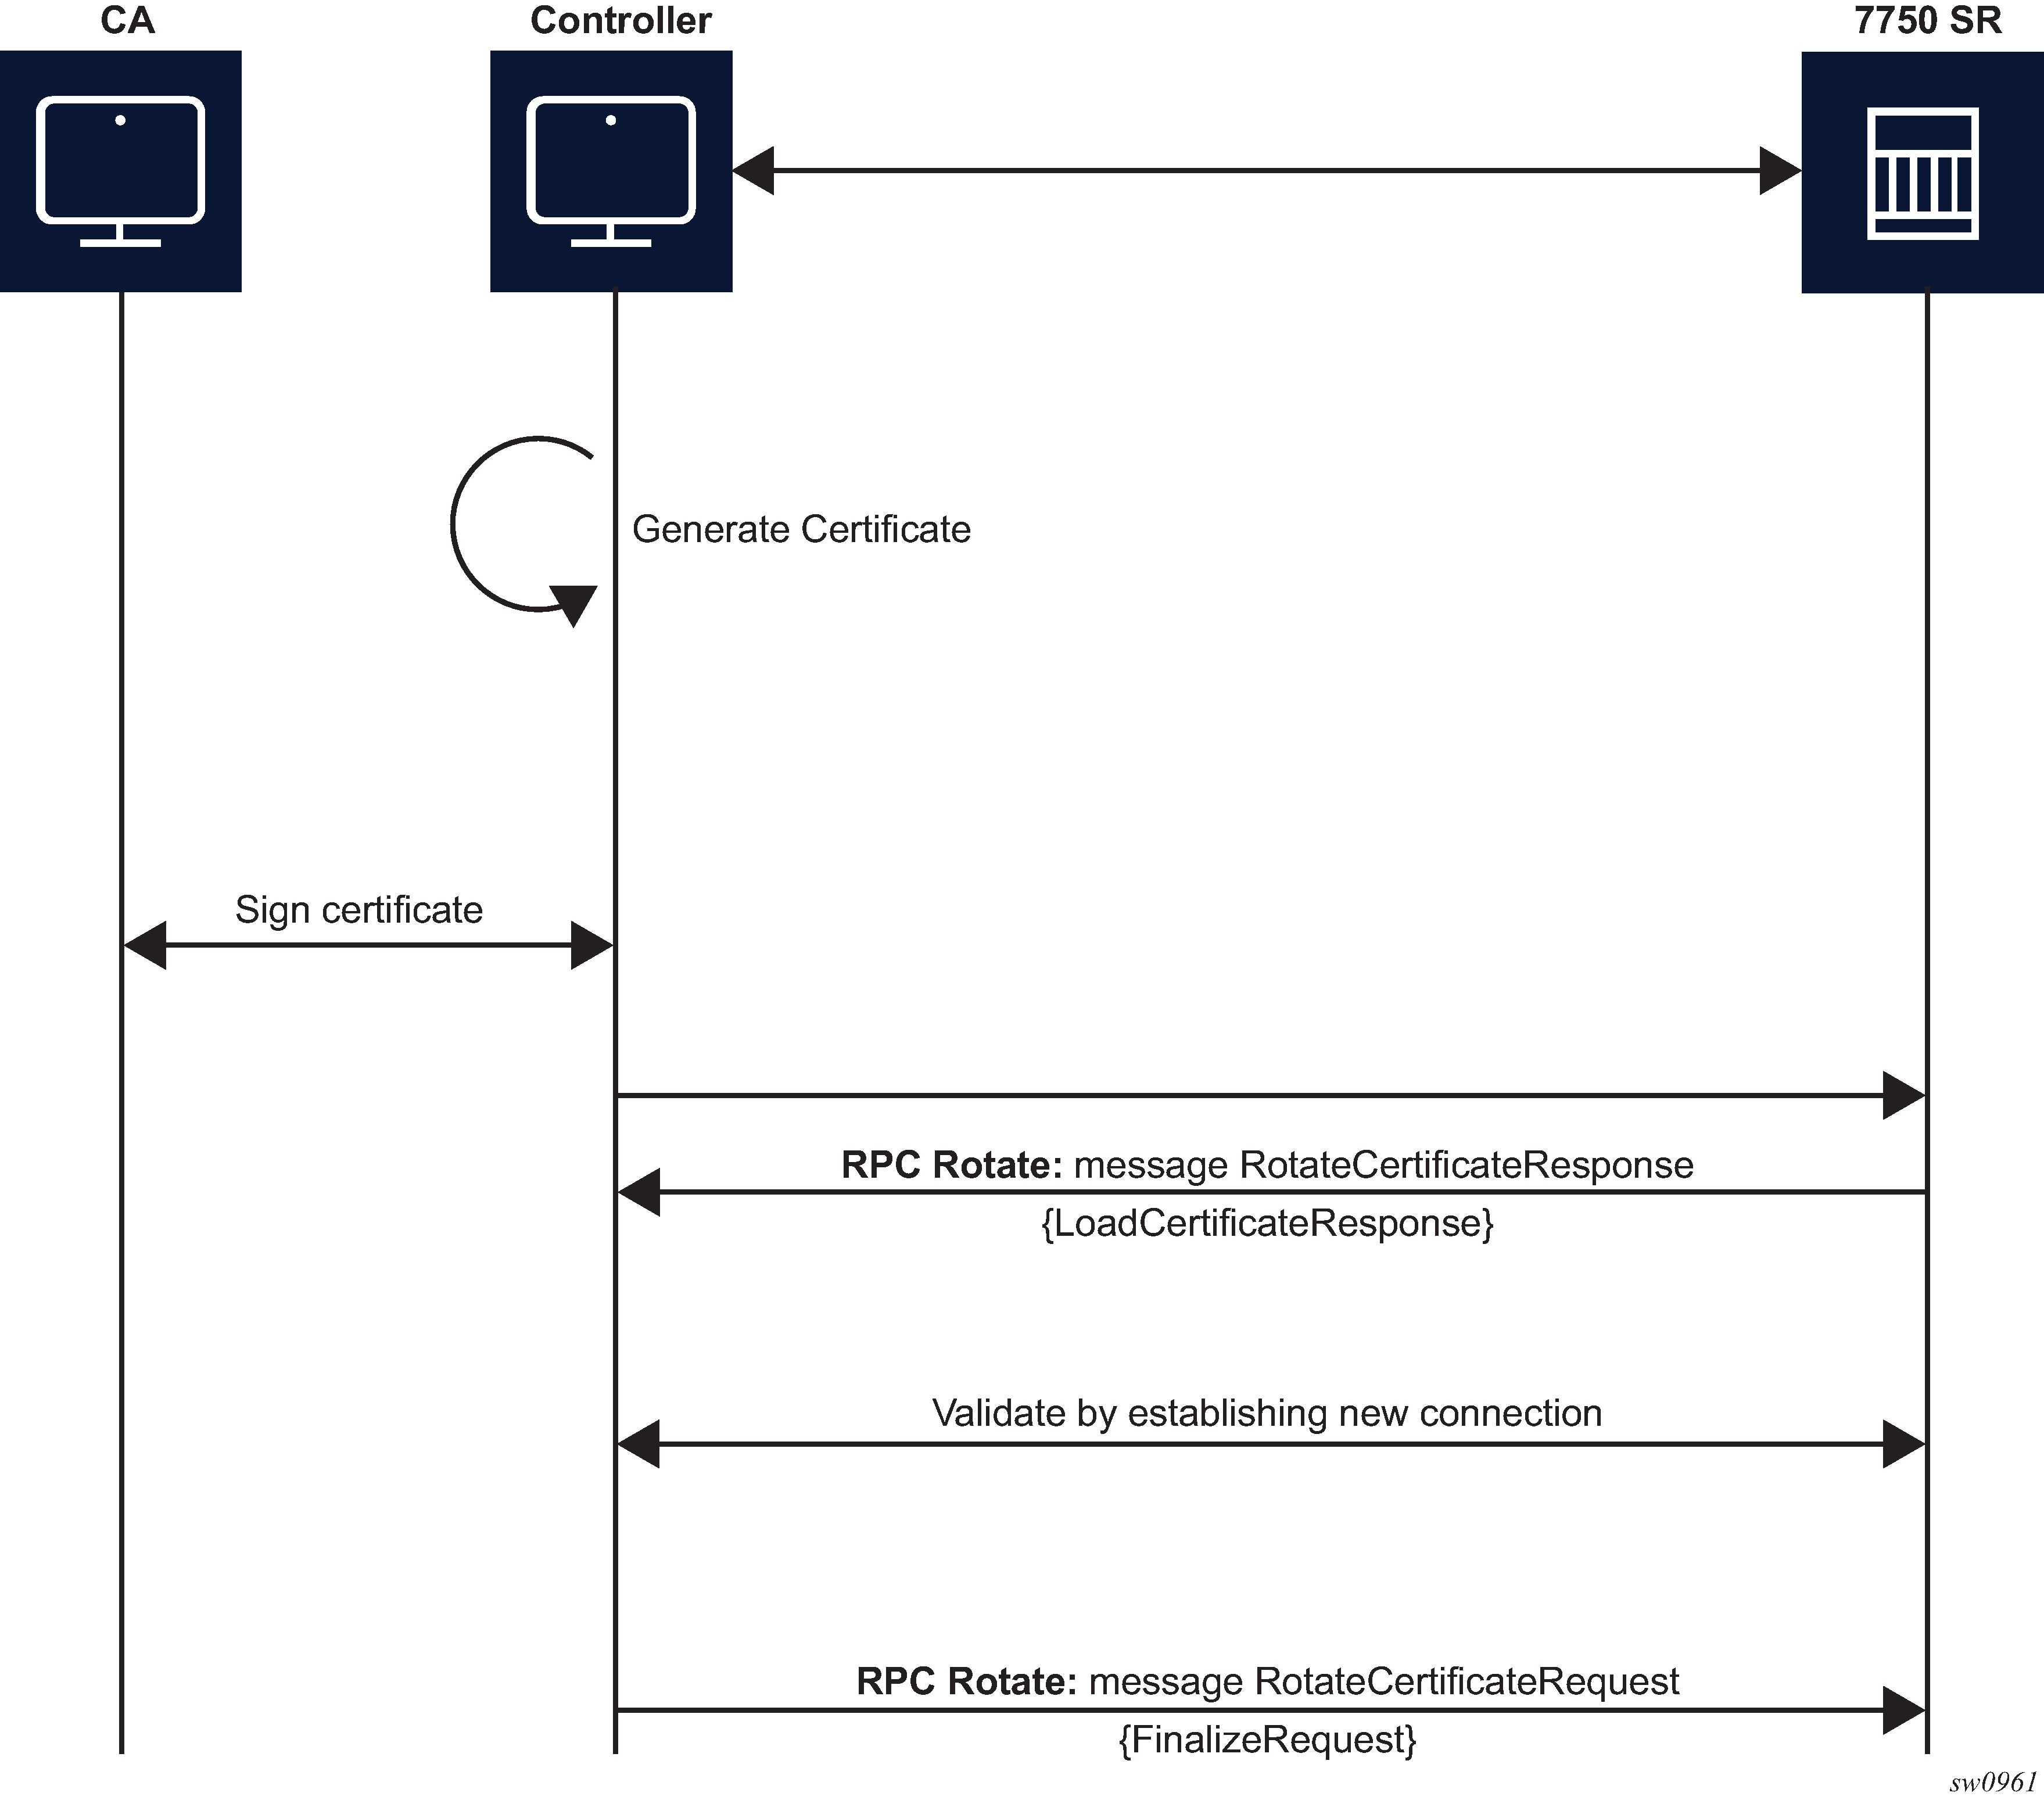
From the perspective of the interaction of the controller and the server (SR OS) two stages are the most important:
message exchange to generate the CSR
message exchange to load the new certificates on the server
The following figure shows a detailed content of the messages that are exchanged for CSR generation. The SR OS accepts requests only for the X509 certificate type, RSA key type, and a minimum key length of 512 bits.
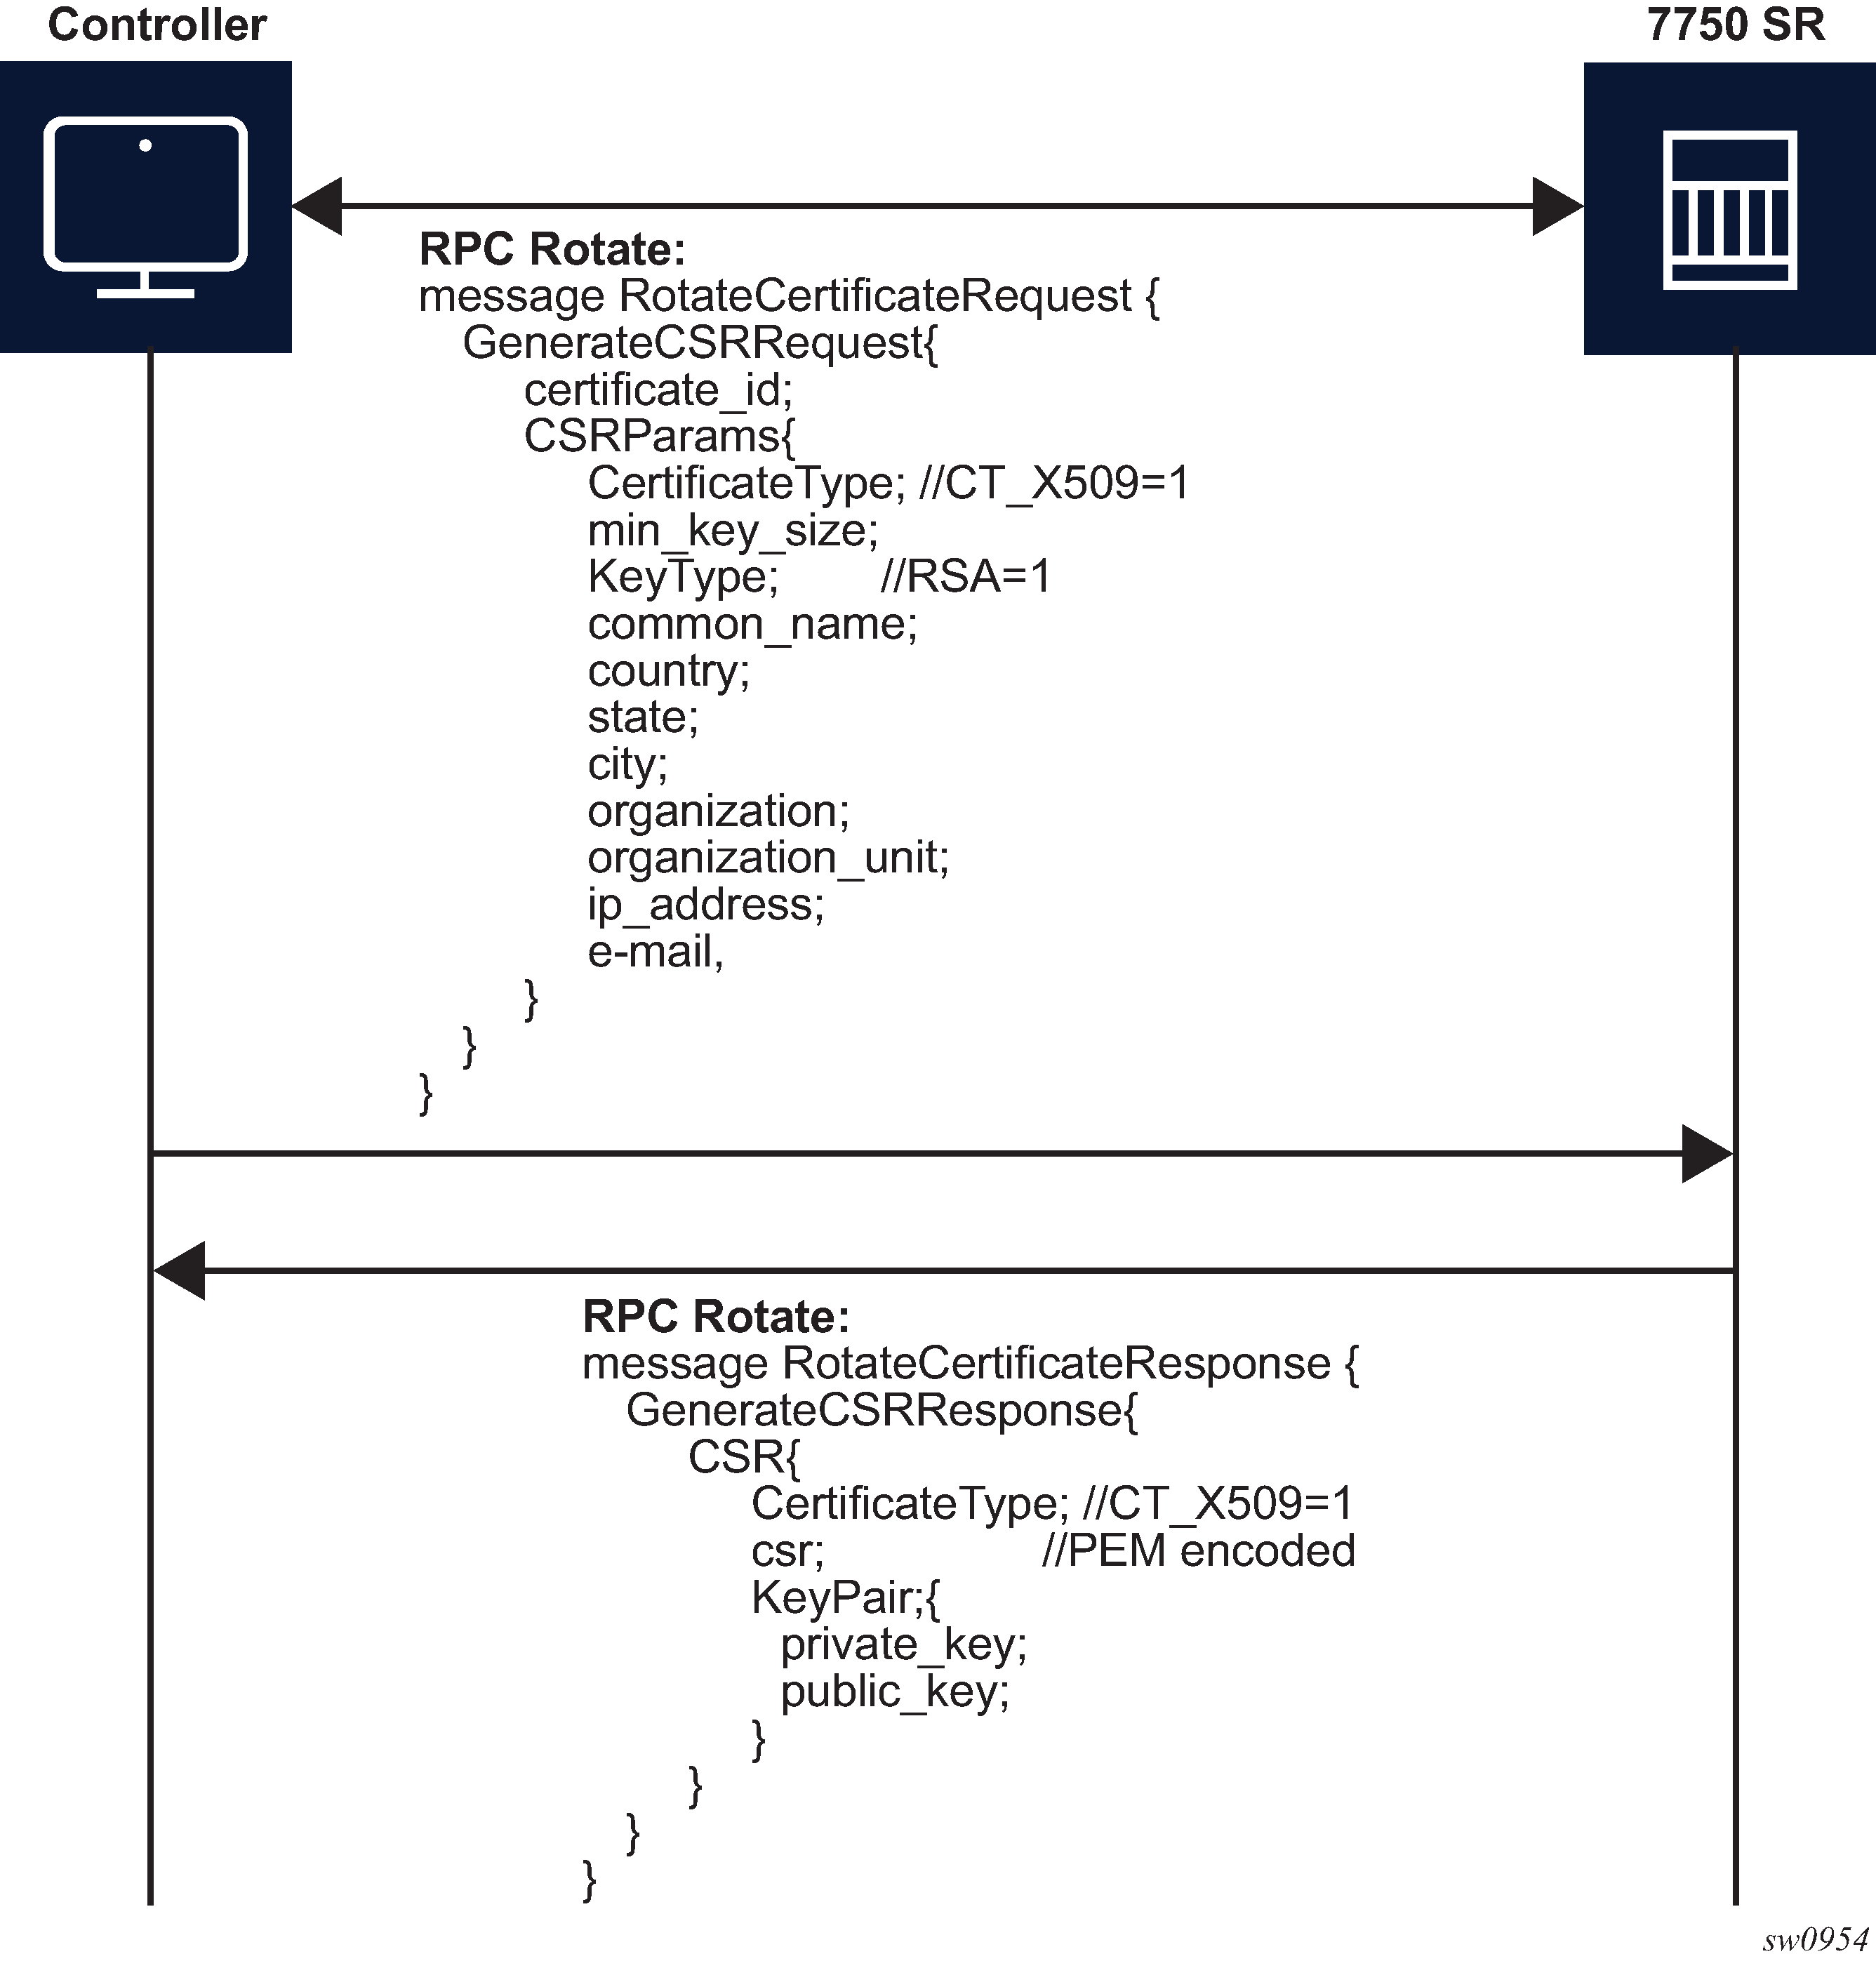
For RPC Rotate, the certificate_id points to an existing certificate on the node. All the other parameters in the GenerateCSRRequest message are not checked by the SR OS software explicitly. They are used by the internal API to generate the CSR and that result is transparently passed to the controller.
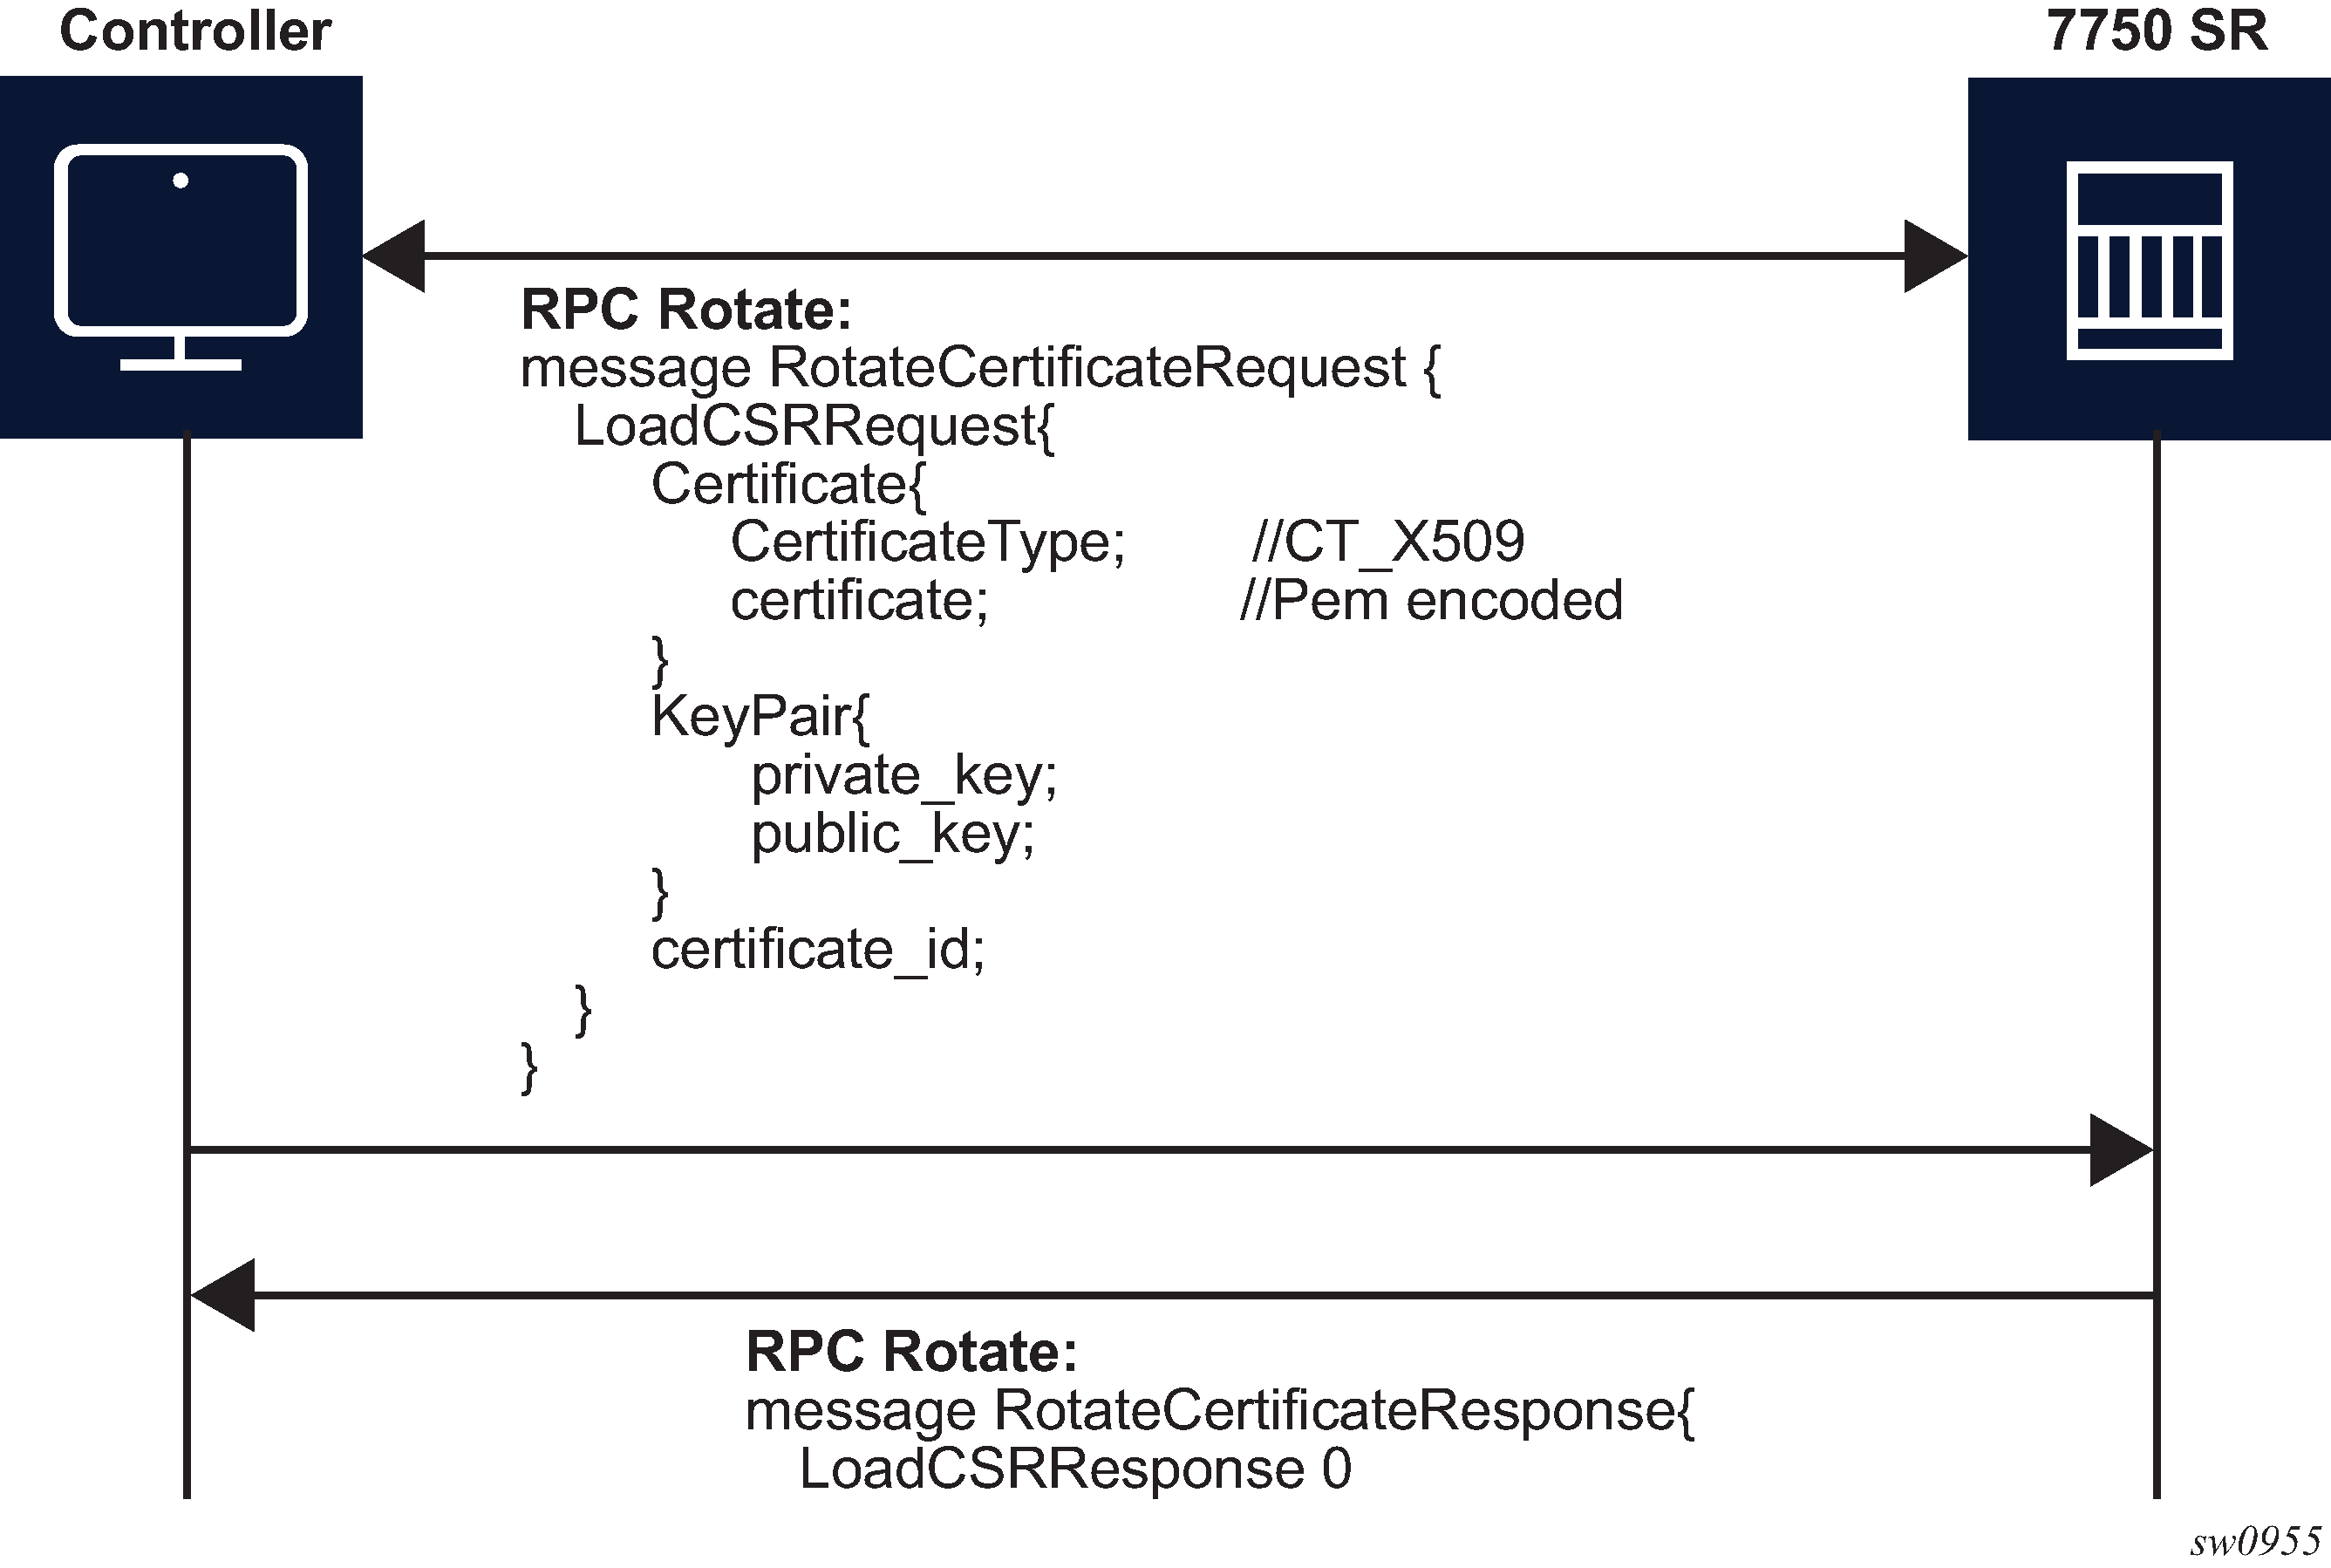
After the CA signs the certificates, the files are loaded to the server using LoadCSRRequest and LoadCSRResponse message exchange, as shown in the following figure. If this message exchange is used in the context of RPC Rotate, the certificate_id should not be present in LoadCSRRequest message. When the SR OS receives the message, it performs all the necessary steps to load this certificate, including storing the certificate and key files on the disk.
The controller is responsible for verifying the connection with the new certificate (Step 4 in RPC Rotate message flow for CSRs generated on the SR OS node and RPC Rotate message flow when CSRs are not generated on the SR OS node); SR OS treats this as an optional step.
After the whole RPC is successfully closed, the system can use the new certificate to start new TLS connections.
RPC Install
The controller can use RPC Install to install a new certificate on the server. After the certificate is installed, the server must be configured (assign a certificate and key files in the CERT profile) before the new certificate can be used.
The following two possible cases are supported for installing a certificate:
-
server capable of generating a CSR (see RPC install message flow for CSRs generated on the SR OS node)
-
server is not capable of generating a CSR (see RPC install message flow if CSRs are not generated on the SR OS node)
The SR OS supports both scenarios, although it is assumed that in most cases the CSR is generated on the SR OS node.
Both scenarios require the following steps:
Generate the CSR.
Sign the CSR by the Certificate Authority (CA).
Load the new certificate on the server.
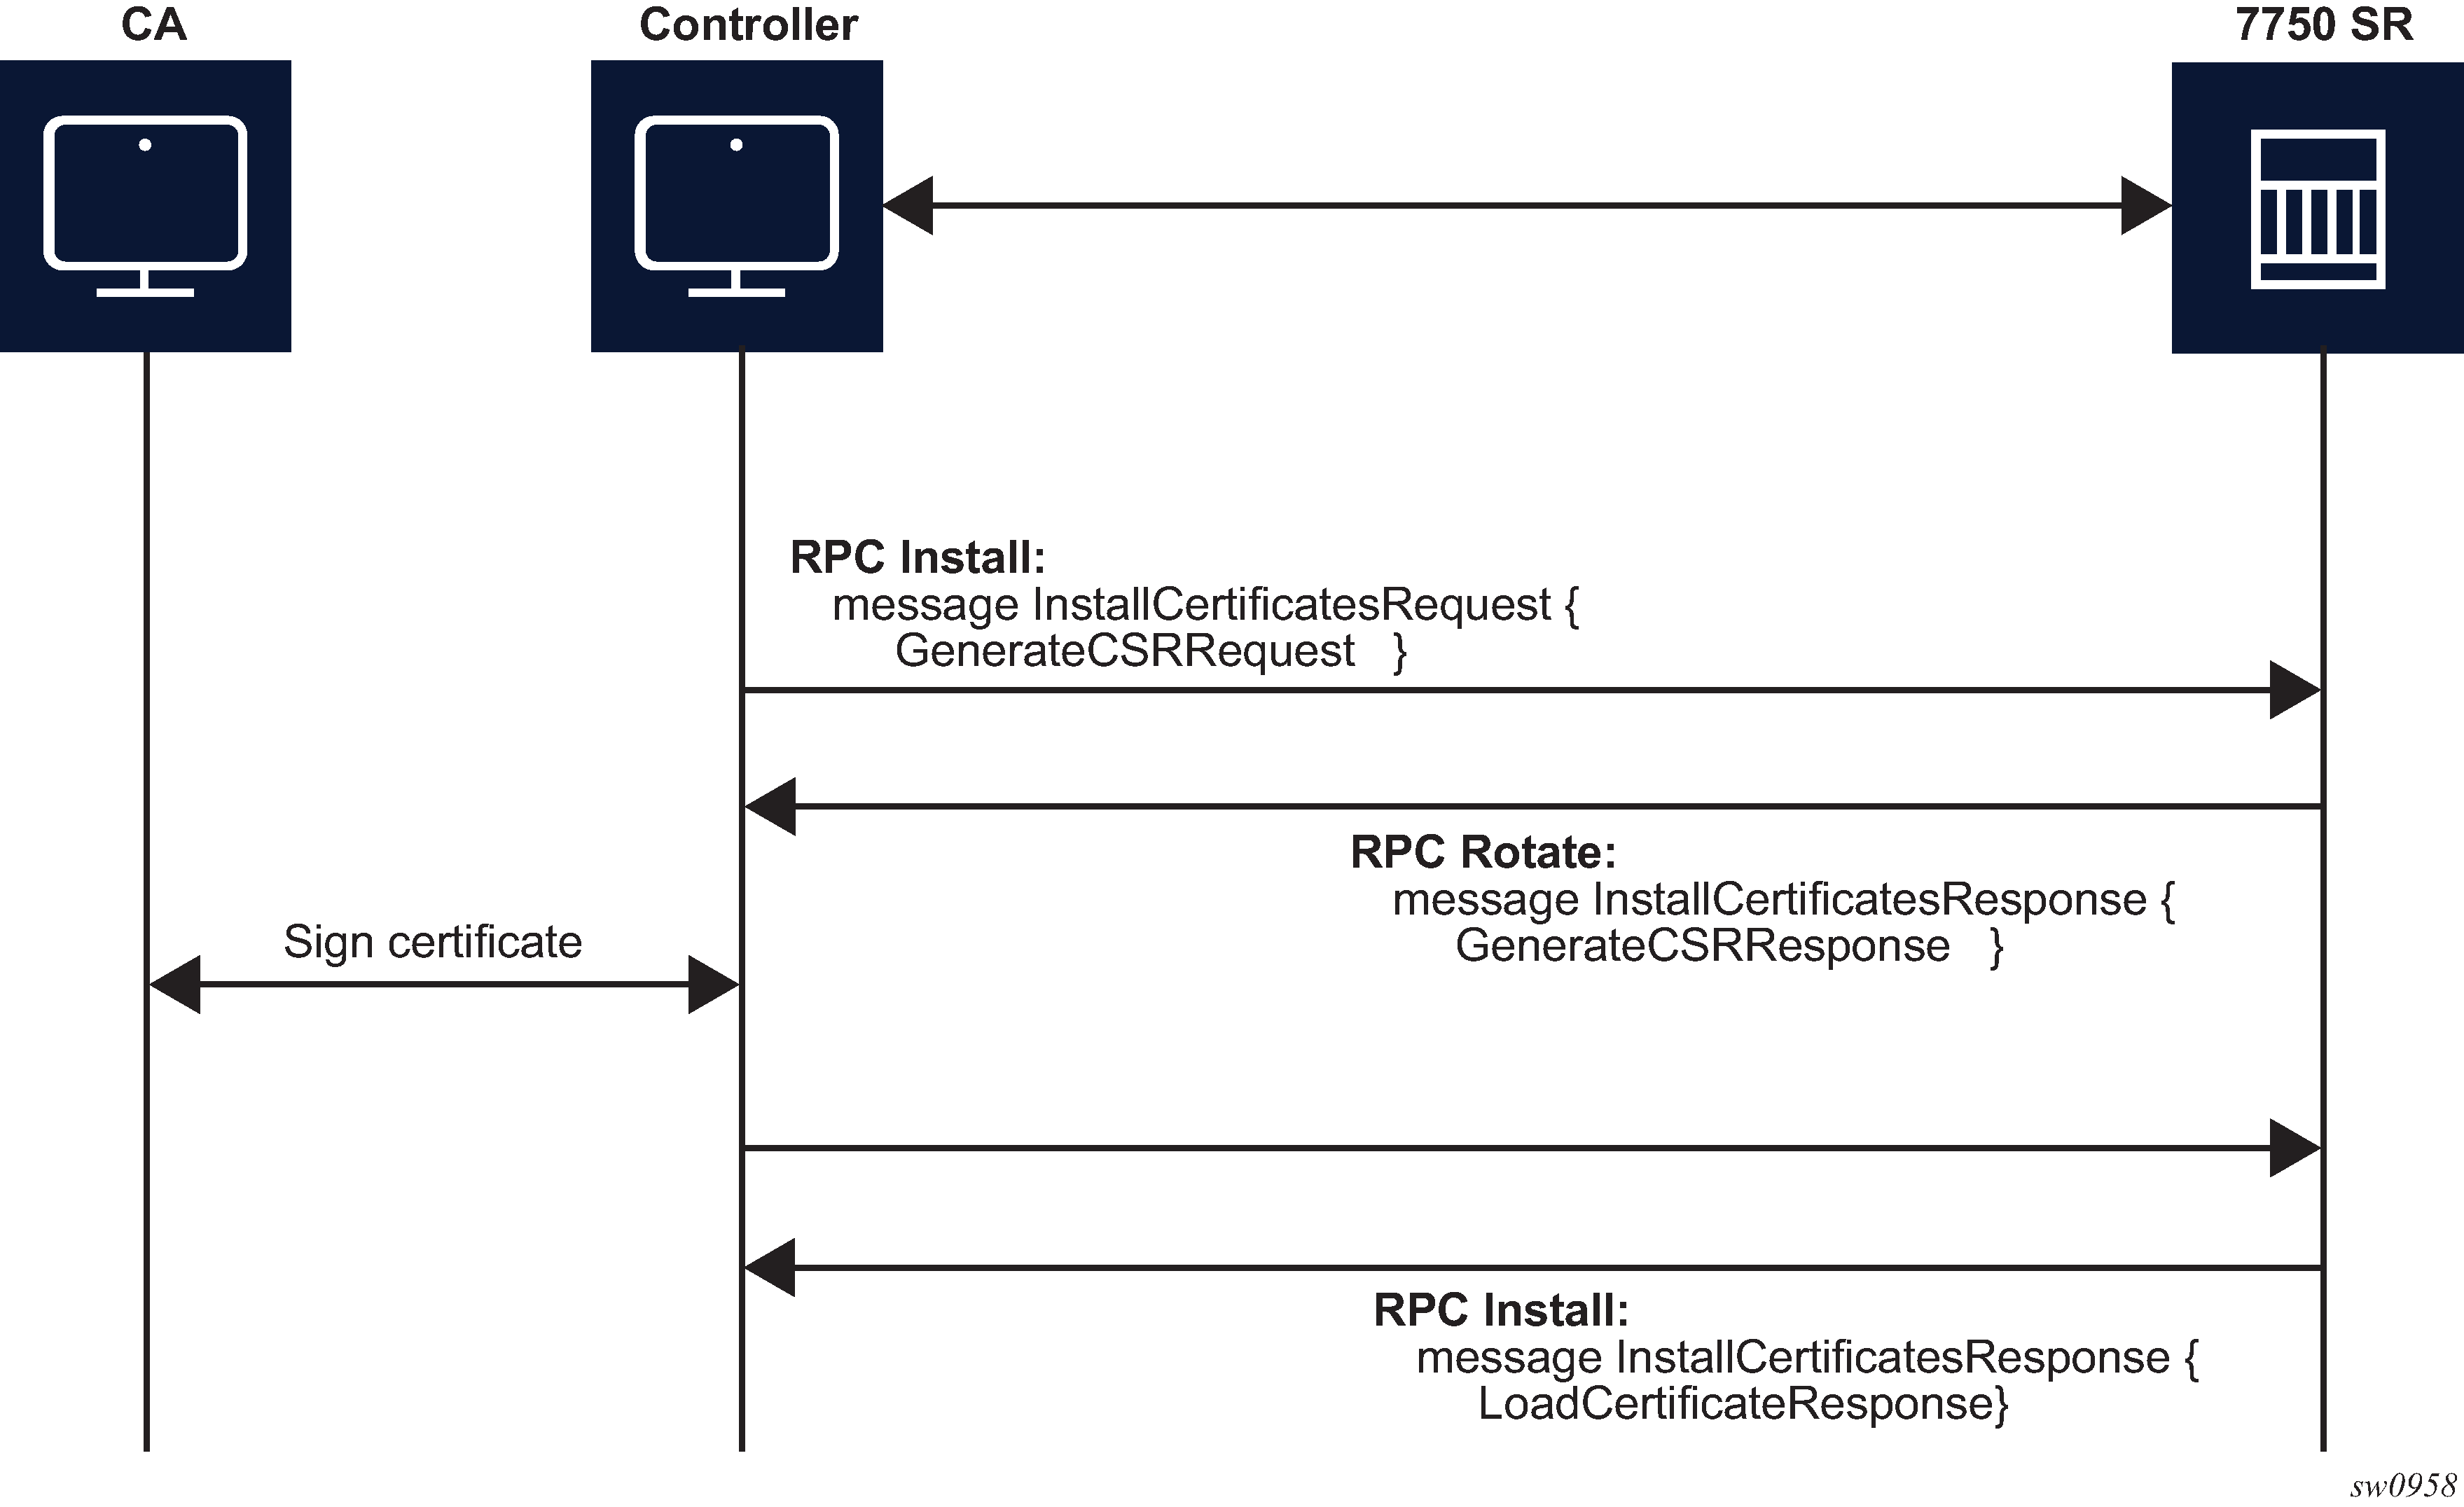
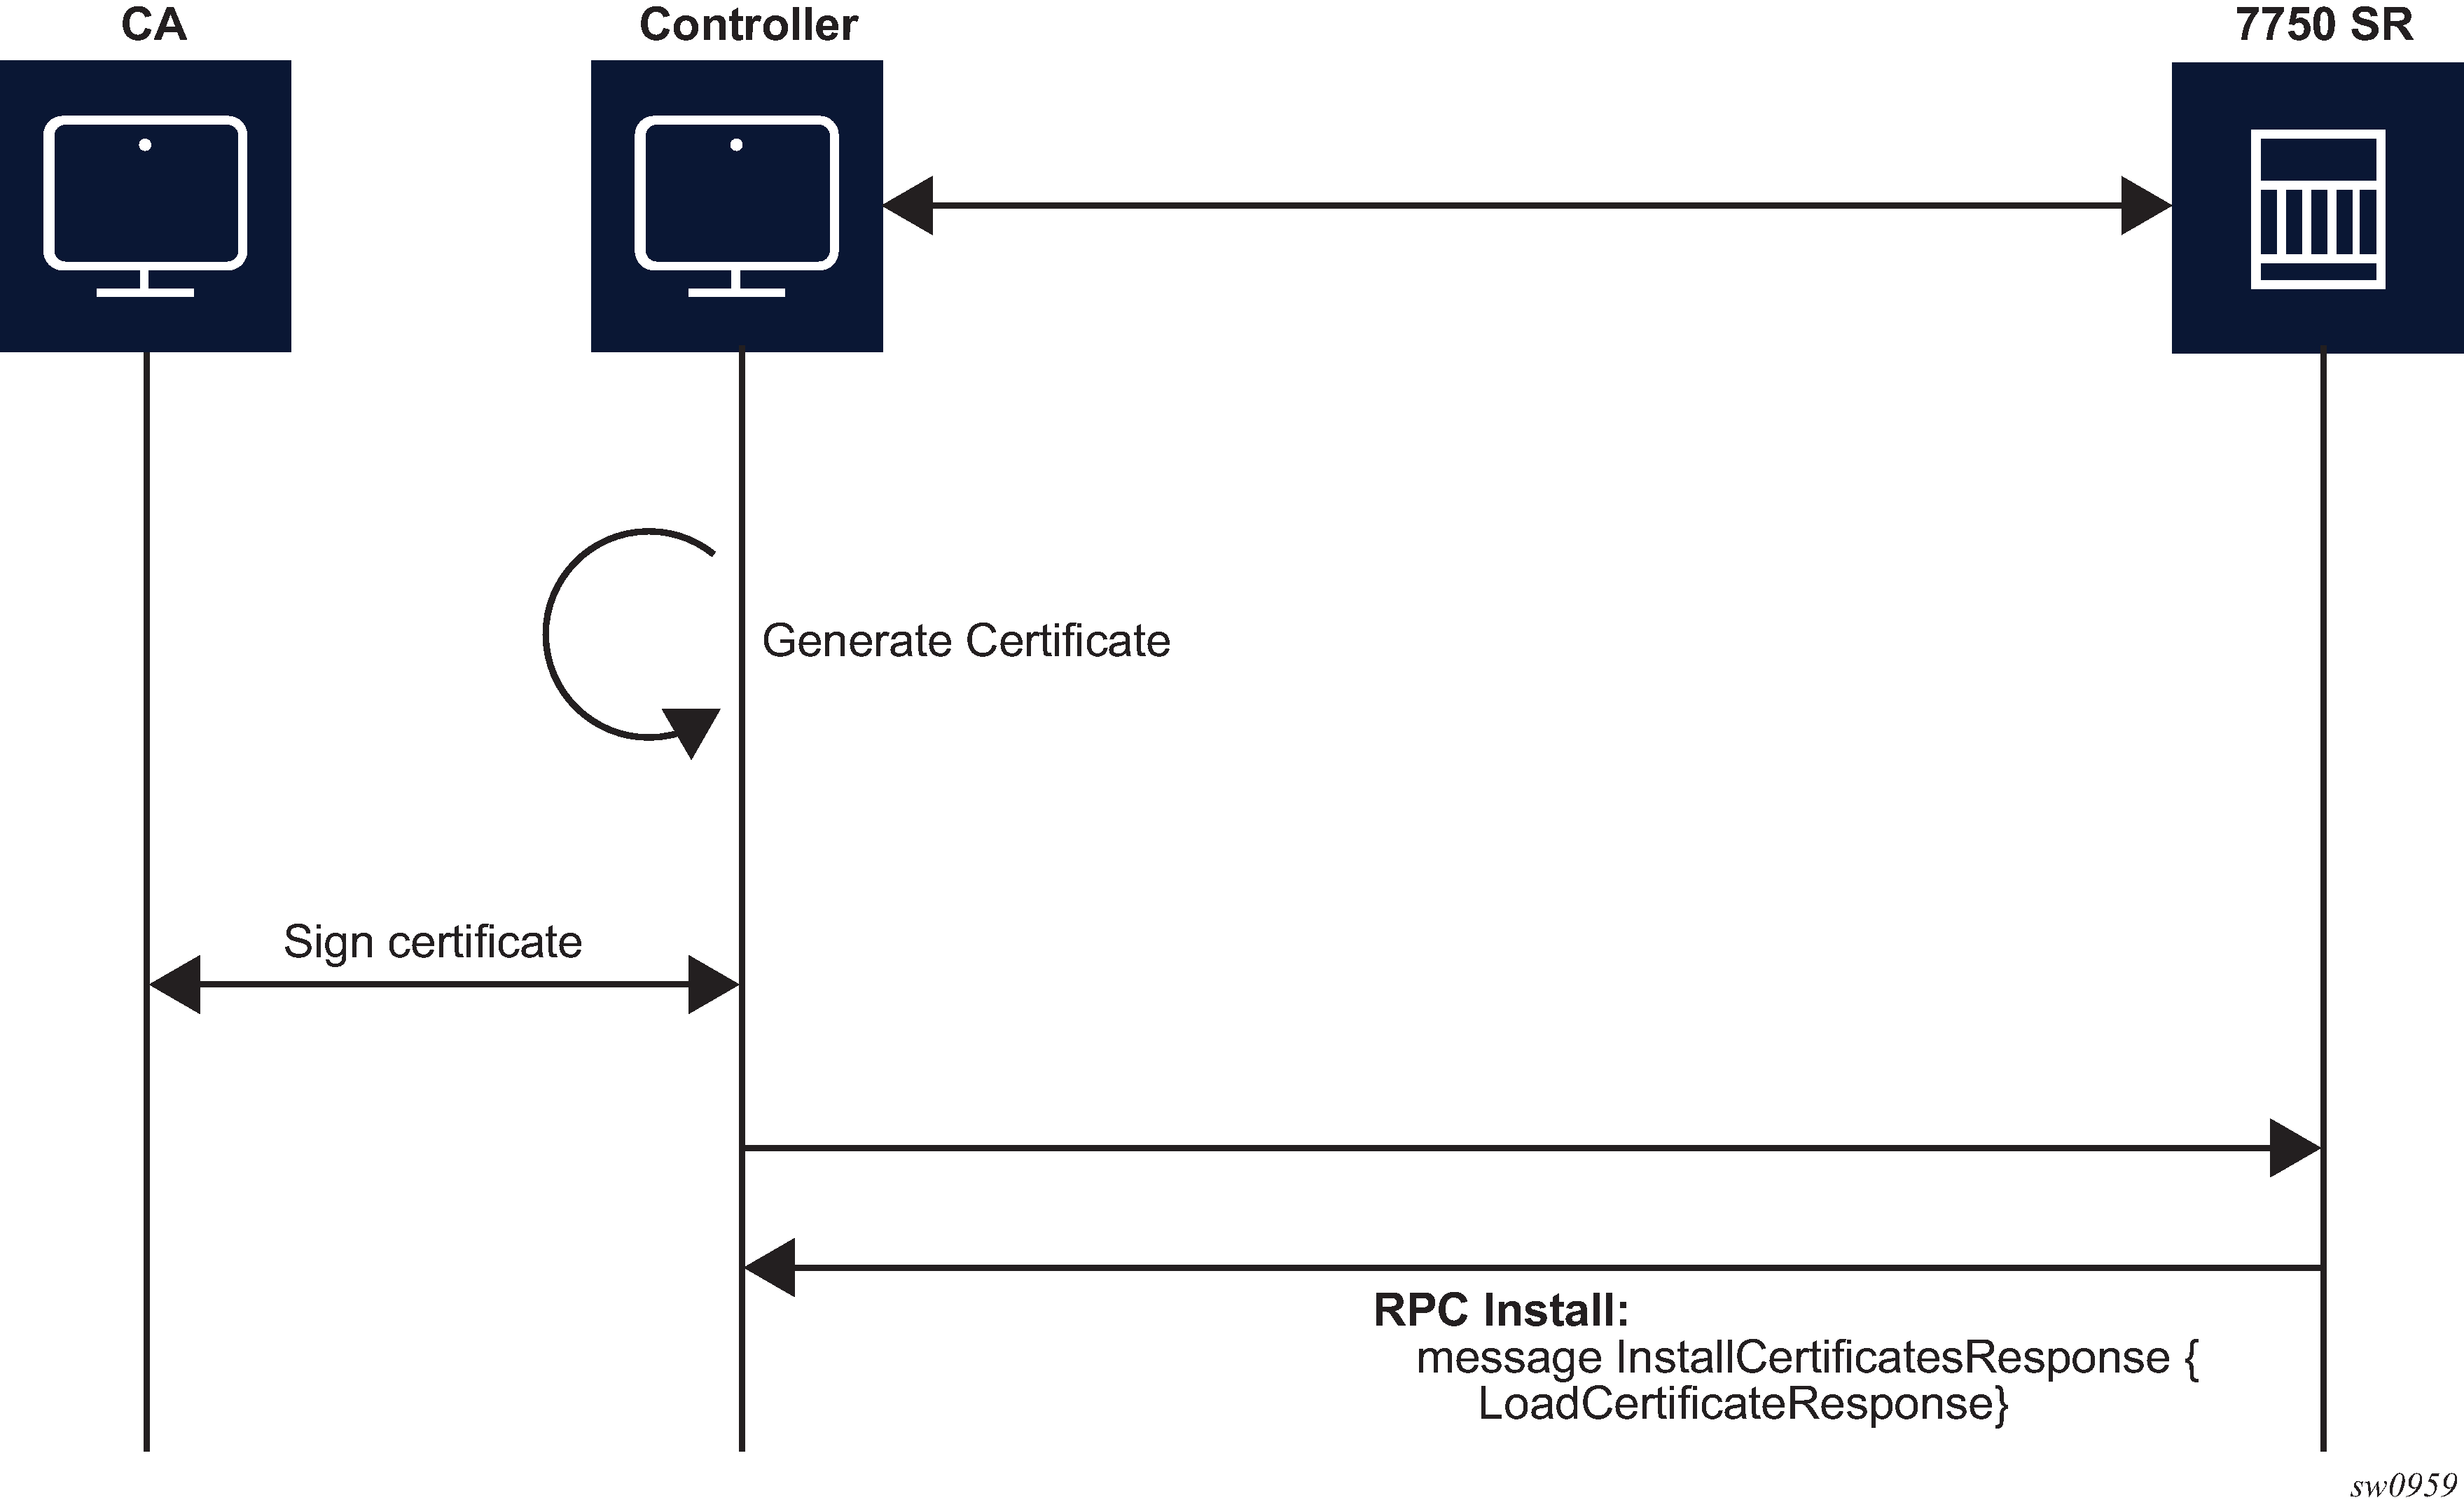
The message exchange during phases 1 and 3 is the same as shown in GenerateCSR message flow and LoadCSRRequest/Response message flow. The only difference, in the case of RPC Install, is that a new certificate_id is used.
After new certificates are installed, the system must be configured before it can be used. Configuration is supported using the following methods:
an existing gRPC session
a CLI session, SNMP, or NETCONF
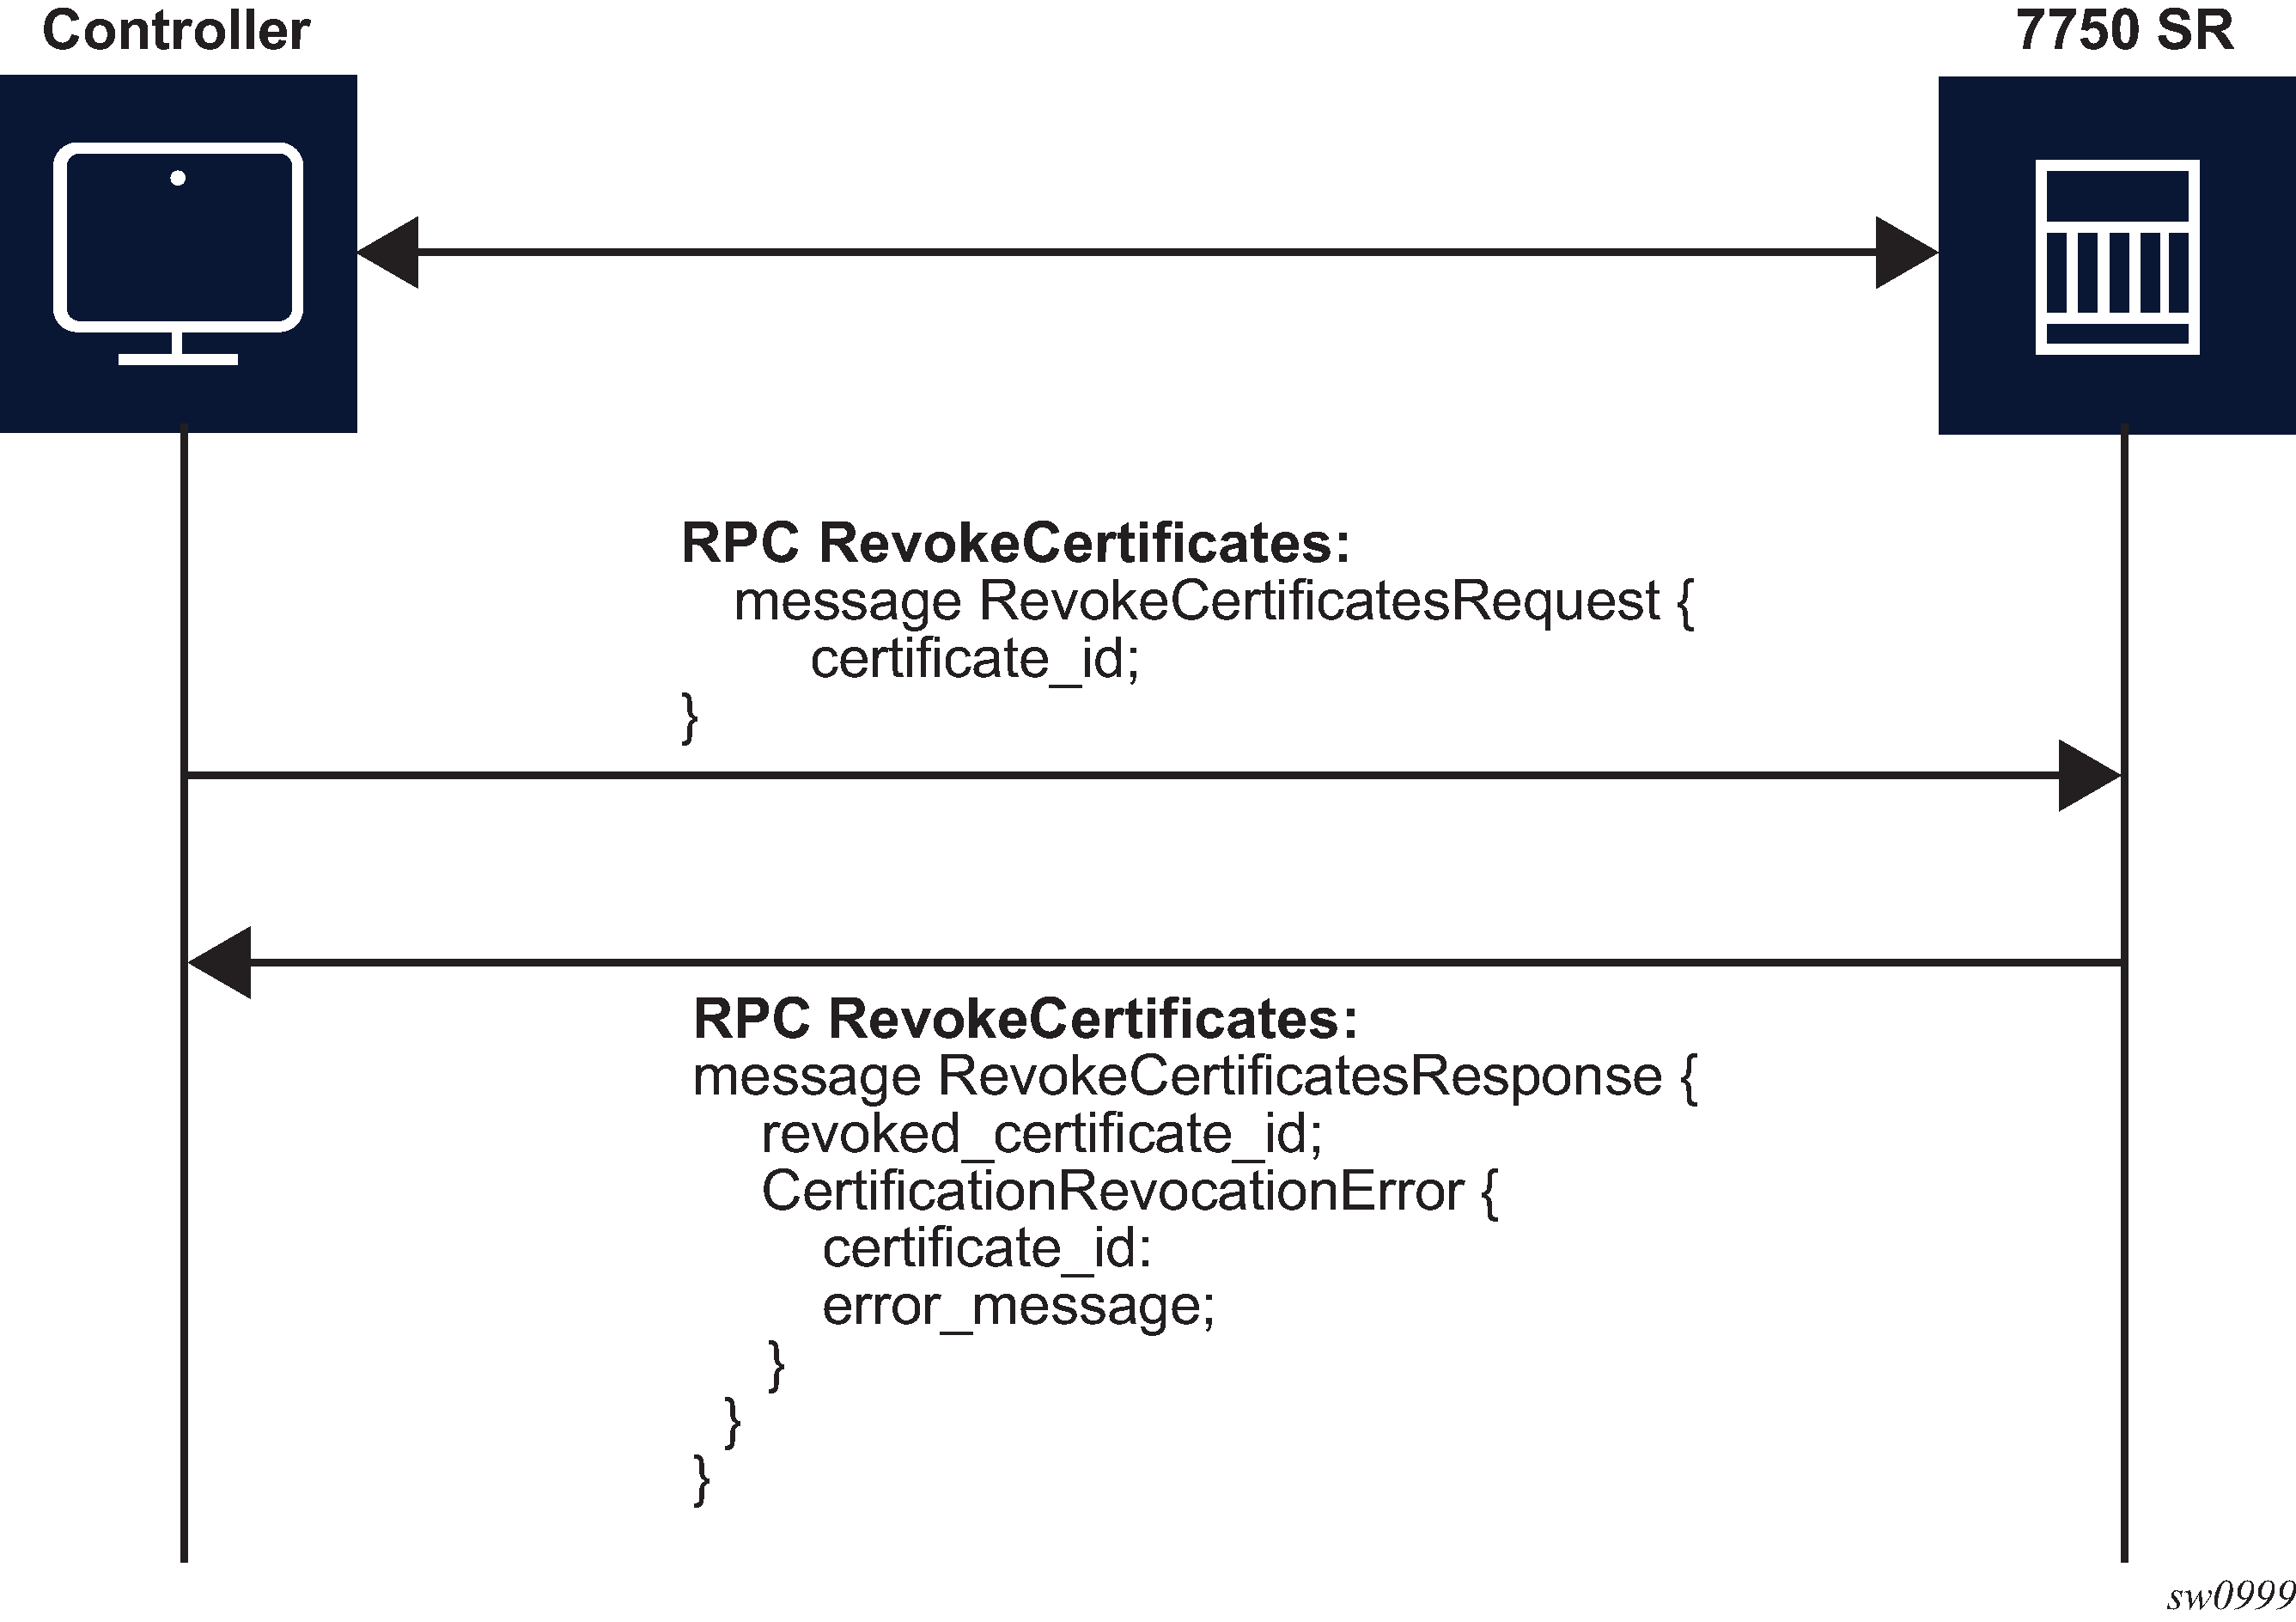
RPC RevokeCertificates
The purpose of the RPC RevokeCertificates is to make the existing certificate unusable by any client. In cases where the certificate being revoked by the client does not exist on the SR OS node, the corresponding RPC silently succeeds. The following figure shows the message flow.
gNOI System
In the gNOI System service, OpenConfig defines a generic interface that performs operational tasks on target network nodes. The specification can be found at following link: https://github.com/openconfig/gnoi/blob/master/system/system.proto.
These operations can be performed on individual targets, regardless of vendor. SR OS supports the following gNOI system RPCs:
SetPackage RPC
Reboot RPC
CancelReboot RPC
RebootStatus RPC
SwitchControlProcessor RPC
Ping RPC
Time RPC
Traceroute RPC
SetPackage RPC
The SetPackage RPC allows the controller to place a software package on the target node. The file transfer is protected by the checksum. SR OS supports options where the controller can directly stream files to the target node. The remote download option is not supported.
The controller can use the SetPackage RPC to modify the bof.cfg file when the package destination is different from the bootable image path configured in bof.cfg.
Reboot, CancelReboot, and RebootStatus RPC
The Reboot RPC allows the controller to reboot a target node. The RebootRequest message can be used to specify reboot delay and system actions that should be performed during the reboot. SR OS supports only cold reboot; that is, the entire node is shut down and restarted during the reboot process. A Reboot RPC can be used to reboot both IOMs and CPMs.
The CancelReboot RPC allows the controller to cancel pending reboots.
The RebootStatus RPC allows the controller to query the status of a reboot for an individual component specified in the RebootStatus request. SR OS supports querying on a single component at a time.
SwitchControlProcessor RPC
The SwitchControlProcessor RPC allows the switching of the active Control-Processor to the Control-Processor that is provided in the request message. Because SR OS supports two Control-Processors, one of the following paths must be provided in the request message, depending on which Control-Processor is currently in standby.
-
/state/cpm[cpm-slot=A]
-
/state/cpm[cpm-slot=B]
Ping RPC
The Ping RPC allows the controller to execute the ping command on the target node and results are streamed back to the source node.
The user can specify a network instance to use while running the Ping RPC. If no network instance is specified, SR OS uses the Base network instance.
Time RPC
The Time RPC returns the current time on the target node. This RPC is typically used to test for a response from the target.
Traceroute RPC
The Traceroute RPC allows the controller to execute the traceroute command on the target node and results are streamed back to the source node.
The user can specify a network instance to use by running the Traceroute RPC. If no network instance is specified, SR OS uses the Base network instance.
gNOI file
In the gNOI file service, OpenConfig defines a generic interface to perform file operational tasks. For information about the gNOI specification, see the following link: https://github.com/openconfig/gnoi/blob/master/file/file.proto.
SR OS supports the following gNOI file RPCs:
Get RPC
Put RPC
Stat RPC
Remove RPC
TransferToRemote RPC
Use the commands in the following context to configure authorization for each file RPC:
- MD-CLI
configure system security aaa local-profiles profile grpc rpc-authorization - classic
CLI
configure system security profile grpc rpc-authorization
Get RPC
A Get RPC reads and streams the contents of a file from a target location. The file is streamed using sequential messages and a final message containing the hash of the streamed data is sent before the stream is closed. An error is returned when:
the file does not exist
there is a problem reading the file
Put RPC
A Put RPC streams data to be written on a file on the target location. The file is streamed using sequential messages and a final message that includes the hash of the streamed data is sent prior to closing the stream. An error is returned when:
the location does not exist
an error is encountered while writing the data
Stat RPC
A Stat RPC returns metadata (that is, statistical information) about a file on the target location. An error is returned when:
the file does not exist
an error is encountered while accessing the metadata
Remove RPC
A Remove RPC removes the specified file from the target location. An error is returned when:
the file does not exist
there is a directory instead of a file
an error is encountered during the remove operation (for example, permission denied)
TransferToRemote RPC
A TransferToRemote RPC transfers the file from the target node to a specified remote location. When the file transfer is complete, the response contains the hash of the transferred data. An error is returned when:
the file does not exist
the file transfer fails
an error is encountered reading the file
Custom gRPC packages, services, and RPCs
SR OS allows users to create customized gRPC-based APIs as proto files using the Python programming language to implement the required behaviour. With these proto files, you can define gRPC services and build applications that interact between the gRPC client and the server.
The following figure shows the workflow for the custom gRPC packages, services, and RPCs.
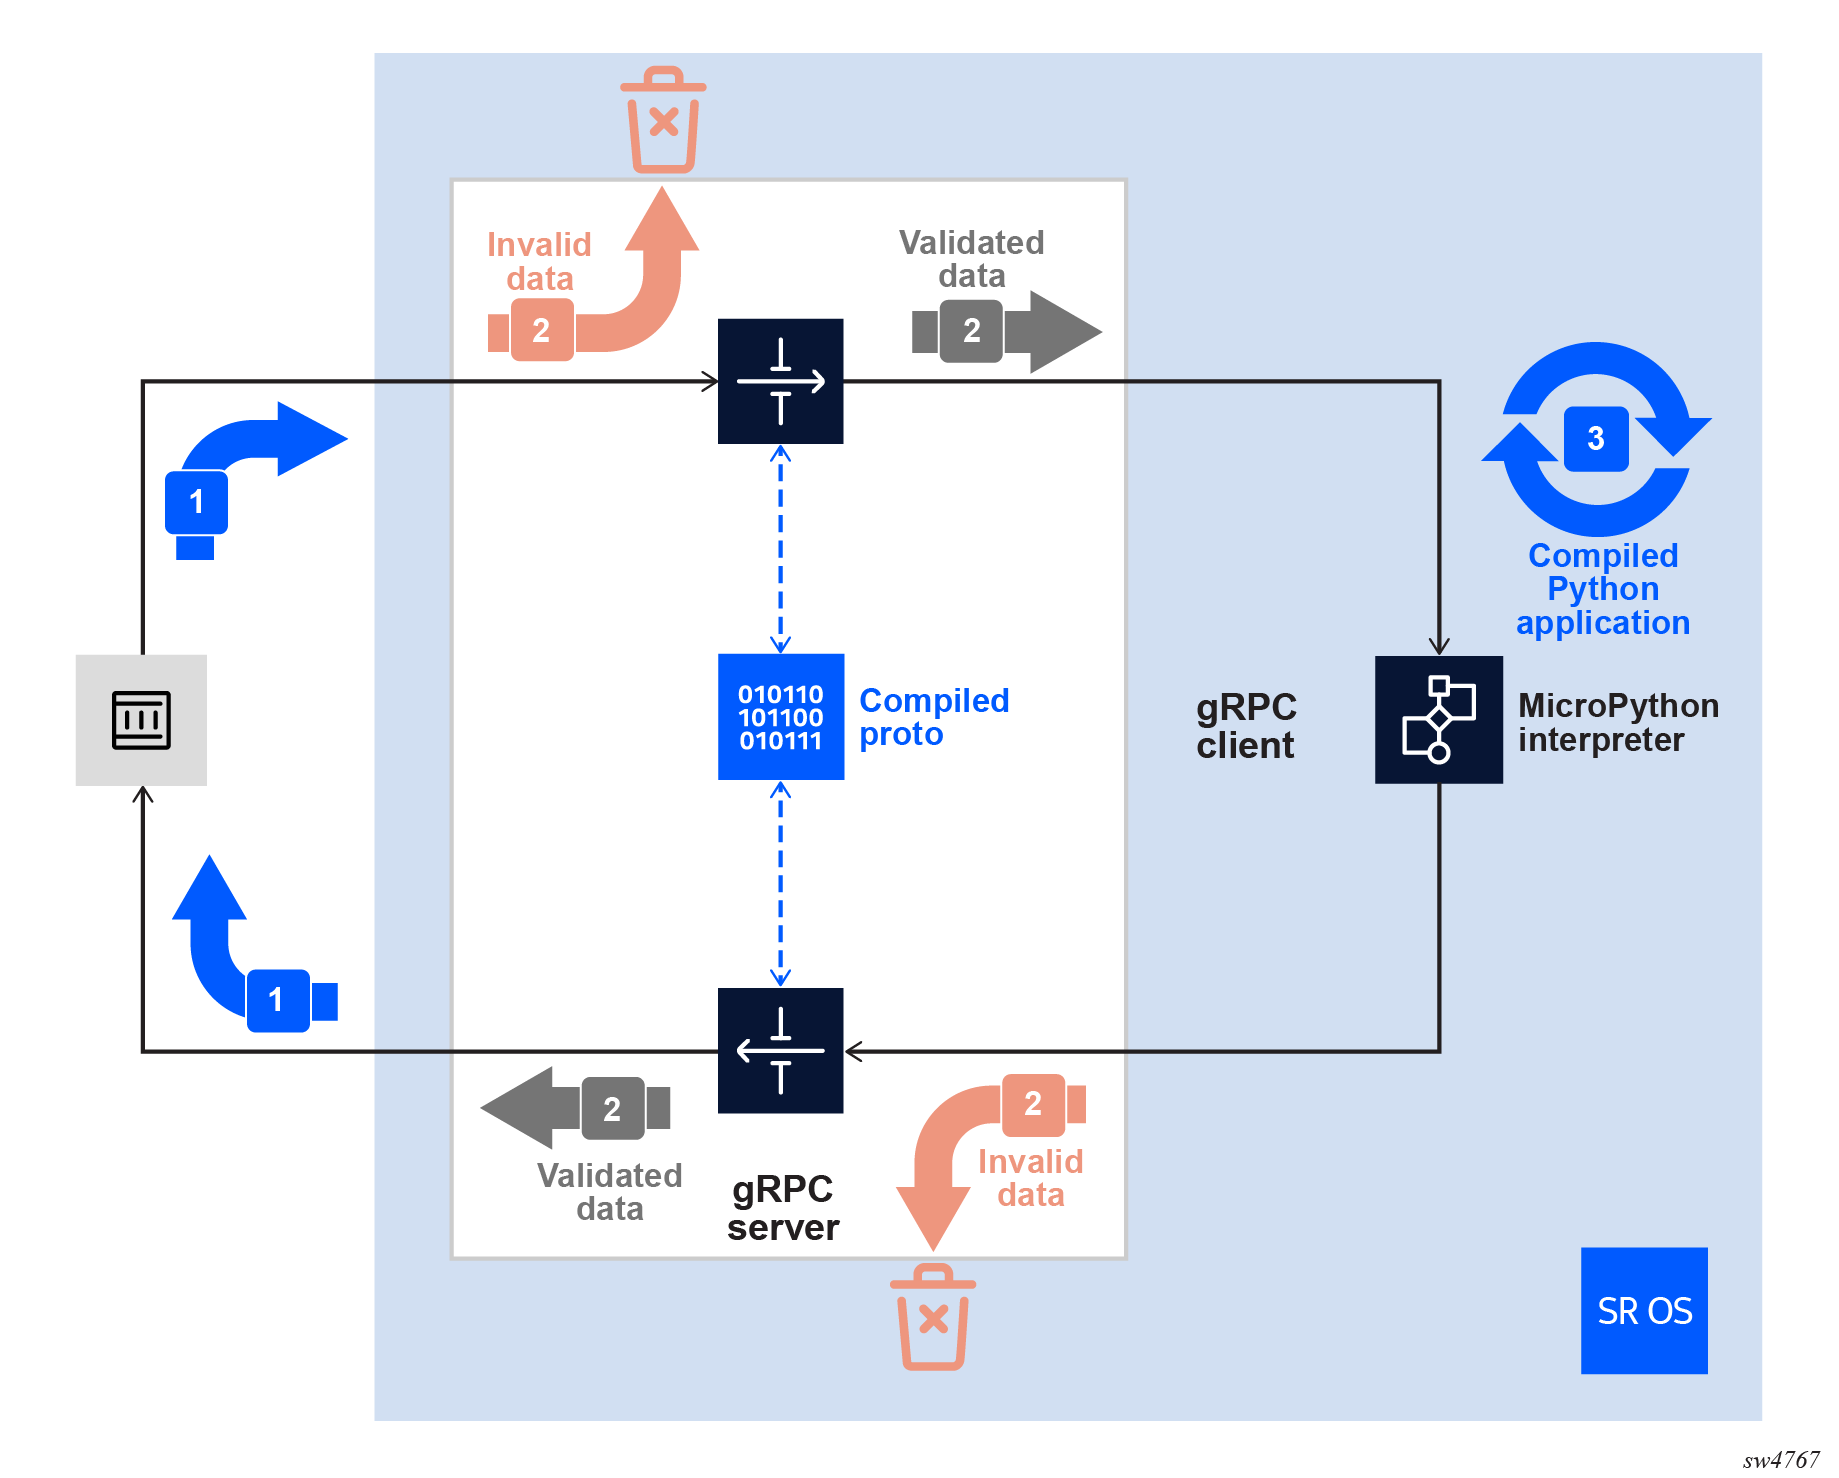
The custom proto service configured in SR OS receives the incoming traffic from a gRPC client. The payload is validated against the compiled custom gRPC service for the correct fields and types. Correctly formatted data is sent to the built-in MicroPython interpreter, and incorrectly formatted data is discarded. When data reaches the interpreter, the user-defined behaviour programmed in the Python application is performed, and the required response is returned to the gRPC service, which again checks against the compiled gRPC service for the correct fields and types before forwarding to the gRPC client.
The following workflow applies for implementing customized gRPC packages, services, and RPCs.
- Create a customized text proto file.
- Compile the proto file to a protoc file.
- Upload the compiled protoc file to the SR OS device.
- Create a Python application with specific code to handle each RPC in the proto file.
- Upload the Python application to the SR OS device if the application is built external to the device.
- Configure the Python application as a
python script. - Configure the customized protoc as a
custom-proto. - Ensure the AAA security setting is accurate.
Creating a customized proto file
A customized proto file allows operators to define packages, services, RPCs, and messages based on specific functions or operational requirements. The proto file is a text file that provides the flexibility to add or modify RPCs without changing the underlying system framework. Use an external device to create the file and ensure that the format conforms to the proto2 or proto3 language specifications.
Perform the following steps to create a customized proto file.
- Create a text file with a .proto extension.
- Specify the protobuf version and define the required
packages.
syntax = "proto3"; - Define the gRPC service and its RPC
messages.
service myservice { rpc Add (AddRequest) returns (AddResponse) {} rpc StreamingAdd (stream AddStreamRequest) returns (AddResponse) {} rpc Count (CountRequest) returns (stream CountResponse) {} rpc PrimeFinder (PrimeRequest) returns (stream PrintResponse) {} } - Specify the
RequestandResponsemessage definitions. TheRequestandResponsenames are provided as examples to indicate what each message is expected to perform. These names are user-defined and optional.message AddRequest { uint32 number_one = 1; uint32 number_two = 2; } message AddStreamRequest { uint32 number = 1; } message AddResponse { uint32 result = 1; } message CountRequest {} message CountResponse { uint32 response = 1; } message PrimeRequest { uint32 starting_number = 1; } message PrintResponse { uint32 factor = 1; string prime = 2; }
Compiling the proto file
Compile the .proto file using the protoc compiler, and
upload the compiled file to SR OS.
Perform the following steps to compile the customized proto file.
- Install the protoc compiler using the package manager of your choice, from the official protobuf release, or using the Pip Installs Packages (PIP) Python package handler to install protoc from the grpcio-tools package. See Protocol Buffer Compiler Installation for more information about the compiler.
- Compile the .proto file using the protoc
compiler.
In this example, the protoc compiler is used from the grpcio-tools Python library, the .proto file is located in proto/my_custom_proto.proto, and the compiled .protoc file is placed in proto/my_custom_proto.protoc.
python -m grpc_tools.protoc -oproto/my_custom_proto.protoc -Iproto/ proto/my_custom_proto.proto - Upload the compiled file to the compact flash on the device.Note: HTTP, HTTPS, SCP, SFTP, FTP, or TFTP locations are not supported. Only compact flash URLs relative to the active CPM are supported. For example,
cf3:,cf2:,cf1:are supported butcf3-A:,cf3-B:,cf2-A:,cf2-B:are not supported.
Creating a Python application
Create a Python 3 application to process the gRPC package, service, and RPC messages defined in the custom proto file. See Python for more information about creating Python applications.
SR OS provides a preinstalled Python library called grpcserver that interacts with the MicroPython interpreter and gRPC server on the device. See the pySROS GitHub repository and the network developer portal for more information about the API.
The Python code can be created on the SR OS device or on a remote workstation. Perform the following steps to create the Python code.
- Create the Python code to handle each RPC defined in the .proto file.
- Add the created handler code using the add_handler method.
- After all handlers have been added, use the handle_rpc function to start handling the RPCs.
Python functions are also provided to handle errors and exit RPC operations properly.
The custom .proto file supports the following RPC types:
- unary RPCs – single message RPCs
- client streaming RPCs – gRPC client streams data to the server
- server streaming RPCs – gRPC server, which is the SR OS device, streams data to the client
- bidirectional streaming RPCs – gRPC server and client both stream data
Proto file with the service to add two numbers
In this example, the .proto file has a service called Add that accepts two input parameters, number_one and number_two. As a response, the server processes the input and returns a single number as the result.
syntax = "proto3";

service myservice {
  rpc Add (AddRequest) returns (AddResponse) {}

message AddRequest {
  uint32 number_one = 1;
  uint32 number_two = 2;
}

message AddResponse {
  uint32 result = 1;
}
Python application with Add RPC
In this example, the Python application uses the following code to support the Add RPC.
import grpcserver

def addNumbers(request, context):
    return {"result": request['number_one'] + request['number_two']}

def main():
    grpcserver.add_handler(service="myservice", rpc="Add", handler=addNumbers)
    grpcserver.handle_rpc()

if __name__ == "__main__":
    main()
The addNumbers procedure accepts the request from dictionary entries number_one and number_two, which are derived from the proto file. The entries are added, and the result matches the name of the expected variable in the AddResponse proto message.
The add_handler function is invoked once for each RPC, specifying the package name (optional, and omitted), service name, RPC, and the function created to handle the RPC (addNumbers in this example). The handle_rpc function is invoked to trigger the interaction between the SR OS gRPC server and the MicroPython interpreter for the defined RPCs.
Configuring Python application as a python-script
To be used as a Python application that supports a customized gRPC proto, the operator-defined Python file must be configured as a python-script on the device. The configuration is similar to any other Python application.
Configuring a Python application as a Python script in MD-CLI mode
In this example, my_script.py is the name of the Python application, and the file is stored on the cf3: compact flash. Python applications must conform to the Python 3 application format to support custom gRPC services. When the configuration is committed and includes the admin-state enable command, SR OS compiles and caches the Python script.
configure {
    python {
      python-script “my_script“ {
        admin-state enable
        urls [ “cf3:/my_script.py“ ]
        version python3
      }
    }
}
If the file is changed, use the following command to refresh the compiled version.
perform python python-script reload script "my_script"To check the status of the Python script, use the following command.
show python python-script "my_script"

Python script "my_script"
==========================================
Description   : (Not Specified)
Admin state   : inService
Oper state    : inService
Oper state
(distributed) : inService
Version       : python3
Action on fail: drop
Protection    : none
Primary URL   : cf3:/my_script.py
Secondary URL : (Not Specified)
Tertiary URL  : (Not Specified)
Active URL    : primary
Run as user   : (Not Specified)
Code size     : 747
Last changed  : 01/21/2026 21:34:02
To view the output in the MD-CLI structured data format, use the following info command.
/info state python python-script "my_script"

    oper-state up
    oper-state-distributed up
    code-size 747
    active-url primary
    reload-action not-applicable
Configuring customized protoc as a custom-proto
The compiled custom proto must be configured in the gRPC server configuration on the SR OS device.
Compiled custom proto file
The following example shows the configuration for the compiled custom proto file my_custom_proto.protoc stored on the compact flash.
{
  configure {
    custom-proto "my_custom_proto" {
      admin-state enable
      description "Proto providing a number of custom gRPC RPCs"
      urls ["cf3:\my_custom_proto.protoc"]
      python-script "my_script"
    }
  }
}
cf3:, cf2:,
cf1: are supported but cf3-A:,
cf3-B:, cf2-A:, cf2-B: are
not supported.The configuration includes the previously configured python-script
name (for example, my_script). See Configuring Python
application as a python-script for more information. As with the Python
configuration, when the configuration is committed and includes the
admin-state enable command, SR OS
validates, loads, and caches the compiled protoc file.
If changes are made to the protoc file, place the new version on the compact flash and run the following command to reload the file.
perform system grpc custom-proto "my_custom_proto" reloadTo check the status of the compiled proto file, use the following show command.
show system grpc custom-proto "my_custom_proto"

gRPC custom-proto "my_custom_proto"
===============================================================================
Description               : Proto providing a number of custom gRPC RPCs
Administrative State      : Enabled
Operational State         : Up
Primary URL               : cf3:\my_custom_proto.protoc
Secondary URL             : (Not Specified)
Tertiary URL              : (Not Specified)
Active URL                : primary
File Size                 : 571 bytes
Hmac-sha512 Hash          : a2c7e69fdf06bd1e5c2623487e199742f6388a596c4747c6708
                            502ddd22e05d51da6525a8e86289e132d7905b8d06c76001548
                            3410b4fb48644cf35432e33153
Last Changed              : 2026/01/21 21:56:06
Python Script             : my_script
The preceding command also displays a SHA512 hash value that can be compared with the originally compiled protoc file to ensure file authenticity.
To view the output in MD-CLI structured data format, use the following info command.
/info state system grpc custom-proto "my_custom_proto"

    oper-state up
    file-size 571
    last-changed 2026-01-21T21:56:06.8+00:00
    active-url "cf3:\my_custom_proto.protoc"
    hmac-sha512-hash a2c7e69fdf06bd1e5c2623487e199742f6388a596c4747c6708502ddd22
                     e05d51da6525a8e86289e132d7905b8d06c760015483410b4fb48644cf35432e33153
    package "" {
        service "myservice" {
            statistics {
                successful-msgs-in 0
                successful-msgs-out 0
                error-msgs-in 0
                error-msgs-out 0
            }
            rpc "Add" {
                statistics {
                    successful-msgs-in 0
                    successful-msgs-out 0
                    error-msgs-in 0
                    error-msgs-out 0
successful-rpcs 0
                    error-rpcs 0
                }
            }
            rpc "Count" {
                statistics {
                    successful-msgs-in 0
                    successful-msgs-out 0
                    error-msgs-in 0
                    error-msgs-out 0
                    successful-rpcs 0
                    error-rpcs 0
                }
            }
            rpc "PrimeFinder" {
                statistics {
                    successful-msgs-in 0
                    successful-msgs-out 0
                    error-msgs-in 0
                    error-msgs-out 0
                    successful-rpcs 0
                    error-rpcs 0
                }
            }
            rpc "StreamingAdd" {
                statistics {
                    successful-msgs-in 0
                    successful-msgs-out 0
                    error-msgs-in 0
                    error-msgs-out 0
                    successful-rpcs 0
                    error-rpcs 0
                }
            }
        }
    }
Enabling AAA security settings for gRPC proto
To ensure the security of the SR OS device, the option to use the custom gRPC protos feature is disabled by default. This feature is also disabled by default in the authentication, authorization, and accounting (AAA) configuration profiles. Both the default and administrative profiles are disabled by default.
To enable the feature, add the following configuration to the local gRPC authorization profile.
{
  configure {
    system {
      security {
        aaa {
          local-profiles {
            profile "administrative" {
              grpc {
                custom-proto permit
              }
            }
          }
        }
      }
    }
  }
}
This configuration example enables the custom proto feature for the administrative local AAA authorization profile.
Creating client applications (optional)
Users can generate supporting Python libraries from the proto text file using the
protoc compiler and use them to create client applications. To
perform this step, the protoc compiler is used to generate the Python
code.
Generating supporting Python code
The following is an example of generating supporting Python code, which is created
and placed in the python directory. This command also generates the
protoc file in the proto directory.
python -m grpc_tools.protoc --python_out=python/ --pyi_out=python/ --grpc_python_out=python/
-oproto/my_custom_proto.protoc -Iproto/ proto/my_custom_proto.proto
Client application for Add RPC
#!/usr/bin/env python3

import my_custom_proto_pb2
import my_custom_proto_pb2_grpc
import grpc
import random

def main():
    host = "172.20.20.10"
    port = 57400
    auth_metadata = [
        ("username", "myusername"),
        ("password", "mypassword"),
    ]
    number_one = random.getrandbits(16)
    number_two = random.getrandbits(16)
    print(
        f"Sending number {number_one} and {number_two} to {host} over gRPC to add them together"
    )
    with grpc.insecure_channel(f"{host}:{port}") as channel:
        stub = my_custom_proto_pb2_grpc.myserviceStub(channel)
        response = stub.Add(
            my_custom_proto_pb2.AddRequest(
                number_one=number_one, number_two=number_two
            ),
            metadata=auth_metadata,
        )
        print(response.result)

if __name__ == "__main__":
    main()