Procedure 9-3.2: Discontinue Alcatel-Lucent 1665 DMX node from BLSR
Important!
This is not a standalone procedure. Perform this procedure only as directed by Procedure 9-3: Discontinue Alcatel-Lucent 1665 DMX node from network.
Steps
Important!
Verify that the work instructions specify whether automatic ring discovery is enabled or disabled on the existing ring.
The Alcatel-Lucent 1665 DMX node (shelf) may be using the OLIU circuit packs in the Main slot pair or a Function/Growth slot pair to interface with a BLSR.
Complete the following steps to discontinue an Alcatel-Lucent 1665 DMX node from a BLSR.
1 |
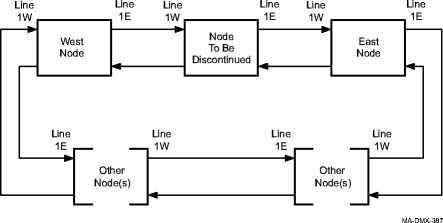
Important! The example assumes that the BLSR network is established using the Main slot pairs of Alcatel-Lucent 1665 DMX nodes. However, a Function/Growth slots pair may also be used to interface with an OC-48 BLSR. Identify the node to be discontinued, the adjacent West node, and the adjacent East node. (Refer to the following figure.) 
Legend: Line 1W: Line 1W (West port) is the port in slot 1 of the 2F BLSR protection group (for example, Main-1 or FN-A-1). Line 1E: Line 1E (East port) is the port in slot 2 of the 2F BLSR protection group (for example, Main-2 or FN-A-2). | ||||||
2 |
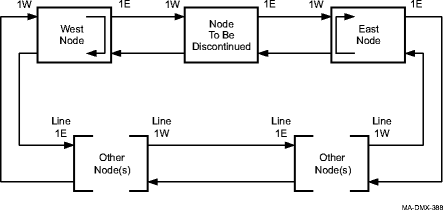
Important! The Force to Protection, Ring switch may cause transmission hits (less than 60 ms). Perform the following: (Refer to the following figure.)

Legend: Line 1W: Line 1W (West port) is the port in slot 1 of the 2F BLSR protection group (for example, Main-1 or FN-A-1). Line 1E: Line 1E (East port) is the port in slot 2 of the 2F BLSR protection group (for example, Main-2 or FN-A-2). | ||||||
3 |
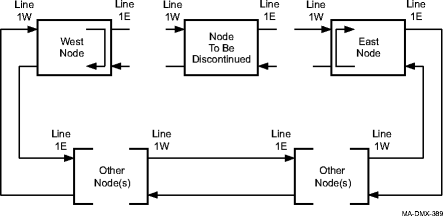
Removal of wrong fiber connections will result in a service interruption. Ensure that you remove only the fiber connections for the optical span being discontinued. Perform the following: (Refer to the following figure.)

Legend: Line 1W: Line 1W (West port) is the port in slot 1 of the 2F BLSR protection group (for example, Main-1 or FN-A-1). Line 1E: Line 1E (East port) is the port in slot 2 of the 2F BLSR protection group (for example, Main-2 or FN-A-2). | ||||||
4 |
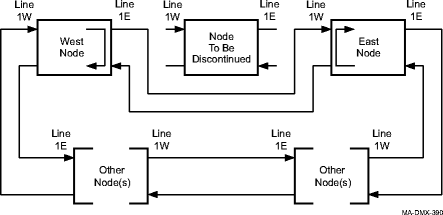
Perform the following: (Refer to the following figure.)
Refer to Procedure 14-4: Perform connection and verification of optical facility. 
Legend: Line 1W: Line 1W (West port) is the port in slot 1 of the 2F BLSR protection group (for example, Main-1 or FN-A-1). Line 1E: Line 1E (East port) is the port in slot 2 of the 2F BLSR protection group (for example, Main-2 or FN-A-2). | ||||||
5 |
| ||||||
6 |
If Automatic Ring Discovery is disabled at the remaining nodes in the ring, activate the manual ring maps. Select Configuration → Activate Manual Ring Map. Select the required Ring ID and click Select. Result: A dialog box appears asking you to confirm activating the manual ring map. Click OK. The inactive manual ring map is now activated. | ||||||
7 |
Perform the following:
Important! The Clear switch may cause transmission hits (less than 60 ms). Wait for alarms to clear. Result: The node to be discontinued is now removed from the ring. | ||||||
8 |
From the System View menu at the East and West nodes,
| ||||||
9 |
To verify that no alarms are present in the network, click the Alarm List button at each node. If required, clear any alarms that are present. Reference: Alcatel-Lucent 1665 Data Multiplexer (DMX) Alarm Messages and Trouble Clearing Guide, 365-372-302 | ||||||
10 |
Is the removed shelf to be powered down?
| ||||||
11 |
If required to prevent alarms, provision the system Timing Mode parameter as Free Running using Configuration → Timing/Sync. Reference: Procedure 6-5: Network Element synchronization provisioning | ||||||
12 |
If the shelf is being removed from service, select View → Cross-Connections to verify that there are no cross-connections on the shelf. If required, remove any existing cross-connection using Configuration → Cross-Connections. | ||||||
13 |
Update the internal equipment list by either pressing the UPD/INIT push-button on the SYSCTL circuit pack or using Configuration → Update System → Update All. | ||||||
14 |
To verify that no alarms are present, click the Alarm List button. If required, clear any alarms that are present. Reference: Alcatel-Lucent 1665 Data Multiplexer (DMX) Alarm Messages and Trouble Clearing Guide, 365-372-302 | ||||||
15 |
The Alcatel-Lucent 1665 DMX node is now removed from the bidirectional line switched ring (BLSR). End of steps |