Procedure 9-4: Provision manual ring map
 Overview
Use this procedure to perform the following at a node in a 2-fiber bidirectional line switched ring (BLSR):
Important!
If deleting a node(s) from an existing ring map, then the circuits that add/drop to the deleted node(s) must be deleted. Refer to Chapter 10, TDM service provisioning procedures and Chapter 11, Ethernet/Data network provisioning procedures.
 Before you begin
Prior to performing this procedure:
-
Refer to Before you begin in this chapter
-
Refer to Laser safety and Electrostatic discharge information in Chapter 1, Safety.
-
Verify that the work instructions specify the 2F BLSR protection group (port Application parameter must be provisioned 2F BLSR), Ring ID, and node ID(s).
Steps
Complete the following steps to provision the manual ring map at a node(s) in a 2-fiber bidirectional line switched ring (BLSR).
1 |
| ||||||||
2 |
Is the Automatic Ring Discovery parameter Enabled or Disabled?
| ||||||||
3 |
Select Configuration → Configure Manual Ring Map. Result: The Configure Manual Ring Map window opens. | ||||||||
4 |
| ||||||||
5 |
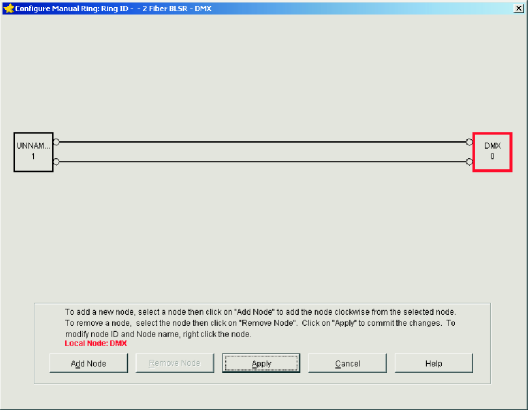
Click on the required Ring ID and Select. Result: A dialog box appears stating that there is no existing manual ring map, you will be configuring a new manual ring map. Click OK. The Configure Manual Ring window opens showing the local node and an unnamed node. (Refer to following figure.)  | ||||||||
6 |
Important! The local node appears on the right side of the Configure Manual Ring screen. This shows the NE Name (DMX) and Node ID (0). The Node ID of the local node may need to be changed to comply with the work instructions. If required, right click on the local node and change the Node ID according to the work instructions. Click OK. Result: A dialog box appears asking you to confirm executing this command. Click Yes, and the modified node information appears on the Configure Manual Ring screen. | ||||||||
7 |
Important! The NE Name and Node ID of the unnamed node must be modified to the NE Name and node ID of the node that is connected to the East port (for example, Main-2) of the Local node per the work instructions. Right click on the unnamed node (UNNAMED 1) and change the NE Name and Node ID according to the work instructions. Click OK. Result: A dialog box appears asking you to confirm executing this command. Click Yes, and the modified node information appears on the Configure Manual Ring screen. | ||||||||
8 |
Important! In the manual ring map, nodes are added in the clockwise (East) direction only from the node that is selected. To add another node, click on the required node and click Add Node. Enter the NE Name and Node ID of the next node in the East direction (clockwise) according to the work instructions. Click OK. Result: A dialog box appears asking you to confirm adding a new node to the manual ring map. Click Yes, and the new node appears on the Configure Manual Ring screen. | ||||||||
9 |
Are additional nodes to be added?
| ||||||||
10 |
Click on the required Ring ID and Select. Result: The Configure Manual Ring window opens. | ||||||||
11 |
Important! The local node appears at the top of the Configure Manual Ring screen. In the manual ring map, nodes are added in the clockwise (East) direction only from the node that is selected. Select the required node and then click Add Node. Enter the NE Name and Node ID of the new node according to the work instructions. Click OK. Result: A dialog box appears asking you to confirm executing this command. Click Yes, and the new node appears on the Configure Manual Ring screen. | ||||||||
12 |
Are additional nodes to be added?
| ||||||||
13 |
Click on the required Ring ID and Select. Result: The Configure Manual Ring window opens. | ||||||||
14 |
Important! The local node appears at the top of the Configure Manual Ring screen. Click on the node to be deleted and then click Remove Node. Result: A dialog box appears asking you to confirm executing this command. Click Yes and the node is removed from the Configure Manual Ring screen. | ||||||||
15 |
Are additional nodes to be deleted?
| ||||||||
16 |
Click Apply. | ||||||||
17 |
Select Configuration → Activate Manual Ring Map. Result: The Activate Manual Ring Map window opens. | ||||||||
18 |
Select the required Ring ID and click Select. Result: A dialog box appears asking you to confirm activating the manual ring map. Click OK. The inactive manual ring map is now activated. | ||||||||
19 |
Select View → Rings → Ring Map. Select the required Ring ID and click Select. Verify that the manual ring map was provisioned correctly and click Close. End of steps |