Procedure 4-7.1: Install LNW16 and LNW19/19B DS3/EC1 circuit packs
Steps
Important!
The system does not support mixing standard density LNW16 12DS3/EC1 and high-density LNW19/19B 48DS3/EC1 circuit packs in the same function group.
The LNW19 is DA'd and is no longer available
Complete the following steps to install LNW16 and LNW19/19B DS3/EC1 circuit packs.
1 |
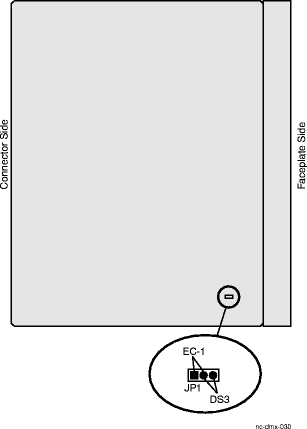
If required, set the jumper on the LNW16 12DS3/EC1 circuit pack(s) for either DS3 or EC-1 service as illustrated in Figure 4-3, Jumper settings for LNW16. Figure 4-3: Jumper settings for LNW16
Important! The LNW19/19B 48DS3/EC1 circuit packs do not have the illustrated jumper; the LNW19/19B circuit pack defaults to DS3 upon installation. Port provisioning using the WaveStar® CIT is supported. The electrical interface (EIF) parameter has possible values of DS3 or EC-1. If you set the jumper on the LNW16 and therefore the whole pack for DS3 or EC-1, you can still provision the ports individually for either DS3 or EC-1 service. The jumper setting only determines how the ports will come up during the initial installation of the circuit pack. | ||||||
2 |
Holding the circuit pack vertically, rotate the circuit pack 90 degrees to the right (clockwise). The faceplate label with LNW( ) should be on your right, next to the fan unit. | ||||||
3 |
Open both faceplate latches and seat the DS3/EC1 circuit pack into the required Function/Growth slot by applying steady pressure to both faceplate latches. Result: The FAULT LED on the DS3/EC1 circuit pack lights for approximately 30 seconds then goes off and then ACTIVE LED lights, indicating successful installation. (Firmware updates may take place that add additional wait time.) Select View → Refresh System View and the circuit pack appears in the WaveStar® CIT System View indicating successful installation. | ||||||
4 |
Is a second (protection) DS3/EC1 circuit pack required in the companion Function/Growth slot?
| ||||||
5 |
Holding the circuit pack vertically, rotate the circuit pack 90 degrees to the right (clockwise). The faceplate label with LNW( ) should be on your right, next to the fan unit. | ||||||
6 |
Open both faceplate latches, and seat the second (protection) DS3/EC1 circuit pack in the companion Function/Growth slot by applying steady pressure to both faceplate latches. Result: The FAULT LED on the DS3/EC1 circuit pack lights for approximately 30 seconds then goes off, indicating successful installation. (Firmware updates may take place that add additional wait time.) Select View → Refresh System View and the circuit pack appears in the WaveStar® CIT System View indicating successful installation. | ||||||
7 |
From the System View window, click the Alarm List button to verify that no alarms, loopbacks, protection switch lockouts, or protection switches are present for the ports on the circuit packs just installed. Result: The NE Alarm List appears. No alarms should be present for the circuit packs just installed. | ||||||
8 |
If required at this time, provision the circuit pack and/or port parameters. Reference: Procedure 4-8: Provision DS3/EC1 circuit packs/ports for service End of steps |