Boot Options
This chapter provides information about configuring boot option parameters.
Topics in this chapter include:
System Initialization
Depending on the chassis, the primary copy of 7705 SAR software is located either on a removable compact flash card that is shipped with the 7705 SAR router or in the router on-board flash memory. The compact flash (cf3) contains a copy of the 7705 SAR image, the bootstrap file (boot.ldr), and the boot options file (BOF). The compact flash can also be used to store configurations and executable images. These configurations and images can also be stored at an FTP file location.
The following chassis have removable compact flash cards:
7705 SAR-8 Shelf V2
7705 SAR-18
7705 SAR-H
7705 SAR-M
All other chassis have integrated memory that cannot be removed.
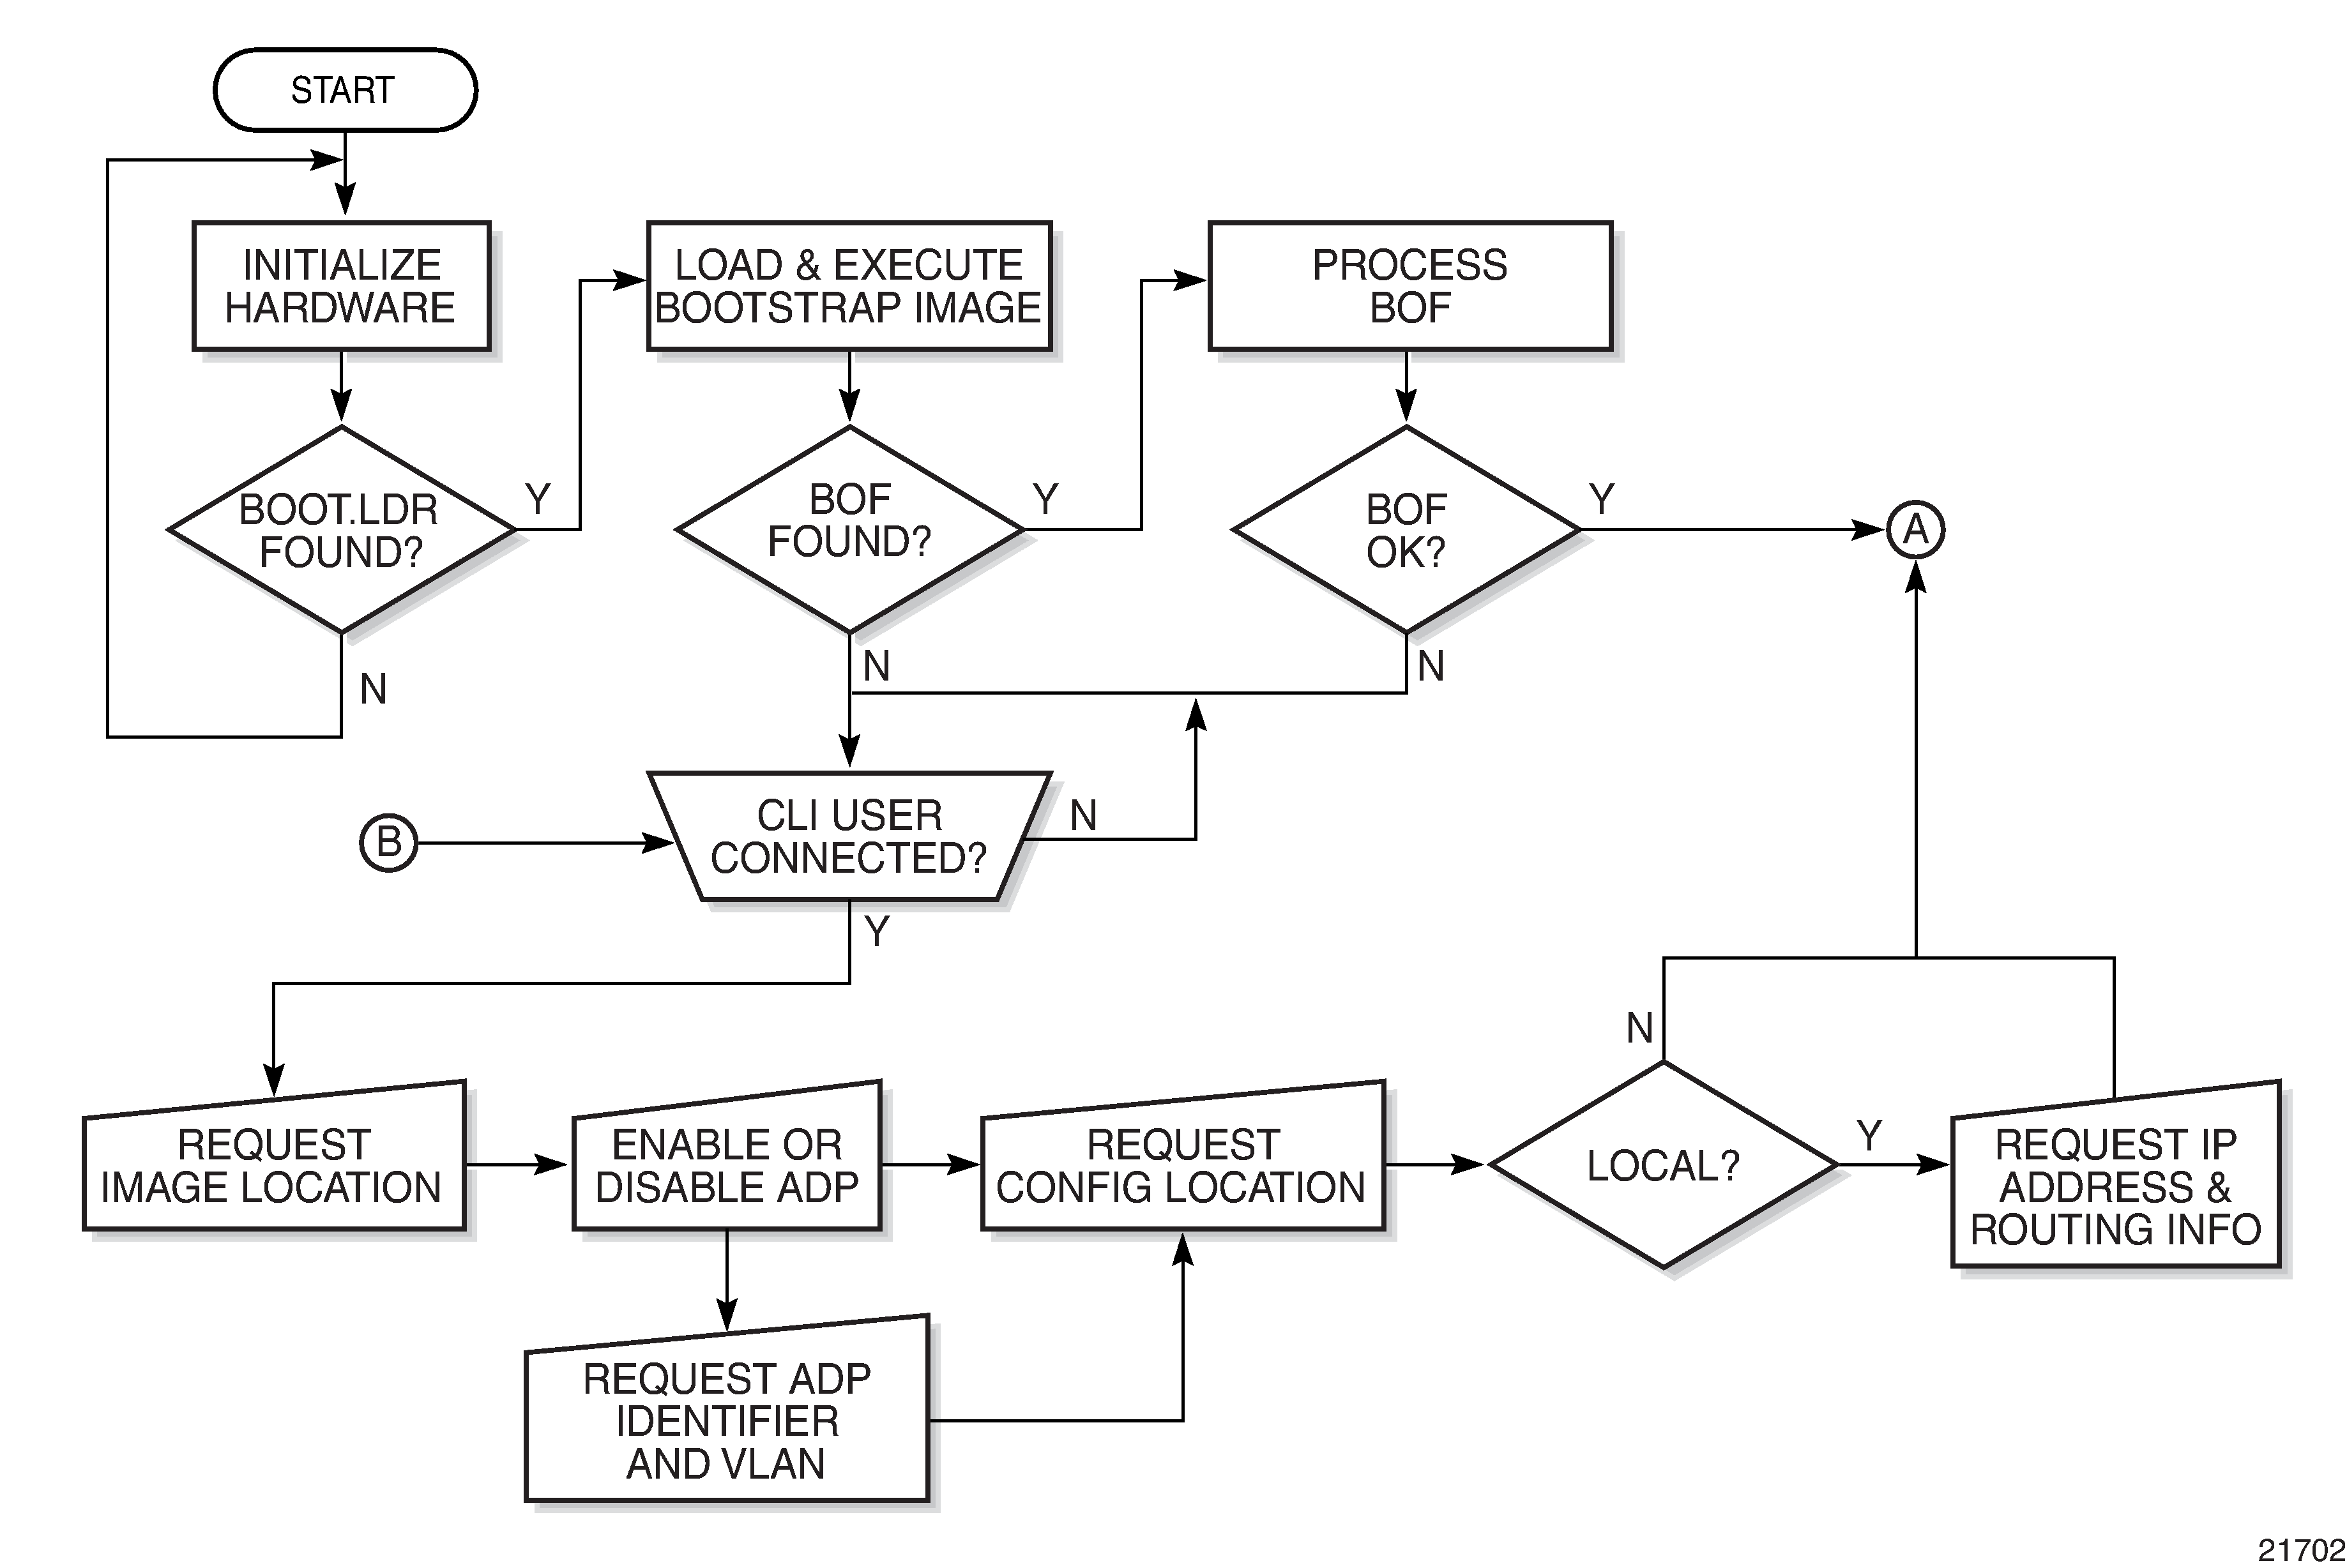
Starting a 7705 SAR begins with hardware initialization (a reset or power cycle). By default, the system searches the compact flash (cf3) for the boot.ldr file (also known as the boot loader or bootstrap file). The boot.ldr file is the image that reads and executes the system initialization commands configured in the BOF. The default value to initially search for the boot.ldr file on cf3 cannot be modified.
If the system cannot load or cannot find the boot.ldr file on the compact flash memory device (cf3), the system reboots continuously in an attempt to successfully find and load the file. If this happens, the available options depend on the chassis.
For the 7705 SAR-8 Shelf V2 and 7705 SAR-18, there are two options:
remove the compact flash, connect it to a PC, and download another software package from OLCS; contact your Nokia support representative for detailed instructions
return the faulty CSM to Nokia for replacement
For the 7705 SAR-M, there are two options:
remove the compact flash, connect it to a PC, and download another software package from OLCS; contact your Nokia support representative for detailed instructions
return the faulty chassis to Nokia for replacement
For the 7705 SAR-H, there are one or two options:
if the compact flash is accessible, connect it to a PC, and download another software package from OLCS; contact your Nokia support representative for detailed instructions
return the faulty chassis to Nokia for replacement
For the 7705 SAR-A, 7705 SAR-Ax, 7705 SAR-Hc, 7705 SAR-Wx, and 7705 SAR-X, return the faulty chassis to Nokia for replacement.
When the bootstrap image is loaded, the BOF is read to obtain the location of the image and configuration files. The BOF should be located on the same compact flash drive as the boot.ldr file. If the BOF cannot be found or loaded, the system prompts the user for alternate software and configuration file locations.
The following example displays the output when the boot sequence is interrupted.
. . .
Hit a key within 3 seconds to change boot parms...
You must supply some required Boot Options. At any prompt, you can type:
   "restart" - restart the query mode.
   "reboot"  - reboot.
   "exit"    - boot with existing values.

Press ENTER to begin, or 'flash' to enter firmware update...

Software Location
-----------------
   You must enter the URL of the TiMOS software.
   The location can be on a Compact Flash device,
   or on the network.

   Here are some examples
      cf3:/timos2.0R1
      ftp://user:passwd@192.168.xx.xxx/./timos2.0R1
      tftp://192.168.xx.xxx/./timos2.0R1

The existing Image URL is 'ftp://*.*@192.168.xx.xxx/./rel/0.0/xx'
Press ENTER to keep it.
Software Image URL:
Using: 'ftp://*.*@192.168.xx.xxx/./rel/0.0/xx'

Configuration File Location
---------------------------
   You must enter the location of configuration
   file to be used by TiMOS. The file can be on
   a Compact Flash device, or on the network.

   Here are some examples
      cf1:/config.cfg
      ftp://user:passwd@192.168.xx.xxx/./config.cfg
      tftp://192.168.xx.xxx/./config.cfg

The existing Config URL is 'cf3:/config.cfg'
Press ENTER to keep it, or the word 'none' for no Config URL.
Config File URL:
Using: 'cf3:/config.cfg'

Network Configuration
---------------------
   You specified a network location for either the
   software or the configuration file. You need to
   assign an IP address for this system.

   The IP address should be entered in standard
   dotted decimal form with a network length.
       example:   192.168.xx.xxx/24
Display on Non-Redundant Models
The existing IP address is 192.168.xx.xxx/20. Press ENTER to keep it.
Enter IP Address:
Using: 192.168.xx.xxx/20
Display on Redundant Models
The existing Active IP address is 192.168.xx.xxx/20. Press ENTER to keep it.
Enter Active IP Address:
Using: 192.168.xx.xxx/20

The existing Standby IP address is 192.168.xx.xxx/20. Press ENTER to keep it.
Enter Standby IP Address (Type 0 if none desired):
Using: 192.168.xx.xxx/20


Would you like to add a static route? (yes/no) y

Static Routes
-------------
   You specified network locations which require
   static routes to reach. You will be asked to
   enter static routes until all the locations become
   reachable.

   Static routes should be entered in the following format:
   prefix/mask next-hop ip-address
       example:     192.168.xx.xxx/16 next-hop 192.168.xx.xxx

Enter route: 1.x.x.0/24 next-hop 192.168.xx.xxx
OK

Would you like to add another static route? (yes/no) n

New Settings
------------
    primary-image    ftp://*.*@192.168.xx.xx/./rel/0.0/xx
    primary-config   cf3:/config.cfg
    address          192.168.xx.xx/20 active
    primary-dns      192.168.xx.xx
    dns-domain       xxx.xxx.com
    static-route     1.x.x.0/24 next-hop 192.168.xx.xxx
    autonegotiate
    duplex           full
    speed            100
    wait             3
    persist          off

Do you want to overwrite cf3:/bof.cfg with the new settings? (yes/no): y

Successfully saved the new settings in cf3:/bof.cfg
System Initialization - Part 1 displays the system initialization sequence.
Files on the Compact Flash displays the compact flash directory structure and filenames.
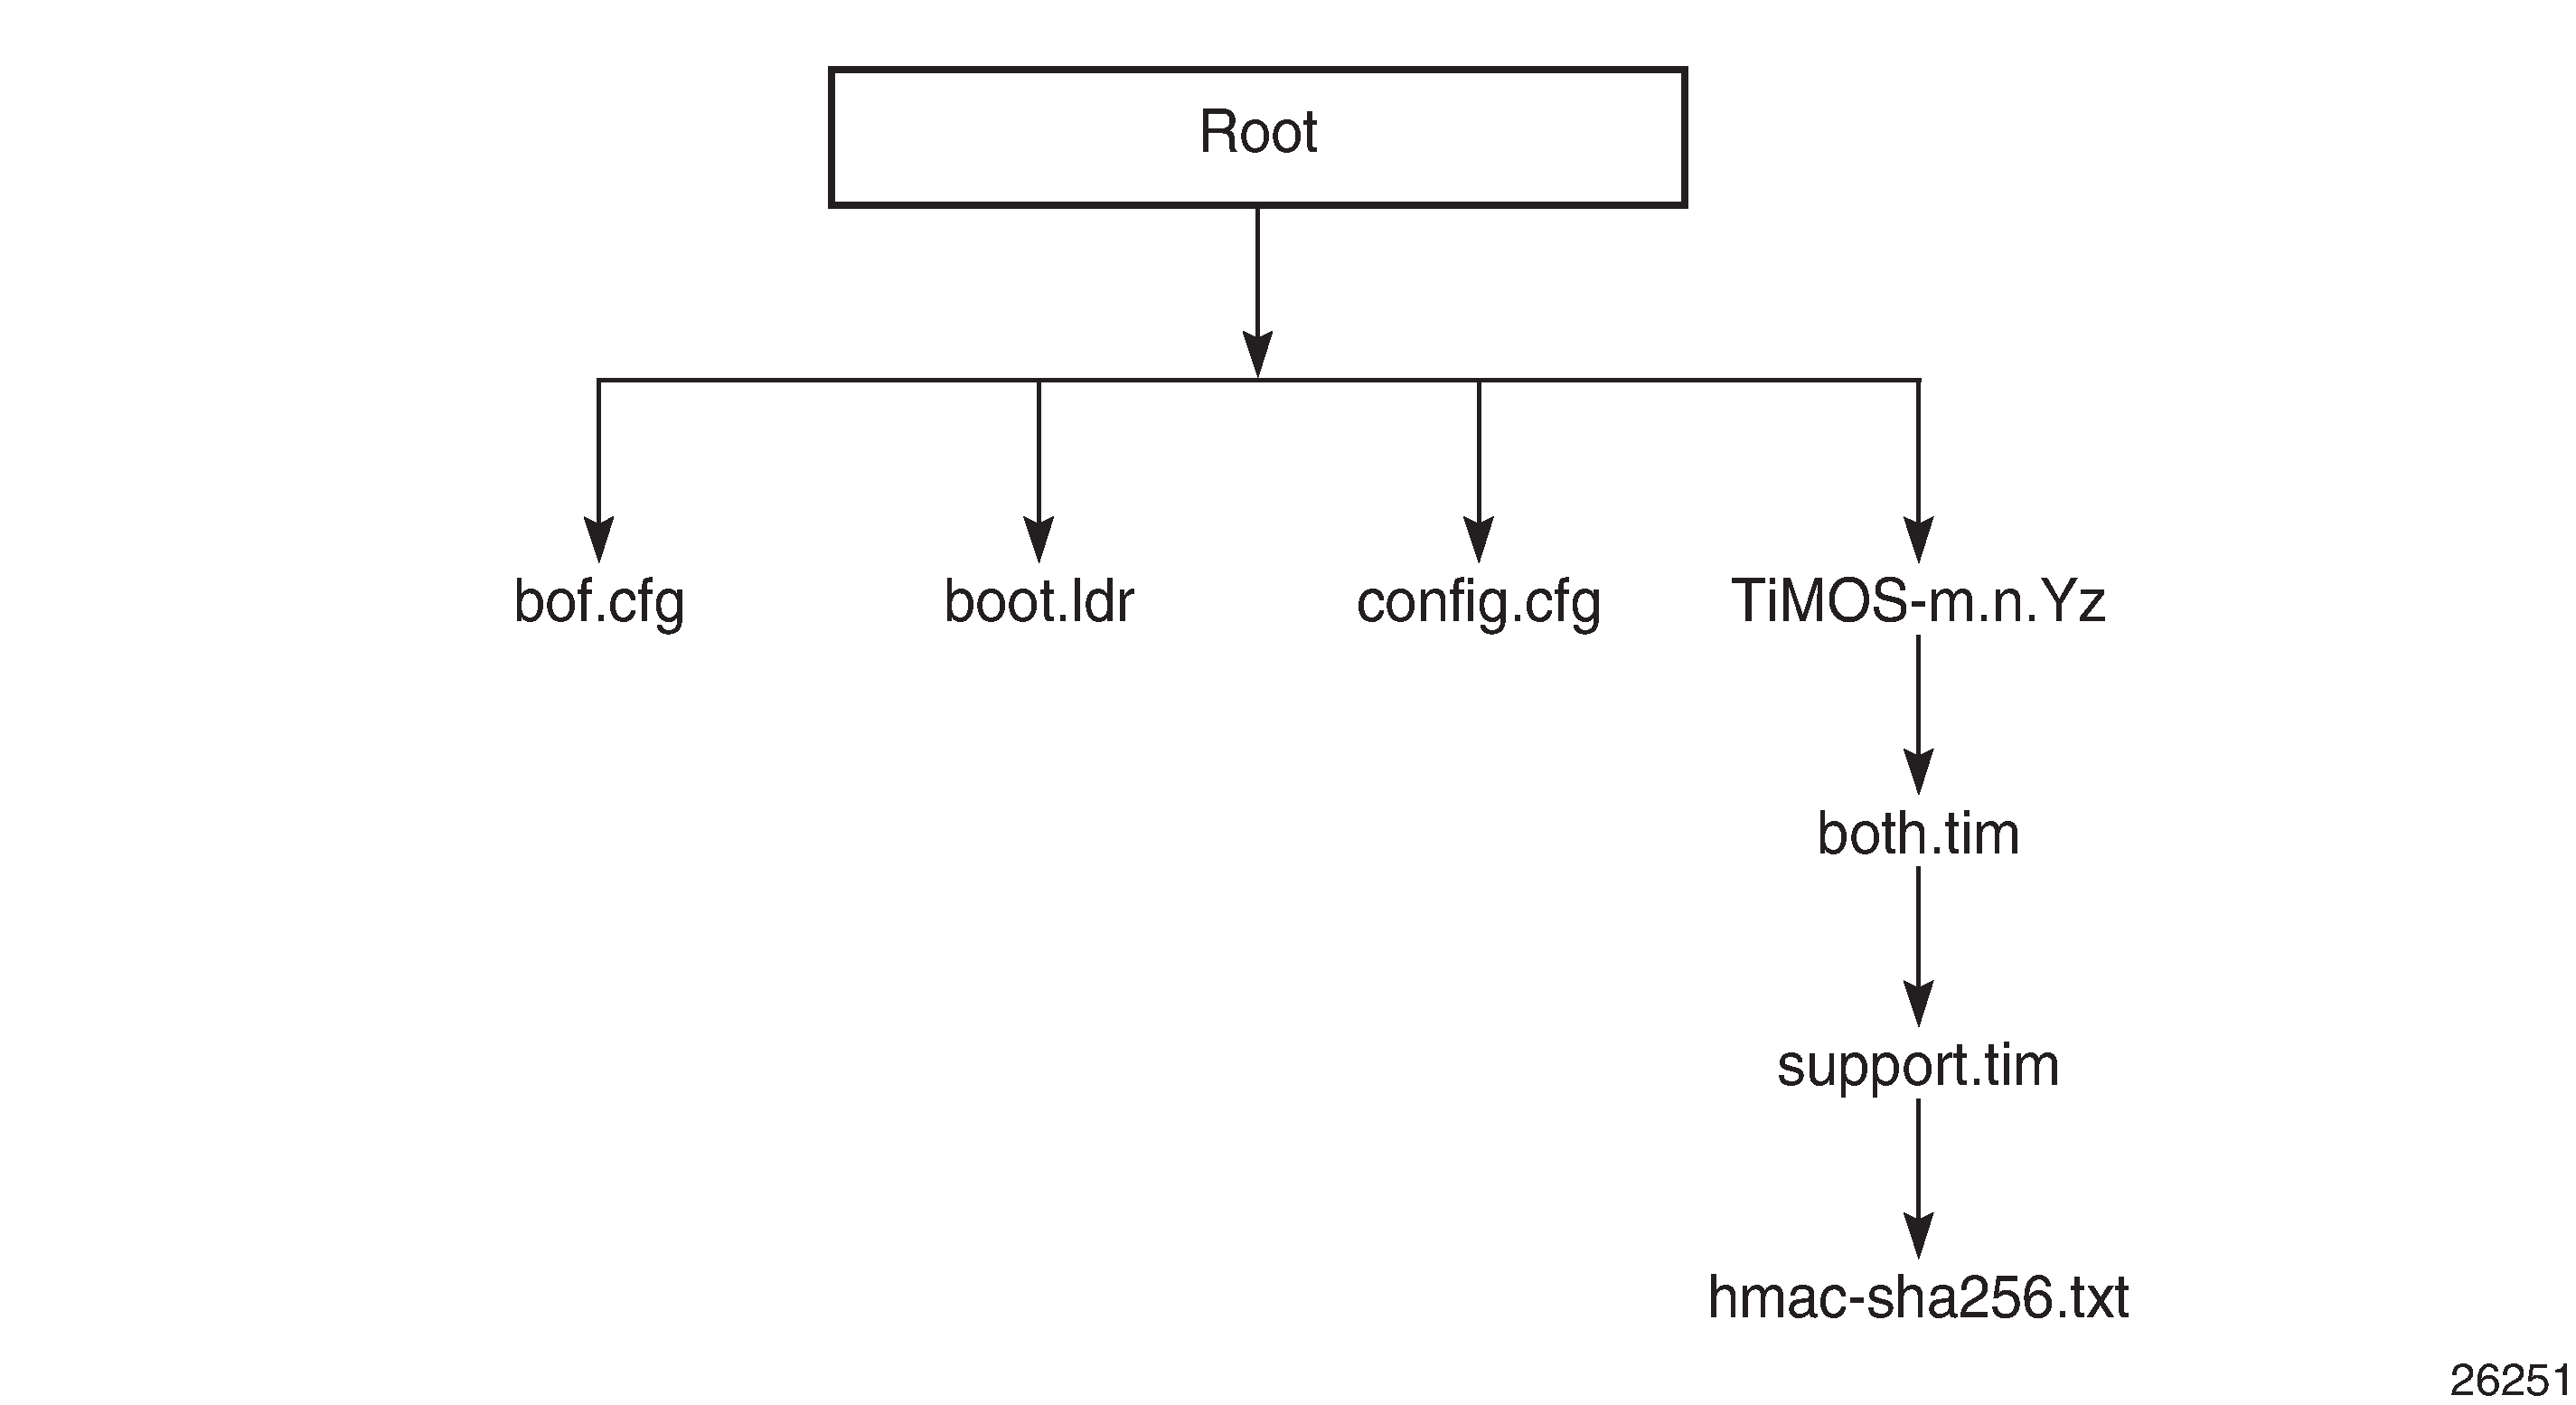
Files on the compact flash are:
bof.cfg — boot options file
boot.ldr — bootstrap image
config.cfg — default configuration file
TiMOS-m.n.Yz:
m — major release number
n — minor release number
Y: type of release
A — Alpha release
B — Beta release
M — maintenance release
R — released software
z — version number
both.tim — CSM image file
support.tim — field-programmable gate array (FPGA) file
hmac-sha256.txt
The support.tim file is included in the software bundles for the following platforms only: 7705 SAR-8 Shelf V2, 7705 SAR-18, 7705 SAR-H, 7705 SAR-M, and 7705 SAR-X.
The hmac-sha256.txt file is supported in FIPS-140-2 mode only. See FIPS-140-2 Mode for more information.
Configuration and Image Loading
When the system executes the boot.ldr file, the initialization parameters from the BOF are processed. Three locations can be configured for the system to search for the files that contain the runtime image. The locations can be local or remote. The first location searched is the primary image location. If not found, the secondary image location is searched, and lastly, the tertiary image location is searched.
If the files cannot be found or loaded, the system enters a console message dialog session prompting the user to enter alternate file locations and filenames.
When the runtime image is successfully loaded, control is passed from the bootstrap loader to the image. Depending on the options in the BOF file, the runtime image loads the configuration in one of two ways.
If ADP is enabled, no configuration files are processed at startup. Instead, ADP discovers the node configuration from the network and the primary-config file is generated based on the configuration discovered by ADP. Any existing primary-config file is backed up, then overwritten.
If ADP is not enabled, the runtime image attempts to locate the configuration file as configured in the BOF. Like the runtime image, three locations can be configured for the system to search for the configuration file. The locations can be local or remote. The first location searched is the primary configuration location. If not found, the secondary configuration location is searched, and lastly, the tertiary configuration location is searched.
The configuration file includes chassis, CSM, adapter card and port configurations, as well as system, routing, and service configurations.
System Initialization - Part 2 displays the boot sequence.

System Initialization With ADP shows the boot sequence if Automatic Discovery Protocol (ADP) is run on the system.

Persistence
The BOF persist parameter can specify whether the system should preserve system indexes when a save command is executed. During a subsequent boot, the index file is read along with the configuration file. As a result, a number of system indexes are preserved between reboots, including the interface index, LSP IDs, and path IDs. If persistence is not required and the configuration file is successfully processed, the system becomes operational. If persistence is required, a matching x.ndx file must be located and successfully processed before the system can become operational. Matching files (configuration and index files) must have the same filename prefix, such as test123.cfg and test123.ndx, and are created at the same time when a save command is executed. The persistence option must be enabled to deploy the Network Management System (NMS). The default is off.
Traps, logs, and console messages are generated if problems occur, and SNMP shuts down for all SNMP gets and sets; however, traps are issued.
Automatic Discovery Protocol
Automatic Discovery Protocol (ADP) is triggered by a factory-installed boot option and automates the initial commissioning of 7705 SAR nodes. When the 7705 SAR is started for the first time, an ADP keyword in the BOF causes automatic discovery to run as part of the TiMOS application image. See the appropriate chassis installation guide, ‟Automatic Discovery Protocol”, for more information on ADP.
ADP supports null, dot1q, and qinq encapsulation on:
all ports on the 6-port Ethernet 10Gbps Adapter card
all ports on the 8-port Gigabit Ethernet Adapter card
all ports on the 10-port 1GigE/1-port 10GigE X-Adapter card (supported on the 7705 SAR-18 only)
all ports on the 6-port SAR-M Ethernet module
all Ethernet ports on the 7705 SAR-A, 7705 SAR-Ax, 7705 SAR-H, 7705 SAR-Hc, 7705 SAR-Wx, and 7705 SAR-X
When run on the system, ADP goes through four basic stages:
Self-discovery
During the self-discovery stage, all supported adapter cards and CSMs are detected and automatically provisioned. The 7705 SAR then brings up all Ethernet ports. Depending on the physical connectivity of the port, some ports may fail to come up. If at least one port connected to the transport network becomes operationally up, ADP moves to the next stage.
Network Discovery
During the network discovery stage, the 7705 SAR sends a DHCP DISCOVER message from all operational ports. DHCP DISCOVER Message Options describes the DHCP DISCOVER message options.
|
Option |
Name |
Description |
|---|---|---|
|
chaddr |
Client HW Address |
The MAC address of the port |
|
51 |
Lease Time |
Always set to Infinite |
|
60 |
Class Identifier |
The class of 7705 SAR router: ALU-AD | SAR-8 ALU-AD | SAR-18 ALU-AD | SAR-A ALU-AD | SAR-Ax ALU-AD | SAR-H ALU-AD | SAR-Hc ALU-AD | SAR-M ALU-AD | SAR-Wx ALU-AD | SAR-X |
|
61 |
Client Identifier |
Not sent by default, but can be configured to be the chassis MAC address or an operator-defined string |
|
82 |
Relay Agent Information |
Network uplink information, such as circuit ID and gateway address, added by the relay agent, if applicable |
No client identifier is sent by default, but you can configure this option during boot-up, or with the auto-discover command, to be the chassis MAC address or a unique string. During boot-up, you can also configure the VLAN ID for ADP with dot1q or qinq encapsulation.
The ADP network discovery phase is enhanced to automatically scan the entire VLAN range on every datapath Ethernet port on supported cards and nodes. During startup a new node acts as an ADP client and send DHCP discovery packets across the entire VLAN range to automatically discover the Ethernet virtual connection (EVC) VLAN. If at least one DHCP discovery packet reaches a server and that server responds with a DHCP offer packet, the ADP client node registers the new interface against that server's VLAN.
Configuration Discovery
During the configuration discovery stage, the DHCP server receives the DHCP DISCOVER message and replies with a DHCP OFFER message that contains an IP address assigned to the network interface. DHCP OFFER Message Options describes the options included in the DHCP OFFER. If any of the required options are not included, the packet may be dropped and not processed.
Option |
Name |
Description |
Required |
|---|---|---|---|
yiaddr |
Client Ip-Address |
The network interface IP address For network consistency, it is recommended that this IP address be a fixed IP address, not assigned randomly from a DHCP server IP pool |
Yes |
1 |
Subnet Mask |
The network interface subnet mask |
Yes |
3 |
Router |
The network interface default gateway Only the first router is used – all others are ignored |
No |
12 |
Host Name |
The network interface hostname |
No |
51 |
Lease Time |
The least time, validated as infinite |
Yes |
54 |
Server Address |
Identifies the DHCP server |
No |
67 |
Bootfile Name |
Contains the ADP instructions or a URL to an ADP instructions file |
No |
DHCP OFFER messages are not dropped if they contain a yiaddr that does not match the local configured subnets on the DHCP relay interface. This applies only to regular IES and VPRN interfaces with no lease-populate configured on the DHCP relay interface.
Option 67 contains further configuration information in the form of keyword text files interpreted by ADP as instructions and executed during the Configuration and Test phases. For basic reachability, option 67 is not mandatory; however, it can be used to send the system IP address of a newly discovered node, making it possible to communicate with the NSP NFM-P and complete ADP.
If a system IP address is made available with the DHCP OFFER and a template configuration file is also executed using the load-cfg keyword, then the system IP address specified in the template configuration file is used instead of the one in the DHCP OFFER.
ADP Instructions describes the keywords used in ADP instructions. A DHCP offer message can contain a maximum of 15 instructions in either the Bootfile Name option, or in an external file referenced by the include keyword. If more than 15 instructions are included, ADP fails to complete and the system generates an error message in the ADP log.
Keyword |
Description |
Format |
|---|---|---|
sys-addr |
Specifies the system interface IP address and the system base routing instance subnet |
sys-addr 10.10.10.1/32 |
sys-name |
Specifies the chassis name |
sys-name SITE43_7705 |
sys-loc |
Specifies the chassis location |
sys-loc 600_MARCH_ROAD |
load-cfg |
Specifies the URL of a template configuration file to load into the router's runtime configuration |
load-cfg ftp://.....@.../7705.cfg |
test-ip |
Specifies an IP address that must be successfully pinged before committing configuration and declaring ADP a success |
test-ip 192.20.2.30 |
include |
Specifies the URL of a file containing additional ADP instructions |
include ftp://.....@.../7705.tmp |
Any BOF keyword |
Interpreted as instructions to update the specified field in the BOF |
As per BOF |
Test and Commit
In order for ADP to be declared successful during the test and commit stage, the discovered configuration must contain an IP address. If the optional test-ip keyword is included in the ADP instructions, the node pings the IP address included in the DHCP OFFER message. If ADP is successful, the system stores the configuration and opens an SSH session to provide remote operators access to the router.
ADP can be controlled, without a connected PC or ASCII terminal, by the ACO/LT button on the Fan module. You can use the ACO/LT button to terminate or restart ADP, or reboot the chassis.
ADP runs in the background to allow continued CLI access for status queries and troubleshooting. Periodic progress updates are sent to the console and can be viewed through a connected PC. Additionally, dump commands are available to display information and detailed logs about ADP during and after running on the system. The logs are not retained over a chassis reboot.
ADP runs only once on a router during initial startup if the automatic discovery is successful. The learned network interface configuration is retained in the local database. On subsequent reboots, the router uses its local database to reload its network configuration. After ADP successfully completes, or if it is manually terminated, the system sends a command to the BOF to remove the ADP keyword. You can terminate ADP at any time while it is running by using the CLI or the ACO/LT button.
Any temporary configuration done by ADP is not stored; however, network configuration and remote access remain enabled to allow the router to be manually provisioned remotely. ADP does not run again on future system reboots unless it is re-enabled via the CLI. If a standby CSM with ADP enabled is inserted into a running system that does not have the ADP keyword in its BOF file, the ADP keyword is automatically removed from the inactive card’s BOF file during reconcile.
FIPS-140-2 Mode
The 7705 SAR provides the fips-140-2 boot command to allow a node to run in FIPS-140-2 mode. This mode limits the use of cryptographic algorithms on both the CSM and data plane to only those that are in accordance with security level 1 of the Federal Information Processing Standards 140 series, version 2 (FIPS-140-2).
FIPS-140-2 mode is supported on the CSM on all 7705 SAR platforms that are equipped with a CSM.
FIPS-140-2 mode is supported on both the CSM and data plane on the following platforms:
7705 SAR-8 Shelf V2 and 7705 SAR-18 when equipped with the following adapter cards:
8-port Gigabit Ethernet Adapter card, version 3
2-port 10GigE (Ethernet) Adapter card
10-port 1GigE/1-port 10GigE X-Adapter card, version 2 (supported on the 7705 SAR-18 only)
7705 SAR-Ax
7705 SAR-H
7705 SAR-Hc
7705 SAR-Wx
7705 SAR-X
On the 7705 SAR-A and 7705 SAR-M, FIPS-140-2 mode is supported on the CSM only.
To support the implementation of FIPS-140-2, the TiMOS software image contains an HMAC-SHA-256 secret key that is verified upon boot-up. When FIPS-140-2 is enabled on the node, an HMAC-SHA-256 integrity check is performed during the loading of the both.tim file to ensure that the calculated HMAC-SHA-256 secret key of the loaded image matches that stored in the hmac-sha256.txt file. This is a signature file that has been added to the TiMOS software image and only applies to FIPS-140-2.
If the image fails the HMAC-SHA-256 check, the node does not boot up, an error message is displayed, and the node tries to reboot the load after a delay of 60 s. The node keeps trying to reboot until the operator cancels the reboot. If the software image is verified by the HMAC-SHA-256 check, the node boots up normally and a message indicating that the software load has passed verification is displayed.
The node performs its normal boot-up sequence, including reading the config.cfg file and loading the configuration. The config.cfg file that is used to boot the node in FIPS-140-2 mode must not contain any configuration that is not supported by the FIPS-140-2 implementation. If such a configuration is present in the config.cfg file when the node boots up, the node loads the config.cfg file until the unsupported configuration is reached and then stops. A failure message is also displayed.
When the node boots in FIPS-140-2 mode, Cryptographic Module Validation Program (CMVP) startup tests are executed on the CSM and applicable data plane. CMVP conditional tests, such as manual key entry tests, pairwise consistency checks, and RNG tests, are executed when required during normal operation.
CSM and Data Path Security Features and Algorithms in FIPS-140-2 Mode
CSM Algorithms and Data Path Algorithms show the CSM and data path security features and associated algorithms for a 7705 SAR node running in FIPS-140-2 mode.
FIPS-140-2 CSM Algorithms |
SSHv2 |
IPSec (IKEv1, IKEv2) |
NGE |
SNMPv3 |
SCP, SFTP |
IGP, BGP, MPLS |
PKI |
|---|---|---|---|---|---|---|---|
Authentication |
RSA 2048 DSA 1024 Preference to RSA in SSH negotiation |
PSK (DH G14, DH G15) |
SSH |
N/A |
SSH |
N/A |
N/A |
Asymmetric Key |
DH G14 (P ≥ 2K prime numbers, q > 224) |
DH G14, DH G15 (P ≥ 2K prime numbers, q > 224) |
SSH |
N/A |
SSH |
N/A |
RSA/ DSA 2048 |
Symmetric Key |
AES-CBC (128, 192, 256) AES-CTR (128, 192, 256) 3DES-CBC |
AES-CBC (128, 192, 256) 3DES-CBC |
N/A |
AES-128 |
SSH |
N/A |
N/A |
| Hash Algorithm | SHA-1 (128) –HMAC-MD5 –HMAC-SHA1-96 –HMAC-MD5-96 |
SHA-1 (128) SHA-2 (256, 384, 512) |
N/A |
SHA-1 (SHA-128) |
SSH |
SHA-1 (128) SHA-2 (256) AES-18- CMAC-96 |
SHA1 SHA-224 SHA-256 SHA-384 SHA-512 |
| Digital Signature | RSA 2048 DSA 1024 |
N/A |
N/A |
N/A |
N/A |
N/A |
RSA/ DSA 2048 |
FIPS-140-2 Data Path Algorithms |
SSHv2 |
IPSec |
NGE/L3 Encryption |
SNMPv3 |
SCP, SFTP |
IGP, BGP, MPLS |
|---|---|---|---|---|---|---|
Authentication |
N/A |
N/A |
N/A |
N/A |
N/A |
N/A |
Asymmetric Key |
N/A |
N/A |
N/A |
N/A |
N/A |
N/A |
Symmetric Key |
N/A |
AES-CBC (128, 192, 256) 3DES-CBC |
AES-CBC (128, 256) |
N/A |
N/A |
N/A |
Hash Algorithm |
N/A |
SHA-1 (128) SHA-2 (256, 384, 512) |
N/A |
N/A |
N/A |
N/A |
SSHv2 Approved Algorithms in FIPS-140-2 Mode
The following algorithms, configured using the client-cipher-list or server-cipher-list command, are available for SSHv2 when the node is running in FIPS-140-2 mode:
aes128-cbc
aes192-cbc
aes256-cbc
aes128-ctr
aes192-ctr
aes256-ctr
Initial System Startup Process Overview
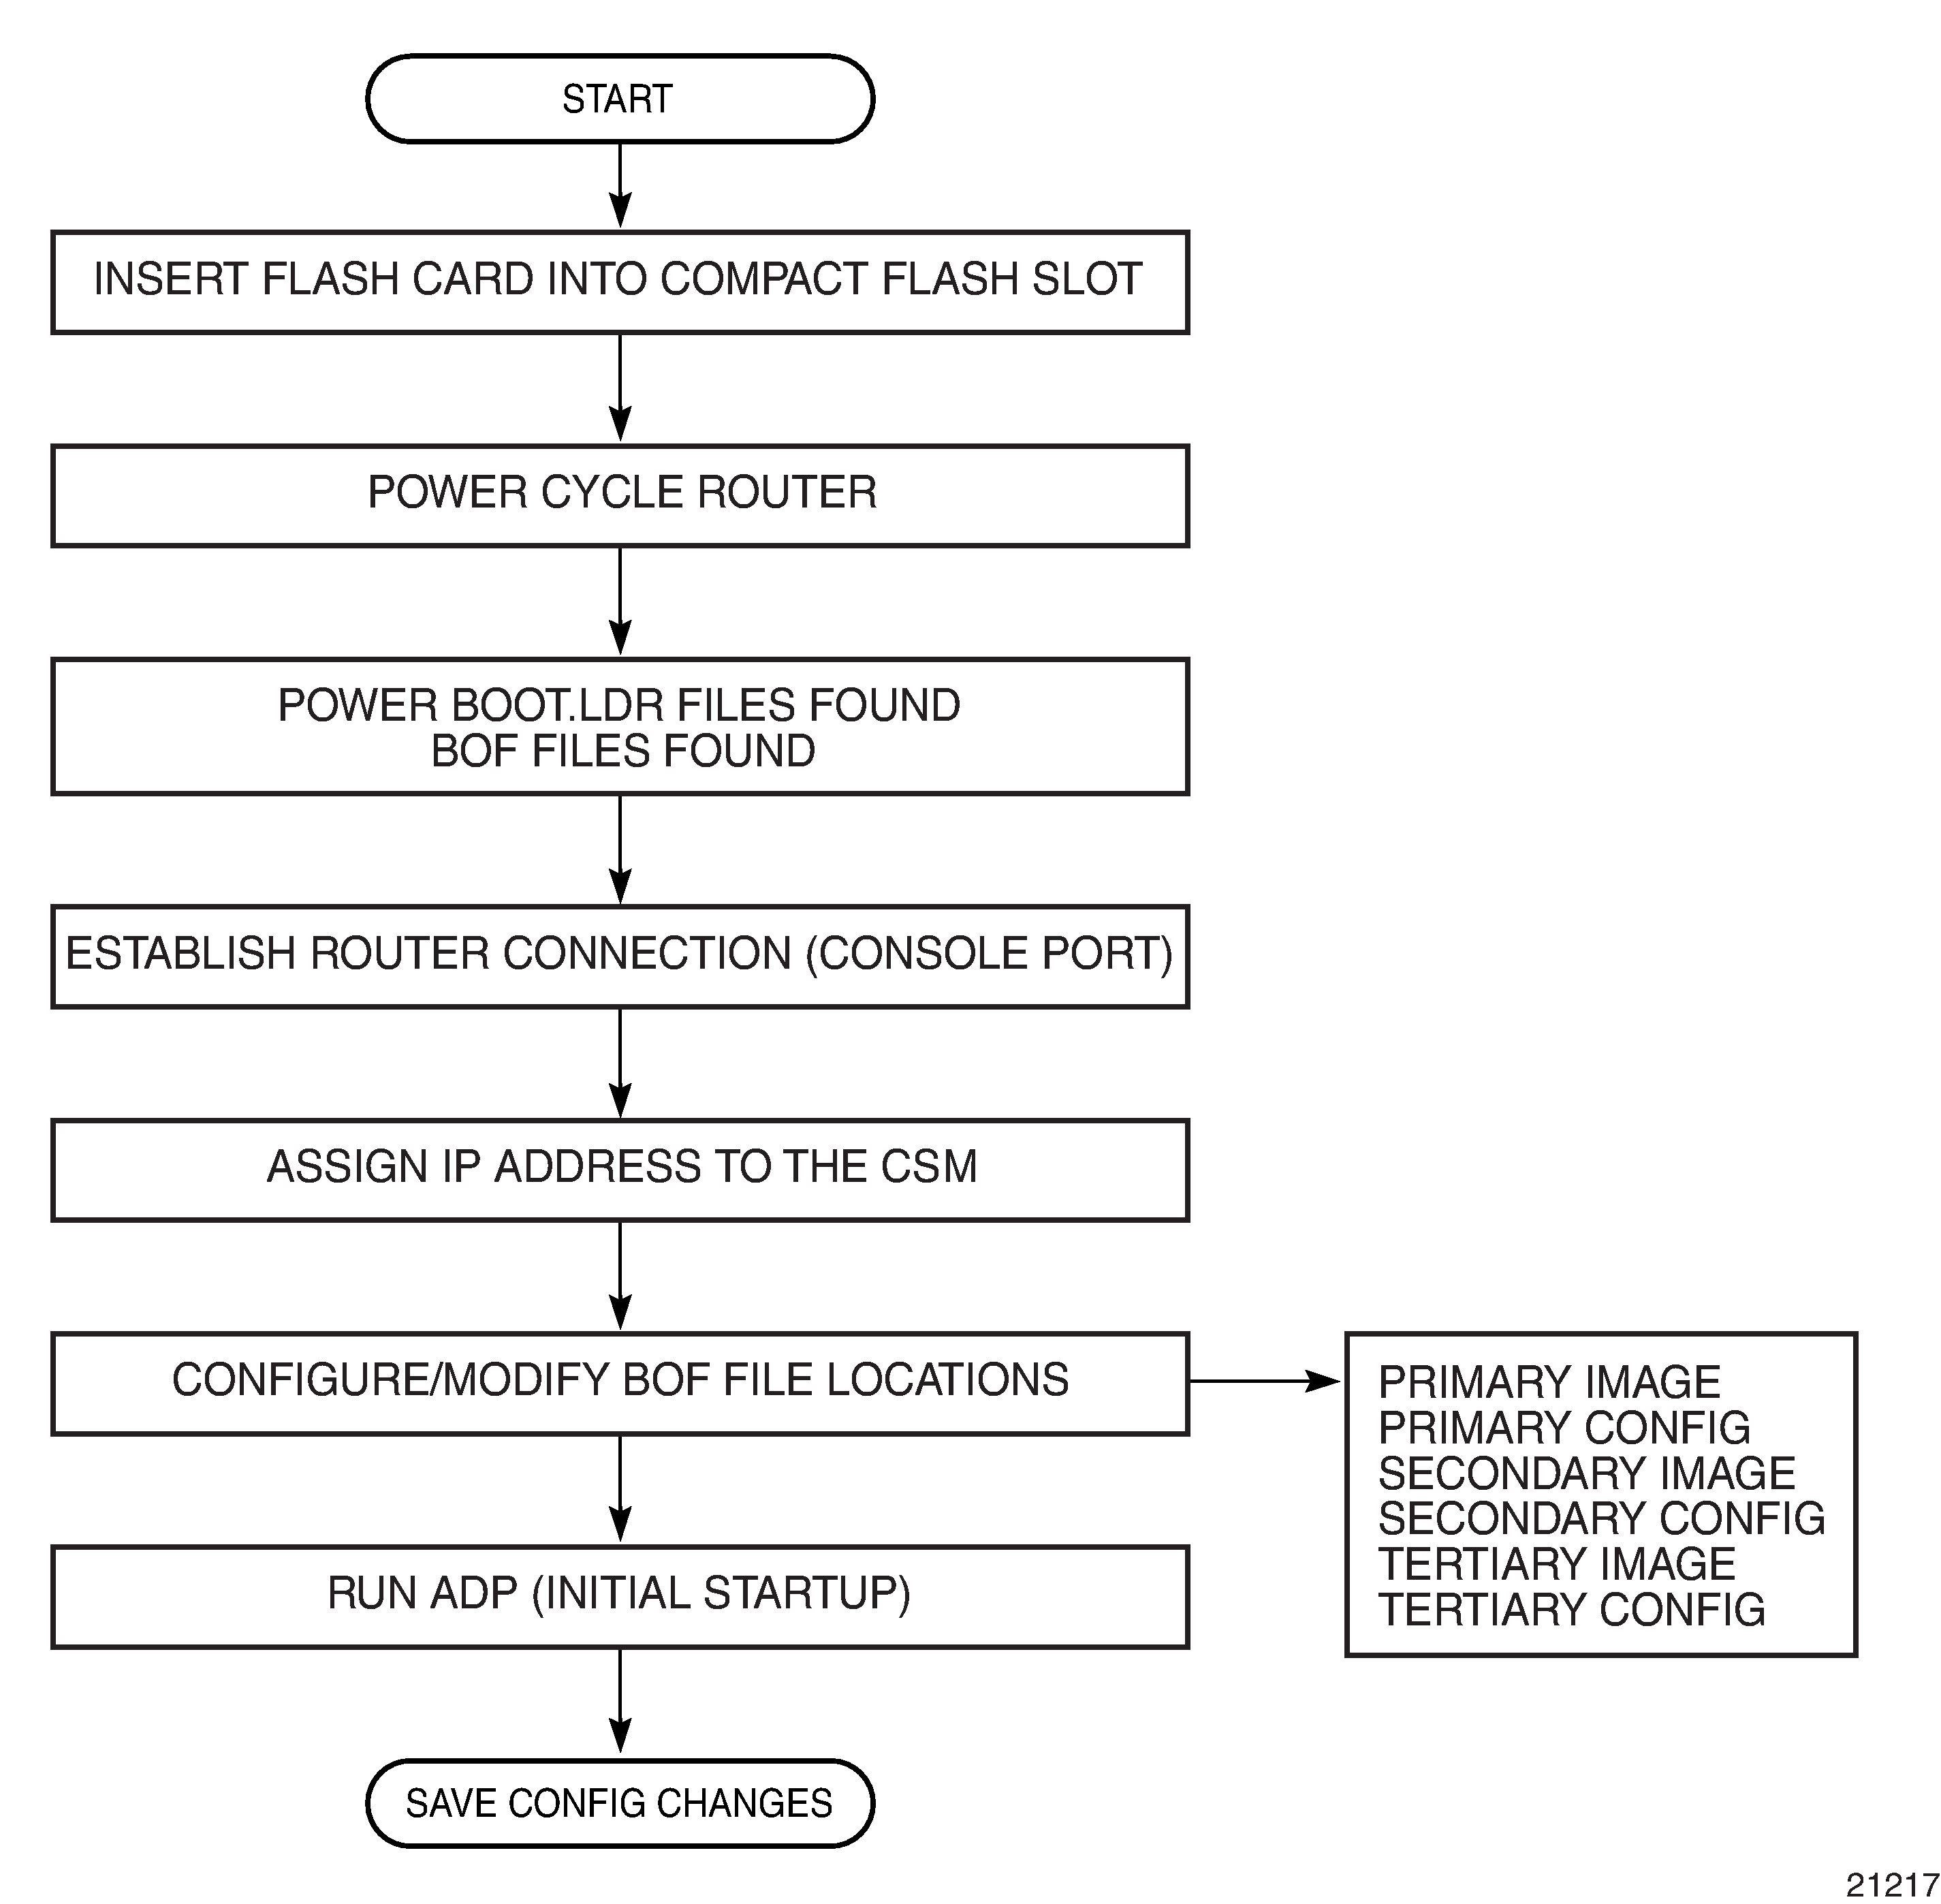
System Startup Flow displays the process for starting a system that has a removable compact flash. This example assumes that the boot loader, BOF, and the image and configuration files are successfully located. For a system with a non-removable compact flash, the first step in System Startup Flow does not apply.
Boot Loader File Protection
Nokia recommends that the boot loader file on all 7705 SAR platforms be upgraded using a specific command. This command is mandatory on all 7705 SAR platforms that do not have a removable compact flash drive and is part of a mechanism that protects the boot loader file from accidental overwrites on these platforms.
The command checks that the new boot.ldr file is a valid image and that it is at least a minimum supported variant for the hardware platform on which it is being loaded. Once this has been verified, the command overwrites the boot.ldr file that is stored on the system.
Before Upgrading
Before starting the upgrade, all 7705 SAR image files must be copied to the cf3: device on the system. Nokia recommends copying all the image files for a given release into an appropriately named subdirectory off the root directory; for example, cf3:\7705-TiMoS-R6.1.R2. Copying the boot.ldr and other files in a given release to a separate subdirectory ensures that all files for that release are available in case it is necessary to downgrade the software version.
Performing the Upgrade
Upgrade the boot loader file using the command admin>update boot-loader source_url, where the source URL specifies the new boot.ldr filename and its location; for example, in the format cf3:\sub_directory\boot.ldr.
On systems with redundant CSMs, the upgraded boot.ldr file can be copied to the secondary CSM by using the command admin>redundancy>synchronize boot-env.
See the latest 7705 SAR Software Release Notes, ‟Standard Software Upgrade Procedure” section, for complete instructions.
Accessing the CLI
There are three ways to access management of the 7705 SAR:
console connection
Telnet connection
SSH connection
To access the CLI to configure the software for the first time, follow these steps:
Ensure that the CSM is installed and power to the chassis is turned on. The 7705 SAR software then automatically begins the boot sequence.
When the boot loader and BOF image and configuration files are successfully located, establish a router connection (console session).
Console Connection
To establish a console connection, you need the following:
an ASCII terminal or a PC running terminal emulation software set to the parameters shown in Console Configuration Parameter Values
a standard serial cable with a male DB9 connector
Parameter |
Value |
|---|---|
Baud Rate |
115 200 |
Data Bits |
8 |
Parity |
None |
Stop Bits |
1 |
Flow Control |
None |
7705 SAR Console Port displays an example of the Console port on a 7705 SAR front panel.

To establish a console connection:
Connect the terminal to the Console port on the front panel (7705 SAR Console Port) using the serial cable.
Power on the terminal.
Establish the connection by pressing the <Enter> key a few times on your terminal keyboard.
At the router prompt, enter the login and password.
The default login is admin.
The default password is admin.
Telnet Connection
Telnet access via a connection to the Management port provides the same options for user and administrator access as those available through the Console port or SSH. You can access the chassis with a Telnet connection from a PC or workstation connected to the network once the following conditions are met:
the chassis has successfully initialized
Telnet connections have been enabled using the config>system>security>telnet-server (or telnet6-server) command
the Management port has been configured using the bof>address command as shown below.
- CLI Syntax:
bofaddress ip-prefix/ip-prefix-length [active | standby]
where:
address is an IPv4 (or IPv6) address
Running Telnet
After the Management port IP address is configured, the CLI can be accessed with a Telnet connection. To establish a Telnet connection, run a Telnet program and issue the telnet command, followed by the Management port IP address.
The following displays an example of a Telnet login:
C:\>telnet 192.168.1.xx1
Login: admin
Password: ########
ALU-1#
The default login is admin.
The default password is admin.
SSH Connection
SSH access via a connection to the Management port provides the same options for user and administrator access as those available through the console port or Telnet; however, SSH is more secure than Telnet. You can access the chassis with an SSH connection from a PC or workstation connected to the network once the following conditions are met:
the chassis has successfully initialized
the Management port has been configured using the bof>address command as shown below:
- CLI Syntax:
bofaddress ip-prefix/ip-prefix-length [active | standby]
where:
address is an IPv4 or IPv6 address
Running SSH
After the IP parameters are configured, the CLI can be accessed with an SSH connection. To establish an SSH connection, run an SSH program and issue the SSH command, followed by -l and the username (optional), followed by the IP address.
The following displays an example of an SSH connection with the default admin user (the default password is admin).
C:\>ssh -l admin 192.168.1.xx1
TiMOS-B-0.0.I2263 both/hops NOKIA SAR 7705
Copyright (c) 2016 Nokia.
All rights reserved. All use subject to applicable license agreements.
Built on Wed Jul 30 00:11:49 EDT 2016 by csabuild in /rel0.0/I2263/panos/main

admin@192.168.1.xx1’s password: ########
Accessing MPT Radios Connected to a 7705 SAR
The Wavence MPT Craft Terminal Launcher (MCT Launcher) is an application that runs on a Windows PC. By connecting the PC to the 7705 SAR out-of-band Management (Mgmt) port on the active CSM, local MPT radios can be configured and monitored using this application.
To reach both local and remote MPT radios, the PC must be connected to an Ethernet data port on an adapter card and requires a service access point (SAP) to enable in-band management. An IES service together with a local DHCP server configured on the 7705 SAR provides this capability to on-site technicians.
The following output shows a configuration example for a local DHCP server and an IES service.
A:SAR18>config>port# info
----------------------------------------------
        description ‟Craft Port for MW Technicians”
        ethernet
        exit
        no shutdown
----------------------------------------------

*A:SAR18>config>router>dhcp>server# info
----------------------------------------------
                description ‟DHCP server to serve on-site microwave technician pc”
                pool ‟craft_pool” create
                    description ‟Single address pool”
                    use-gi-address
                    subnet 192.168.1.0/30 create
                        options
                            subnet-mask 255.255.255.252
                            default-router 192.168.1.1
                        exit
                        address-range 192.168.1.2 192.168.1.2
                    exit
                exit
                no shutdown
----------------------------------------------

*A:SAR18>config>service>ies>if$ info
----------------------------------------------
                address 192.168.1.1/30
                dhcp
                    server 192.168.1.1
                    gi-address 192.168.1.1
                    no shutdown
                exit
                local-dhcp-server ‟craft_dhcp_server”
                sap 1/3/2 create
                exit
----------------------------------------------
See the Wavence MPT Craft Terminal User Manual for Single NE Mode with 7705 SAR for information about using the MCT Launcher.
Configuration Notes
The following describes BOF configuration guidelines and restrictions.
For router initialization on devices with a removable compact flash, the compact flash card must be installed in the compact flash slot.
The loading sequence is based on the order in which it is placed in the configuration file (not based on service ID, for example) and it is loaded as it is read in at boot time.
Configuring the BOF with the CLI
This section provides information to configure BOF parameters with the CLI.
Topics in this section include:
BOF Configuration Overview
The 7705 SAR routers do not contain a boot EEPROM. The boot loader code is loaded from the boot.ldr file. The BOF file performs the following tasks:
Sets up the CSM Management port (speed, duplex, auto)
Assigns the IP address for the CSM Management port
Creates static routes for the CSM Management port
Sets the console port speed
Configures the Domain Name System (DNS) name and DNS servers
Configures the primary, secondary, tertiary configuration source
Configures the primary, secondary, and tertiary image source
Configures operational parameters
Note: The CSM Management port is referred to as the CPM Management port in the CLI to align with the CLI syntax used with other SR products.
Basic BOF Configuration
The parameters that specify the location of the image filename that the router tries to boot from and the configuration file are in the BOF.
The most basic BOF configuration should have the following:
primary address
primary image location
primary configuration location
The following displays an example of a basic BOF configuration.
A:ALU-1# show bof
===============================================================================
BOF (Memory)
===============================================================================
    primary-image    ftp://*:*@xxx.xxx.xxx.xx/home/csahwreg17/images/both.tim
    primary-config   ftp://*:*@ xxx.xxx.xxx.xx /home/csahwreg17/images/dut-a.cfg
    address          xxx.xxx.xxx.xx /24 active
    address          xxx.xxx.xxx.xx /24 standby
    primary-dns      xxx.xxx.xxx.xx
    dns-domain       labs.ca.alcatel-lucent.com
    static-route     xxx.xxx.0.0/16 next-hop xxx.xxx.xxx.x
    autonegotiate
    duplex           full
    speed            100
    wait             3
    persist          off
    FIPS-140-2
    console-speed    115200
===============================================================================
A:ALU-1#
Configuring BOF Parameters
Use the CLI syntax displayed below to configure BOF parameters:
- CLI Syntax:
bofaddress ip-prefix/ip-prefix-length [active | standby]auto-discoverautonegotiateconsole-speed baud-ratedns-domain dns-nameduplex {full | half}encrypt {on | off}encryption-key keyfips-140-2password passwordpersist {on | off}primary-config file-urlprimary-dns ip-addressprimary-image file-urlsave [cflash-id]secondary-config file-urlsecondary-dns ip-addresssecondary-image file-urlspeed speedstatic-route ip-prefix/ip-prefix-length next-hop ip-addresstertiary-config file-urltertiary-dns ip-addresstertiary-image file-urlwait seconds
The following example displays BOF command usage:
- Example:
ALU-1# bofALU-1>bof# address 10.10.10.103/8 activeALU-1>bof# dns-domain ca.alcatel.comALU-1>bof# duplex fullALU-1>bof# encrypt onALU-1>bof# encryption-key hashedALU-1>bof# fips-140-2ALU-1>bof# password hashedALU-1>bof# persist onALU-1>bof# wait 3ALU-1>bof# primary-image cf3:\TIMOS.5.0.R0ALU-1>bof# primary-config cf3:\test123.cfgALU-1>bof# primary-dns 10.10.10.103ALU-1>bof# save cf3:
A:ALU-1# show bof
===============================================================================
BOF (Memory)
===============================================================================
    primary-image    ftp://*:*@192.168.192.64/cephwreg10/images/both.tim
    primary-config   ftp://*:*@192.168.192.64/cephwreg10/images/dut-a.cfg
    encryption-key   *
    password         *
    address          xxx.xxx.xxx.xx /24 active
    primary-dns      138.120.252.55
    secondary-dns    138.120.252.48
    tertiary-dns     138.120.252.49
    dns-domain       labs.ca.alcatel-lucent.com
    static-route     135.121.0.0/16 next-hop 192.168.192.63
    static-route     138.120.0.0/16 next-hop 192.168.192.63
    static-route     152.148.0.0/16 next-hop 192.168.192.63
    autonegotiate
    duplex           full
    speed            100
    wait             4
    persist          off
    no fips-140-2
    console-speed    115200
    encrypt          on
===============================================================================
A:ALU-1#
Configuring BOF Encryption
Use the following CLI syntax to enable encryption of the BOF (bof.cfg) using the AES-256-CBC cipher algorithm.
- CLI Syntax:
bofencrypt {on | off}
After the BOF is encrypted, it can still be modified using the BOF interactive menu. Access to the BOF interactive menu is controlled using a password.
Use the following syntax to set the interactive menu password.
- CLI Syntax:
bofpassword password [hash | hash2]
The password can be in one of the following formats:
a plaintext string between 8 and 32 characters; the plaintext string cannot contain embedded nulls or end with ‟hash” or ‟hash2”
a hashed string between 1 and 64 characters; the selected hashing scheme can be hash or hash2
Note: The hash2 encryption scheme is node-specific and the password cannot be transferred between nodes.
After the password is set, editing of the BOF during a boot process is allowed only if the password is entered correctly (the boot process can be interrupted in order to make BOF changes). If the password is not entered correctly within 30 s, the node reboots whether the BOF is encrypted or not. This adds an additional layer of security that ensures that the BOF is not exposed to any unauthorized user. After the system is booted, changes can be made to the BOF without entering the password.
Configuration File Encryption
Use the following syntax to set the configuration file encryption key using the AES-256-CBC cipher algorithm. This key is used for all configuration files (primary, secondary, and tertiary).
- CLI Syntax:
bofencryption-key key [hash | hash2]
The encryption key can be in one of the following formats:
a plaintext string between 8 and 32 characters; the plaintext string cannot contain embedded nulls or end with ‟hash” or ‟hash2”
a hashed string between 1 and 64 characters; the selected hashing scheme can be hash or hash2
The hash2 encryption scheme is node-specific and the key cannot be transferred between nodes.
After creating the encryption key, use the admin save command to save the encrypted configuration file.
If the admin rollback save command is used, the rollback files are also encrypted.
-
When an encrypted configuration file is opened in a text editor, editing or viewing the file contents is not possible, as the entire file is encrypted.
Service Management Tasks
This section describes system administration commands.
System Administration Commands
Use the following administrative commands to perform management tasks.
- CLI Syntax:
admindisplay-configreboot [active | standby | upgrade] [now]save [file-url] [detail] [index]
Viewing the Current Configuration
Use the following CLI command to display the current configuration. The detail option displays all default values. The index option displays only the persistent indexes.
- CLI Syntax:
admin display-config [detail|index]
The following displays an example of a configuration file:
A:ALU-1# admin display-config
# TiMOS-B-0.0.R3 both/hops NOKIA SAR 7705
# Copyright (c) 2018 Nokia.
# All rights reserved. All use subject to applicable license agreements.
# Built on Wed Jan 17 01:05:13 EST 2016 by csabuild in /re8.0/I297/panos/main

# Generated THU JAN 18 21:21:21 2018 UTC

exit all
configure
#--------------------------------------------------
echo "System Configuration"
#--------------------------------------------------
    system
        name "ALU-1"
exit
        login-control
            idle-timeout disable
            pre-login-message "CSAxxx - 7705" name
        exit
        time
            sntp
                server-address 192.0.2.37 preferred
                server-address 192.0.2.200
                no shutdown
            exit
            zone EST
        exit
        thresholds
            rmon
            exit
        exit
    exit
#--------------------------------------------------
echo "System Security Configuration"
#--------------------------------------------------
    system
        security
            telnet-server
            ftp-server
            snmp
    exit
...exit all

# Finished THU JAN 17 21:57:11 2016 UTC
A:ALU-1#
Modifying or Deleting BOF Parameters
You can modify or delete BOF parameters. The no form of these commands removes the parameter from configuration. The changes remain in effect only during the current power cycle unless a save command is executed. Changes are lost if the system is powered down or the router is rebooted without saving.
-
If you have a dual IPv4/IPv6 BOF address configuration and you are running a Telnet IPv6 session or an SSH session, changing or deleting the active IPv4 address will not affect the session.
-
If you have a dual IPv4/IPv6 BOF address configuration and you are running a Telnet IPv4 session or an SSH session, changing or deleting the active IPv6 address will not affect the session.
-
If you have a dual IPv4/IPv6 BOF address configuration and you change or delete the active IP address that is the same version as the session (for example, you delete the active IPv4 address while running a Telnet IPv4 session), the session will hang once the change executes, and CLI access will be lost. You can either close the session (if possible) or wait until it times out. You must start a new session, using the new or existing active BOF address, to regain CLI access.
-
If there is only one active BOF address on the port (that is, not the dual IPv4/IPv6 configuration), and it is deleted through a Telnet or SSH session, the session will hang and CLI access will be lost. You must use a directly connected console session to create a new BOF address. It is strongly recommended that you do not delete a single active BOF address through Telnet or SSH.
Use the following CLI syntax to remove BOF configuration parameters:
- CLI Syntax:
bofsave [cflash-id]
- Example:
ALU-1# bofALU-1>bof# save cf3:ALU-1>bof#bof#no address ip-prefix/ip-prefix-length [active | standby]no autonegotiateno console-speedno dns-domainencrypt offnoencryption-keynopasswordno primary-configno primary-dnsno primary-imageno secondary-configno secondary-dnsno secondary-imageno static-route ip-prefix/ip-prefix-length next-hop ip-addressno tertiary-configno tertiary-dnsno tertiary-image
Saving a Configuration
If you modify a configuration file, the changes remain in effect only during the current power cycle unless a save command is executed. Changes are lost if the system is powered down or the router is rebooted without saving.
Specify the file URL location to save the running configuration. If a destination is not specified, the files are saved to the location where the files were found for that boot sequence. The same configuration can be saved with different filenames to the same location or to different locations.
The detail option adds the default parameters to the saved configuration.
The index option forces a save of the index file.
Use either of the following CLI syntaxes to save a configuration:
- CLI Syntax:
bofsave [cflash-id]
- Example:
ALU-1# bofALU-1>bof# save cf3:ALU-1>bof#
- CLI Syntax:
admin save [file-url][detail][index]
- Example:
ALU-1# admin save cf3:\test123.cfgSaving config.# Saved to cf3:\test123.cfg... completeALU-1#
If the persist option is enabled and the admin save file-url command is executed with an FTP path used as the file-url parameter, two FTP sessions simultaneously open to the FTP server. The FTP server must be configured to allow multiple sessions from the same login; otherwise, the configuration and index files will not be saved correctly.
If BOF encryption is on, the contents of the BOF will be encrypted and unreadable when saved.
Saving a Configuration to a Different Filename
Save the current configuration with a unique filename to have additional backup copies and to edit parameters with a text editor. You can save your current configuration to an ASCII file.
Use either of the following CLI syntaxes to save a configuration to a different location:
- CLI Syntax:
bofsave [cflash-id]
- Example:
ALU-1# bofALU-1>bof# save cf3:ALU-1>bof#
or
- CLI Syntax:
admin save [file-url][detail][index]
- Example:
ALU-1>admin save cf3:\testABC.cfgSaving config.# Saved to cf3:\testABC.cfg... completeALU-1#
Rebooting
When an admin>reboot command is issued, routers with redundant CSMs are rebooted. Changes are lost unless the configuration is saved. Use the admin>save file-url command to save the current configuration. If no command line options are specified, the user is prompted to confirm the reboot operation.
Use the following CLI syntax to reboot:
- CLI Syntax:
adminreboot [active | standby] [now]
- Example:
ALU-1>admin# rebootA:DutA>admin# rebootAre you sure you want to reboot (y/n)? yResetting...OKNokia 7705 Boot ROM. Copyright 2016Nokia.All rights reserved. All use is subject to applicablelicense agreements.....
BOF Command Reference
Command Hierarchies
Configuration Commands
bof
    - [no] address ip-prefix/ip-prefix-length [active | standby]
    - auto-discover [id client-identifier] [vlan vlan-id]
    - no auto-discover
    - [no] autonegotiate
    - console-speed baud-rate
    - no console-speed
    - dns-domain dns-name
    - no dns-domain
    - duplex {full | half}
    - encrypt {on | off}
    - encryption-key key [hash | hash2]
    - no encryption-key
    - [no] fips-140-2
    - password password [hash | hash2]
    - no password
    - persist {on | off}
    - primary-config file-url
    - no primary-config
    - primary-dns ip-address
    - no primary-dns
    - primary-image file-url
    - no primary-image
    - save [cflash-id]
    - secondary-config file-url
    - no secondary-config
    - secondary-dns ip-address
    - no secondary-dns
    - secondary-image file-url
    - no secondary-image
    - speed speed
    - [no] static-route ip-prefix/prefix-length next-hop ip-address
    - tertiary-config file-url
    - no tertiary-config
    - tertiary-dns ip-address
    - no tertiary-dns
    - tertiary-image file-url
    - no tertiary-image
    - wait seconds
Show Commands
show
    - bof [cflash-id | booted]
    - boot-messages
Command Descriptions
Configuration Commands
File Management Commands
bof
Syntax
bof
Context
<root>
Description
This command creates or edits the boot options file (BOF) for the specified local storage device.
A BOF specifies where the system searches for runtime images, configuration files, and other operational parameters during system initialization.
BOF parameters can be modified. Changes can be saved to a specified compact flash. The BOF must be located in the root directory of either an internal or external compact flash local to the system and have the mandatory filename of bof.cfg.
When modifications are made to in-memory parameters that are currently in use or operating, the changes are effective immediately. For example, if the IP address of the CSM Management port is changed, the change takes place immediately.
Only one entry of the BOF configuration command statement can be saved after the statement has been found to be syntactically correct.
When opening an existing BOF that is not the BOF used in the most recent boot, a message is issued notifying the user that the parameters do not affect the operation of the node.
The pound (#) sign is used at the beginning of the File syntax. Using the command file type bof.cfg displays the # character as a comment delimiter at the top of the raw file. No default BOF exists. The router boots with the factory default boot sequence and options.
Default
n/a
encrypt
Syntax
encrypt {on | off}
Context
bof
Description
This command enables or disables encryption of the BOF (bof.cfg) using the AES256 cipher algorithm.
After the BOF is encrypted, it can still be modified using the BOF interactive menu. Access to the BOF interactive menu is controlled by a password set with the password command.
After BOF encryption is configured, use the bof save command to save the encrypted file.
Default
encrypt off
Parameters
- on
enables BOF encryption
- off
disables BOF encryption
password
Syntax
password password [hash | hash2]
no password
Context
bof
Description
This command configures a password to access the BOF interactive menu at startup.
After the password is configured, the BOF interactive menu is accessible only when the correct password is entered. If the correct password is not entered within 30 s, the node reboots.
The no form of this command removes the configured password.
Default
no password
Parameters
- password
specifies the password
If the hash or hash2 parameter is not configured, the password is entered in plaintext and the password length must be between 8 and 32 characters. A plaintext password cannot contain embedded nulls or end with ‟hash” or ‟hash2”.
If the hash or hash2 parameter is configured, the password is hashed and the password length must be between 1 and 64 characters.
- hash
specifies that the password is entered in an encrypted form
- hash2
specifies that the password is entered in a more complex encrypted form. The hash2 encryption scheme is node-specific and the password cannot be transferred between nodes.
save
Syntax
save [cflash-id]
Context
bof
Description
This command uses the boot option parameters currently in memory and writes them from the BOF to the specified compact flash.
The BOF must be located in the directory of the compact flash drives local to the system and have the mandatory filename of bof.cfg.
The BOF is saved to the compact flash drive associated with the active CSM. The slot name is not case-sensitive. You can use uppercase or lowercase ‟A” or ‟B”.
Command usage:
bof save — saves the BOF to the default drive (cf3:) associated with the active CSM (either in slot A or B)
bof save cf3: — saves the BOF to cf3: associated with the active CSM (either in slot A or B)
To save the BOF to a compact flash drive associated with the standby CSM (for example, the redundant (standby) CSM is installed in slot B), specify the -A or -B option.
Command usage:
bof save cf3-A: — saves the BOF to cf3: associated with the CSM in slot A whether it is active or standby
bof save cf3-B: — saves the BOF to cf3: associated with the CSM in slot B whether it is active or standby
The slot name is not case-sensitive. You can use uppercase or lowercase ‟A” or ‟B”.
The bof save and show bof commands allow you to save to or read from the compact flash of the standby CSM. Use the show card command to determine the active and standby CSM (A or B).
Default
saves must be explicitly executed; the BOF is saved to cf3: if a location is not specified
Parameters
- cflash-id
the compact flash ID where the bof.cfg is to be saved (see URL Types and Syntax for parameter descriptions and values)
BOF Processing Control Commands
wait
Syntax
wait seconds
Context
bof
Description
This command configures a pause, in seconds, at the start of the boot process, which allows system initialization to be interrupted at the console.
When system initialization is interrupted, the operator is allowed to manually override the parameters defined in the BOF.
Only one wait command can be defined in the BOF.
Default
3
Parameters
- seconds
the time to pause at the start of the boot process, in seconds
Console Port Configuration Commands
console-speed
Syntax
console-speed baud-rate
no console-speed
Context
bof
Description
This command configures the console port baud rate.
When this command is issued while editing the BOF file used for the most recent boot, both the BOF file and the active configuration are changed immediately.
The no form of the command reverts to the default value.
Default
115200 — console configured for 115 200 b/s operation
Parameters
- baud-rate
the console port baud rate, expressed as a decimal integer
Image and Configuration Management Commands
encryption-key
Syntax
encryption-key key [hash | hash2]
no encryption-key
Context
bof
Description
This command creates a key for configuration file encryption and hashing using the AES256 cipher algorithm. This key is used for all configuration files (primary, secondary, and tertiary).
After creating the encryption key, use the admin save command to save the encrypted file.
The no form of this command deletes the configured encryption key.
Default
no encryption-key
Parameters
- key
specifies the encryption key
If the hash or hash2 parameter is not configured, the key is entered in plaintext and the key length must be between 8 and 32 characters. A plaintext key cannot contain embedded nulls or end with ‟hash” or ‟hash2”.
If the hash or hash2 parameter is configured, the key is hashed and the key length must be between 1 and 64 characters.
- hash
specifies that the key is entered in an encrypted form
- hash2
specifies that the key is entered in a more complex encrypted form. The hash2 encryption scheme is node-specific and the key cannot be transferred between nodes.
persist
Syntax
persist {on | off}
Context
bof
Description
This command specifies whether the system preserves system indexes when a save command is executed. During a subsequent boot, the index file is read along with the configuration file. As a result, a number of system indexes are preserved between reboots, including the interface index, LSP IDs, and path IDs. This reduces resynchronizations of the Network Management System (NMS) with the affected network element.
If persist is on and the reboot with the appropriate index file fails, SNMP is operationally shut down to prevent the management system from accessing and possibly synchronizing with a partially booted or incomplete network element. To enable SNMP access, enter the config>system>snmp>no shutdowncommand.
If persist is enabled and the admin save <url> command is executed with an FTP path used as the <url> parameter, two FTP sessions simultaneously open to the FTP server. The FTP server must be configured to allow multiple sessions from the same login; otherwise, the configuration and index files are not saved correctly.
Persistency files (.pst) should not be saved on the same disk as the configuration files and the image files.
When an operator sets the location for the persistency file, the system checks to ensure that the disk has enough free space. If there is not enough free space, the persistency does not become active and a trap is generated. The operator must free up adequate disk space before persistency becomes active. The system performs a space availability check every 30 seconds. As soon as the space is available the persistency becomes active on the next 30-second check.
Default
off
Parameters
- on
preserves the system index when saving the configuration
- off
disables the system index saves between reboots
primary-config
Syntax
primary-config file-url
no primary-config
Context
bof
Description
This command specifies the name and location of the primary configuration file.
The system attempts to use the configuration specified in primary-config. If the specified file cannot be located, the system automatically attempts to obtain the configuration from the location specified in secondary-config and then in tertiary-config.
If an error in the configuration file is encountered, the boot process aborts.
The no form of the command removes the primary-config configuration.
Default
n/a
Parameters
- file-url
the primary configuration file location (see URL Types and Syntax for parameter descriptions)
primary-image
Syntax
primary-image file-url
no primary image
Context
bof
Description
This command specifies the primary directory location for runtime image file loading.
The system attempts to load all runtime image files configured in the primary-image first. If this fails, the system attempts to load the runtime images from the location configured in the secondary-image. If the secondary image load fails, the tertiary image specified in tertiary-image is used.
The no form of the command removes the primary-image configuration.
Default
n/a
Parameters
- file-url
the location-url can either be local (this CSM) or a remote FTP server (see URL Types and Syntax for parameter descriptions)
secondary-config
Syntax
secondary-config file-url
no secondary-config
Context
bof
Description
This command specifies the name and location of the secondary configuration file.
The system attempts to use the configuration as specified in secondary-config if the primary config cannot be located. If the secondary-config file cannot be located, the system attempts to obtain the configuration from the location specified in the tertiary-config.
If an error in the configuration file is encountered, the boot process aborts.
The no form of the command removes the secondary-config configuration.
Default
n/a
Parameters
- file-url
the secondary configuration file location (see URL Types and Syntax for parameter descriptions)
secondary-image
Syntax
secondary-image file-url
no secondary-image
Context
bof
Description
This command specifies the secondary directory location for runtime image file loading.
The system attempts to load all runtime image files configured in the primary-image first. If this fails, the system attempts to load the runtime images from the location configured in the secondary-image. If the secondary image load fails, the tertiary image specified in tertiary-image is used.
The no form of the command removes the secondary-image configuration.
Default
n/a
Parameters
- file-url
the file-url can either be local (this CSM) or a remote FTP server (see URL Types and Syntax for parameter descriptions)
tertiary-config
Syntax
tertiary-config file-url
no tertiary-config
Context
bof
Description
This command specifies the name and location of the tertiary configuration file.
The system attempts to use the configuration specified in tertiary-config if both the primary and secondary config files cannot be located. If this file cannot be located, the system boots with the factory default configuration.
If an error in the configuration file is encountered, the boot process aborts.
The no form of the command removes the tertiary-config configuration.
Default
n/a
Parameters
- file-url
the tertiary configuration file location (see URL Types and Syntax for parameter descriptions)
tertiary-image
Syntax
tertiary-image file-url
no tertiary-image
Context
bof
Description
This command specifies the tertiary directory location for runtime image file loading.
The system attempts to load all runtime image files configured in the primary-image first. If this fails, the system attempts to load the runtime images from the location configured in the secondary-image. If the secondary image load fails, the tertiary image specified in tertiary-image is used.
All runtime image files (both.tim) must be located in the same directory.
The no form of the command removes the tertiary-image configuration.
Default
n/a
Parameters
- file-url
the file-url can either be local (this CSM) or a remote FTP server (see URL Types and Syntax for parameter descriptions)
CSM Management Configuration Commands
address
Syntax
[no] address ip-prefix/ip-prefix-length [active | standby]
Context
bof
Description
This command assigns an IP address to the CSM Management port in the running configuration and the BOF on the active CSM, or the CSM Management port on the standby CSM for systems using redundant CSMs.
Either an IPv4 or IPv6 address can be assigned to the CSM Management port. If an address already exists, it is overwritten with the new address. If no address exists, a new one is created.
Before changing an active IPv4 or IPv6 address, you must ensure that:
all static routes are removed
the standby address is removed; address changes are not allowed unless both addresses are on the same subnet
In previous releases, if an IPv6 address was assigned to the CSM Management port, an IPv4 address was also required on the port. This setup is no longer required; therefore, for configurations with both IPv4 and IPv6 addresses, the IPv4 address can be deleted from the BOF.
The no form of the command deletes the IP address from the CSM Management port.
If you delete an active IPv4 address from the BOF, or you replace an IPv4 address with an IPv6 address, the following must be considered.
IPv4 static routes must be removed before the IPv4 active address can be deleted.
If remote directory locations are used for the primary image file (primary-image) and primary configuration file (primary-config), you must also change the primary image and primary configuration paths (as well as the secondary and tertiary image and configuration files) to use IPv6 addresses. Otherwise, when the 7705 SAR reboots, it tries to load the image using IPv4, which causes continuous reboots.
If a primary DNS server is configured (primary-dns), the server address must be changed to an IPv6 address in order for it to be reachable.
If the IPv4 address is removed before any Telnet sessions can be established, Telnet IPv6 servers must be enabled using the config>system>security>telnet6-server command. See the 7705 SAR System Management Guide for the command description.
If you have a dual IPv4/IPv6 BOF address configuration and you are running a Telnet IPv6 session or an SSH session, changing or deleting the active IPv4 address does not affect the session.
If you have a dual IPv4/IPv6 BOF address configuration and you are running a Telnet IPv4 session or an SSH session, changing or deleting the active IPv6 address does not affect the session.
If you have a dual IPv4/IPv6 BOF address configuration and you change or delete the active IP address that is the same version as the session (for example, you delete the active IPv4 address while running a Telnet IPv4 session), the session hangs after the change executes, and CLI access is lost. You can either close the session (if possible) or wait until it times out. You must start a new session, using the new or existing active BOF address, to regain CLI access.
If there is only one active BOF address on the port (that is, not the dual IPv4/IPv6 configuration), and it is deleted through a Telnet or SSH session, the session hangs and CLI access is lost. You must use a directly connected console session to create a new BOF address. It is strongly recommended that you do not delete a single active BOF address through Telnet or SSH.
Default
no address — there are no IP addresses assigned to CSM Management ports
Parameters
- ip-prefix/ip-prefix-length
the IP address for the CSM Management port
- active | standby
specifies which CSM Management port address is being configured: the active CSM Management port or the standby CSM Management port
auto-discover
Syntax
auto-discover [id client-identifier][vlan vlan-id]
no auto-discover
Context
bof
Description
This command enables ADP as part of the boot-up sequence by adding an ADP keyword to the BOF file. ADP runs the next time the chassis is rebooted. You can also use this command to specify an optional unique identifier to use in the automatic discovery broadcast. You can use any unique identifier of up to 16 characters. If you specify mac, the chassis MAC address is used. If you run ADP with 802.1q encapsulation, you can specify the VLAN ID.
Parameters
- client-identifier
indicates the unique system identifier to use in the auto-discovery broadcast. If you use MAC as the client identifier, the chassis MAC address is used.
- vlan-id
indicates the VLAN ID for ADP with 802.1q encapsulation
autonegotiate
Syntax
[no] autonegotiate
Context
bof
Description
This command enables speed and duplex autonegotiation on the CSM Management port in the running configuration and the BOF.
When autonegotiation is enabled, the link attempts to automatically negotiate the link speed and duplex parameters. If autonegotiation is enabled, then the configured duplex and speed parameters are ignored.
The no form of the command disables the autonegotiate feature on this port.
Default
autonegotiate
duplex
Syntax
duplex {full | half}
Context
bof
Description
This command configures the duplex mode of the CSM Management port when autonegotiation is disabled in the running configuration and the BOF.
This configuration command allows for the configuration of the duplex mode of the CSM Management port. If the port is configured to autonegotiate, this parameter is ignored.
Default
duplex full — full duplex operation
Parameters
- full
sets the link to full duplex mode
- half
sets the link to half duplex mode
fips-140-2
Syntax
[no]fips-140-2
Context
bof
Description
This command is used to enable the node to support security level 1 of Federal Information Processing Standards 140 series, version 2 (FIPS-140-2). This mode limits the use of cryptographic algorithms on both the CSM and data plane to only those that are in accordance with FIPS-140-2. The node must be rebooted after executing this command in order for the node to begin operating in FIPS-140-2 mode.
The no form of the command disables support for security level 1 of FIPS-140-2 on the node.
Default
no fips-140-2
speed
Syntax
speed speed
Context
bof
Description
This command configures the speed for the CSM Management port when autonegotiation is disabled in the running configuration and the BOF.
If the port is configured to autonegotiate, this parameter is ignored.
Default
100 — 100 Mb/s operation
Parameters
- speed
the link speed, in Mb/s
static-route
Syntax
[no] static-route ip-prefix/prefix-length next-hop ip-address
Context
bof
Description
This command creates a static route entry for the CSM Management port in the running configuration and the BOF.
This command allows manual configuration of static routing table entries. These static routes are only used by traffic generated by the CSM Management port. To reduce configuration, manual address aggregation should be applied where possible.
A static default route (0.0.0.0/0) cannot be configured on the CSM Management port. A maximum of 10 IPv4 and 10 IPv6 static routes can be configured on the CSM Management port.
Each unique next hop of active static routes configured on both the active and standby CSM Management ports are tested every 60 seconds. If the next hop is unreachable, an alarm is raised. The alarm condition is cleared when the preferred static route becomes reachable.
The no form of the command deletes the static route.
Default
n/a
Parameters
- ip-prefix/prefix-length
the destination address requiring the static route
- next-hop ip-address
the next hop IP address used to reach the destination
DNS Configuration Commands
dns-domain
Syntax
dns-domain dns-name
no dns-domain
Context
bof
Description
This command configures the domain name used when performing DNS address resolution.
This is a required parameter if DNS address resolution is required. Only a single domain name can be configured. If multiple domain statements are configured, the last one encountered is used.
The no form of the command removes the domain name from the configuration.
Default
no dns-domain — no DNS domain name is configured
Parameters
- dns-name
the DNS domain name
primary-dns
Syntax
primary-dns ip-address
no primary-dns
Context
bof
Description
This command configures the primary DNS server used for DNS name resolution.
DNS name resolution can be used when executing ping, traceroute, and service-ping, and also when defining file URLs. DNS name resolution is not supported when DNS names are embedded in configuration files.
The no form of the command removes the primary DNS server from the configuration.
Default
no primary-dns — no primary DNS server is configured
Parameters
- ip-address
the IP address of the primary DNS server
secondary-dns
Syntax
secondary-dns ip-address
no secondary-dns
Context
bof
Description
This command configures the secondary DNS server for DNS name resolution.
The secondary DNS server is used only if the primary DNS server does not respond.
DNS name resolution can be used when executing ping, traceroute, and service-ping, and also when defining file URLs. DNS name resolution is not supported when DNS names are embedded in configuration files.
The no form of the command removes the secondary DNS server from the configuration.
Default
no secondary-dns — no secondary DNS server is configured
Parameters
- ip-address
the IP address of the secondary DNS server
tertiary-dns
Syntax
tertiary-dns ip-address
no tertiary-dns
Context
bof
Description
This command configures the tertiary DNS server for DNS name resolution.
The tertiary DNS server is used only if the primary DNS server and the secondary DNS server do not respond.
DNS name resolution can be used when executing ping, traceroute, and service-ping, and also when defining file URLs. DNS name resolution is not supported when DNS names are embedded in configuration files.
The no form of the command removes the tertiary DNS server from the configuration.
Default
no tertiary-dns — no tertiary DNS server is configured
Parameters
- ip-address
the IP address of the tertiary DNS server
Show Commands
bof
Syntax
bof [cflash-id | booted]
Context
show
Description
This command displays the BOF executed on the last system boot or on the specified device.
If no device is specified, the BOF used in the last system boot displays. If the BOF has been modified since the system boot, a message displays.
Parameters
- cflash-id
the cflash directory name. The slot name is not case-sensitive. Use uppercase or lowercase ‟A” or ‟B” for the slot name.
- booted
displays the BOF used to boot the system
Output
The following outputs are examples of BOF information, and BOF Field Descriptions describes the fields.
Output ExampleA:ALU-1# show bof cf3:
===============================================================================
BOF on CF3:
===============================================================================
primary-image ftp://*:*@192.168.192.64/cephwreg10/images/both.tim
primary-config ftp://*:*@192.168.192.64/cephwreg10/images/dut-a.cfg
encryption-key *
password *
address xxx.xxx.xxx.xx /24 active
primary-dns 138.120.252.55
secondary-dns 138.120.252.48
tertiary-dns 138.120.252.49
dns-domain labs.ca.alcatel-lucent.com
static-route 135.121.0.0/16 next-hop 192.168.192.63
static-route 138.120.0.0/16 next-hop 192.168.192.63
static-route 152.148.0.0/16 next-hop 192.168.192.63
autonegotiate
duplex full
speed 100
wait 4
persist off
no fips-140-2
console-speed 115200
encrypt on
===============================================================================
A:ALU-1#
A:ALU-1# show bof booted
===============================================================================
System booted with BOF
===============================================================================
    primary-image    ftp://*:*@192.168.192.64/cephwreg10/images/both.tim
    primary-config   ftp://*:*@192.168.192.64/cephwreg10/images/dut-a.cfg
    encryption-key   *
    password         *
    address          xxx.xxx.xxx.xx /24 active
    primary-dns      138.120.252.55
    secondary-dns    138.120.252.48
    tertiary-dns     138.120.252.49
    dns-domain       labs.ca.alcatel-lucent.com
    static-route     135.121.0.0/16 next-hop 192.168.192.63
    static-route     138.120.0.0/16 next-hop 192.168.192.63
    static-route     152.148.0.0/16 next-hop 192.168.192.63
    autonegotiate
    duplex           full
    speed            100
    wait             4
    persist          off
    no fips-140-2
    console-speed    115200
    encrypt          on
===============================================================================
A:ALU-1#
|
Label |
Description |
|---|---|
primary-image |
The primary location of the directory that contains the runtime images of the CSM |
primary-config |
The primary location of the file that contains the configuration |
encryption-key |
The encrypted encryption key |
password |
The encrypted password |
address |
The IP address and mask associated with the CSM Management port or the secondary CSM Management port |
primary-dns |
The primary DNS server for resolution of hostnames to IP addresses |
secondary-dns |
The secondary DNS server for resolution of hostnames to IP addresses |
tertiary-dns |
The tertiary DNS server for resolution of hostnames to IP addresses |
dns-domain |
The domain name used when performing DNS address resolution |
static-route |
The static route entry for the CSM Management port in the running configuration and the BOF |
autonegotiate |
no autonegotiate — autonegotiate is not enabled |
autonegotiate — autonegotiate is enabled |
|
duplex |
half — specifies that the system uses half duplex |
full — specifies that the system uses full duplex |
|
speed |
The speed of the CSM Ethernet interface |
wait |
The time configured for the boot to pause while waiting for console input |
persist |
Indicates whether the system preserves system indexes when a save command is executed |
fips-140-2 |
Indicates whether FIPS-140-2 is enabled on the node |
console speed |
The console port baud rate |
encrypt |
on — BOF encryption is enabled |
off — BOF encryption is not enabled |
boot-messages
Syntax
boot-messages
Context
show
Description
This command displays boot messages generated during the last system boot.
Output
The following output is an example of boot messages.
Output ExampleA:ALU-1# show boot-messages
===============================================================================
cf3:/bootlog.txt
===============================================================================
Boot log started on CPU#0
Build: X-2.1.R1 on Tue Apr 1 16:25:56 EDT 2016 by csabuild
Total Memory: 992MB Chassis Type: sar8 Card Type: corona_r1
TiMOS-L-2.1.R1 boot/hops NOKIA SAR 7705
Copyright (c) 2016 Nokia.
All rights reserved. All use subject to applicable license agreements.
Built on Wed Apr 9 09:36:02 EDT 2016 by csabuild in /rel2.0/b1/R1/panos/main
TiMOS BOOT LOADER
Time from clock is FRI APR 11 13:31:16 2016 UTC
Switching serial output to sync mode...
Total Memory: 992MB Chassis Type: sar8 Card Type: corona_r1
TiMOS-B-2.1.R1 both/hops NOKIA SAR 7705
Copyright (c) 2016 Nokia.
All rights reserved. All use subject to applicable license agreements.
Built on Wed Apr 9 09:53:01 EDT 2016 by csabuild in /rel2.0/b1/R1/panos/main
___ ___ ___ ___
/\ \ /\__\ /\ \ /\ \
\:\ \ ___ /::| | /::\ \ /::\ \
\:\ \ /\__\ /:|:| | /:/\:\ \ /:/\ \ \
/::\ \ _\/__/ /:/|:|__|__ /:/ \:\ \ _\:\~\ \ \
/:/\:\__\ /\__\ /:/ |::::\__\ /:/__/ \:\__\ /\ \:\ \ \__\
/:/ \/__/ /:/ / \/__/~~/:/ / \:\ \ /:/ / \:\ \:\ \/__/
/:/ / /:/ / /:/ / \:\ /:/ / \:\ \:\__\
\/__/ \/__/ /:/ / \:\/:/ / \:\/:/ /
/:/ / \::/ / \::/ /
\/__/ \/__/ \/__/
Time from clock is FRI APR 11 13:31:57 2016 UTC
Initial DNS resolving preference is ipv4-only
CRITICAL: CLI #1001 Cannot locate the configuration file -
Using default configuration values.
MAJOR: CLI #1008 The SNMP daemon is disabled. To enable SNMP, execute the comma
nd 'config>system>snmp no shutdown'.
TiMOS-B-2.1.R1 both/hops NOKIA SAR 7705
Copyright (c) 2016 Nokia.
All rights reserved. All use subject to applicable license agreements.
Built on Wed Apr 9 09:53:01 EDT 2016 by csabuild in /rel2.0/b1/R1/panos/main
Login:
===============================================================================
cf3:/bootlog_prev.txt
===============================================================================
Boot log started on CPU#0
Build: X-2.1.R1 on Tue Apr 1 16:25:56 EDT 2016 by csabuild
Total Memory: 992MB Chassis Type: sar8 Card Type: corona_r1
TiMOS-L-2.1.R1 boot/hops NOKIA SAR 7705
Copyright (c) 2016 Nokia.
All rights reserved. All use subject to applicable license agreements.
Built on Wed Apr 9 09:36:02 EDT 2016 by csabuild in /rel2.0/b1/R1/panos/main
TiMOS BOOT LOADER
Time from clock is FRI APR 11 13:30:38 2016 UTC
Switching serial output to sync mode...
reboot
===============================================================================