Boot options
This chapter provides information about configuring boot option parameters.
System initialization
When the 7210 SAS device is powered on, the system executes the boot.tim file (also known as the boot loader or the bootstrap image) from the file system located on a flash device (cf1:\) or the USB (on the 7210 SAS-K 2F1C2T, 7210 SAS-K 2F6C4T, and 7210 SAS-K 3SFP+ 8C) available on the 7210 SAS platform. The boot.tim file is the image that reads and executes the system initialization commands configured in the Boot Option File (BOF).
Some 7210 SAS platforms (including the 7210 SAS-K 2F1C2T, 7210 SAS-K 2F6C4T, and 7210 SAS-K 3SFP+ 8C) do not ship with an image. It is expected that the user will use the external flash or the USB device with boot-loader image (boot.tim) to boot the system. Insert the device containing the bootstrap image in the specified storage media location before powering on the system, as follows:
external flash
Insert the compact flash into the external compact flash slot.
SD card
Insert the SD card into the SD card slot.
USB device
Insert the USB storage device into the USB port.
See the appropriate 7210 SAS chassis installation guide for more information about the prerequisites for specific 7210 SAS platforms.
If the boot.tim file is absent or invalid, and cannot be loaded, the platform-specific handling is as follows:
7210 SAS-D
On this platform, the boot ROM loads the golden bootstrap image. The golden bootstrap image is equivalent to a boot.tim file, but it is present outside the file system, and can be updated and checked using special CLI commands.
7210 SAS-K 2F1C2T, 7210 SAS-K 2F6C4T, 7210 SAS-K 3SFP+ 8C
On these platforms, if the system cannot find the bootstrap image in the default location (cf:\boot.tim), the system searches other storage locations (such as uf1:\) for the file and uses the boot.tim file in these locations to boot the system.
7210 SAS-Dxp
The 7210 SAS-Dxp supports the use of a single replaceable storage medium in the SD card slot. The user must ensure that the image files are available on the medium and can be read by the system. If the system fails to boot, the medium can be replaced with another working medium containing the correct images.
The following figure shows the typical flash directory structure and filenames when the node is shipped from the factory.
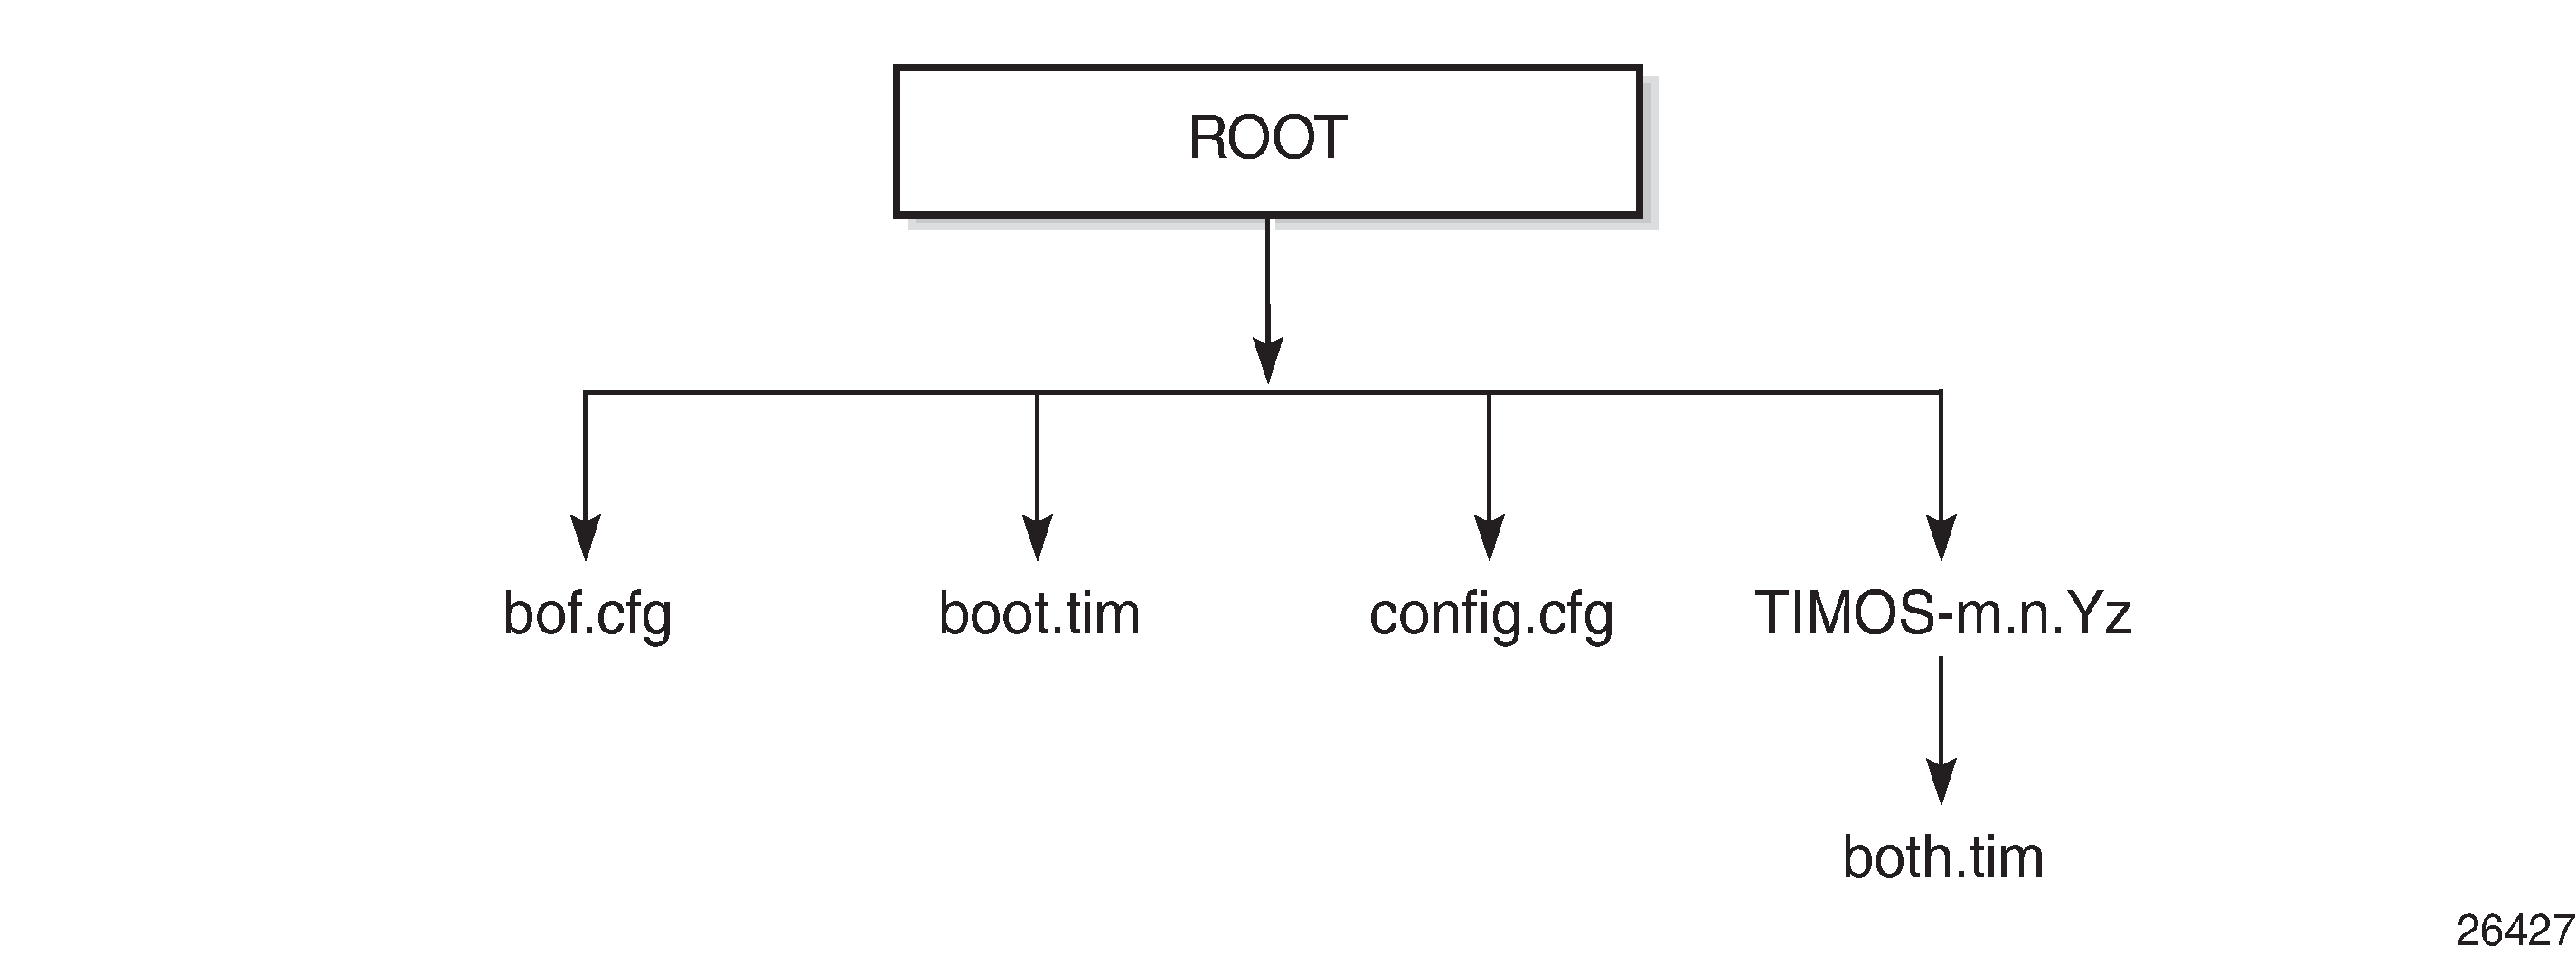
Files on the compact flash are the following:
bof.cfg - boot option file
boot.tim - bootstrap image
config.cfg - default configuration file
TIMOS-m.n.Yz:
m - major release number
n - minor release number
Y - type of release
- A - alpha release
-
B - beta release
-
M - maintenance release
-
R - released software
z - version number
both.tim - CPM and IOM image file
Contents of factory-shipped 7210 SAS systems
The following table lists the contents that are shipped with the system on each 7210 SAS platform.
7210 SAS platforms |
System contents |
|||
|---|---|---|---|---|
boot.tim File |
Golden bootstrap image |
BOF |
TiMOS image |
|
7210 SAS-D |
✓ | ✓ |
✓ |
|
7210 SAS-Dxp1 |
✓ |
✓ |
✓ |
|
|
7210 SAS-K 2F1C2T1 |
✓ |
✓ |
✓ |
|
|
7210 SAS-K 2F6C4T1 |
✓ |
✓ |
✓ |
|
|
7210 SAS-K 3SFP+ 8C1 |
✓ |
✓ |
✓ |
|
System boot option modes
When the system executes the boot.tim file, the bootstrap image searches for and processes the BOF. The user has the option to modify the BOF manually and save it (see Manual mode for more information), or boot the 7210 SAS node using the existing BOF (see Auto-init mode for more information).
Depending on whether the node is factory-shipped with the BOF, the user can obtain and use the BOF as follows:
On 7210 SAS nodes that are factory-shipped with the BOF, use one of the following options:
boot the system by using the starter BOF (auto-init mode)
boot the system by interrupting the default boot process and manually edit the contents of the BOF to create a new BOF (manual mode)
See the appropriate 7210 SAS chassis installation guide for more information about editing and creating a new BOF for the specific 7210 SAS platform.
On 7210 SAS nodes that are factory-shipped without a BOF, the file is not present when the system is powered on for the first time. Use one of the following options to obtain a BOF for the system:
boot the system by manually creating a BOF (manual mode)
boot the system by retrieving the BOF from the network, using DHCP to retrieve the network location of the BOF (auto-init mode); auto-init mode is the default boot procedure if there is no manual intervention during the first boot of the node
See the appropriate chassis installation guide for more information about using the available system boot options for the specific 7210 SAS platform.
If the operator executes the reset command in the boot loader prompt or the admin reboot auto-init command in the TiMOS CLI, 7210 SAS resets the current BOF and reboots.
Auto-init mode
During the first boot or a reboot after the execution of the admin reboot auto-init command, if the user does not intervene to create the BOF in the manual mode, the system, by default, runs the auto-init procedure after a wait time. The default wait time is 3 seconds. Two designated front-panel ports are used for auto-init. See Configuration guidelines for use of auto-init and manual mode for more information about the front-panel ports used for each 7210 SAS platform. Auto-init requires a DHCP server to be configured in the network and reachable by the system. DHCP requests are directed out of one uplink port at a time because all other ports in the system are down.
If a DHCP server is present in the network, the system expects to receive an IP address, default gateway information, and a BOF location in the response returned by the DHCP server. Upon receiving these parameters from the DHCP server, the system applies the IP configuration and downloads the BOF from the location specified by the DHCP server. The BOF is saved in the flash drive and used for subsequent reboots. The bootstrap image processes the BOF parameters to boot the system. See Configuration file and TiMOS image loading for information about the BOF processing.
Before the node attempts to use DHCP to obtain the BOF and image files, you can configure the following link parameters in the BOF to suit your deployment needs:
the uplink ports to use
VLAN ID used
link speed
duplex setting for the link
auto-negotiation capability for the link
DHCP uses the values specified in the partial BOF to retrieve the complete BOF from the network. If you configure the preceding parameters in the partial BOF, Nokia recommends using the same values for the locally modified BOF as in the BOF downloaded from the network.
To update the preceding BOF parameters, use console access and break the boot sequence. Then enter the auto keyword and follow the prompts to update the BOF parameters. Enter exit when you are done. The boot loader software uses these parameters to configure the link appropriately and sends out the DHCP requests to obtain the BOF. The BOF obtained through DHCP must contain the location of the image file and configuration file (and values for other BOF parameters). If the DHCP process is successful, the BOF obtained from the network is copied to the local flash.
The parameter values in the BOF downloaded from the network must match those configured in the partial BOF. If there is a mismatch between the values retrieved from the network (that is, the network BOF is not configured to match the new values) and the user-configured values in the partial BOF, the next reboot of the system will fail. For example, specifying different auto-negotiate values in the two BOFs may cause the system to fail to bring up the link, which will cause the auto-init procedure and subsequent reboots to fail.
A mismatch may also cause the system to require twice the number of network resources. For example, the use of different VLAN ID values causes the system to require twice the number of resources for two services (one for each VLAN ID).
See System initialization: bootstrap process overview for more information about the bootstrap process and system initialization.
The system first attempts to use uplinkA and then uplinkB parameters to receive a successful response from the DHCP server. If there is no response on both uplink ports, the boot procedure is restarted, during which the user can choose to enter the manual mode or allow the system to default to the auto-init procedure again.
If the image fails to download through the auto-init process, the system loads the TiMOS image by using the both.tim file located on the local flash (that is, cf1:\both.tim on 7210 SAS-D and 7210 SAS-Dxp, and cf1:\both.tim, uf1:\both.tim, cf1:\*TIMOS*\both.tim, and uf1:\*TIMOS*\both.tim on the 7210 SAS-K 2F1C2T, 7210 SAS-K 2F6C4T, and 7210 SAS-K 3SFP+ 8C). After a successful bootup using the TiMOS image, the user can choose to continue using the same image by entering the admin>auto-init stop command within a fixed amount of time, as prompted. Running the admin>auto-init stop command creates a BOF and saves it on the local flash, with the image location pointing to the image on the flash. If the user does not run this command, the system reboots again and attempts to find an image through the auto-init process (that is, by sending out DHCP requests).
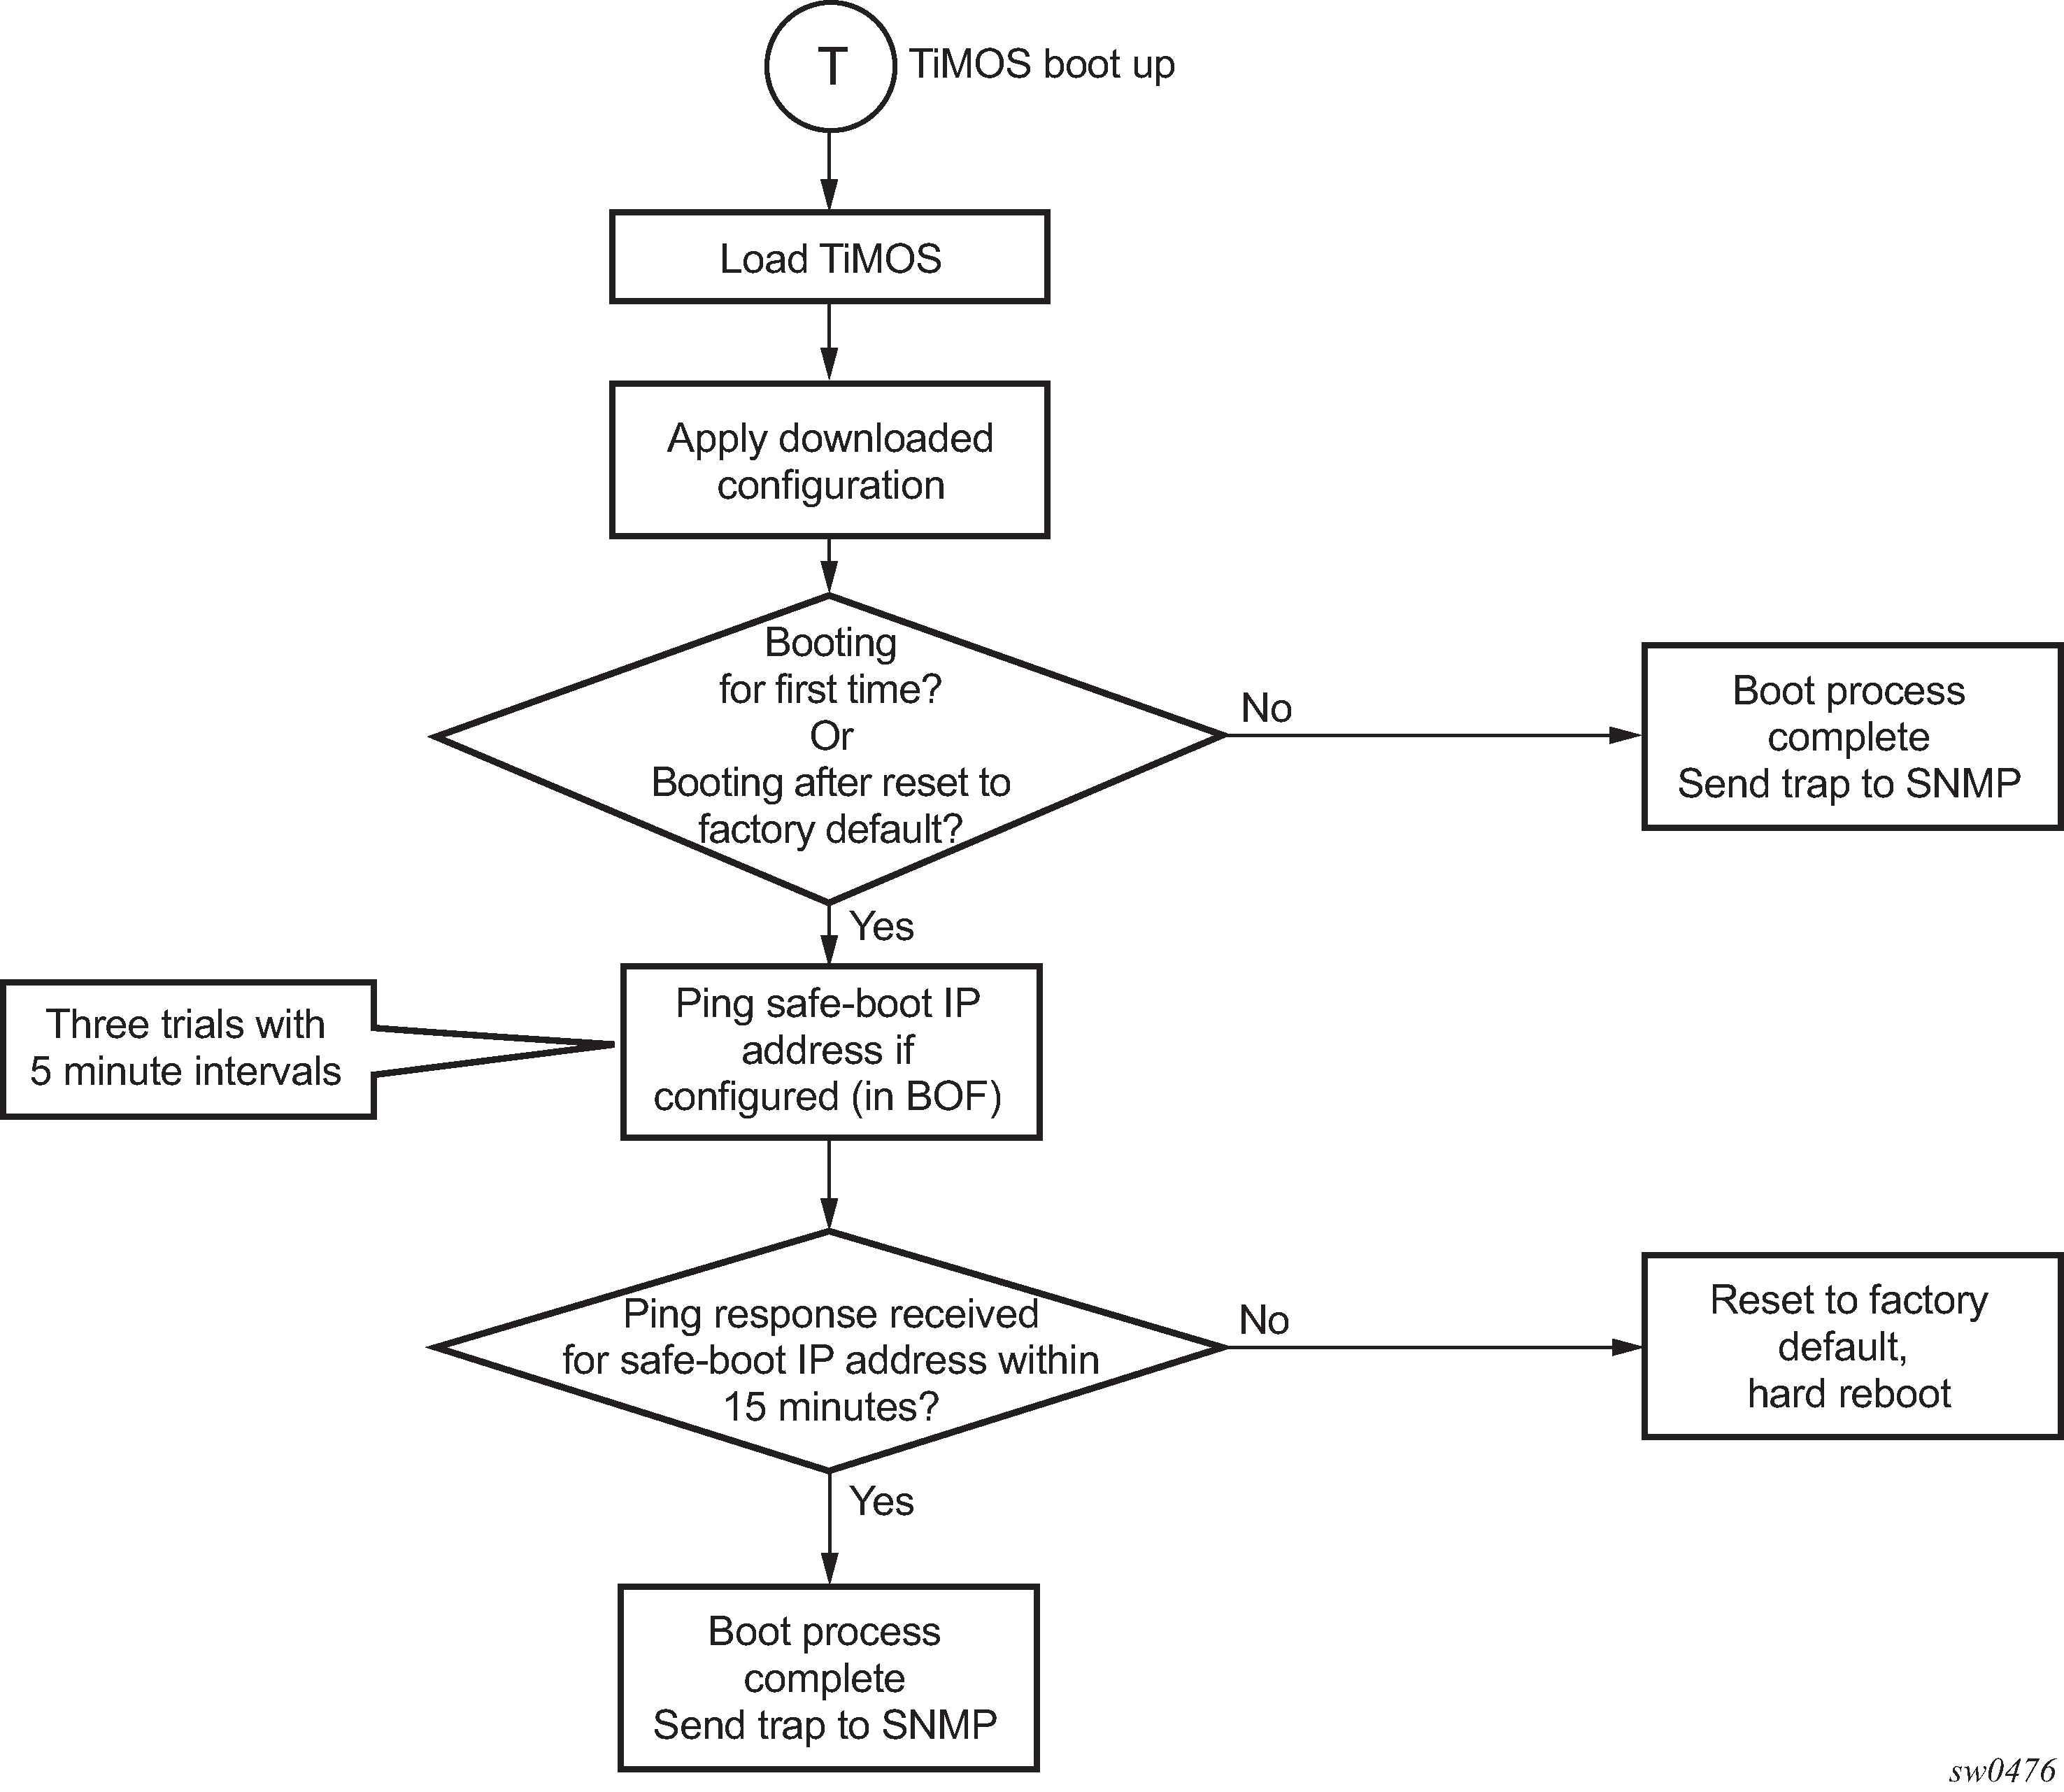
Ping check in auto-init mode
If the system is booted using the Auto-init mode procedure, the runtime image performs a ping check to make sure that the system has IP connectivity. The runtime image, after loading the configurations from the configuration file, tries three times to ping the IP address specified in the ping-address parameter in the BOF, at a 2, 8, and 16 minute interval. If the ping check does not succeed, the system is rebooted with the BOF reset after 1 minute and the boot process is repeated. If the address in the BOF is zero or the ping address is not specified, the ping check is not performed.
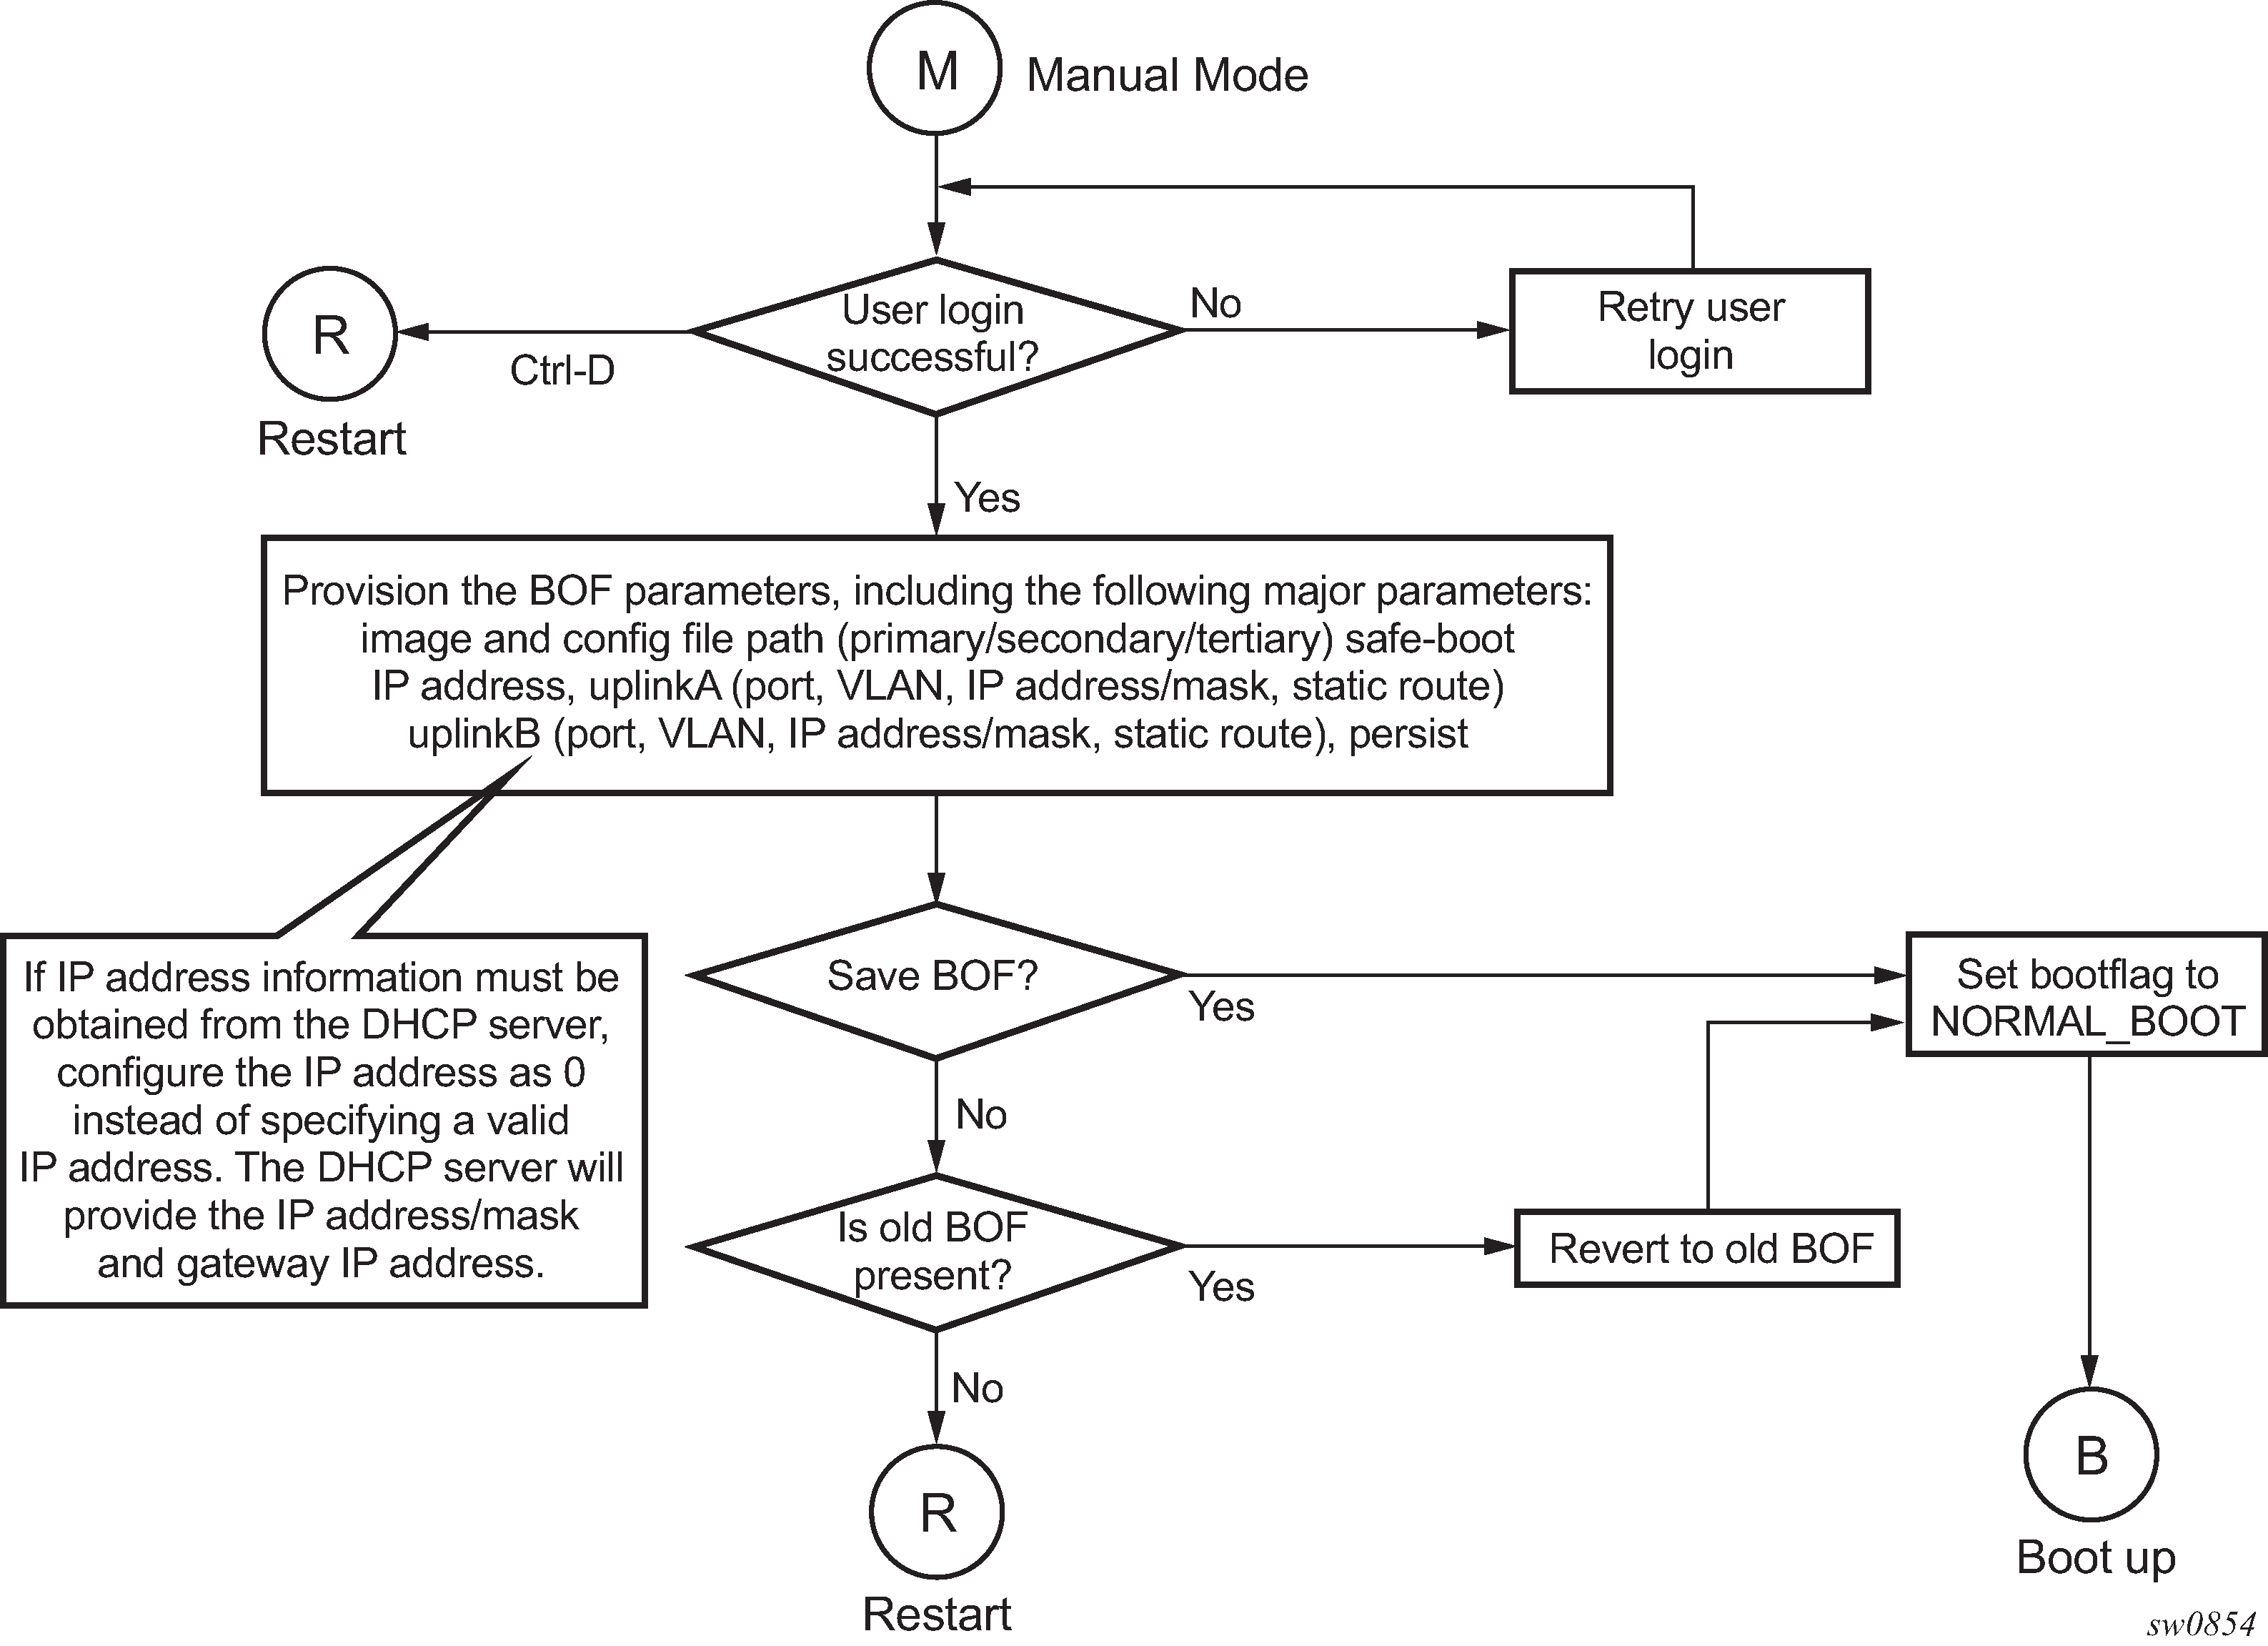
Manual mode
If the user opts for the manual-mode boot procedure for the first-time boot, the required parameters must be specified for a successful system boot. Manual mode configurations require authentication. The default password is password. BOF parameters that should be configured include the following:
image path
configuration file path
uplinkA parameters (port number, vlan ID, IP/mask, static route)
uplinkB parameters (port number, vlan ID, IP/mask, static route)
Provisions to configure two uplinks is supported in the BOF for port redundancy. If the image path and configuration file path are local, the IP address and routing information for uplinkA and uplinkB is not required. Optionally, the user can obtain IP parameters through DHCP by configuring 0 (zero) for the IP address of the uplink port. In this case, the DHCP server should be configured to grant the IP address and the default gateway information used to reach the server where the image and configuration files are located. After the BOF configuration is complete, a BOF with configured parameters is created in the flash that can be used for subsequent reboots. The bootstrap image then processes the BOF parameters to boot the system. See Configuration file and TiMOS image loading for information about BOF processing.
The 7210 SAS-D, 7210 SAS-Dxp, 7210 SAS-K 2F1C2T, 7210 SAS-K 2F6C4T, and 7210 SAS-K 3SFP+ 8C do not support the out-of-band Ethernet management port. On a 7210 SAS node where a previous version of the BOF exists, the boot process uses the existing parameter values for uplinkA and uplinkB ports to boot the TIMOS image.
BOF and configuration file encryption
This feature is supported on all 7210 SAS platforms as described in this document, except the 7210 SAS-D.
In cases where the 7210 SAS platform is not installed in a physically secure location, the user can encrypt the BOF and the configuration file to halt or hinder interpretation of the contents of the file.
By default, the BOF and configuration file are not encrypted. When encryption is enabled for either file and a change is saved (using the admin save command), the original file is moved to filename.1 and the encrypted file becomes the new filename.cfg.
When the original file is moved to filename.1, this file is unencrypted. To maintain node security, delete the unencrypted filename.1 file.
When the BOF is encrypted on the compact flash, the BOF parameters can be modified using the BOF interactive menu during node startup, and fields can be modified using this menu.
See Configuring BOF encryption for information about configuring BOF encryption. See Configuring the BOF interactive menu password for information about configuring the BOF interactive menu password. See Configuring configuration file encryption for information about configuring configuration file encryption.
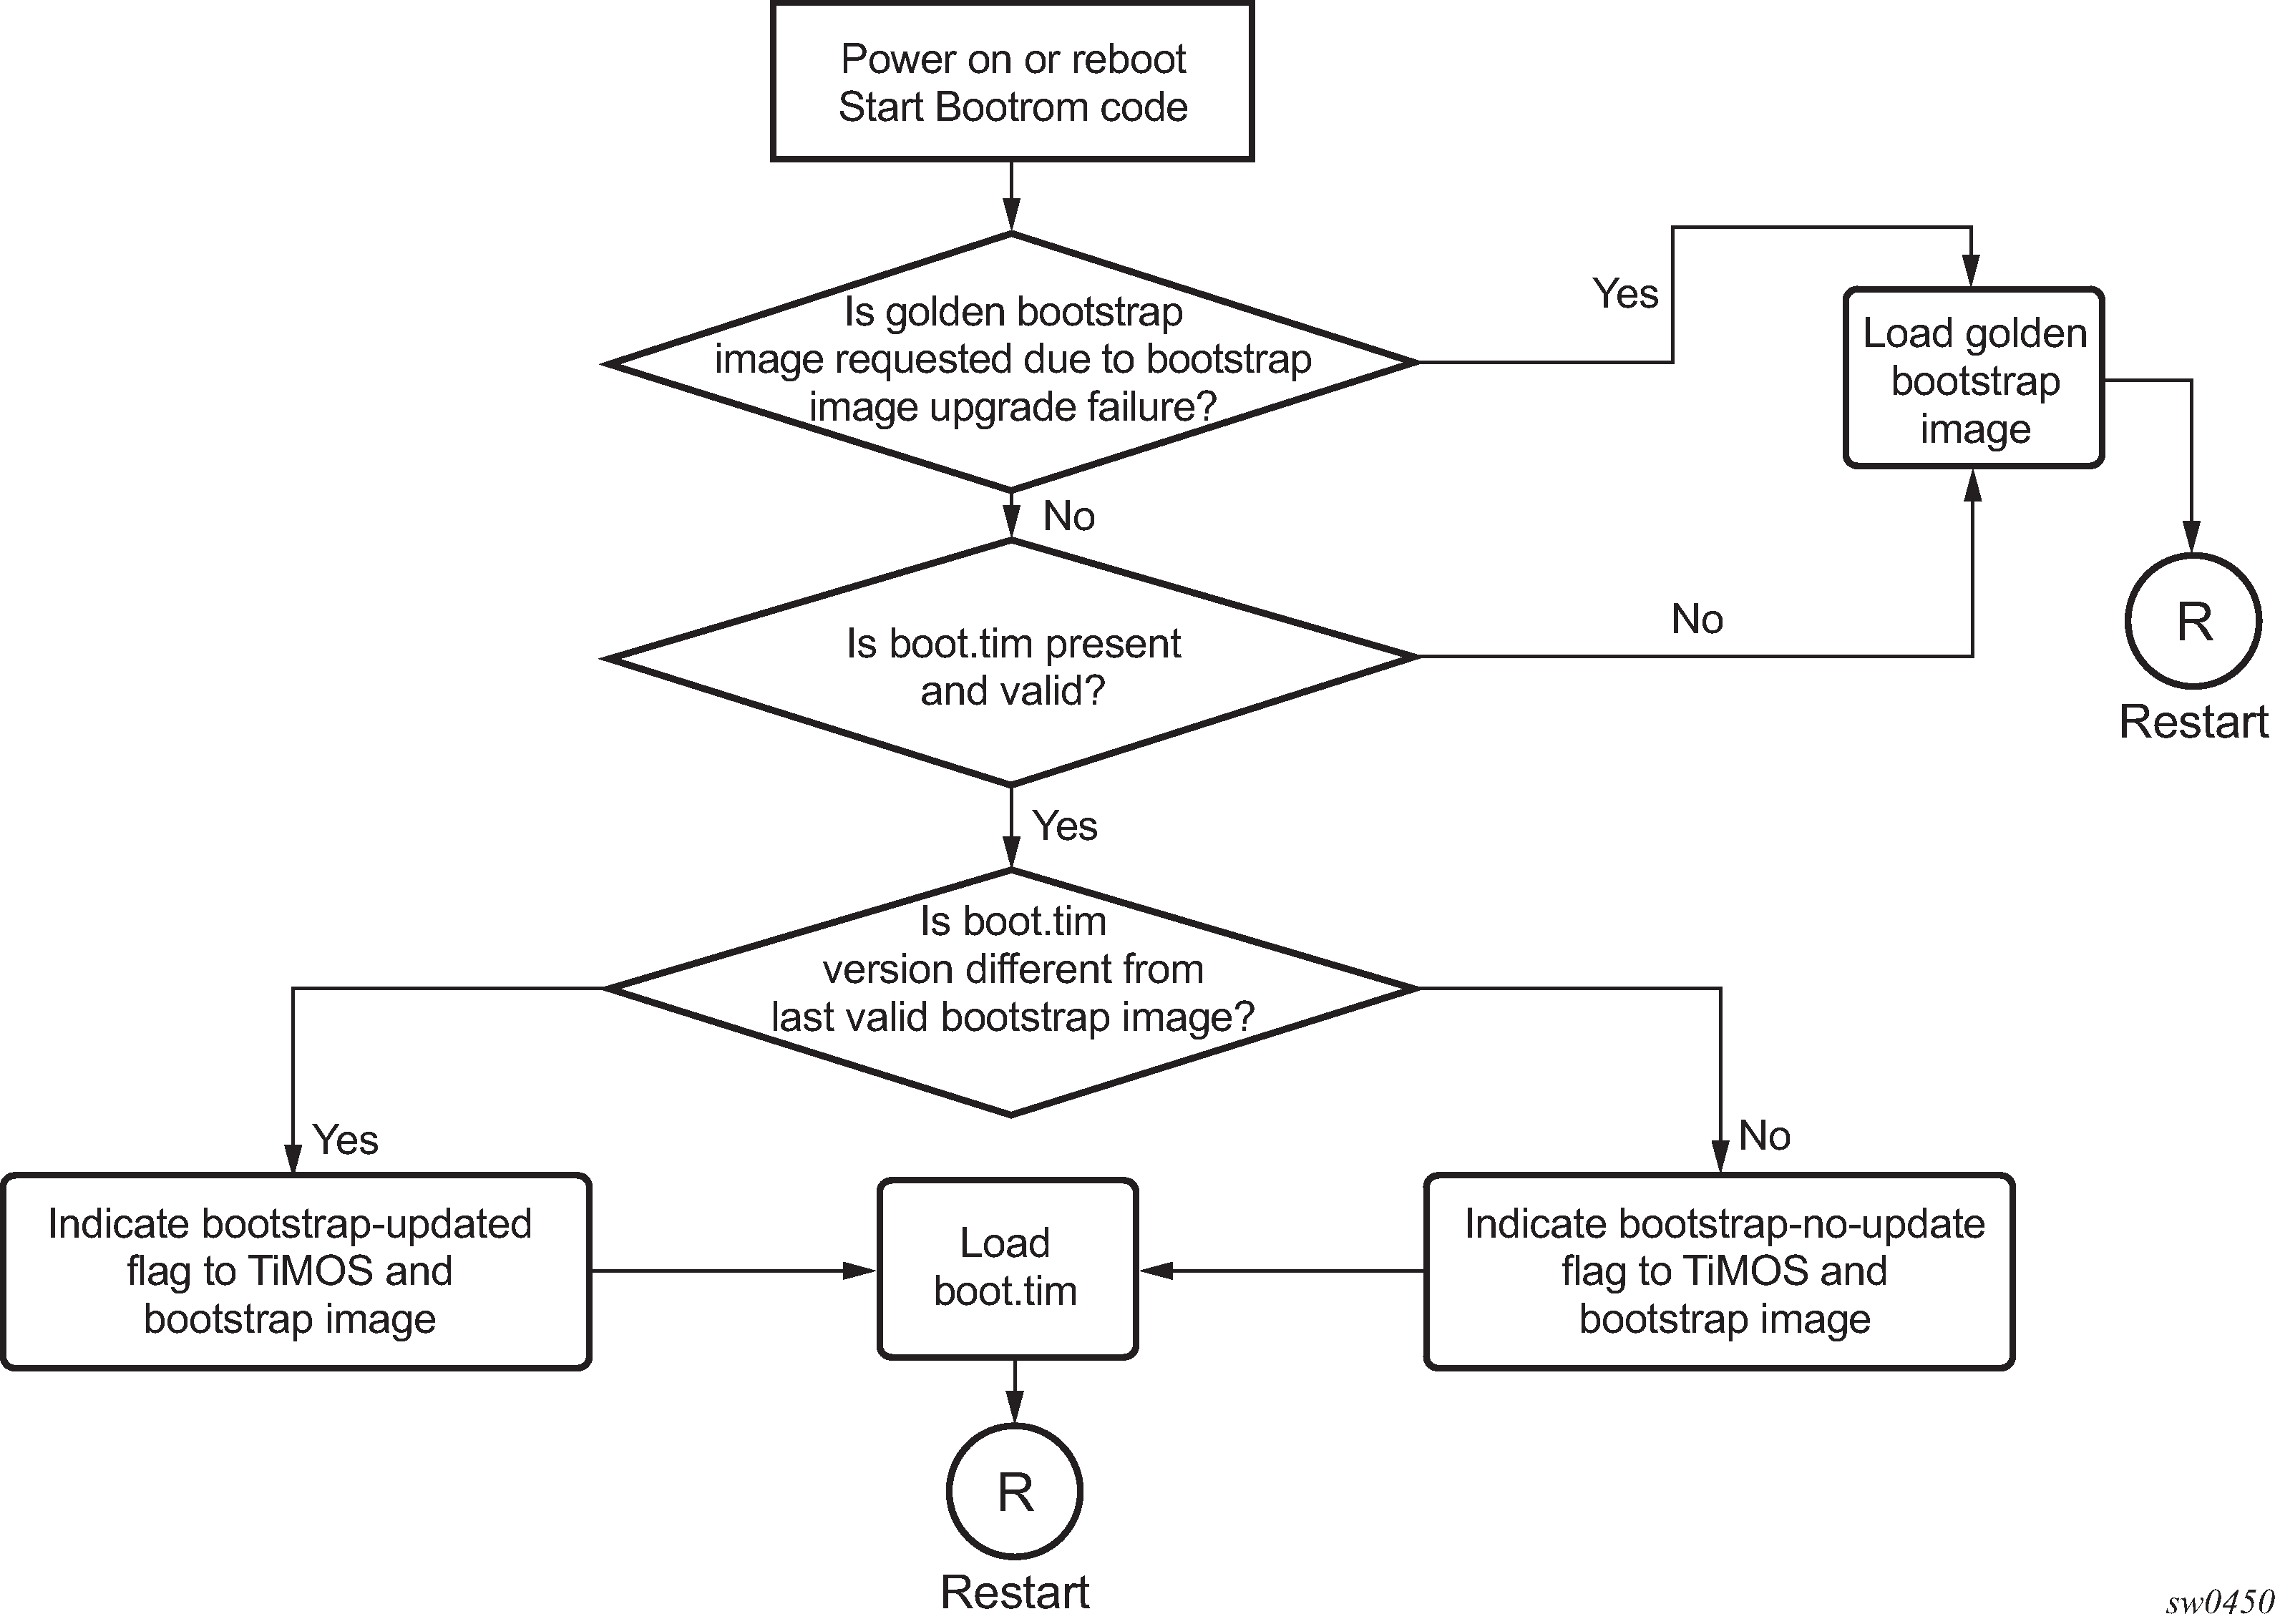
Bootstrap load process
The following figure shows the bootstrap load process.
The golden bootstrap image shown in System initialization: bootstrap load process is only supported on the 7210 SAS-D.
See Boot options on 7210 SAS platforms for more information about platform-specific supported boot options, and how the specific system processes these options and loads the bootstrap image file (boot.tim), the TiMOS image (both.tim) and the configuration file to make the system operational and ready for use.
The following is a sample of console display when the boot.tim file is located on cf1:/ and the system boots successfully.
Nokia 7210 Boot ROM. Copyright 2016 Nokia.
All rights reserved. All use is subject to applicable license agreements.
Running POST tests from ROM
Testing ROM load area...done

Relocating code...Jumping to RAM

Performing second stage RAM test....passed

Board Serial Number is 'SN123456789'
Bootlog started for Version V-0.0.I317
Build V-0.0.I317 bootrom/mpc 7xxx
Built on Tue Jan 6 02:23:14 IST 2016 by panosbld in /panosbld/ws/panos/main

?Attempting to load from file cf1:/boot.tim
Version L-0.0.I312, Fri Jan  2 04:26:32 IST 2016 by panosbld in /panosbld/ws/panos/
main
text:(3002475-->12623392) + data:(550940-->2414128)
Starting at 0xb000000...


Total Memory: 512MB  Chassis Type: sas  Card Type: badami_7210
TiMOS-L-0.0.I312 boot/mpc NOKIA SAS-D 7210 Copyright (c) 2016 Nokia.
All rights reserved. All use subject to applicable license agreements.
Built on Fri Jan 2 04:26:32 IST 2016 by panosbld in /panosbld/ws/panos/main

TiMOS BOOT LOADER

...
Boot options on 7210 SAS platforms
The location of the boot.tim bootstrap image varies per 7210 SAS platform and depends on the storage locations supported by the platform. The boot option modes to find and load the boot.tim bootstrap image file also vary per 7210 SAS platform.
This section provides information about the supported boot option modes and storage locations for 7210 SAS platforms.
System boot options on 7210 SAS-D and 7210 SAS-Dxp devices
Thea platforms support the following options to boot the system:
storage media associated with cf1:\
internal flash on 7210 SAS-D
SD card slot on 7210 SAS-Dxp
network (with auto-init)
network (without auto-init)
The 7210 SAS platforms do not support the use of a boot.tim file on a USB storage device for booting up.
During bootup, the bootrom searches cf1:\ (internal USB on 7210 SAS-D; SD card slot on 7210 SAS-Dxp) for the boot.tim in the following locations in the specified order, and uses the image obtained from the first location where boot.tim is found to load the bootloader.
If the boot.tim bootstrap image is not found in any of these locations, the boot procedure fails. If the boot.tim image is found, the system searches for bof.cfg (the boot options file) on the same storage device in the root directory. For example, if boot.tim is found on cf2:\, the system also looks for bof.cfg in cf2:\bof.cfg.
If bof.cfg is found, the system uses the BOF to locate the TiMOS software (both.tim file), configuration file, and other boot parameters, and processes them to boot the system. If the BOF is not found, the system attempts to retrieve the BOF from the network using the auto-init mode and create a new BOF as part of the auto-init process.
See the appropriate 7210 SAS chassis installation guide for more information about booting the system using these options.
System boot options on 7210 SAS-K 2F1C2T, 7210 SAS-K 2F6C4T, and 7210 SAS-K 3SFP+ 8C devices
These platforms support the following options to boot the system:
internal flash at the rear of the node (cf1:\)
external USB flash (uf1:\)
network (with auto-init mode)
network (without auto-init mode)
Because multiple storage locations are available for the bootstrap image boot.tim file on the 7210 SAS-K 2F1C2T, 7210 SAS-K 2F6C4T, and 7210 SAS-K 3SFP+ 8C, these platforms do not support the golden bootstrap image.
During bootup, the bootrom searches for the boot.tim in the following locations in the specified order, and uses the image obtained from the first location where boot.tim is found to load the bootloader:
cf1:\ (SD card slot or USB slot)
uf1:\ (external USB)
Users must plug in a USB storage device or SD card, with the correct TiMOS images into one of the supported locations before powering on the system.
If the boot.tim bootstrap image is not found in any of these locations, the boot procedure fails. If the boot.tim image is found, the system searches for bof.cfg (the boot options file) on the same storage device in the root directory. For example, if boot.tim is found on cf1:\, the system also looks for bof.cfg in cf1:\bof.cfg.
If bof.cfg is found, the system uses the BOF to locate the TiMOS software (both.tim file), configuration file, and other boot parameters, and processes them to boot the system. If the BOF is not found, the system attempts to retrieve the BOF from the network using the auto-init mode and create a new BOF as part of the auto-init process.
See the appropriate 7210 SAS chassis installation guide for more information about booting the system using these options.
Storage locations for index files (ndx, sdx) and images for 7210 SAS-K 2F1C2T, 7210 SAS-K 2F6C4T, and 7210 SAS-K 3SFP+ 8C
The 7210 SAS-K 2F1C2T, 7210 SAS-K 2F6C4T, and 7210 SAS-K 3SFP+ 8C software sets the default location for accounting records, logs, and other frequently written objects to cf1:\.
The following storage locations are supported in the 7210 SAS-K 2F1C2T, 7210 SAS-K 2F6C4T, and 7210 SAS-K 3SFP+ 8C:
The software sets the default location for accounting records and logs to cf1:\. The user can change the storage location to uf1:\.
The boot.tim and BOF can be on cf1:\ (recommended) or uf1:\.
TiMOS images (both.tim) can be located on either cf1:\ or uf1:\ with appropriate configuration of the BOF (that is, primary, secondary, and tertiary locations pointing to the appropriate places).
The ndx file and sdx file are generated at the location specified in the BOF parameter for the configuration file. If the user does not specify the location in the BOF, these files are located at the same location as the default configuration file. The default configuration file is created in the same location as the TiMOS image that the system uses to boot up.
Nokia recommends to use the following guidelines for storing the TiMOS, boot.tim, BOF.cfg, ndx, sdx, and nvsys.info files:
Store the boot.tim and BOF.cfg on cf1:\. Create a backup of the boot.tim and BOF.cfg on uf1:\.
Store the both.tim, configuration file (and as a result, the ndx, sdx, and nvsys.info) on cf1:\. Create a backup of these files on uf1:\, or create a backup on the SAM/network management station regularly.
Configuration file and TiMOS image loading
The bootstrap image processes the initialization parameters from the BOF and attempts to locate the configuration file configured in the BOF. Up to three locations can be configured for the system to search for the configuration file. The locations can be local or remote. The first location searched is the primary configuration location. If not found, the secondary configuration location is searched, and lastly, the tertiary configuration location is searched.
If the configuration file is in a remote location, the bootstrap process saves it on the flash as cf1:/default.cfg. Users must not delete this file or create a file with this name. The configuration file includes chassis, IOM, MDA, and port configurations, as well as system, routing, and service configurations.
Like the configuration file, three locations can be configured for the system to search for the files that contain the runtime image. The locations can be local or remote. The first location searched is the primary image location. If not found, the secondary image location is searched, and lastly, the tertiary image location is searched.
The following diagrams and paragraphs provide details about how the 7210 SAS platform boots up on power ON, and how it obtains the TiMOS image file, the BOF, the configuration file loads, the image, and the configuration file to bring up the platform.
Boot sequence and image loading
This section describes the booting sequence of the 7210 SAS platforms when they are powered on, and how they obtain the TiMOS image file, the BOF, the configuration file loads, the image, and the configuration file to bring up the platform:
System initialization: bootstrap load process shows the boostrap load process.
System initialization: bootstrap process overview shows the process for booting up the BOF after it is retrieved using either the manual mode or auto-init mode.
System initialization: bootstrap process for manual mode shows the process for manual mode to create or edit the BOF.
System initialization: Bootstrap process for auto-init mode with partial BOF shows the process for configuring partial BOF parameters for auto-init mode.
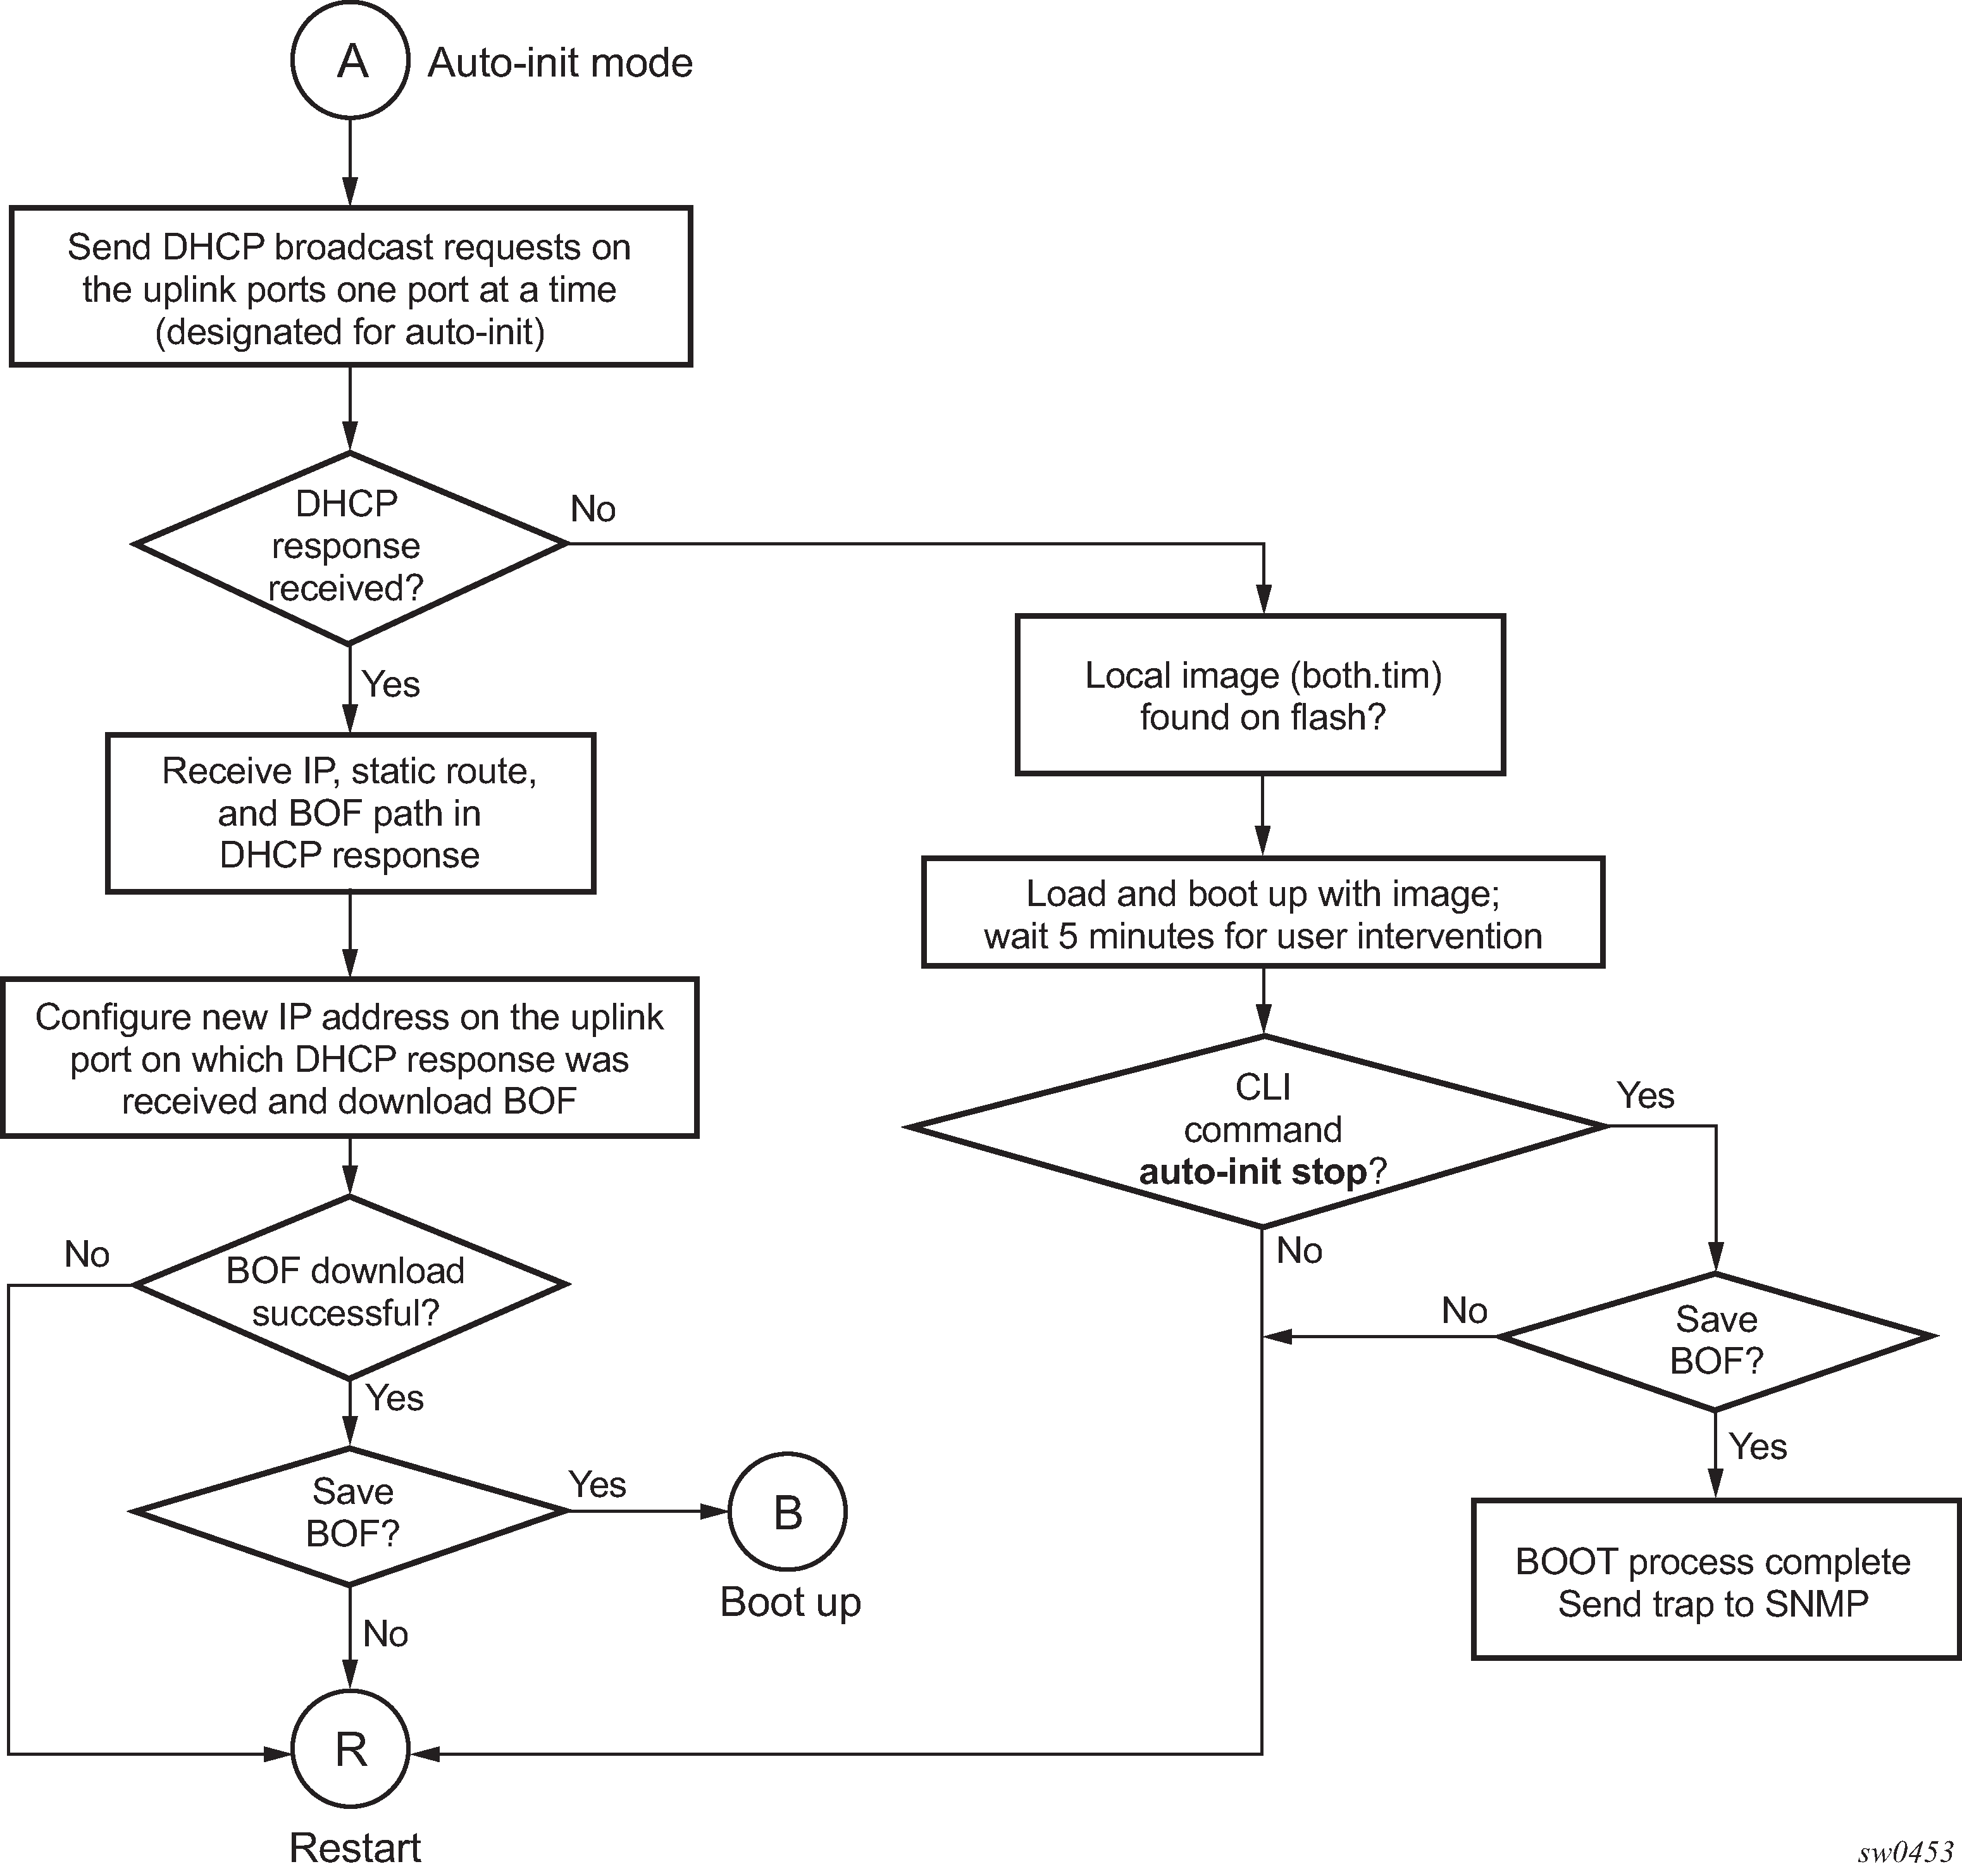
System initialization: bootstrap process for auto-init mode shows the process for auto-init mode to retrieve the BOF from the network.
System initialization: TiMOS boot shows the process for booting up the TiMOS file.
See Persistence for more information about persistence of the index files.
See Manual mode for more information about the manual mode process.
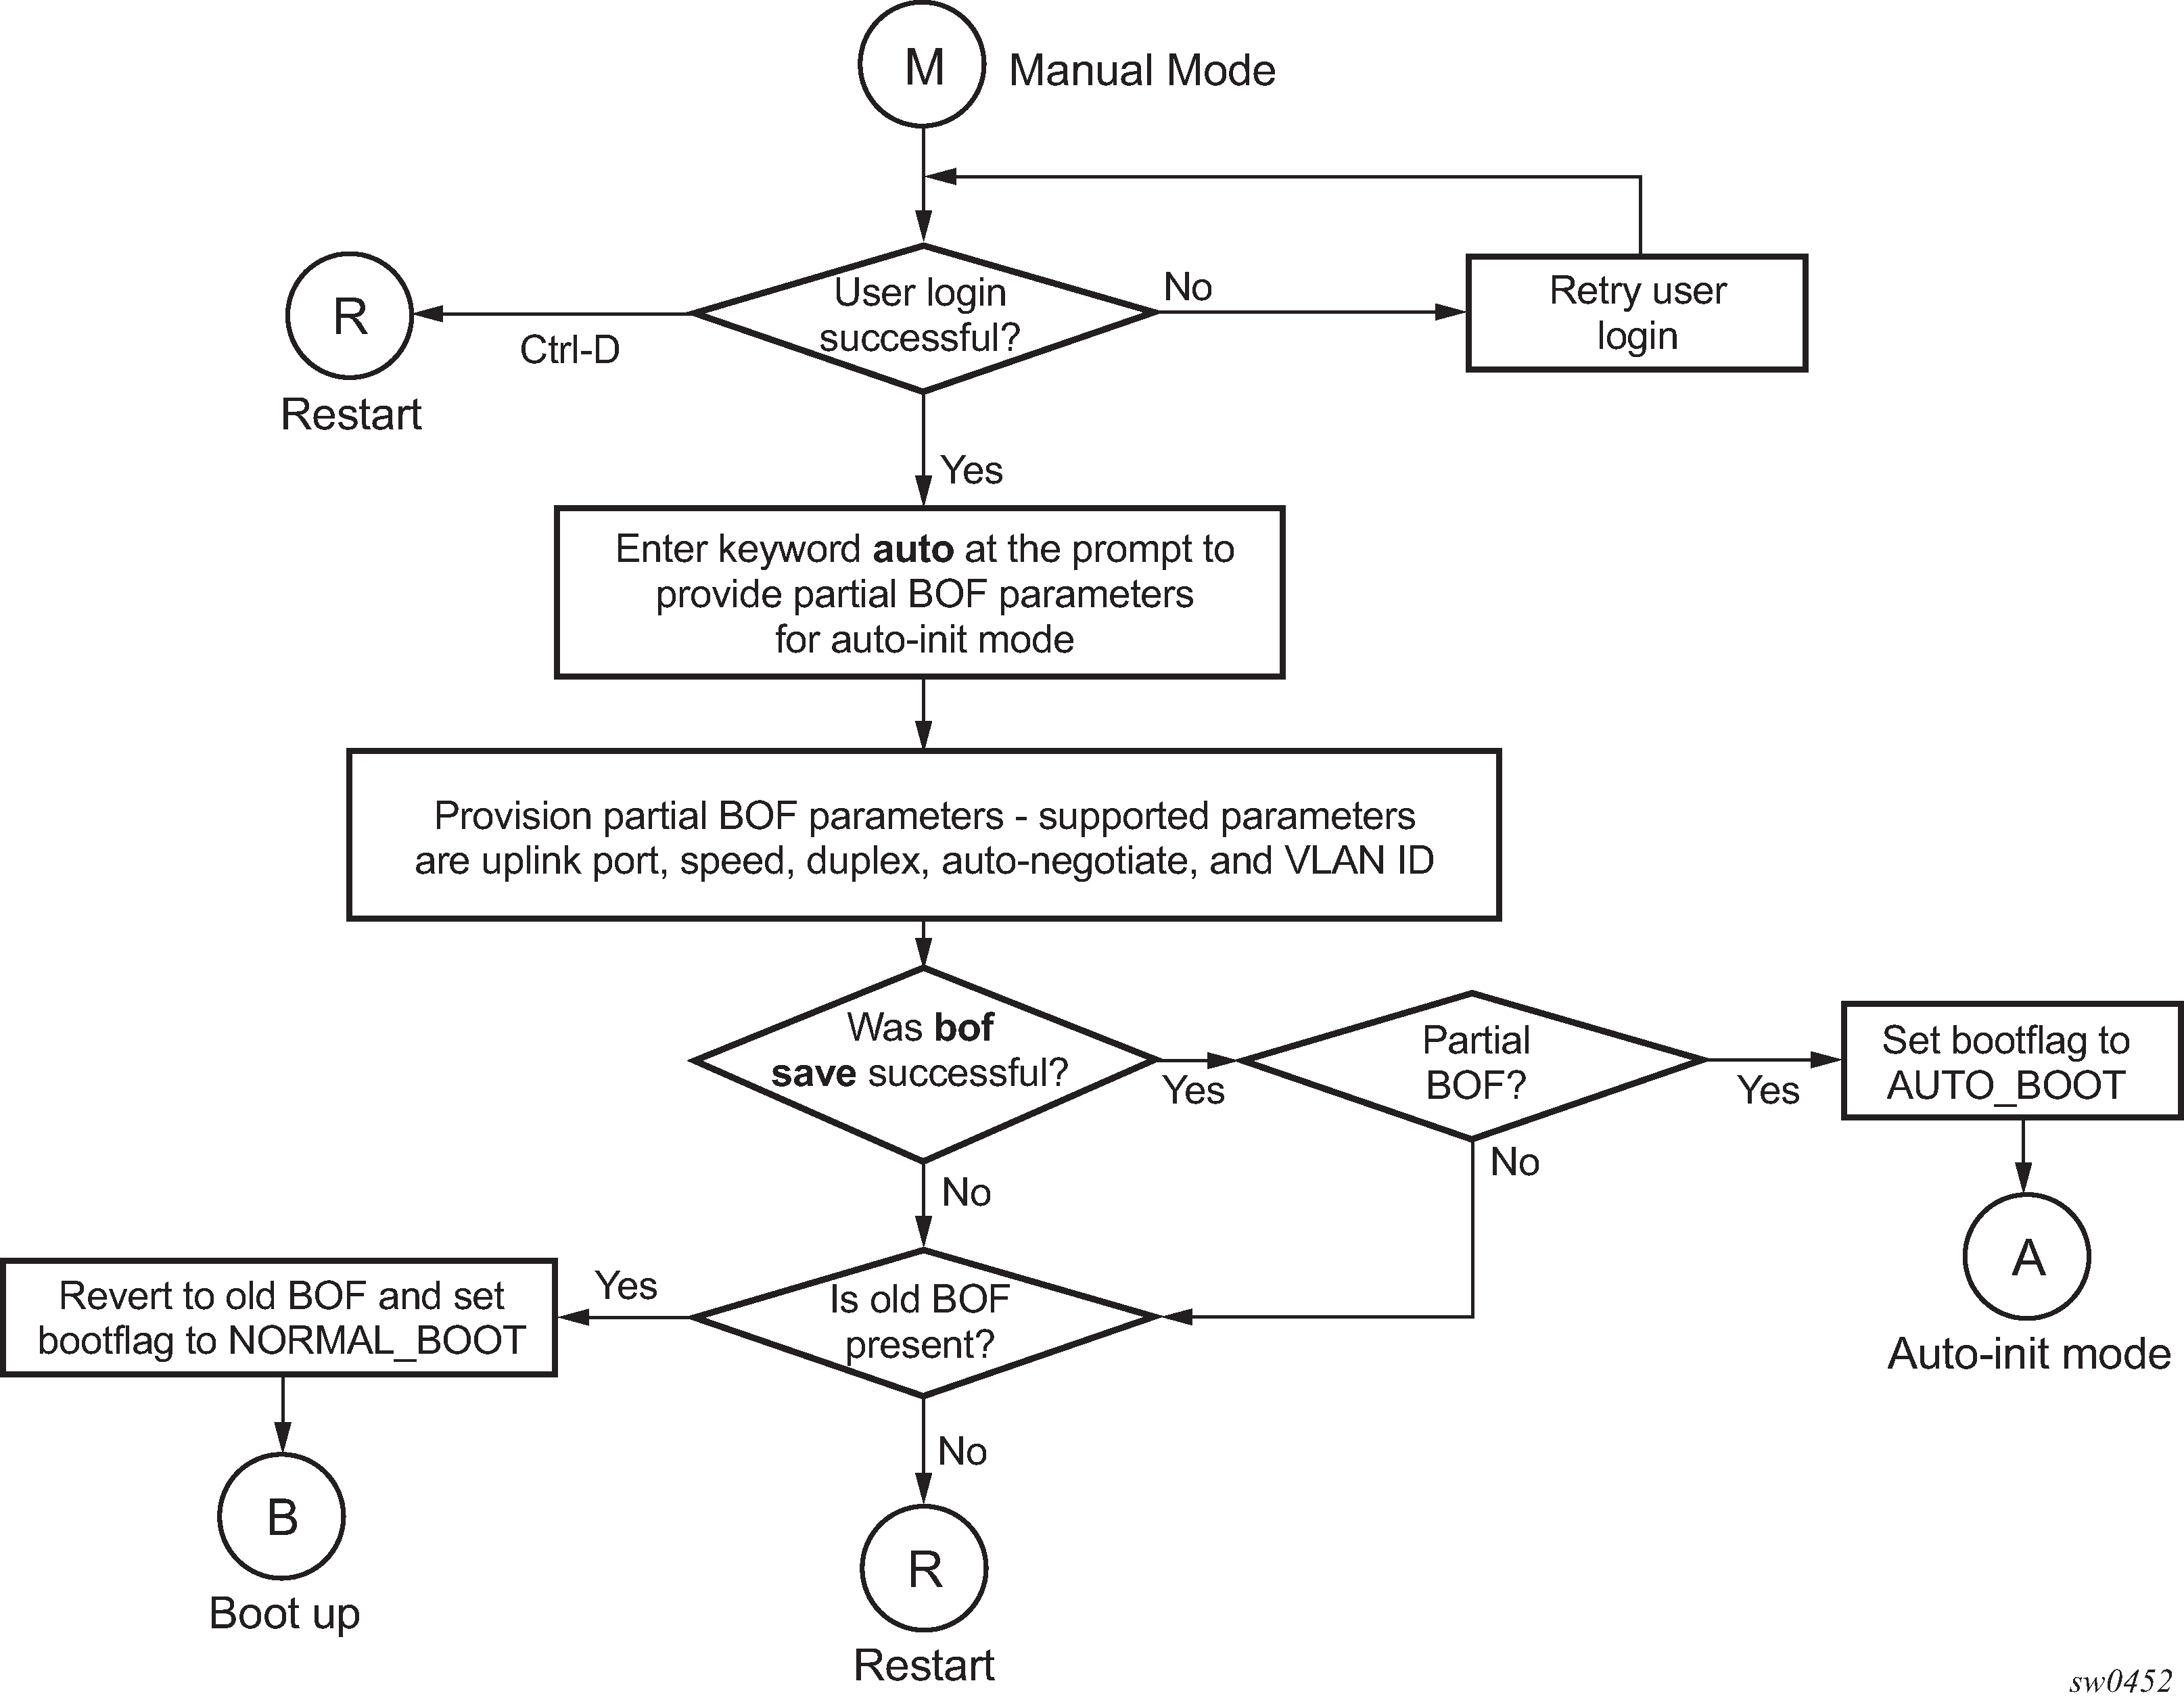
See Auto-init mode for more information about operating in the auto-init mode with a partial BOF.
When the both.tim image is successfully downloaded, control is passed from the bootstrap image to the TiMOS image. The both.tim attempts to load the configurations from the downloaded configuration file. If no configuration file location is present in the BOF, the system is loaded with default configuration.
During the auto-init procedure, if the configuration file or image file download fails from the network, the system reinitiates the auto-init procedure.
See Auto-init mode for more information about the auto-init mode process.
Persistence
Optionally, the BOF persist command can specify whether the system should preserve system indexes when a save command is executed. During a subsequent boot, the index file is read along with the configuration file. As a result, a number of system indexes are preserved between reboots, including the interface index. If persistence is not required and the configuration file is successfully processed, the system becomes operational. If persistence is required, a matching x.ndx file must be located and successfully processed before the system can become operational. Matching files (configuration and index files) must have the same filename prefix such as test123.cfg and test123.ndx, and are created at the same time when a save command is executed. The persistence option must be enabled to deploy the Network Management System (NMS). The default is off.
Traps, logs, and console messages are generated if problems occur and SNMP shuts down for all SNMP gets and sets; however, traps are issued.
Configuration guidelines for use of auto-init and manual mode
The following configuration guidelines apply for the auto-init and manual modes:
The use of DHCP to obtain the BOF from the network and other system parameters is currently not supported on Ethernet management ports. Consequently, the Ethernet management port does not support auto-init mode.
In auto-init mode, DHCP requests sent out by the node are in two formats. The system attempts communication with the DHCP server in these two formats, one after another (if necessary), in the following order:
Initially, DHCP requests are sent out to the DHCP server with a priority VLAN tag (VLAN ID = 0, dot1p PCP bits set to 7).
If no response is received from the DHCP server during the preceding request period, DHCP requests are sent without VLAN tags (that is, null-tagged packets).
In auto-init mode, the BOF can be downloaded through FTP or TFTP based on the information a client receives from the DHCP server. The DHCP client tries the following options to obtain the BOF name and the server IP address:
using the vendor-specific option
The client searches for option 43 in the DHCP reply. This provides the URL to be accessed through FTP. For example, ftp://abcd:xyz@10.0.0.2/test/bof.cfg. If this file is found, the client retrieves this file.
collating server-name and file-name
If option 43 is not found in the DHCP reply, a URL is formed by using the TFTP server name and the BOF retrieved via TFTP. The IP address of the TFTP server is obtained from DHCP option 66 or the ‟sname” field of a DHCP message, and the filename on the TFTP server is obtained from DHCP option 67 or the ‟file” field of a DHCP message.
The 7210 SAS-D, 7210 SAS-K 2F1C2T, and 7210 SAS-K 2F6C4T try ports 1/1/1 and 1/1/2 to boot in the auto-init mode.
The 7210 SAS-Dxp tries ports in the following order to boot in the auto-init mode:
1/1/11 and 1/1/12 (10GE fiber ports)
1/1/7 and 1/1/8 (1GE fiber ports)
The 7210 SAS-K 3SFP+ 8C tries ports in the following order to boot in the auto-init mode:
1/1/1 and 1/1/2 (10GE fiber ports)
1/1/10 and 1/1/11 (1GE fiber ports)
Configuration guidelines for use of software images on the 7210 SAS-D with 128MB
7210 SAS-D platforms with a 128MB flash can boot entirely new software releases. Older images cannot be used with these devices. 7210 SAS-D platforms with a 64MB flash can use any image. All 7210 SAS-D devices with a 128MB flash are shipped with the latest boot ROM. The system boot ROM, boot loader, and TiMOS image introduce the following checks to prevent use of older releases with this hardware:
If a user issues an admin reboot upgrade with an older boot.tim, the boot ROM detects it and fails to load the boot loader; instead, the boot ROM uses the golden bootstrap image, loads it for booting with the boot ROM, and loads the both.tim file.
If a user issues an admin reboot upgrade with an older boot.tim and older both.tim, the boot ROM detects it and fails to load the boot loader; instead, the boot ROM uses the golden bootstrap image and stops booting when the user specifies an earlier version of the both.tim, which the system cannot use. This process results in loss of management connectivity.
If a user issues an admin reboot upgrade with an older boot.tim, an older both.tim as primary, and a newer both.tim as secondary, the boot ROM detects it and fails to load the boot loader; instead, the boot ROM uses the golden bootstrap image. The boot loader checks the primary location for a compatible both.tim image, and because the image is an earlier version, the boot fails. The boot loader then checks the secondary location for a compatible both.tim image, and because the image is a newer version, the boot loader successfully boots the system.
The admin>update-golden-bootstrap CLI command does not update the golden bootstrap image with the boot.tim specified in the parameter value if the boot.tim is not a new image.
BOF password
7210 SAS devices require a BOF password for the user to change the contents of the BOF using the BOF interactive menu. Additionally, the 7210 SAS supports an option to securely store the BOF password using the bof secure-bof-password command, as shown in the following sample logs.
------------
primary-image ftp://*:*@135.254.173.17//usr/global/images/21.9/B1-8/7xxx/
bcmiproc-both.tim
primary-config ftp://*:*@135.254.173.3/tmp/dxp/dxp2537.cfg
secondary-config ftp://*:*@135.254.173.3/tmp/dxp/dxp2537bkup.cfg
password *
ping-address 1.1.1.1
#uplinkA Port Settings:
uplinkA-port 1/1/1
uplinkA-autoneg
uplinkA-duplex full
uplinkA-speed 1000
uplinkA-address 10.135.25.37/24
uplinkA-vlan null
uplinkA-route 135.0.0.0/8 next-hop 10.135.25.1
#uplinkB Port Settings:
uplinkB-port 1/1/11
no uplinkB-autoneg
uplinkB-duplex full
uplinkB-speed 10000
uplinkB-address 0
uplinkB-vlan 0
#System Settings:
wait 3
persist off
console-speed 115200
uplink-mode access-uplink
no console-disabled
secure-bof-password enable
Do you want to overwrite cf1:/bof.cfg with the new settings? (yes/no): y
Successfully saved the new settings in cf1:/bof.cfg
----------------------------
Resetting the node to the factory default setting
The bof>bof-password command is available to modify the factory default BOF password password.
The user must enter the correct BOF password to edit the BOF parameters. If the incorrect password is entered three times consecutively, the system prompts the user, after the third attempt, to reset the BOF password to the factory default.
If the user chooses not to reset the BOF password, the system prompts the user to enter the password again. If the user chooses to reset the password to factory default, the system also resets the flash to factory defaults (removes all files from the flash drive, except the boot image file (cf1:\boot.tim) and TiMOS image file (cf1:\both.tim)) as a security measure to prevent malicious access to the configuration file.
After password reset, the node is rebooted with the factory default settings; the BOF parameters are also set to default values. The user must now setup the box using the same steps that were used during first-time boot up of the factory-shipped box. After the system boots up with this setup, use the factory default password password to edit the BOF parameters, and use the bof>bof-password command to change the password again.
The BOF password can be changed from the default value to any other user-defined value only at the TiMOS level.
Nokia strongly recommends that the user not rename cf1:\boot.tim and cf1:\both.tim if the system needs to retain them during the password recovery procedure.
Nokia strongly recommends that the user retain a backup copy of all the image files, configuration files, and other data.
The following sample logs show the system console prompts that are displayed when the user forgets the password and chooses to reset the password to the factory default setting. The BOF contents before and after the reset are also displayed.
The BOF parameters are set to default values after a password reset.
TiMOS BOOT LOADER
Time from clock is SAT JAN 18 01:41:32 2020 UTC
Switching serial output to sync mode...   done
Looking for cf1:/bof.cfg ... OK, reading
Contents of Boot Options File on cf1:
    primary-image      ftp://*:*@xxx.xxx.xxx.xxx/xxxx/7xxx/both.tim
    primary-config     cf1:\dxp2537.cfg
#uplinkA Port Settings:
    uplinkA-port       1/1/1
    uplinkA-autoneg
    uplinkA-duplex     full
    uplinkA-speed      1000
    uplinkA-address    192.0.2.37
    uplinkA-vlan       null
    uplinkA-route      239.0.0.0/8 next-hop 192.0.2.1
#uplinkB Port Settings:
    uplinkB-port       1/1/1
    uplinkB-autoneg
    uplinkB-duplex     full
    uplinkB-speed      1000
    uplinkB-address    192.0.2.37
    uplinkB-vlan       null
    uplinkB-route      239.0.0.0/8 next-hop 192.0.2.1
#System Settings:
    wait               3
    persist            off
    console-speed      115200
    uplink-mode        access-uplink
    no  console-disabled

Hit a key within 3 seconds to change boot parameters...

Enter password to edit the Boot Options File
Or CTRL-D to exit the prompt

Password:
Incorrect password

Password:
Incorrect password

Password:
Incorrect password

 Authentication failed, Do you want to reset password?(yes/no)

**********************************************************************
  On reset,this node's flash contents will be set to factory defaults.
  All files on the flash drives(i.e. cf1:) of this
  node will be removed.
  If present, files boot.tim and both.tim are not removed
  from cf1: drive.
  Please ensure that you have a backup of the required
  files before you proceed.
**********************************************************************
Type (yes/no) within 10 seconds: yes

********************************************
*** Chassis must not be powered off nor  ***
*** cards removed while password reset   ***
*** is in progress                       ***
********************************************
Password reset complete. Restarting...
At this point, the password reset is complete and the node restarts to boot up with factory default settings.
Resetting...OK

Nokia SASDxp 7210 Boot ROM. Copyright 2000-2019 Nokia.

All rights reserved. All use is subject to applicable license agreements.
Build: X-xx.x.Rx-xx on Fri Dec 13 16:39:13 IST 2019 by sasb
Version: 0x7
SASDxp-DC Board
Passed!
Copying code from FLASH to RAM....
Done
Board CPLD Version: 0x0e
Reboot Reason: 0x05
Boot rom version is v7
>>> RAM: Testing DDR Passed!
Board Serial Number is 'NS1917T0023'

Tuning values already saved. Skip saving to flash.
Memory Test Passed!
Jumping to vxrom at 0x61400000 now..................


Searching for boot.tim on local drives:
Attempting to load file cf1:/boot.tim
Version M-xx.x.Rx, Thu Dec 19 15:32:20 IST 2019 by sasb in /home/xx.x/Rx/main
text:(12965024-->39651248) + data:(4504288-->20038580)
Starting at 0x6f000000...
Total Memory: 2GB  Chassis Type: 0xa  Card Type: 0x4e
TiMOS-xx.x.Rx boot/APRC Nokia SAS-Dxp 6T4F2SFP+ 7210 Copyright (c) 2000-2019 Nokia.
All rights reserved. All use subject to applicable license agreements.
Built on Thu Dec 19 15:32:20 IST 2019 by sasb in /home/xx.0/Rx/main
TiMOS BOOT LOADER
Time from clock is SAT JAN 18 01:43:06 2020 UTC
Switching serial output to sync mode...   done
Looking for cf1:/bof.cfg ... not found
Could not find bof.cfg on drive cf1:

Default Settings
----------------
#uplinkA Port Settings:
    uplinkA-port       1/1/11
    no  uplinkA-autoneg
    uplinkA-duplex     full
    uplinkA-speed      10000
    uplinkA-address    0
    uplinkA-vlan       0
#uplinkB Port Settings:
    uplinkB-port       1/1/12
    no  uplinkB-autoneg
    uplinkB-duplex     full
    uplinkB-speed      10000
    uplinkB-address    0
    uplinkB-vlan       0
#System Settings:
   wait               3
    persist            off
    console-speed      115200
    uplink-mode        access-uplink
    no  console-disabled

Hit a key within 1 second to change boot parameters...
Enter password to edit the Boot Options File
Or CTRL-D to exit the prompt
Password:
At this password prompt, you are required to enter the default password password.
Security for console port and Ethernet management port
The 7210 SAS supports disabling the console port. In remote deployments, operators can choose to disable user access to the node through the console and through the Ethernet management port to prevent unauthorized and malicious access. Operators can use the bof>console-disabled command to disable the console.
Access to the console is only disabled when the TiMOS image is loaded. Console access remains unchanged during the boot loader stage of the boot-up process. That is, the bof command takes effect only when the node is booted with the TiMOS image.
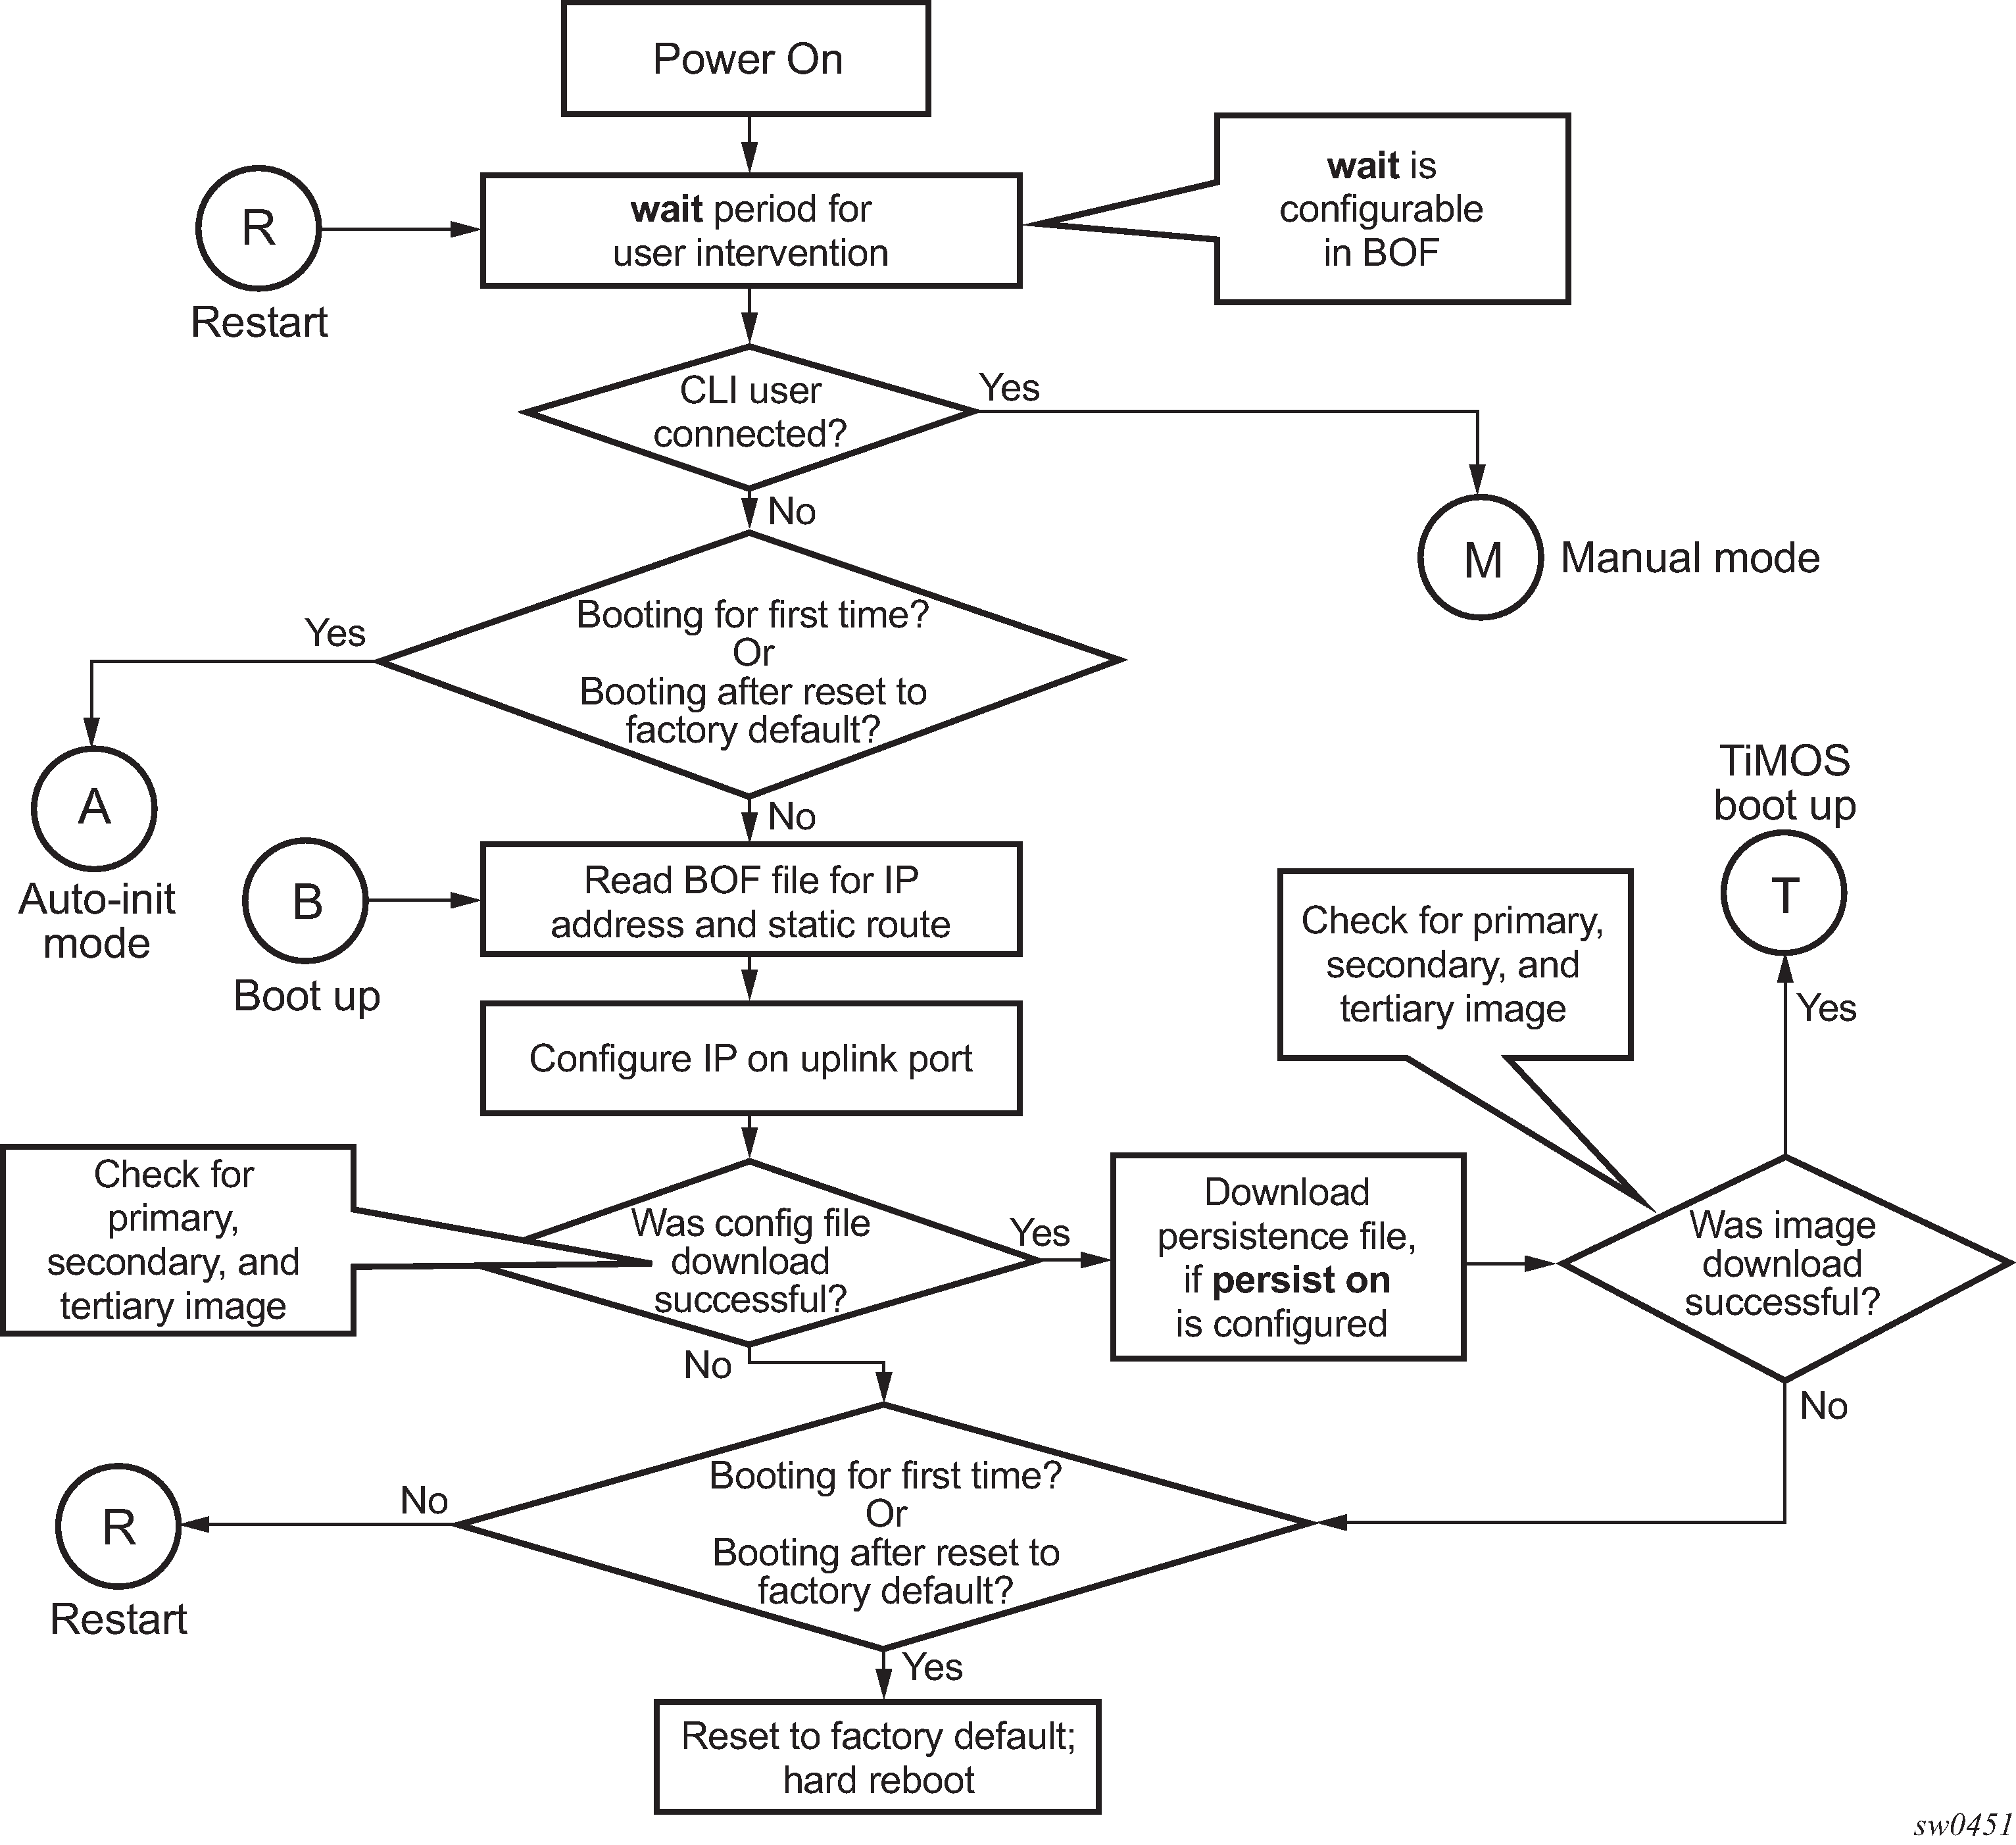
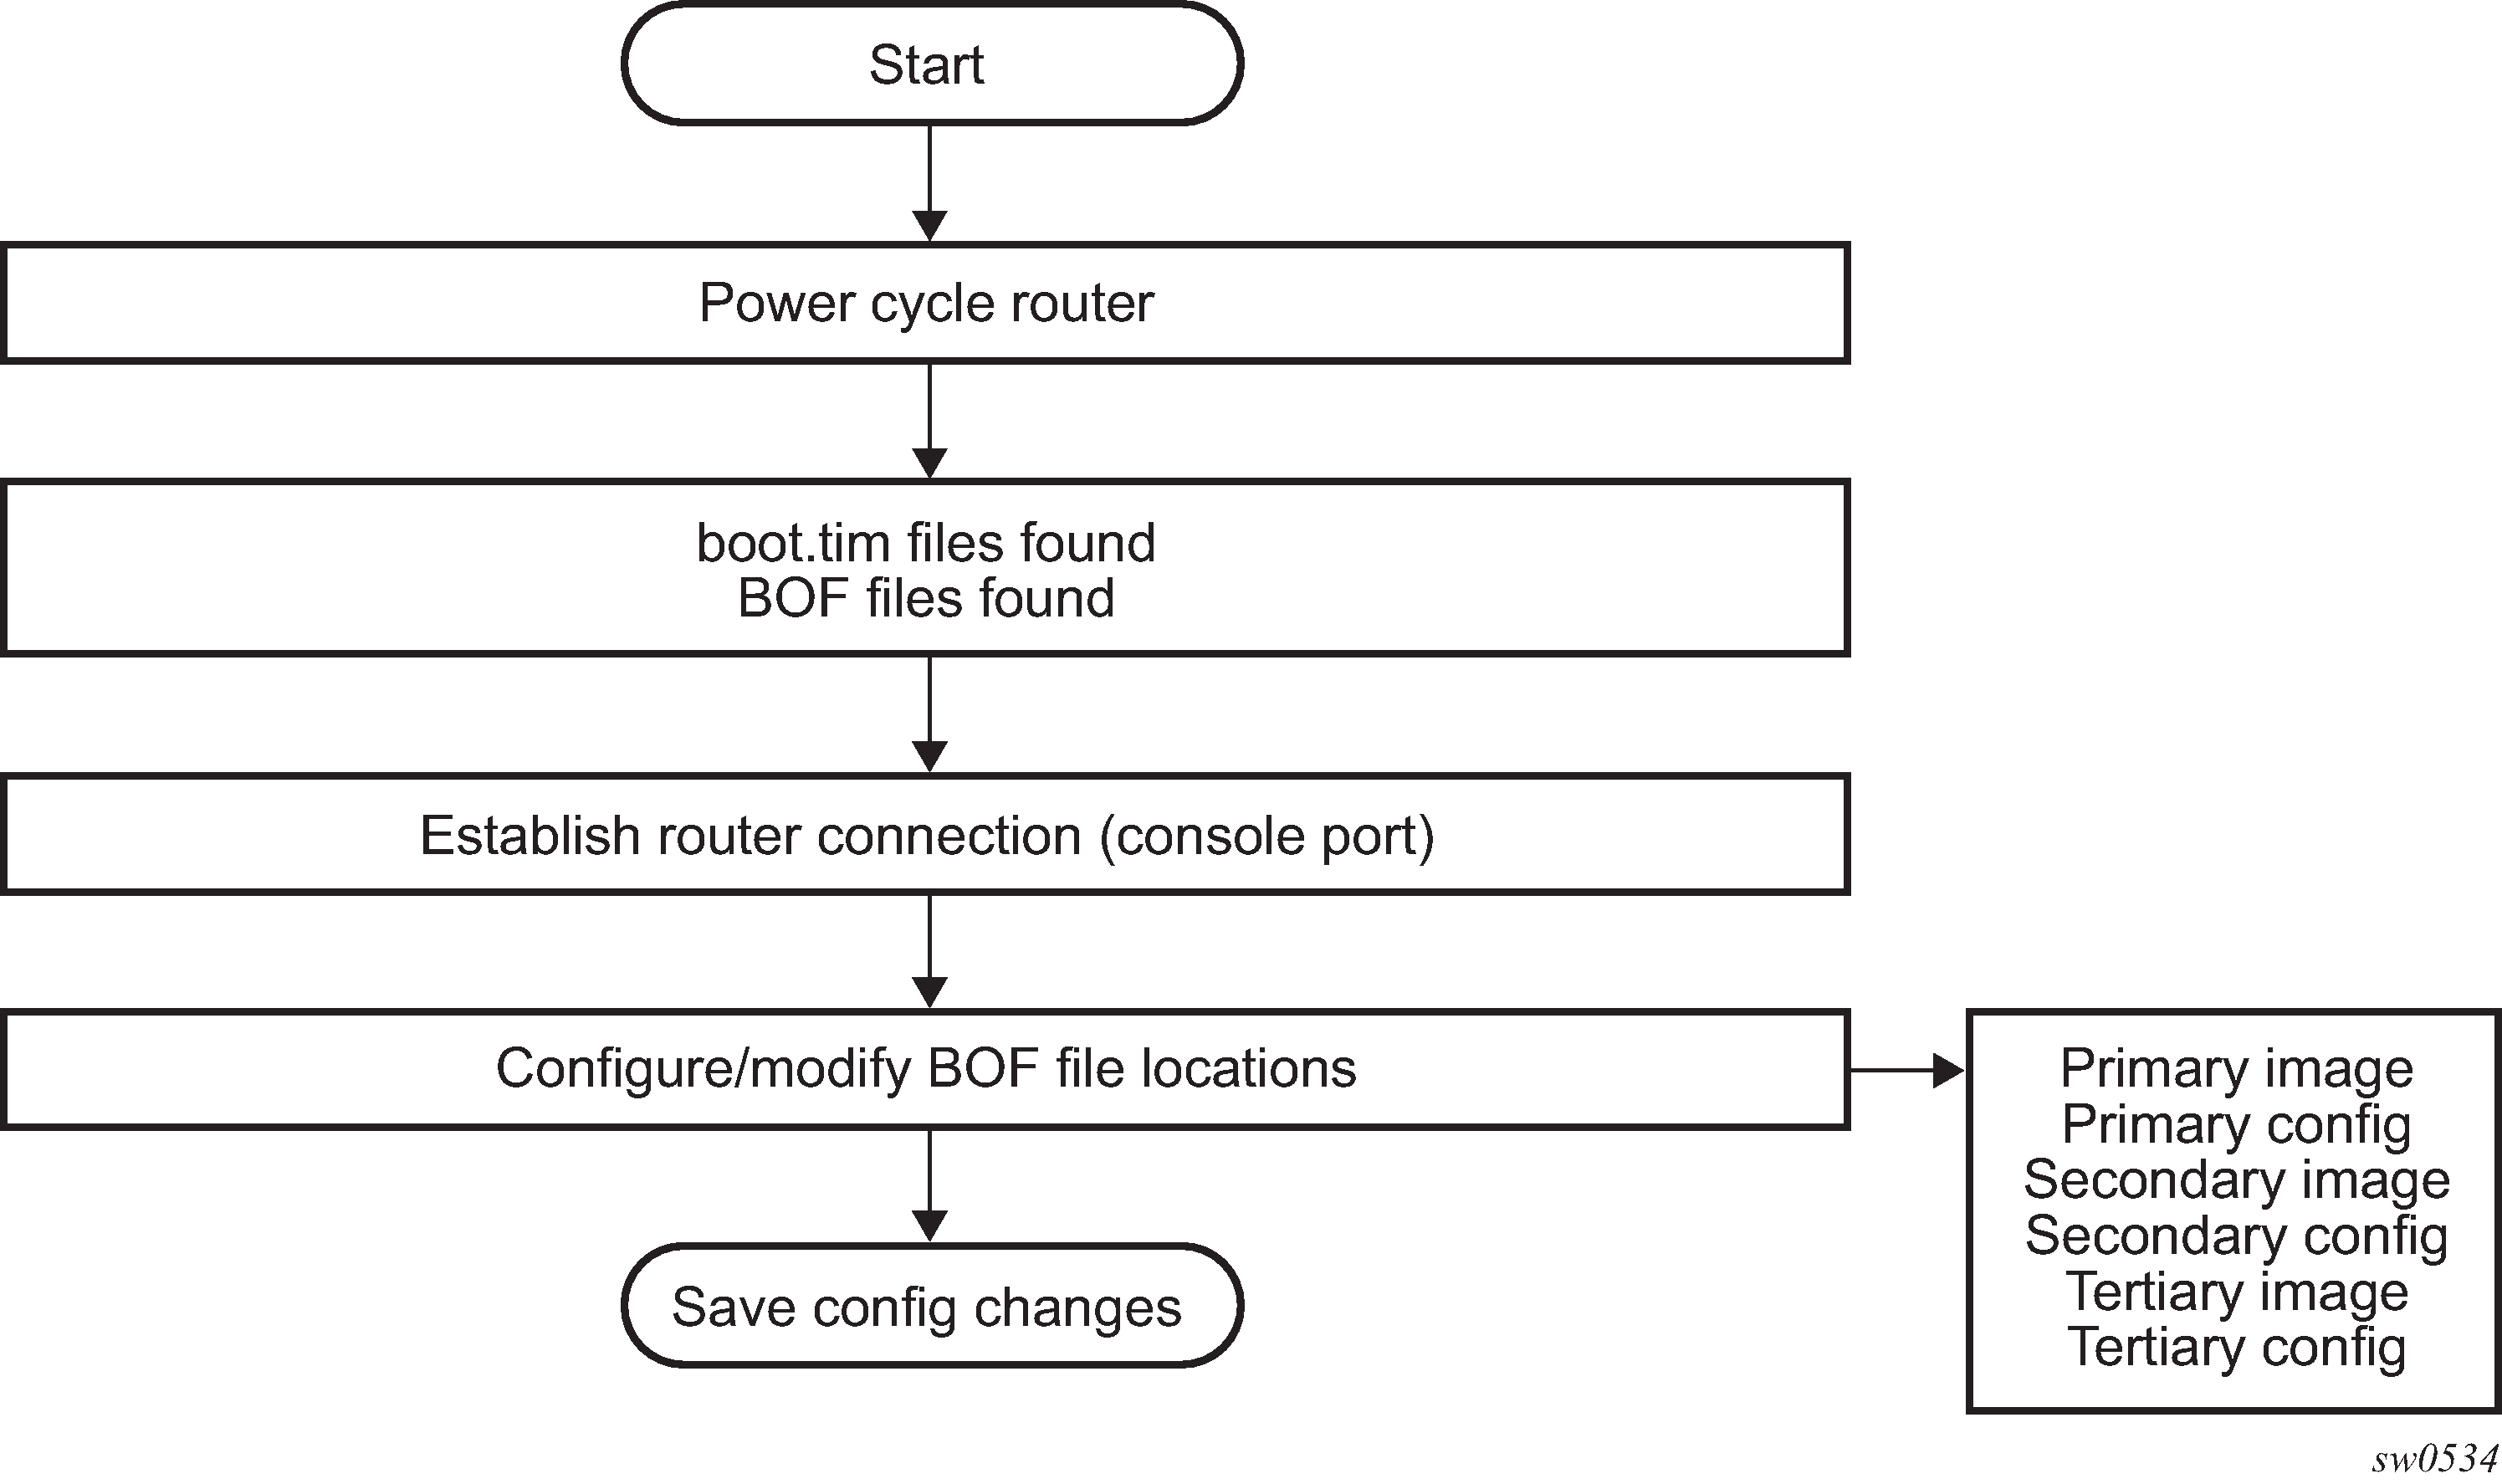
Initial system startup process flow
The following figure shows the process to start your system. This example assumes that the boot loader and BOF image and configuration files are successfully located.
Configuration notes
The loading sequence is based on the order in which it is placed in the configuration file. It is loaded as it is read in at boot time.
Configuring boot file options with CLI
This section provides information about configuring BOF parameters with CLI.
BOF configuration overview
Nokia routers do not contain a boot EEPROM. The bootstrap image is loaded from the boot.tim file. The BOF performs the following tasks:
sets up the uplink ports or the Ethernet management port (speed, duplex, auto) (only on platforms that support the Ethernet management port)
assigns the IP address (either statically or using DHCP) for the uplink or Ethernet management port
assigns the VLAN to the uplink port
creates static routes to provide network connectivity
sets the console port speed
configures the Domain Name System (DNS) name and DNS servers
configures the primary, secondary, and tertiary configuration source
configures the primary, secondary, and tertiary image source
configures operational parameters
Basic BOF configuration
The parameters that specify the location of the image filename that the router will try to boot from and the configuration file are in the BOF.
The most basic BOF configuration should have the following:
uplink port or Ethernet management port parameters
primary image location
primary configuration location
BOF configuration for the 7210 SAS-D and 7210 SAS-Dxp
*A:SAS>show# bof
===============================================================================
BOF (Memory)
===============================================================================
    primary-image      ftp://*:*@xxx.xxx.xxx.xx//home/***/images/SASD-both.tim
    primary-config     cf1:\****.cfg
#uplinkA Port Settings:
    uplinkA-port       1/1/10
    uplinkA-address    xx.xxx.xx.xxx/24
uplinkA-autoneg
    uplinkA-duplex     full
    uplinkA-speed      1000
    uplinkA-address    0
    uplinkA-vlan       0
uplinkA-route          xx.xxx.x.x/16 next-hop xx.xxx.xx.x
    uplinkA-route      xxx.xxx.x.x/16 next-hop xx.xxx.xx.x
    uplinkA-route      xxx.xx.x.x/16 next-hop xx.xxx.xx.x
#System Settings:
    wait               3
    persist            off
    console-speed      115200
    no console-disabled
===============================================================================
*A:SAS>show#
BOF configuration for the 7210 SAS-K 2F1C2T, 7210 SAS-K 2F6C4T, or 7210 SAS-K 3SFP+ 8C
A:Dut-A# show bof
===============================================================================
BOF (Memory)
===============================================================================
    primary-image      ftp://*:*@xxx.xxx.xxx.x/./images/xen-both.tim
    primary-config     ftp://*:*@xxx.xxx.xxx.x/./images/dut-a.cfg
#eth-mgmt Port Settings:
    eth-mgmt-disabled
#uplinkA Port Settings:
    uplinkA-port       1/1/5
    uplinkA-autoneg
    uplinkA-duplex     full
    uplinkA-speed      1000
    uplinkA-address    xxx.xxx.xxx.x/24
    uplinkA-vlan       0
    uplinkA-route      xxx.xxx.x.x/16 next-hop xxx.xxx.xxx.x
#System Settings:
    wait               3
    persist            off
    console-speed      115200
    no  console-disabled
===============================================================================
A:Dut-A#
Common configuration tasks
This section describes basic system configuration tasks that must be performed to configure the BOF.
For details about hardware installation and initial router connections, see the specific hardware installation guide.
Searching for the BOF
The BOF should be on the same drive as the bootstrap image file. If the system cannot load or cannot find the BOF, the system checks whether the boot sequence was manually interrupted; otherwise, the system continues with the auto-init mode. The system prompts for a different image and configuration location.
Accessing the CLI
To access the CLI to configure the software for the first time, perform the following steps.
-
Turn on the power to the chassis.
The 7210 SAS software automatically begins the boot sequence.
-
When the boot loader, BOF image, and configuration files are successfully
located, establish a router connection (console session).
See Console connection for information about establishing a console connection.
Configuring BOF encryption
The BOF contents can be encrypted using AES256 and integrity information maintained using SHA256.
Use the following CLI syntax to configure BOF encryption.
bof
        encrypt {on | off}
Configuring the BOF interactive menu password
The 7210 SAS supports the capability to configure a BOF password to provide specific users with access to the BOF interactive menu. Additionally, the 7210 SAS supports an option to securely store the BOF password using the bof secure-bof-password command.
Use the following CLI syntax to configure a password for the menu.
bof
        bof-password password
        no bof-password
        secure-bof-password {enable | disable}
The password must be a plaintext string, between 8 and 32 characters. The plaintext string cannot contain embedded nulls.
When entering the password in plaintext, ensure that the password is not visible to bystanders.
Configuring configuration file encryption
The configuration file contents can be encrypted using AES256 and integrity information maintained using SHA256.
Use the following CLI syntax to configure a configuration file encryption key.
bof
        encryption-key key
        no encryption-key
The configured encryption key must be a plaintext string, between 8 to 32 characters. The plaintext string cannot contain embedded nulls.
When entering the encryption key in plaintext, ensure that the key is not visible to bystanders.
Console connection
To establish a console connection, you need the following:
an ASCII terminal or a PC running terminal emulation software set to the parameters described in Console Configuration Parameter Values
a standard serial cable connector for connecting to a RS232 port (provides a RJ45 connector)
The following table describes the console configuration parameter values necessary for establishing a console connection.
Parameter |
Value |
|---|---|
Baud |
115,200 |
Data bits |
8 |
Parity |
None |
Stop bits |
1 |
Flow control |
None |
Procedure to connect to a console
Perform this procedure to establish a console connection to any platform:
-
Connect the terminal to the Console port on the front panel using the serial
cable.
See Location of console ports on 7210 SAS platforms for information about the console port and its placement on the 7210 SAS platforms.
- Power on the terminal.
- Establish the connection by pressing Enter a few times on your terminal keyboard.
-
At the router prompt, enter the login and password.
The default login is admin. The default password is admin.
Location of console ports on 7210 SAS platforms
This section provides console port information, supported variants, and modes of operation for 7210 SAS platforms.
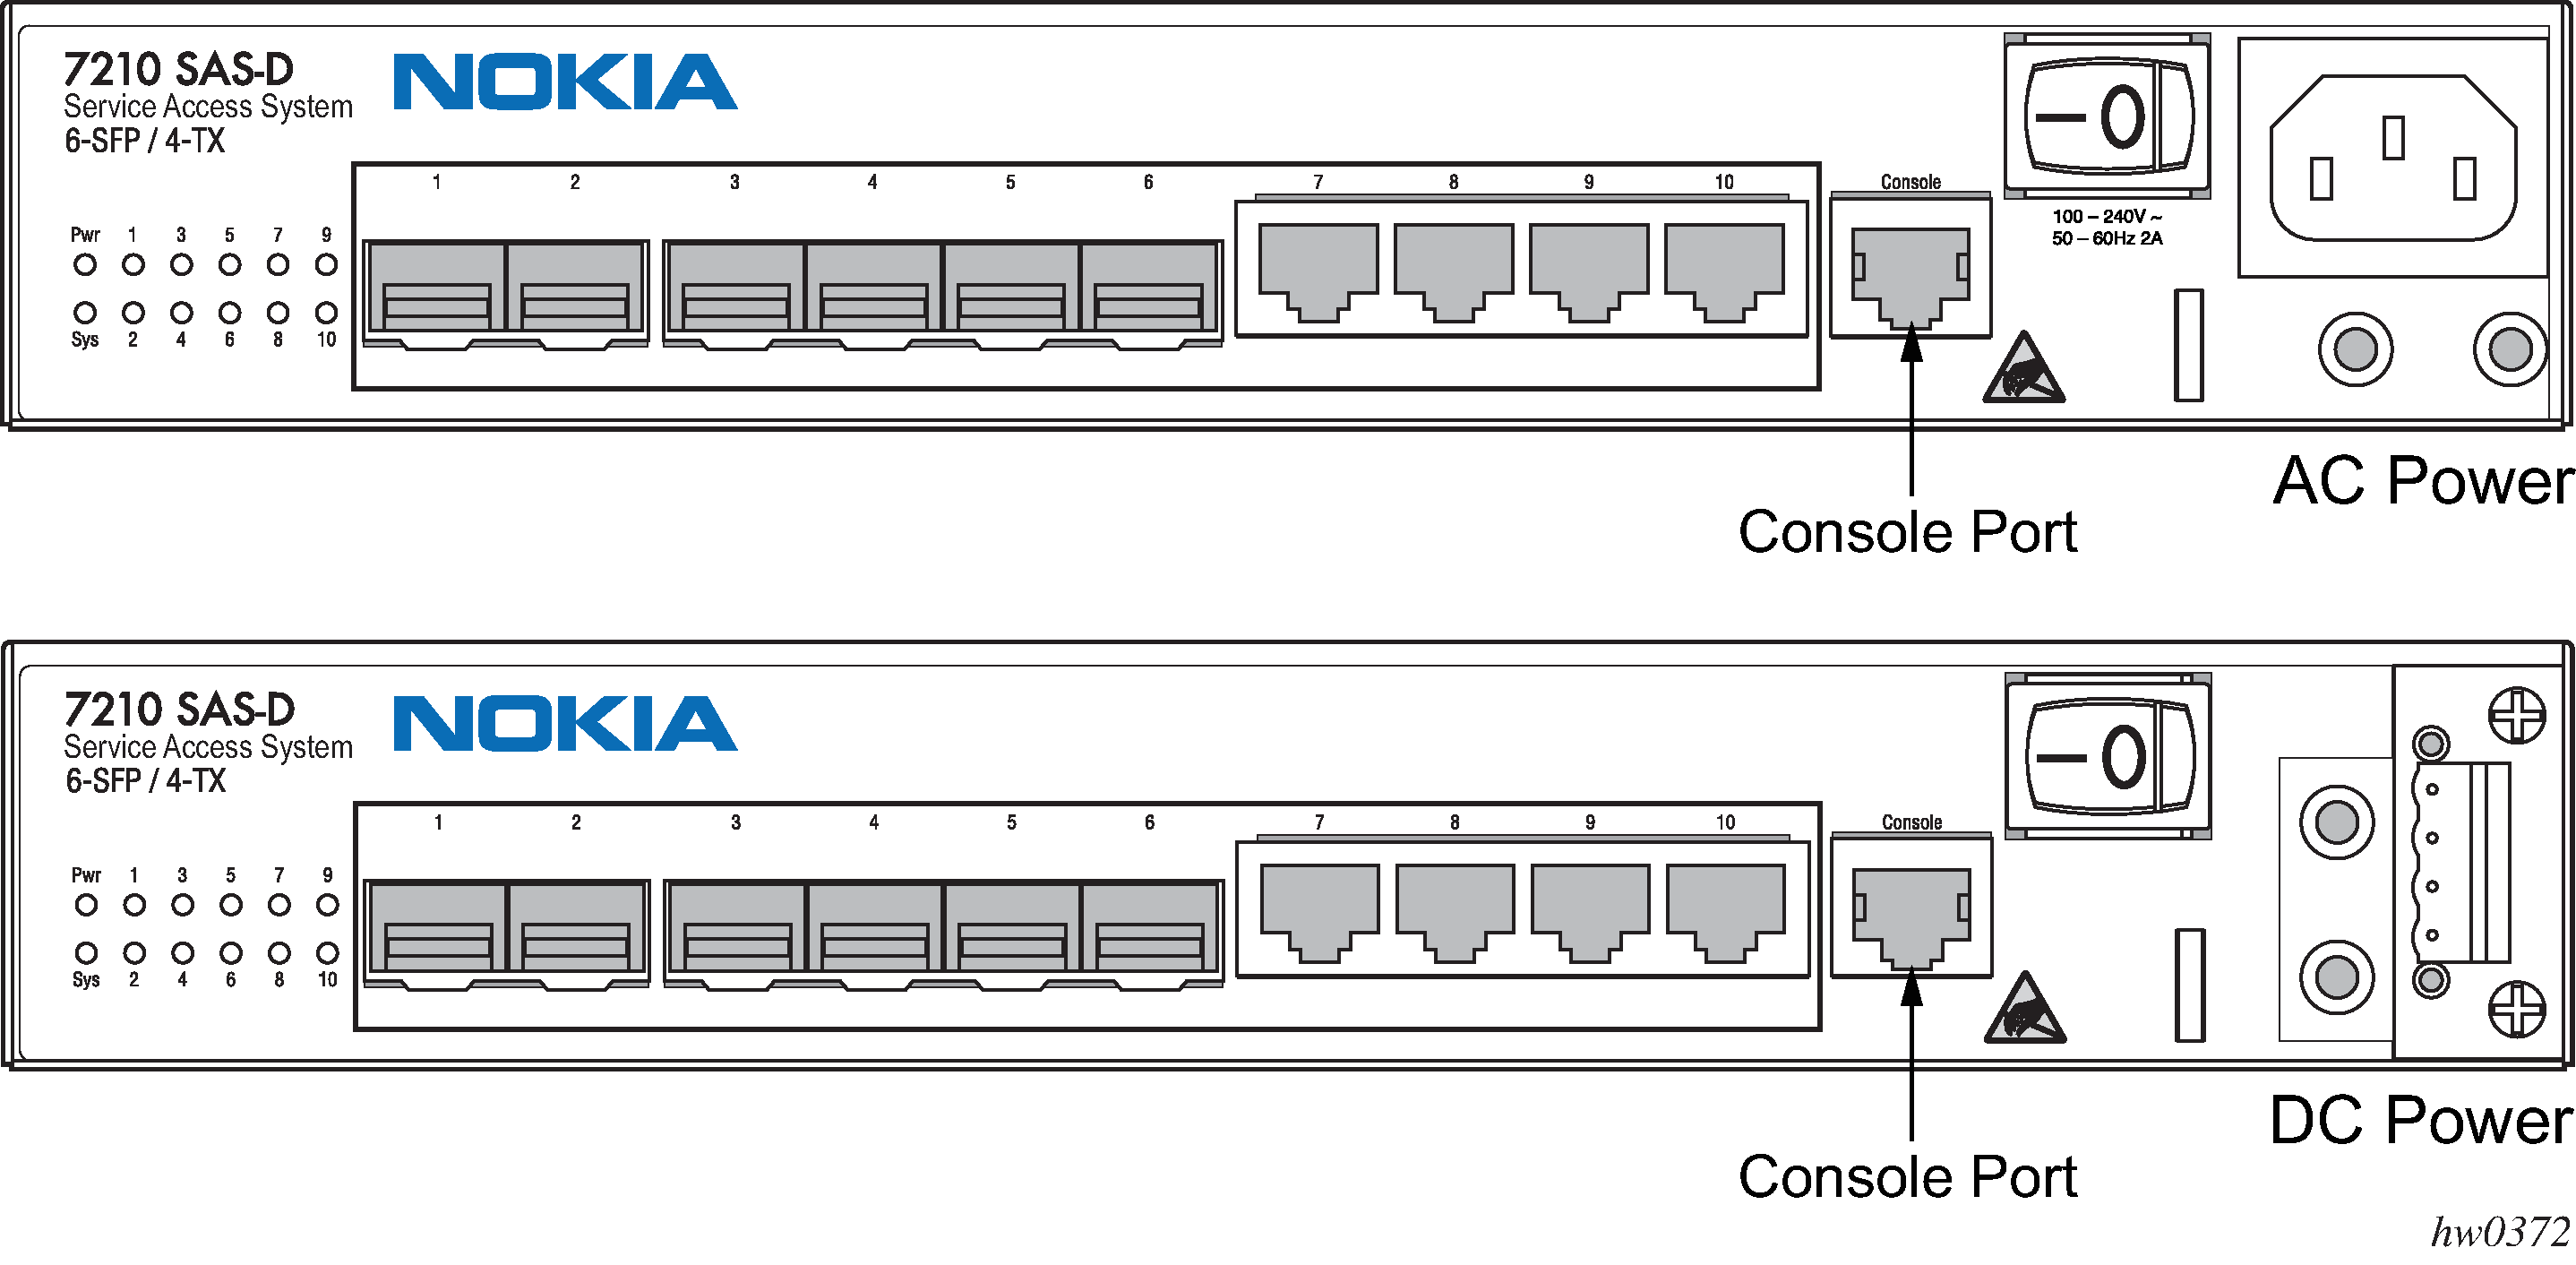
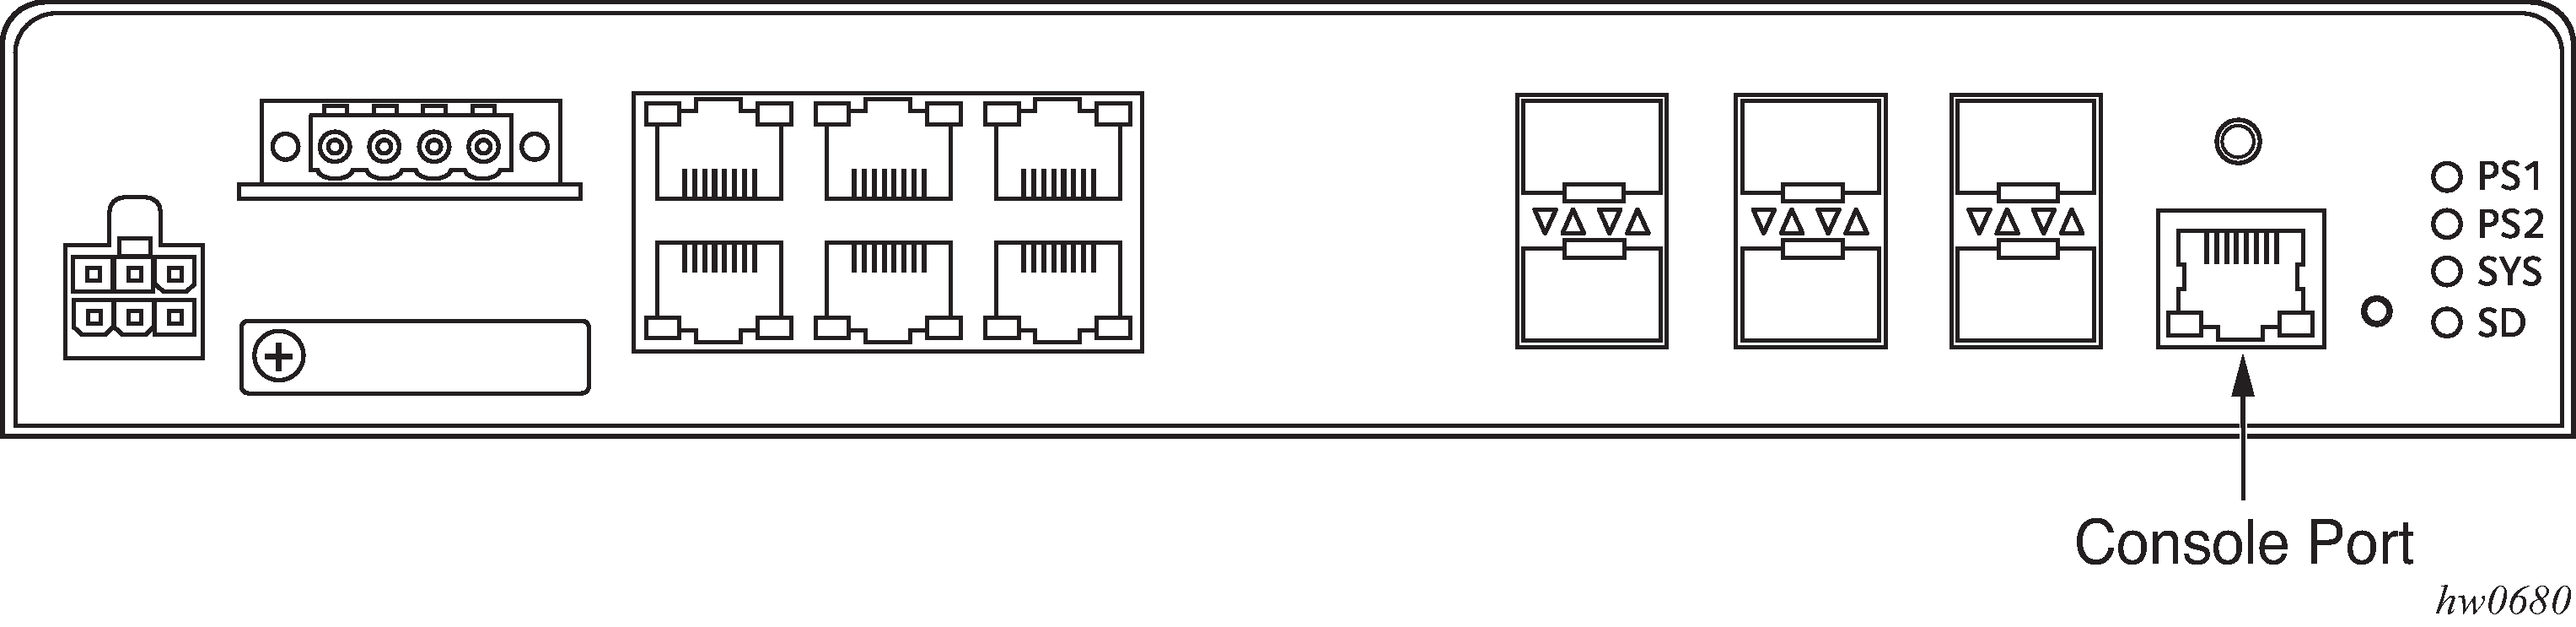
7210 SAS-D console port
The 7210 SAS-D is a service-aware Layer 2 device with support for QinQ Layer 2 uplinks. The device functions as an Ethernet demarcation and back-haul unit with support for four 10/100/1000 Base-T fixed copper ports and six 100/1000 SFP ports with line-rate switching on all the ports.
The following figure shows an example of the console port on a 7210 SAS-D front panel.
7210 SAS-Dxp 12p console port
The 7210 SAS-Dxp 12p (2SFP+ 4SFP 6Tx) is a service-aware Layer 2 device with support for QinQ Layer 2 uplinks. The device can be used as an Ethernet demarcation device, Ethernet access device, and mobile back-haul unit with support for six 10/100/1000 Base-T fixed copper ports, four 100/1000 SFP ports, and two 1GE/10GE SFP+ ports, with line-rate switching on all the ports.
On the 7210 SAS-Dxp 12p, the 10 Mb/s port speed is not supported for an SFP port using a copper SFP.
The following figure shows the location of the console port on the 7210 SAS-Dxp 12p AC variant front panel.
The following figure shows the location of the console port on the 7210 SAS-Dxp 12p ETR AC variant front panel.
The following figure shows the location of the console port on the 7210 SAS-Dxp 12p DC variant front panel.
The following figure shows the location of the console port on the 7210 SAS-Dxp 12p ETR DC variant front panel.
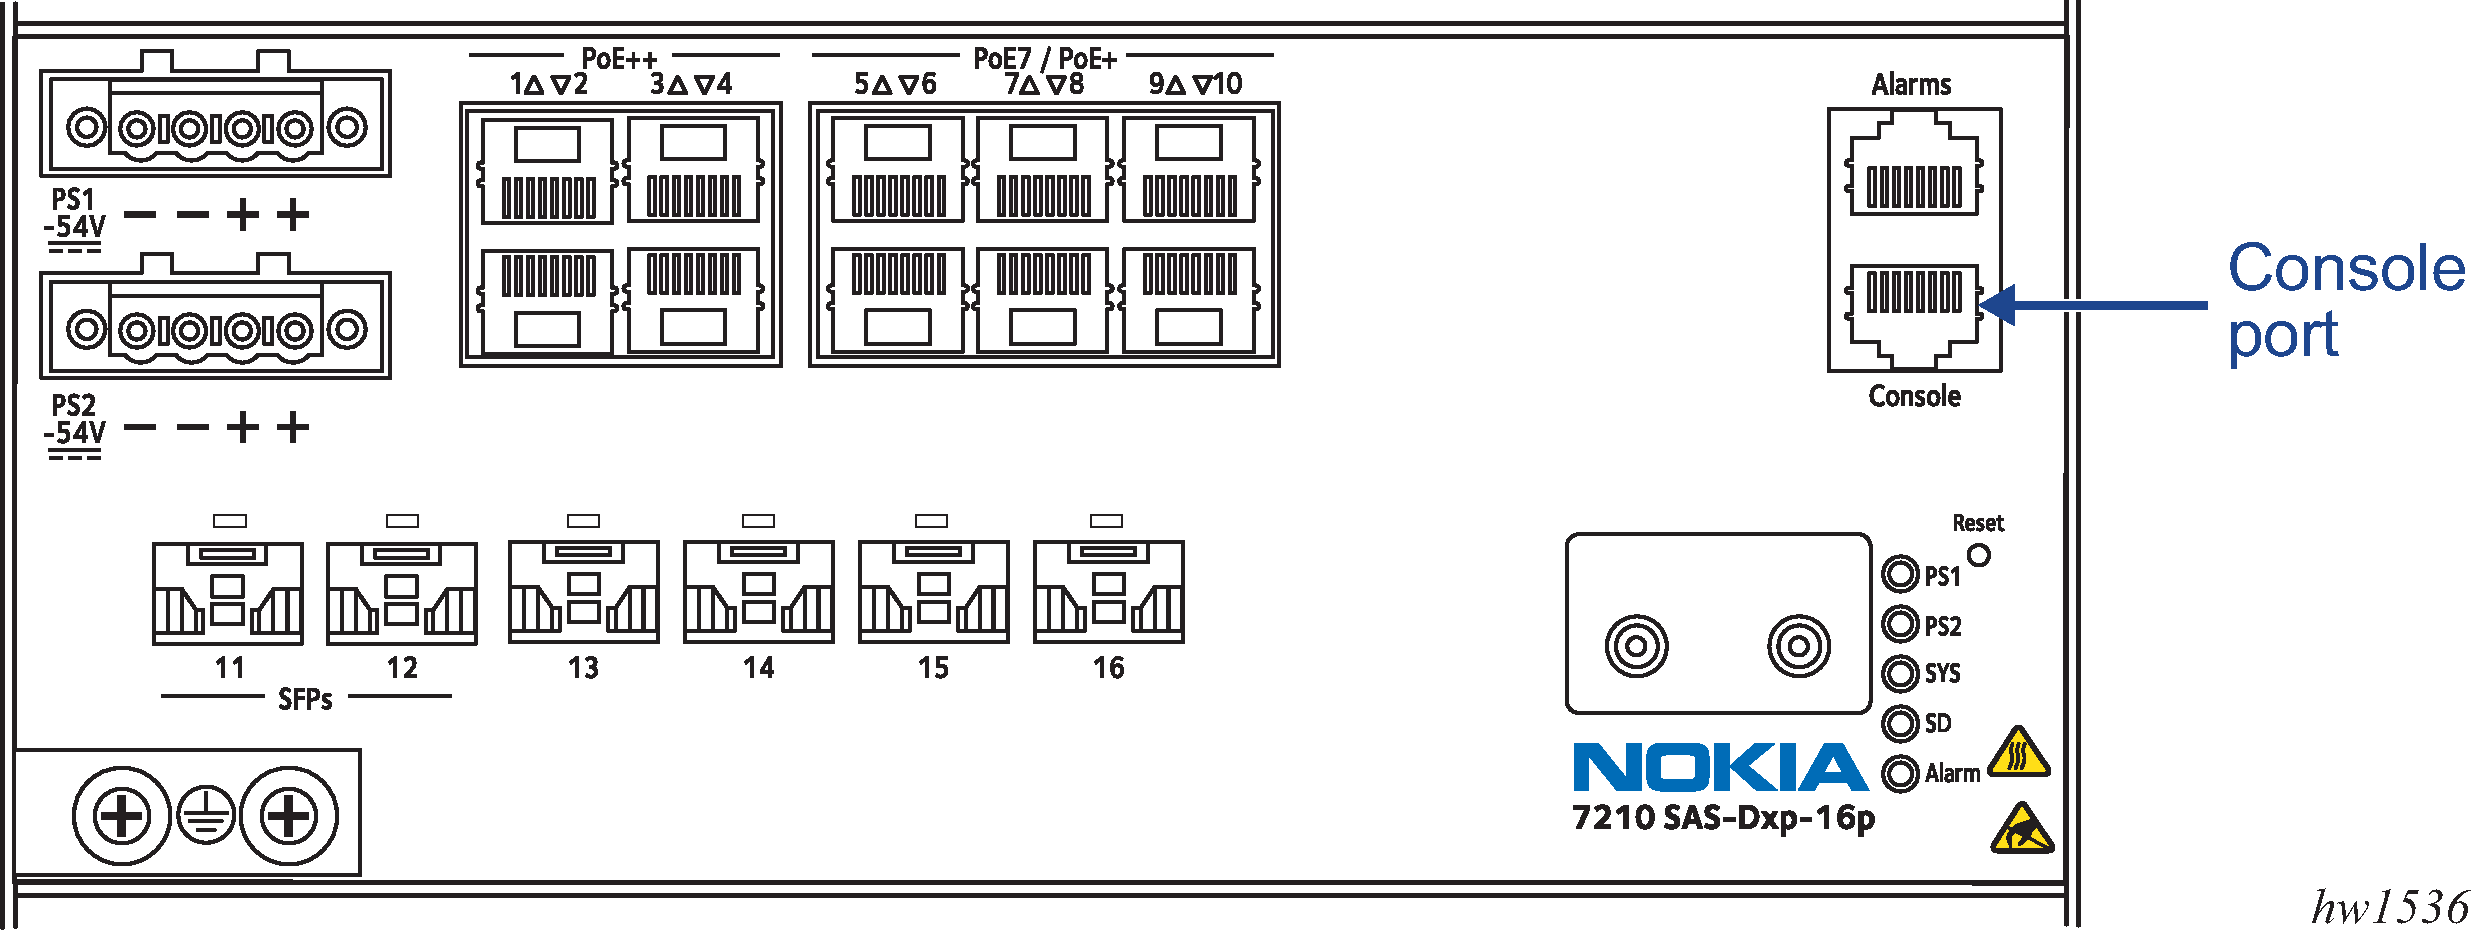
7210 SAS-Dxp 16p console port
The 7210 SAS-Dxp 16p (2SFP+ 4SFP 10Tx) is a service-aware Layer 2 device with support for QinQ Layer 2 uplinks. The device can be used as an Ethernet demarcation device, Ethernet access device, and mobile back-haul unit with support for ten 10/100/1000 Base-T fixed copper ports, four 1 GE SFP ports, and two 1 GE/10 GE SFP+ ports, with line-rate switching on all the ports.
On the 7210 SAS-Dxp 16p, the 10 Mb/s port speed is not supported for an SFP port using a copper SFP.
The following figure shows the location of the console port on the 7210 SAS-Dxp 16p front panel.
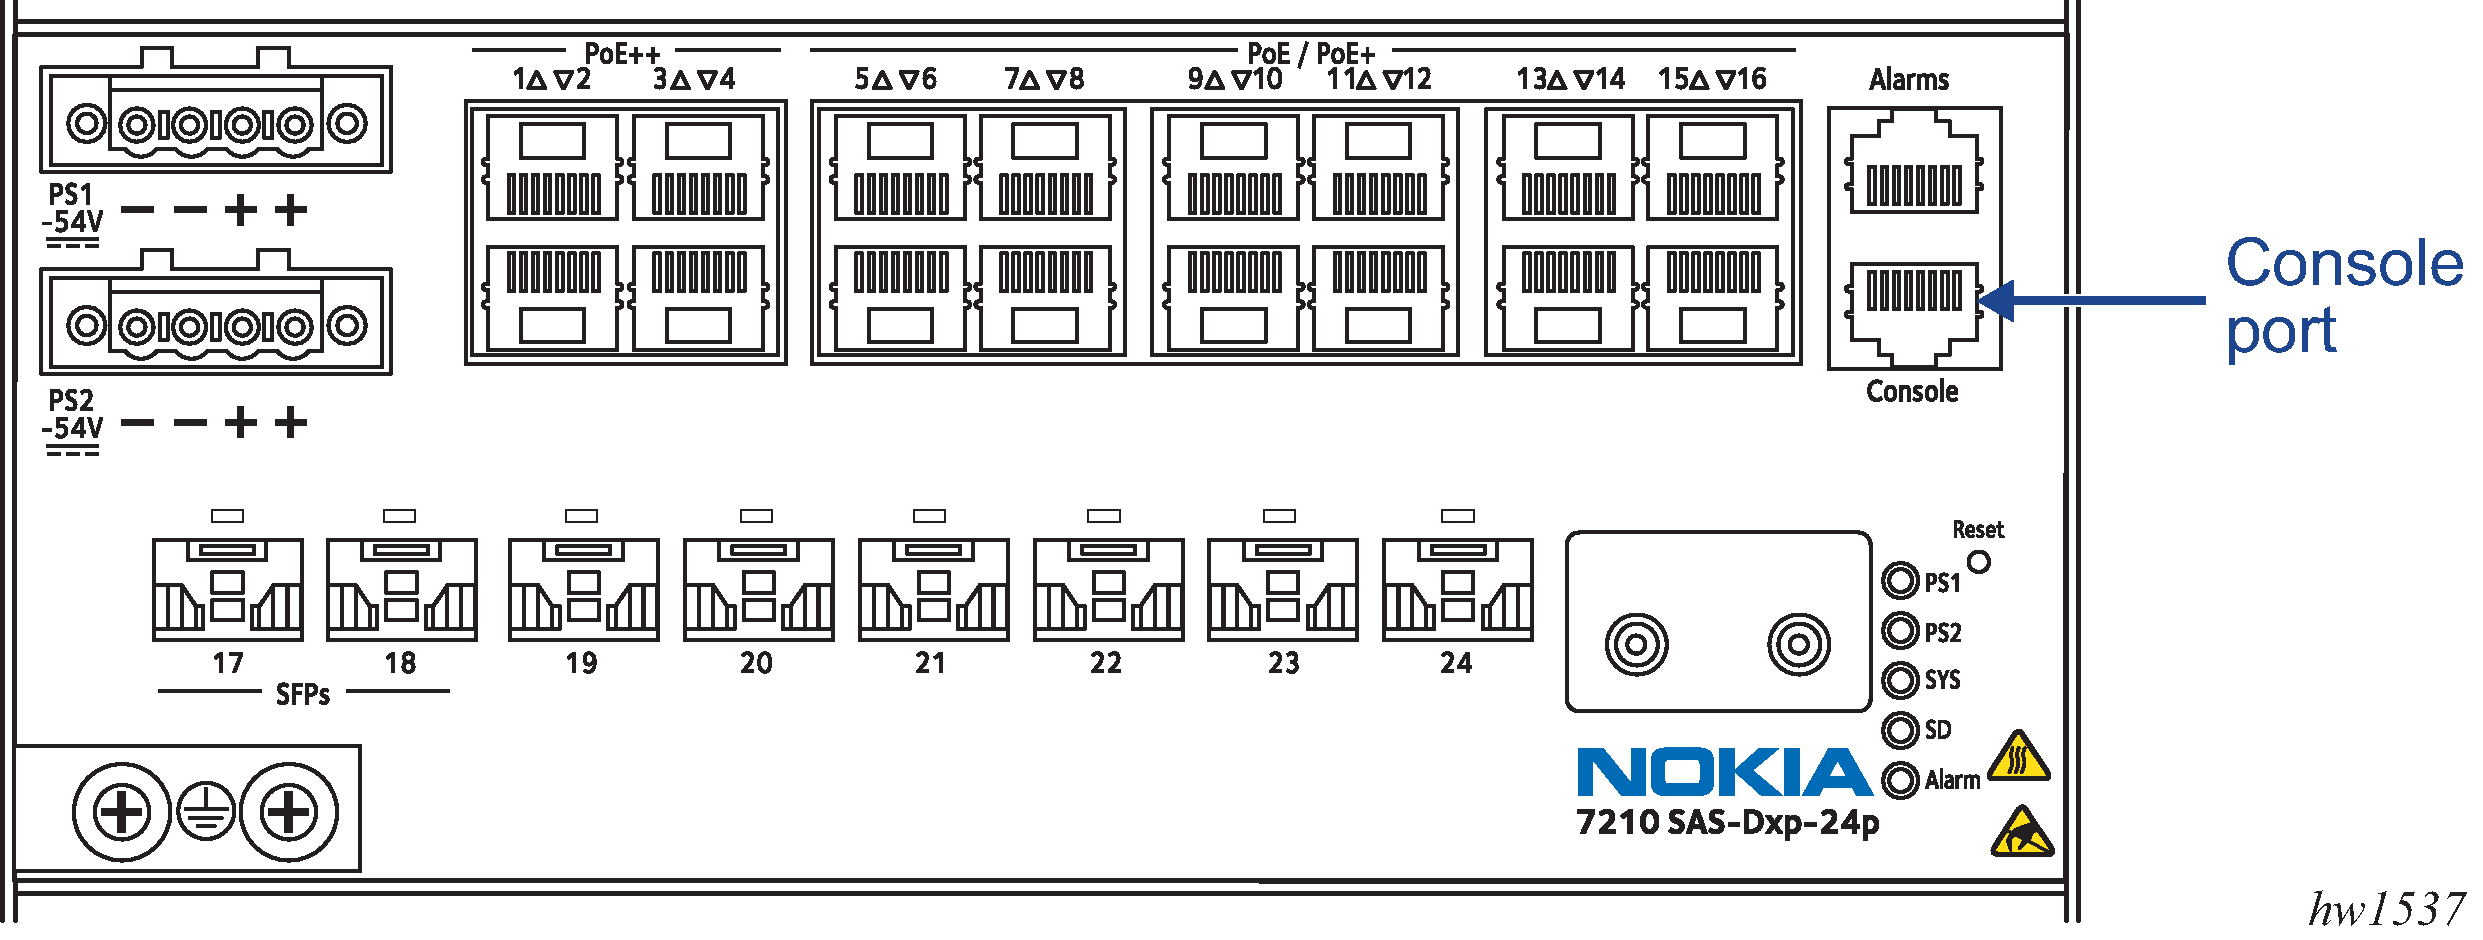
7210 SAS-Dxp 24p console port
The 7210 SAS-Dxp 24p (2SFP+ 6SFP 16Tx) is a service-aware Layer 2 device with support for QinQ Layer 2 uplinks. The device can be used as an Ethernet demarcation device, Ethernet access device, and mobile back-haul unit with support for sixteen 10/100/1000 Base-T fixed copper ports, six 1 GE SFP ports, and two 1 GE/10 GE SFP+ ports, with line-rate switching on all the ports.
On the 7210 SAS-Dxp 24p, the 10 Mb/s port speed is not supported for an SFP port using a copper SFP.
The following figure shows the location of the console port on the 7210 SAS-Dxp 24p front panel.
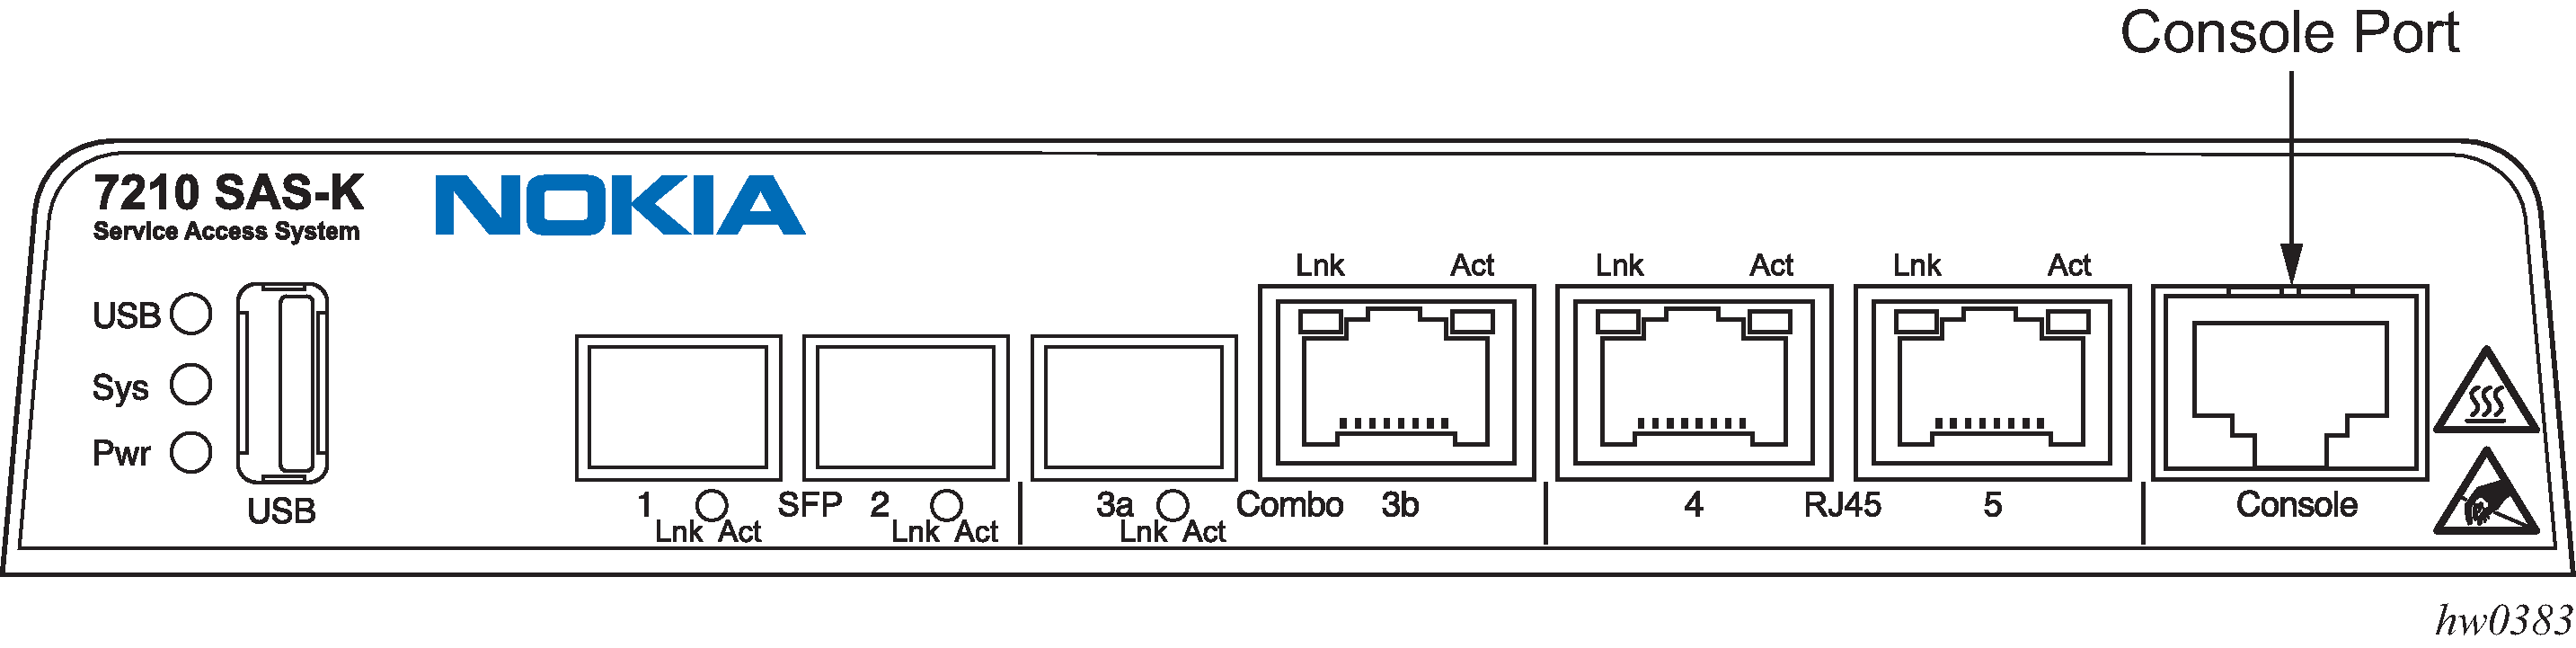
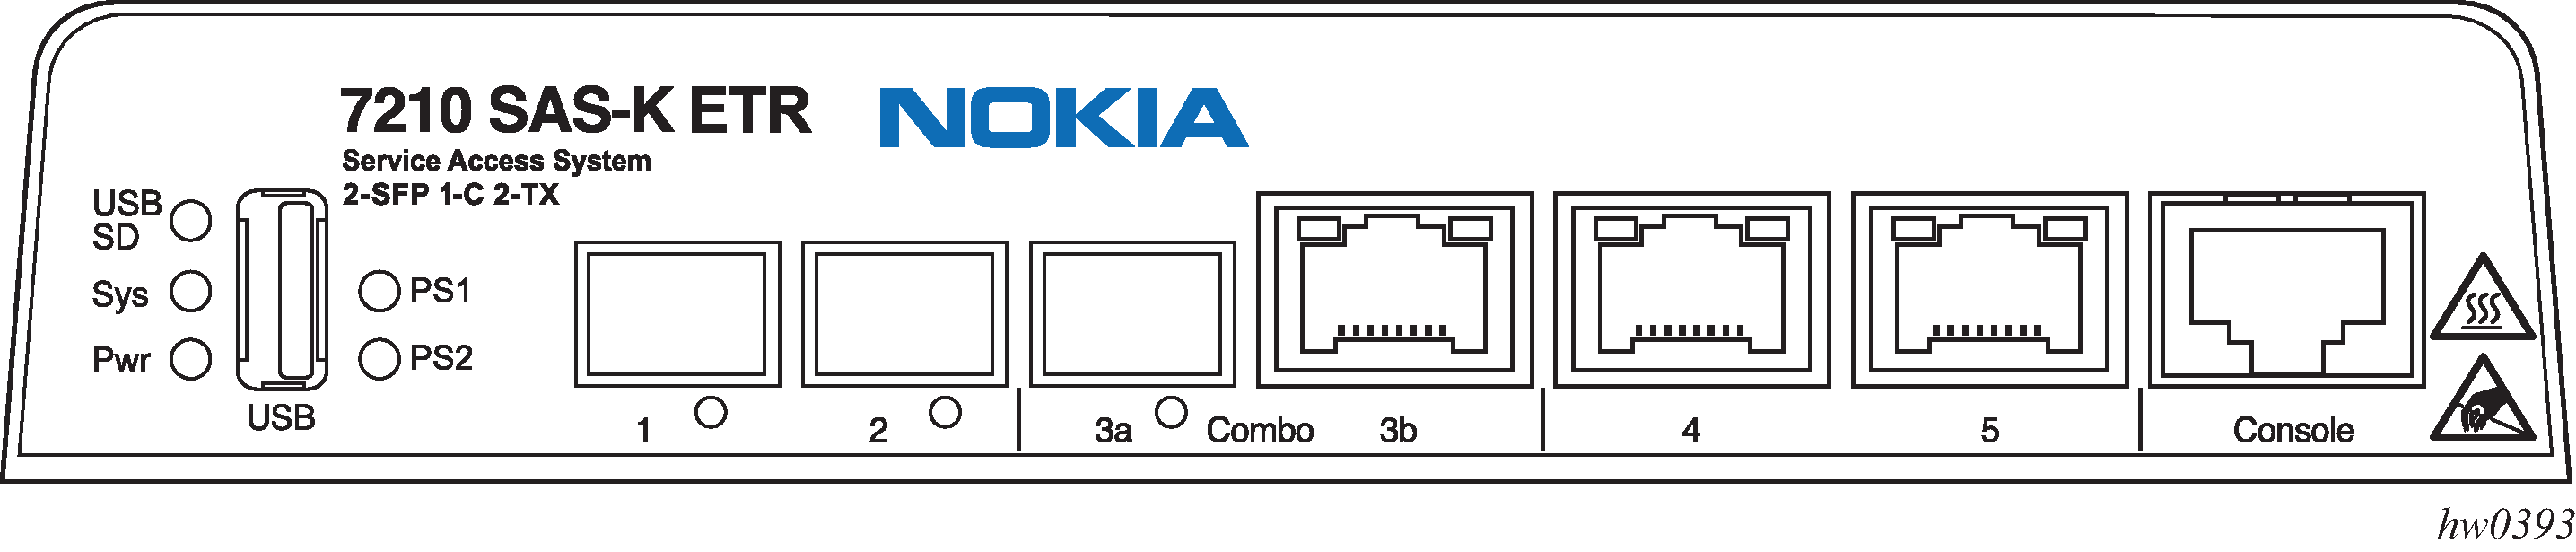
7210 SAS-K 2F1C2T Console Port
The 7210 SAS-K 2F1C2T is a 1GE demarcation device targeted for business services, mobile backhaul, and vertical and strategic industry segments.
The 7210 SAS-K 2F1C2T provides two 100/1000 SFP ports. Each port can be used for a direct connection to subscriber customer premises equipment (CPE) or as an uplink to another aggregation node. The 7210 SAS-K 2F1C2T also provides two 10/100/1000 Base-T fixed copper ports and one combo port.
The 7210 SAS-K 2F1C2T has a non-ETR (standard) variant and an ETR variant.
The following figures show examples of the console port on the front panel of the 7210 SAS-K 2F1C2T and 7210 SAS-K 2F1C2T ETR variants.
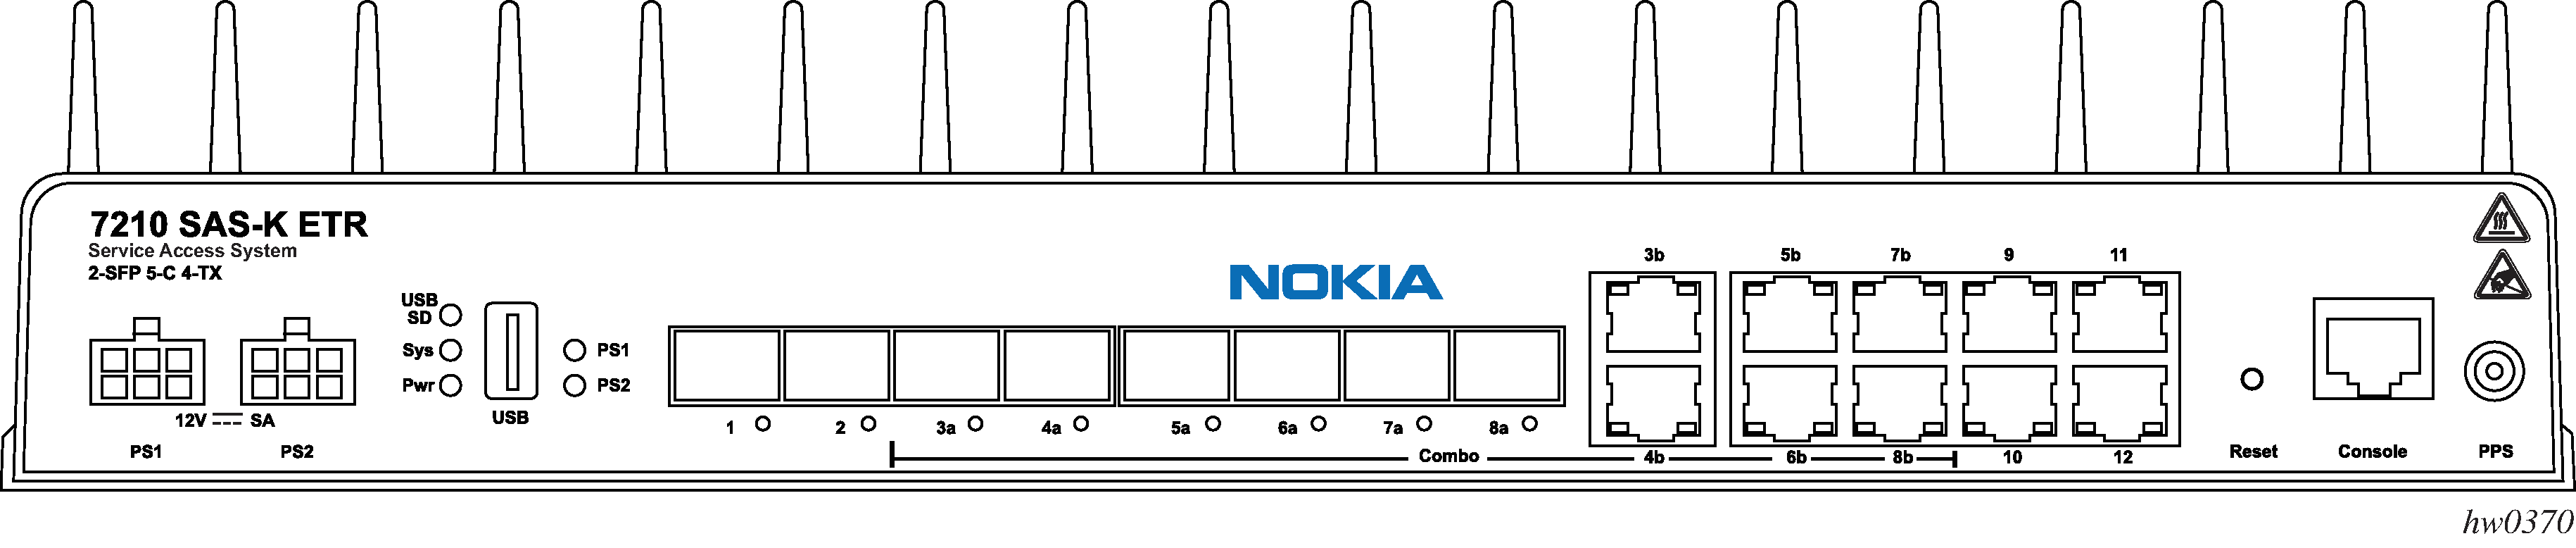
7210 SAS-K 2F6C4T console port
The 7210 SAS-K 2F6C4T is an IP/MPLS capable access and demarcation device targeted for business services, mobile backhaul, and vertical and strategic industry segments.
The 7210 SAS-K 2F6C4T provides two 100/1000 SFP ports, four 10/100/1000 Base-T fixed copper ports and 6 combo ports (that can be configured as either SFP ports or copper ports). Each port can be used for a direct connection to subscriber customer premises equipment (CPE) or as an uplink to another aggregation node (uplinks are typically fiber ports).
The 7210 SAS-K 2F6C4T has a non-ETR (standard) variant and an ETR variant.
The following figure show examples of the console port on the front panel of the 7210 SAS-K 2F6C4T and 7210 SAS-K 2F6C4T ETR variants.

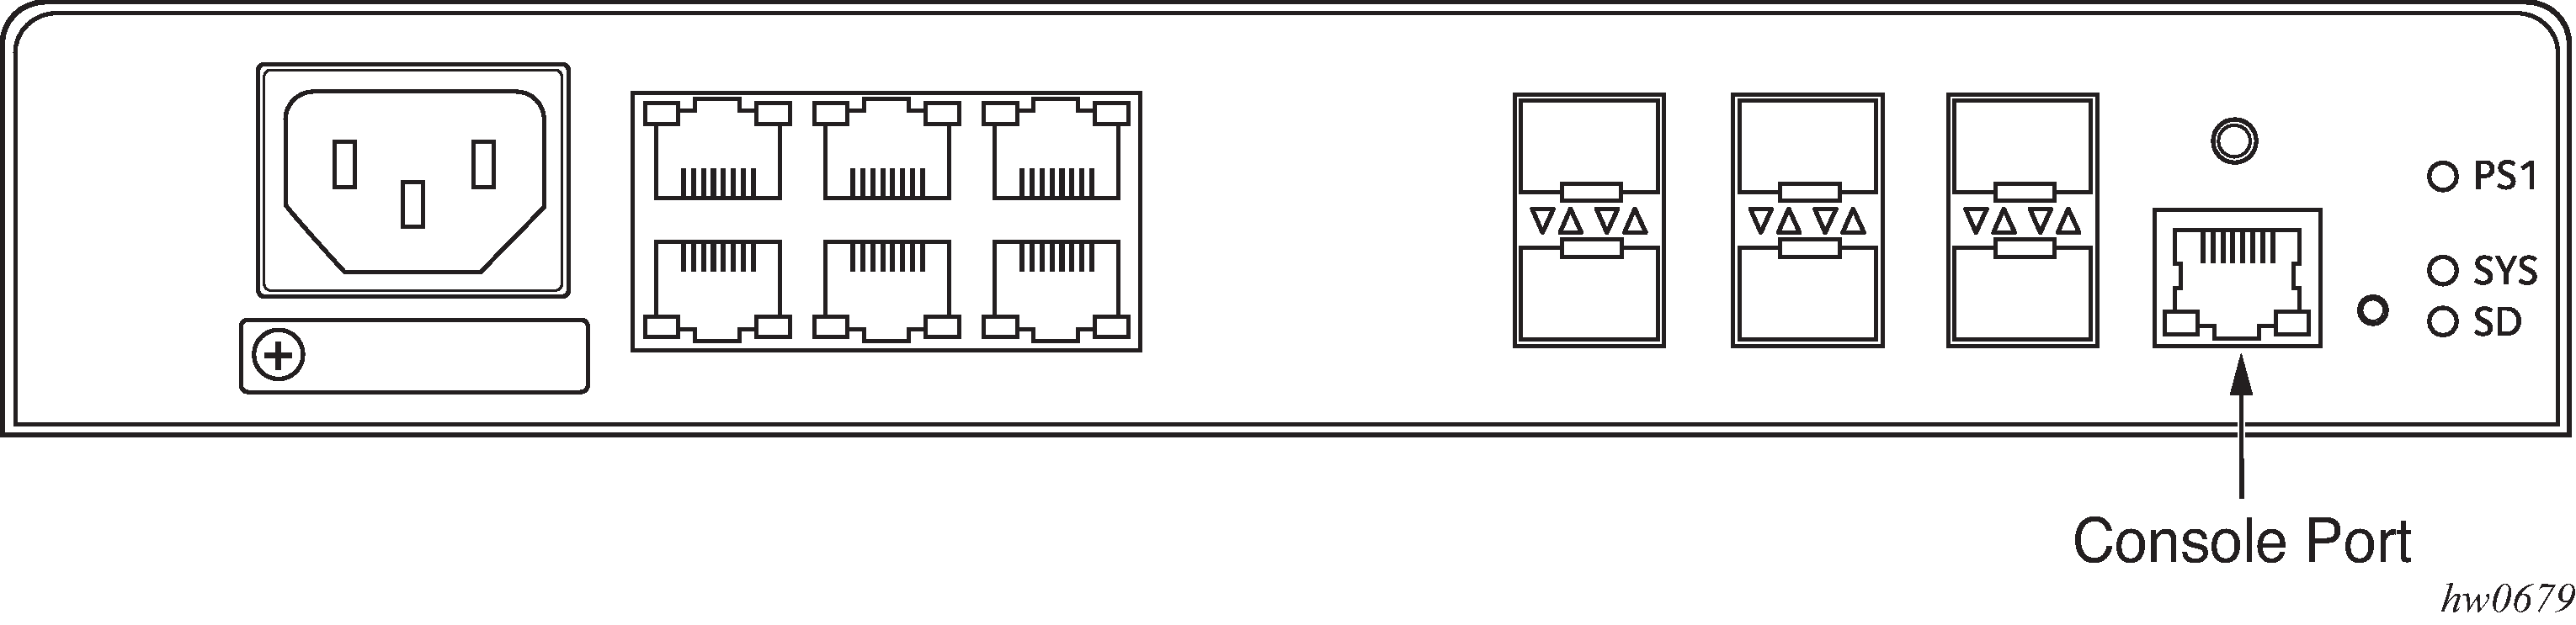
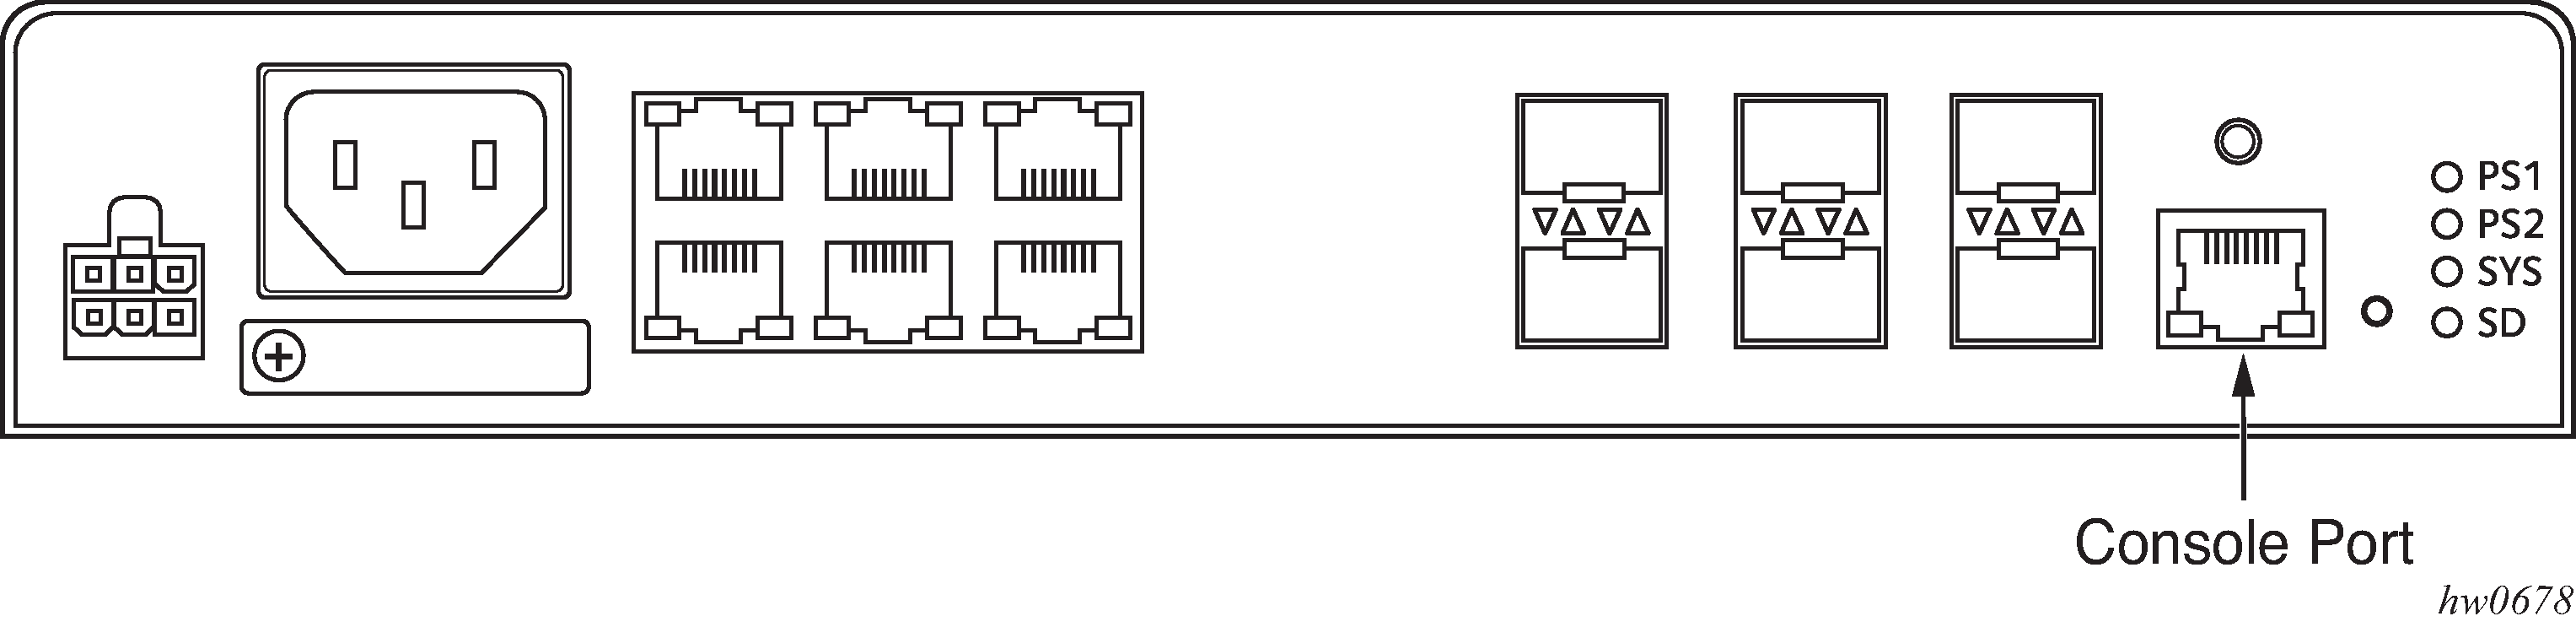
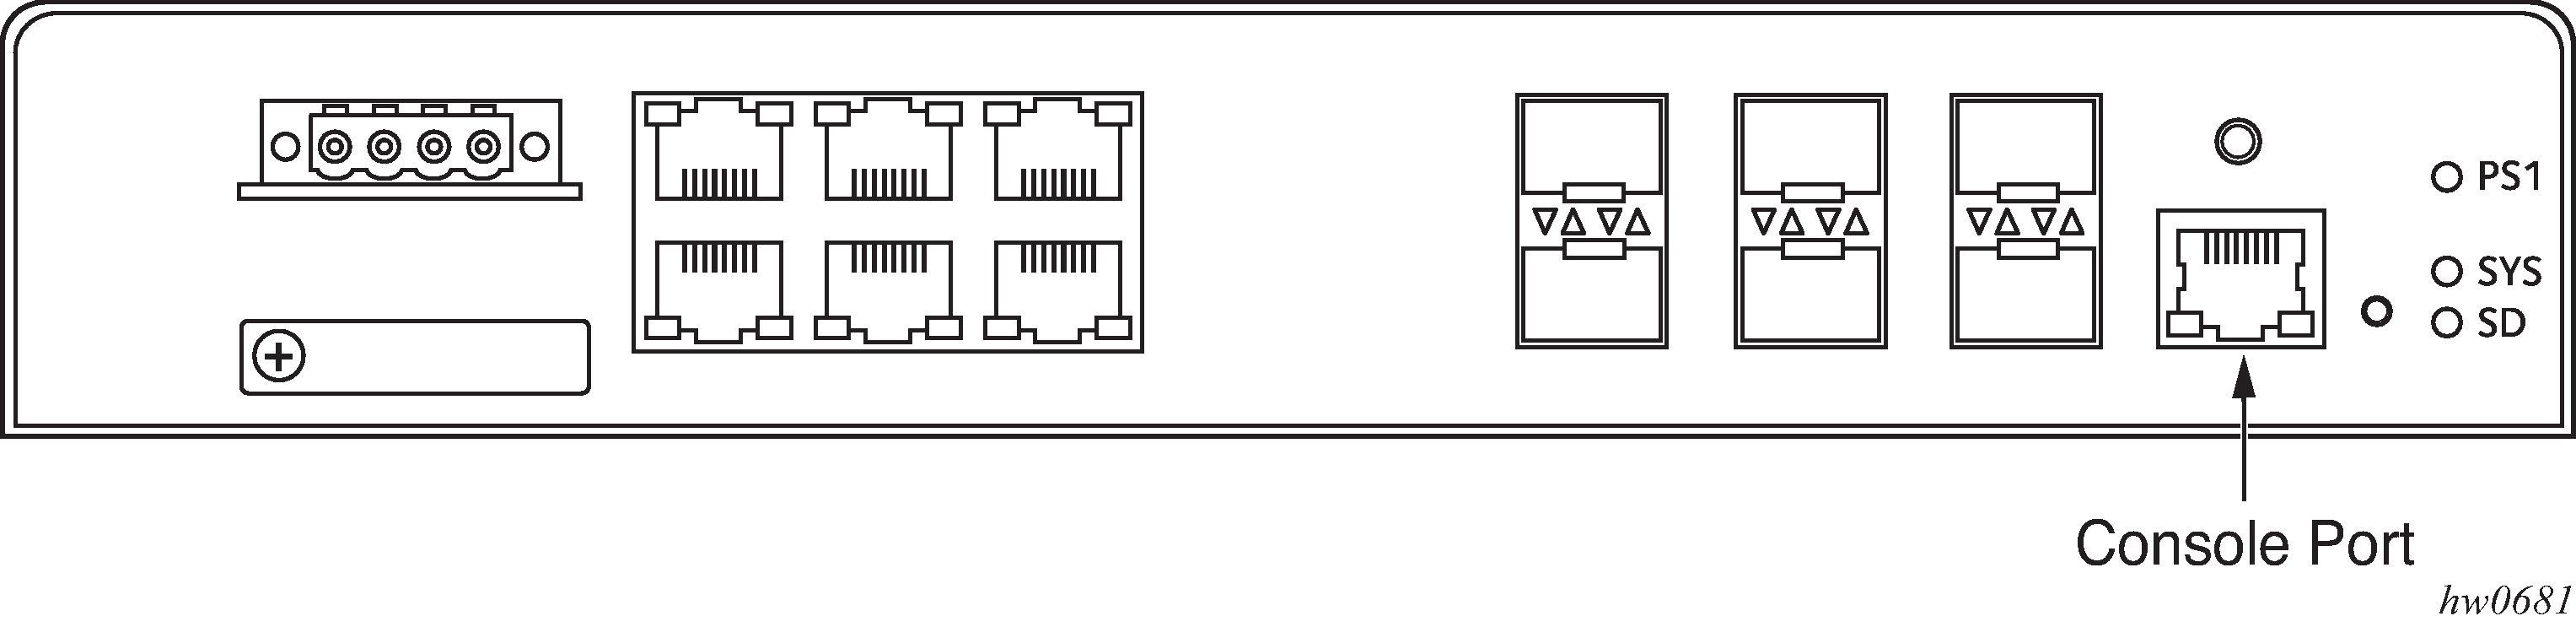
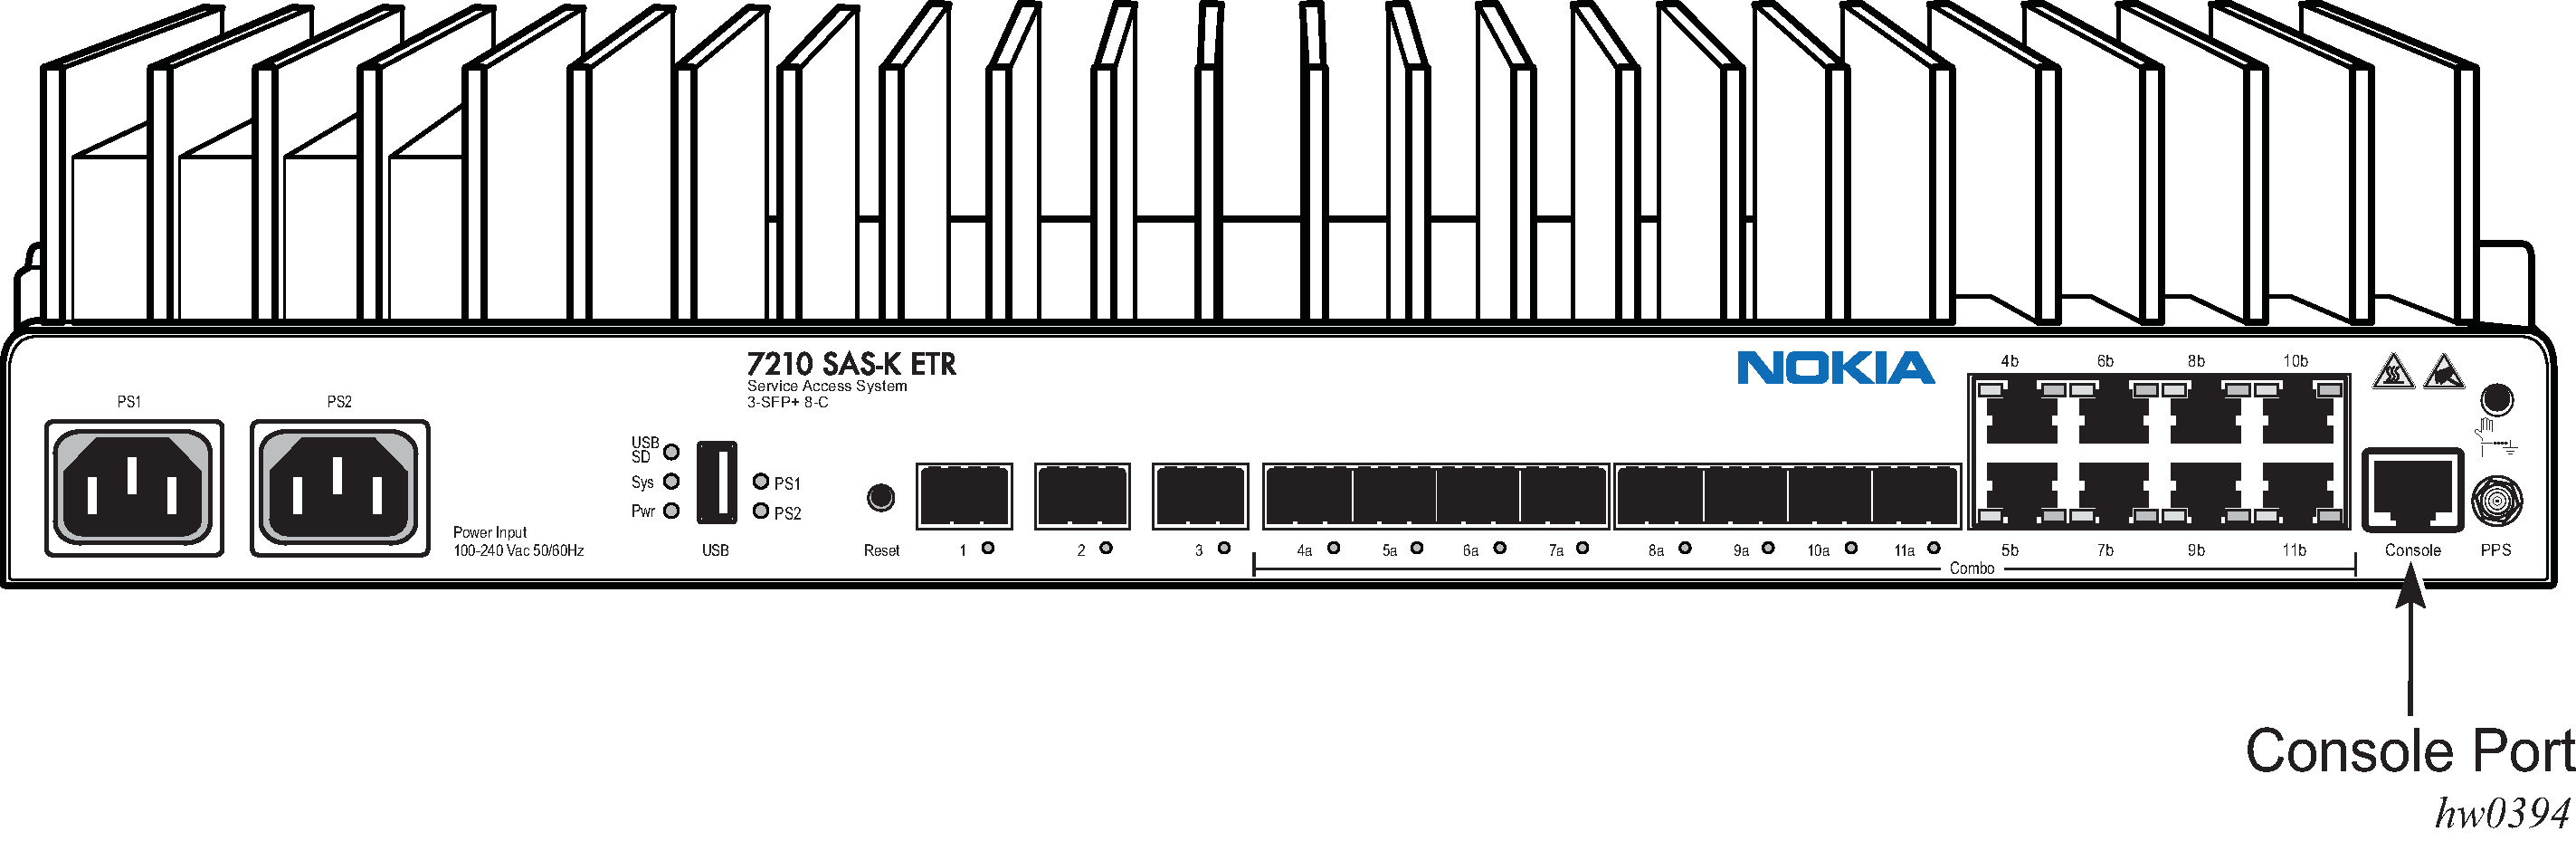
7210 SAS-K 3SFP+ 8C console port
The 7210 SAS-K 3SFP+ 8C is an IP/MPLS capable ETR device designed for delivering differentiated services for mobile backhaul, business services, and vertical industry segments such as railways and transportation. It supports both IP/MPLS and Ethernet-based Layer 2 VPN services and Layer 3 services, and provides a rich set of Ethernet OAM and IP/MPLS OAM tools to aid in troubleshooting, fault resolution, and service performance monitoring.
The 7210 SAS-K 3SFP+ 8C provides three 1GE/10GE SFP+ ports and eight combo ports. The combo ports can be configured as either Base-T or SFP ports, or a mix of both. This flexible configuration can provide up to eight 100/1000 SFP ports or up to eight 10/100/1000 Mb/s RJ-45 Base-T fixed copper ports. A mixed configuration of both SFP and copper ports can provide up to eight 1 Gb/s Ethernet ports.
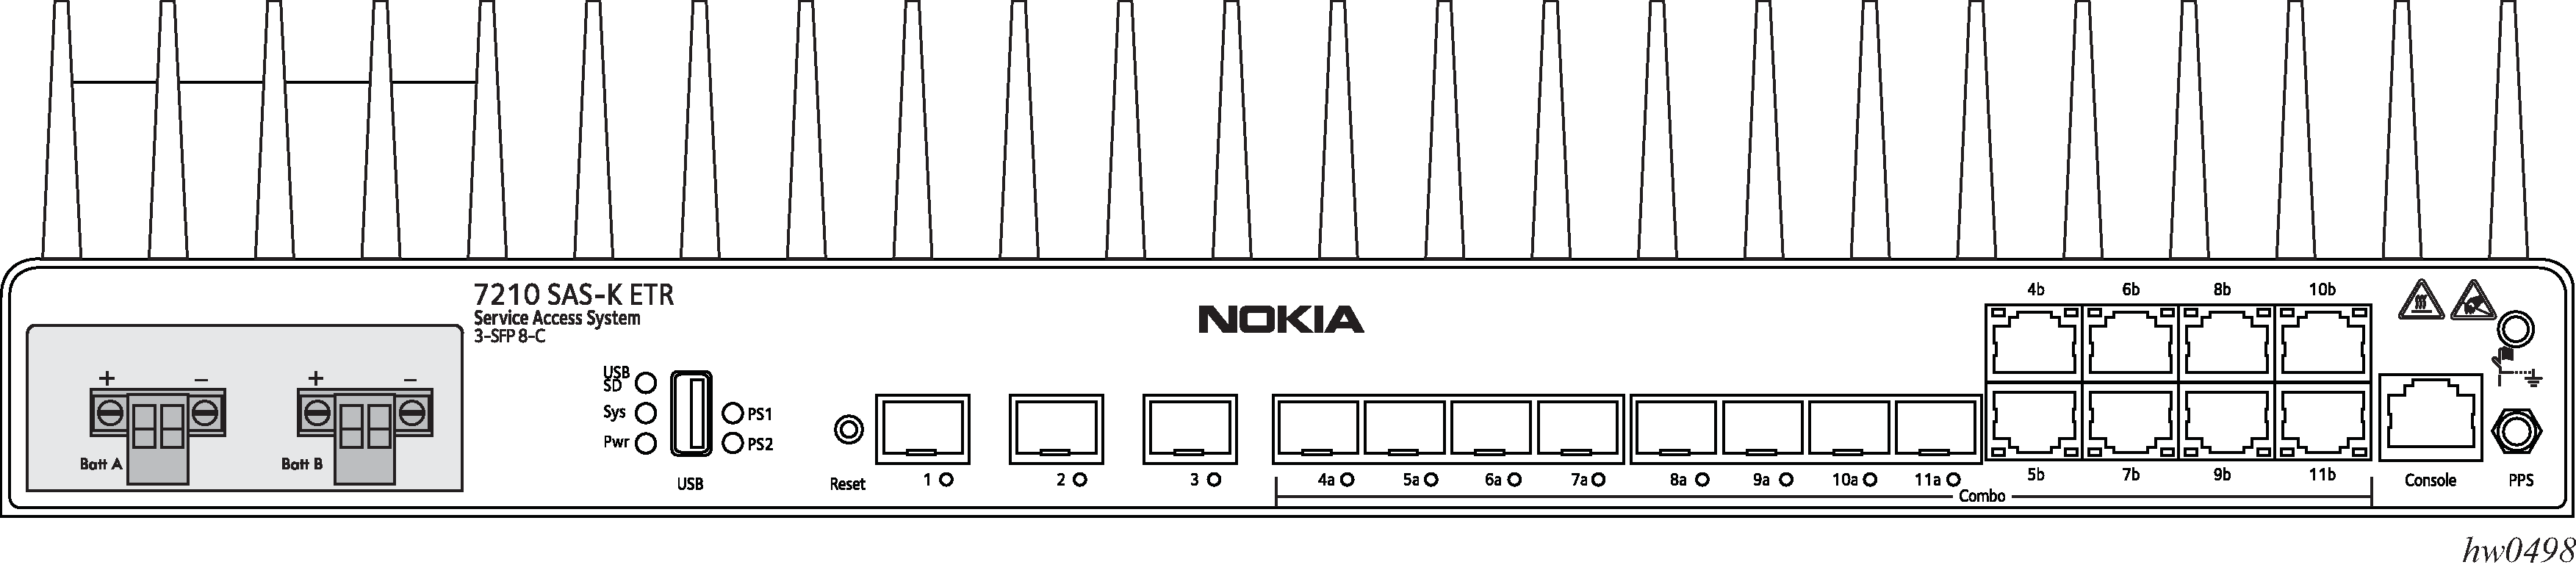
The 7210 SAS-K 3SFP+ 8C offers two variants to support AC and DC power applications. The devices support power redundancy and provide two power input connectors on the front panel of the unit. The AC variant has two integrated AC power supplies and the DC variant has one integrated DC power supply.
The following figure shows the console port on the front panel of the 7210 SAS-K 3SFP+ 8C AC variant that is used to establish a terminal connection to the port. 7210 SAS-K 3SFP+ 8C DC variant shows the 7210 SAS-K 3SFP+ 8C DC variant.
Service management tasks
This section describes the service management tasks and system administration commands.
System administration commands
Use the following administrative commands to perform management tasks.
A:ALA-1# admin
        auto-init stop
        check-golden-bootstrap
        debug-save [<file-url>]
        disconnect [address <ip-address> | username <user-name> |
        {console|telnet|ftp|ssh}]
        display-config
        [no]enable-tech
        reboot [auto-init][now]
        save [file-url] [detail] [index]
        set-time <date> <time>
        tech-support <file-url>
        update-golden-bootstrap [file-url]
Viewing the current configuration
Use one of the following CLI commands to display the current configuration. The detail option displays all default values. The index option displays only the persistent indices. The info command displays context-level information.
admin# display-config [detail|index]
    info detail
Configuration file
*A:sim169# admin display-config
# TiMOS-B-0.0.I218 both/i386 NOKIA SAS-D 7210 Copyright (c) 2016 Nokia.
# All rights reserved. All use subject to applicable license agreements.
# Built on Fri Sep 26 20:46:58 IST 2016 by panosbld in /panosbld/ws/panos/main

# Generated THU JUN 23 19:19:22 2016 UTC

exit all
configure
#--------------------------------------------------
echo "System Configuration"
#--------------------------------------------------
    system
        name "7210-3"
        contact "Fred Information Technology"
        location "Bldg.1-floor 2-Room 201"
        clli-code "abcdefg1234"
        coordinates "N 45 58 23, W 34 56 12"
        ccm 1
        exit
        snmp
        exit
        login-control
            idle-timeout 1440
            motd text "7210-3"
        exit
        time
            sntp
                shutdown
            exit
            zone UTC
        exit
        thresholds
            rmon
            exit
        exit
    exit...
...
#--------------------------------------------------

# Finished FRI Nov 21 15:06:16 2016 UTC
A:*A:sim169##
Modifying and saving a configuration
If you modify a configuration file, the changes remain in effect only during the current power cycle unless a save command is executed. Changes are lost if the system is powered down or the router is rebooted without saving:
Specify the file URL location to save the running configuration. If a destination is not specified, the files are saved to the location where the files were found for that boot sequence. The same configuration can be saved with different filenames to the same location or to different locations.
The detail option adds the default parameters to the saved configuration.
The index option forces a save of the index file.
Changing the active and standby addresses without reboot standby CPM may cause a boot-env sync to fail.
Use the following command sytax to save a configuration.
bof# save [cflash-id]A:ALA-1# bof
A:ALA-1>bof# save cf1:
A:ALA-1>bof# Use the following command syntax to save the system configuration.
admin# save[file-url][detail][index]A:ALA-1# admin save cf1:\test123.cfg
Saving config.# Saved to cf1:\test123.cfg
... complete
A:ALA-1#If the persist option is enabled and the admin save file-url command is executed with an FTP path used as the file-url parameter, two FTP sessions simultaneously open to the FTP server. The FTP server must be configured to allow multiple sessions from the same login; otherwise, the configuration and index files are not saved correctly.
Deleting BOF parameters
You can delete specific BOF parameters. The no form of these commands removes the parameter from configuration. The changes remain in effect only during the current power cycle unless a save command is executed. Changes are lost if the system is powered down or the router is rebooted without saving.
Deleting the BOF file and rebooting causes the system to enter auto mode.
Use the following CLI syntax to save and remove BOF configuration parameters.
bof# save [cflash-id]A:ALA-1# bof
A:ALA-1>bof# save cf1:
A:ALA-1>bof# CLI syntax for the 7210 SAS-D
*A:7210>bof#
    no console-speed
    no dns-domain
    persist
    no ping-address
    no primary-config
    no primary-dns
    no primary-image
    save
    no secondary-config
    no secondary-dns
    no secondary-image
    no tertiary-config
    no tertiary-dns
    no tertiary-image
    no uplinkA-address
    	no uplinkA-autoneg
    no uplinkA-duplex
    no uplinkA-speed
    no uplinkA-port
   no uplinkA-route
    no uplinkA-vlan
    no uplinkB-address
    	no uplinkB-autoneg
    no uplinkB-duplex
    no uplinkB-speed
    no uplinkB-port
    no uplinkB-route
    no uplinkB-vlan
    wait
Saving a configuration to a different filename
Save the current configuration with a unique filename to have additional backup copies and to edit parameters with a text editor. You can save your current configuration to an ASCII file.
Use either of the following CLI syntax to save a configuration to a different location.
bof# save [cflash-id]A:ALA-1# bof
A:ALA-1>bof# save cf1:
A:ALA-1>bof# or
admin# save [file-url][detail][index]A:ALA-1>admin# save cf1:\testABC.cfg
Saving config.# Saved to cf1:\testABC.cfg
... complete
A:ALA-1#Rebooting
When an admin>rebootcommand is issued, the system reboots. Changes are lost unless the configuration is saved. Use the admin>save file-urlcommand to save the current configuration. The user is prompted to confirm the reboot operation. If the now option is not specified, the user is prompted to confirm the reboot operation.
Use the following CLI syntax to reboot.
admin# reboot [auto-init][now]A:ALA-1>admin# reboot
A:DutA>admin# reboot
Are you sure you want to reboot (y/n)? y Resetting...OK
Nokia 7210 Boot ROM. Copyright 2016 Nokia.
All rights reserved. All use is subject to applicable license agreements.
Running POST tests from ROM
Testing ROM load area...done
Relocating code...Jumping to RAM
...
When an admin reboot auto-init command is issued, the system resets the existing BOF file and reboots. The system startup process after the admin reboot auto-init command is executed is the same as the first-time system boot as described in System initialization.
After the BOF is reset, the system may not boot up with the last saved system configuration unless the new BOF file also uses the same configuration file. If booting the system with the last saved system configuration is required, it is recommended to run the admin>save file-url command to save the current system configuration and modify the BOF to use this configuration file.
Use the following syntax to reset the BOF and reboot.
admin# reboot auto-init [now]Example: *A:ALA-1# admin reboot auto-init
WARNING: Configuration and/or Boot options may have changed since the last save.
Are you sure you want to reset the bof and reboot (y/n)? Y
Resetting...OK
Nokia 7210 Boot ROM. Copyright 2016 Nokia.
All rights reserved. All use is subject to applicable license agreements.
BOF command reference
Command hierarchies
Configuration commands
Not all the commands are supported on all the 7210 SAS platforms.
bof
    - bof-password password
    - no bof-password
    - [no] console-disabled
    - console-speed baud-rate
    - no console-speed
    - dns-domain dns-name
    - no dns-domain
    - encrypt {on | off}
    - encryption-key key
    - no encryption-key
    - persist {on | off}
    - ping-address ip-address
    - no ping-address
    - primary-config file-url
    - no primary-config
    - primary-dns ip-address
    - no primary-dns [ip-address]
    - primary-image file-url
    - no primary-image
    - save [cflash-id ]
    - secondary-config file-url
    - no secondary-config
    - secondary-dns ip-address
    - no secondary-dns [ip-address]
    - secondary-image file-url
    - no secondary-image
    - secure-bof-password {enable | disable}
    - tertiary-config file-url
    - no tertiary-config
    - tertiary-dns ip-address
    - no tertiary-dns [ip-address]
    - tertiary-image file-url
    - no tertiary-image
    - wait seconds
    - uplinkA-address ip-address/mask
    - no uplinkA-address
    - uplinkA-autoneg
    - no uplinkA-autoneg
    - uplinkA-duplex {full | half}
    - uplinkA-port port-id
    - no uplinkA-port
    - [no] uplinkA-route ip-address/mask next-hop ip-address
    - uplinkA-speed speed
    - uplinkA-vlan 0..4094
    - no uplinkA-vlan
    - uplinkB-address ip-address/mask
    - no uplinkB-address
    - uplinkB-autoneg
    - no uplinkB-autoneg
    - uplinkB-duplex {full | half}
    - uplinkB-port port-id
    - no uplinkB-port
    - [no] uplinkB-route ip-address/mask next-hop ip-address
    - uplinkB-speed speed
    - uplinkB-vlan 0..4094
    - no uplinkB-vlan
    - wait seconds
Show commands
show
    - bof [cflash-id | booted]
    - boot-messages
Command descriptions
Configuration commands
File management commands
bof
Syntax
bof
Context
<ROOT>
Platforms
Supported on all 7210 SAS platforms as described in this document
Description
This command creates or edits the boot option file (BOF) for the specified local storage device.
A BOF specifies where the system searches for runtime images, configuration files, and other operational parameters during system initialization.
BOF parameters can be modified, and changes can be saved to a specified compact flash. The BOF must be located in the root directory of either an internal or external compact flash local to the system and have the mandatory filename bof.cfg.
When modifications are made to in-memory parameters that are currently in use or operating, the changes are effective immediately. For example, if the console speed is changed, the change takes place immediately.
Only one entry of the BOF configuration command statement can be saved after the statement has been found to be syntactically correct.
No default boot option file exists.
encrypt
Syntax
encrypt {on | off}
Context
bof
Platforms
Supported on all 7210 SAS platforms as described in this document, except the 7210 SAS-D
Description
This command enables and disables encryption of the BOF using AES256 and SHA256.
When the BOF is encrypted on the compact flash, it is still reachable using the BOF interactive menu during node startup, and fields can be modified using this menu.
Default
encrypt off
Parameters
- on
Keyword to enable BOF encryption.
- off
Keyword to disable BOF encryption.
encryption-key
Syntax
encryption-key key
no encryption-key
Context
bof
Platforms
Supported on all 7210 SAS platforms as described in this document, except the 7210 SAS-D
Description
This command creates a key used by AES256 and SHA256 algorithms for configuration file encryption and hashing. This key is used for all configuration files (primary, secondary, and tertiary).
After creating or deleting a key, use the admin save command to save the configuration file with the current encryption key state.
The no form of this command deletes the encryption key.
Default
no encryption-key
Parameters
- key
Specifies the encryption key in plaintext format between 8 and 32 characters.
save
Syntax
save [cflash-id]
Context
bof
Platforms
Supported on all 7210 SAS platforms as described in this document
Description
This command uses the boot option parameters currently in memory and writes them from the BOF to the compact flash.
The BOF is located in the root directory of the internal compact flash drive local to the system and has the mandatory filename bof.cfg. Saves must be explicitly executed. BOF is saved at the same location as the location of the boot.tim file, which is used for booting the system.
Command usage:
bof save
This configuration saves the BOF to the flash drive.
bof save cf1:
This configuration saves the BOF to cf1:.
Parameters
- cflash-id
Specifies the compact flash ID where the bof.cfg is to be saved.
cf1: (7210 SAS-D, 7210 SAS-Dxp)
cf1: | uf1: (7210 SAS-K 2F1C2T, 7210 SAS-K 2F6C4T, and 7210 SAS-K 3SFP+ 8C)
secure-bof-password
Syntax
secure-bof-password {enable | disable}
Context
bof
Platforms
Supported on all 7210 SAS platforms as described in this document, except the 7210 SAS-D
Description
This command securely stores BOF passwords in the bof.cfg file in an encrypted format.
When this command is enabled or disabled, the system resets the BOF password to the default password. Nokia recommends that after enabling or disabling this command, the user should change the password using the bof>bof-password command.
Parameters
- enable
Keyword to enable securing the BOF password.
- disable
Keyword to disable securing the BOF password.
BOF processing control commands
wait
Syntax
wait seconds
Context
bof
Platforms
Supported on all 7210 SAS platforms as described in this document
Description
This command configures a pause, in seconds, at the start of the boot process, which allows system initialization to be interrupted at the console.
When system initialization is interrupted, the operator is allowed to manually override the parameters defined in the BOF.
Only one wait command can be defined in the BOF.
Default
3
Parameters
- seconds
Specifies the length of the pause at the start of the boot process, in seconds.
Console port configuration commands
bof-password
Syntax
bof-password password
no bof-password
Context
bof
Platforms
Supported on all 7210 SAS platforms as described in this document
Description
This command configures a BOF password. The user must provide the password to edit the BOF parameters in the boot loader.
This command also implements a mechanism for password recovery. If the user forgets the password, it can be reset to factory default. When a password is reset, a security measure to prevent a malicious access to the configuration files, the system also resets the flash to factory defaults (that is, it removes all files from the flash, except the boot image file (cf1:\boot.tim) and TiMOS image file (cf1:\both.tim)), and reboots the node with the factory default settings. After boot up, the user must set up the box using the same steps used to boot the box the first time after it was received from the factory. During bootup after a reboot, the user can use the factory default password to edit the BOF parameters. After using the factory default password, Nokia recommends that the user change the password.
Nokia strongly recommends that you not rename cf1:\boot.tim and cf1:\both.tim files, if the system needs to retain them during the password recovery procedure. Nokia also recommends making a backup of all the image files, configuration files, and other data.
Enabling or disabling the secure-bof-password command resets the BOF password to the default password. See secure-bof-password for more information.
The no form of this command deletes the configured password and resets to the default password. The no form is supported only when secure-bof-password enable is configured.
Default
bof-password password
Parameters
- password
Specifies the BOF password, in plaintext string format, between 8 and 32 characters.
console-disabled
Syntax
[no] console-disabled
Context
bof
Platforms
Supported on all 7210 SAS platforms as described in this document
Description
This command enables or disables the serial port console for use.
In remote deployments this command provides an additional security mechanism for the user. The console can be disabled to prevent unauthorized access to the system.
The console is always available for use when the device is booting up. This command is applicable only after the TiMOS image (both.tim) is running successfully. If the user executes this command in the BOF CLI context, the command takes effect only during the next boot. A BOF save operation must be performed after executing the console-disabled command.
The no form of this command enables the console.
Default
no console-disabled
console-speed
Syntax
console-speed baud-rate
no console-speed
Context
bof
Platforms
Supported on all 7210 SAS platforms as described in this document
Description
This command configures the console port baud rate.
When this command is issued to edit the BOF used for the most recent boot, the BOF and the active configuration are changed immediately.
The no form of this command reverts to the default value.
Default
115200 bps
Parameters
- baud-rate
Specifies the console port baud rate, expressed as a decimal integer.
Image and configuration management commands
persist
Syntax
persist {on | off}
Context
bof
Platforms
Supported on all 7210 SAS platforms as described in this document
Description
This command specifies whether the system preserves system indexes when a save command is executed. During a subsequent boot, the index file is read along with the configuration file. As a result, a number of system indexes are preserved between reboots, including the interface index, and so on. This reduces resynchronizations of the Network Management System (NMS) with the affected network element.
If persist is enabled and the reboot with the appropriate index file fails, SNMP is operationally shut down to prevent the management system from accessing and possibly synchronizing with a partially booted or incomplete network element. To enable SNMP access, enter the config>system>snmp>no shutdown command.
If persist is enabled and the admin save file-url command is executed with an FTP path used as the file-url parameter value, two FTP sessions simultaneously open to the FTP server. The FTP server must be configured to allow multiple sessions from the same login, otherwise, the configuration and index files are not saved correctly.
Persistency files (.ndx) are saved on the same disk as the configuration files and the image files.
When a user sets the location for the persistency file, the system checks to ensure that the disk has enough free space. If this there is not enough free space, the persistency does not become active and a trap is generated. Then, it is up to the operator to free adequate disk space. In the meantime, the system performs a space availability check every 30 seconds. As soon as the space is available, the persistency becomes active on the next (30 second) check.
Default
off
Parameters
- on
Keyword to preserve the system index when saving the configuration.
- off
Keyword to disable the system index saves between reboots.
primary-config
Syntax
primary-config file-url
no primary-config
Context
bof
Platforms
Supported on all 7210 SAS platforms as described in this document
Description
This command specifies the name and location of the primary configuration file.
The system attempts to use the configuration specified in primary-config. If the specified file cannot be located, the system automatically attempts to obtain the configuration from the location specified in secondary-config and then the tertiary-config.
If an error in the configuration file is encountered, the boot process aborts.
The no form of this command removes the primary-config configuration.
Parameters
- file-url
Specifies the primary configuration file location, expressed as a file URL.
primary-image
Syntax
primary-image file-url
no primary image
Context
bof
Platforms
Supported on all 7210 SAS platforms as described in this document
Description
This command specifies the primary directory location for runtime image file loading.
The system attempts to load all runtime image files configured in the primary-image first. If this fails, the system attempts to load the runtime images from the location configured in the secondary-image. If the secondary image load fails, the tertiary image specified in tertiary-image is used.
The no form of this command removes the primary-image configuration.
Parameters
- file-url
Specifies the location-url can be either local (this flash) or a remote FTP server.
secondary-config
Syntax
secondary-config file-url
no secondary-config
Context
bof
Platforms
Supported on all 7210 SAS platforms as described in this document
Description
This command specifies the name and location of the secondary configuration file.
The system attempts to use the configuration as specified in secondary-config if the primary config cannot be located. If the secondary-config file cannot be located, the system attempts to obtain the configuration from the location specified in the tertiary-config.
If an error in the configuration file is encountered, the boot process aborts.
The no form of this command removes the secondary-config configuration.
Parameters
- file-url
Specifies the secondary configuration file location, expressed as a file URL.
secondary-image
Syntax
secondary-image file-url
no secondary-image
Context
bof
Platforms
Supported on all 7210 SAS platforms as described in this document
Description
This command specifies the secondary directory location for runtime image file loading.
The system attempts to load all runtime image files configured in the primary-image first. If this fails, the system attempts to load the runtime images from the location configured in the secondary-image. If the secondary image load fails, the tertiary image specified in tertiary-image is used.
The no form of this command removes the secondary-image configuration.
Parameters
- file-url
Specifies that the file-url can be either local (this local flash) or a remote FTP server.
tertiary-config
Syntax
tertiary-config file-url
no tertiary-config
Context
bof
Platforms
Supported on all 7210 SAS platforms as described in this document
Description
This command specifies the name and location of the tertiary configuration file.
The system attempts to use the configuration specified in tertiary-config if both the primary and secondary config files cannot be located. If this file cannot be located, the system boots with the factory default configuration.
If an error in the configuration file is encountered, the boot process aborts.
The no form of this command removes the tertiary-config configuration.
Parameters
- file-url
Specifies the tertiary configuration file location, expressed as a file URL.
tertiary-image
Syntax
tertiary-image file-url
no tertiary-image
Context
bof
Platforms
Supported on all 7210 SAS platforms as described in this document
Description
This command specifies the tertiary directory location for runtime image file loading.
The system attempts to load all runtime image files configured in the primary-image first. If this fails, the system attempts to load the runtime images from the location configured in the secondary-image. If the secondary image load fails, the tertiary image specified in tertiary-image is used.
The no form of this command removes the tertiary-image configuration.
Parameters
- file-url
Specifies that the location-url can be either local (this flash) or a remote FTP server.
ping-address
Syntax
ping-address ip-address
no ping-address
Context
bof
Platforms
Supported on all 7210 SAS platforms as described in this document
Description
This command specifies the IP address used for a ping-test after the system boots.
The no form of this command removes the ping-address configuration. Setting a value of 0 also removes the ping-address configuration.
Parameters
- ip-address
Specifies an IPv4 address in the form a.b.c.d; for example, 10.1.2.10.
uplinkA-address
Syntax
uplinkA-address ip-address/mask
no uplinkA-address
Context
bof
Platforms
Supported on all 7210 SAS platforms as described in this document
Description
This command configures the uplink-A address.
The no form of this command sets the uplinkA to use DHCP to get the IP and the show bof value reflects 0 for this parameter.
Parameters
- ip-address
Specifies the IP address of the BOF. This address must be unique within the subnet and specified in dotted decimal notation.
- mask
Specifies the subnet mask length when the IP prefix is specified in CIDR notation. When the IP prefix is specified in CIDR notation, a forward slash (/) separates the ip-address from the mask parameter. The mask parameter indicates the number of bits used for the network portion of the IP address; the remainder of the IP address is used to determine the host portion of the IP address.
uplinkB-address
Syntax
uplinkB-address ip-address/mask
no uplinkB-address
Context
bof
Platforms
Supported on all 7210 SAS platforms as described in this document
Description
This command configures the uplink-B address.
The no form of this command sets the uplinkB to use DHCP to get the IP, and the show bof value reflects 0 for this parameter.
Parameters
- ip-address
Specifies the IP address of the BOF. This address must be unique within the subnet and specified in dotted decimal notation.
- mask
Specifies the subnet mask length when the IP prefix is specified in CIDR notation. When the IP prefix is specified in CIDR notation, a forward slash (/) separates the ip-address from the mask parameter. The mask parameter indicates the number of bits used for the network portion of the IP address; the remainder of the IP address is used to determine the host portion of the IP address.
uplinkA-autoneg
Syntax
[no] uplinkA-autoneg
Context
bof
Platforms
Supported on all 7210 SAS platforms as described in this document
Description
This command enables speed and duplex auto-negotiation on the uplinkA port in the running configuration and the BOF.
The no form of this command disables auto-negotiate on this port.
The uplinkA-autoneg command is not valid for 10GE ports. Therefore, whenever the user selects 10GE ports as uplinkA-port, the uplinkA-autoneg command is defaulted to no uplinkA-autoneg, speed as uplinkA-speed 10000, and duplex as uplinkA-duplex full, as shown in the following output example.
#uplinkA Port Settings:
    uplinkA-port       1/1/26
    no uplinkA-autoneg
    uplinkA-duplex     full
    uplinkA-speed      10000
    uplinkA-address    0
    uplinkA-vlan       0
Default
uplinkA-autoneg
uplinkB-autoneg
Syntax
[no] uplinkB-autoneg
Context
bof
Platforms
Supported on all 7210 SAS platforms as described in this document
Description
This command enables speed and duplex Auto-negotiation on the uplinkB port in the running configuration and the BOF.
The no form of this command disables auto-negotiate on this port.
The uplinkB-autoneg command is not valid for 10GE ports. Therefore, whenever the user selects 10GE ports as uplinkB-port, the uplinkB-autoneg command is defaulted to no uplinkB-autoneg, speed as uplinkB-speed 10000, and duplex as uplinkB-duplex full, as shown in the following output example.
#uplinkB Port Settings:
    uplinkB-port       1/1/26
    no uplinkB-autoneg
    uplinkB-duplex     full
    uplinkB-speed      10000
    uplinkB-address    0
    uplinkB-vlan       0
Default
uplinkB-autoneg
uplinkA-duplex
Syntax
uplinkA-duplex {full | half}
Context
bof
Platforms
Supported on all 7210 SAS platforms as described in this document
Description
This command configures the duplex mode of the uplinkA port when auto-negotiation is disabled in the running configuration and the BOF.
This command also enables the context to configure the duplex mode of the Ethernet port. If the port is configured to auto-negotiate, this parameter will be ignored.
The uplinkA-autoneg command is not valid for 10GE ports. Therefore, whenever the user selects 10GE ports as uplinkA-port, the uplinkA-autoneg command is defaulted to no uplinkA-autoneg, speed as uplinkA-speed 10000, and duplex as uplinkA-duplex full, as shown in the following output example.
#uplinkA Port Settings:
    uplinkA-port       1/1/26
    no uplinkA-autoneg
    uplinkA-duplex     full
    uplinkA-speed      10000
    uplinkA-address    0
    uplinkA-vlan       0
Default
uplinkA-duplex full
Parameters
- full
Keyword to set the link to full duplex mode.
- half
Keyword to sets the link to half duplex mode.
uplinkB-duplex
Syntax
uplinkB-duplex {full | half}
Context
bof
Platforms
Supported on all 7210 SAS platforms as described in this document
Description
This command configures the duplex mode of the uplinkB port when auto-negotiation is disabled in the running configuration and the BOF.
This configuration command allows for the configuration of the duplex mode of the Ethernet port. If the port is configured to auto-negotiate, this parameter is ignored.
The uplinkB-autoneg command is not valid for 10GE ports. Therefore, whenever the user selects 10GE ports as uplinkB-port, the uplinkB-autoneg command defaults to no uplinkB-autoneg, speed as uplinkB-speed 10000, duplex as uplinkB-duplex full, as shown in the following output example.
#uplinkB Port Settings:
    uplinkB-port       1/1/26
    no uplinkB-autoneg
    uplinkB-duplex     full
    uplinkB-speed      10000
    uplinkB-address    0
    uplinkB-vlan       0
Default
uplinkB-duplex full
Parameters
- full
Keyword to set the link to full duplex mode.
- half
Keyword to set the link to half duplex mode.
uplinkA-port
Syntax
uplinkA-port port-id
no uplinkA-port
Context
bof
Platforms
Supported on all 7210 SAS platforms as described in this document
Description
This command configures the primary port to be used for boot up.
The no form of this command removes all uplinkA parameters from the BOF.
Parameters
- port-id
Specifies the primary port to be used for boot up in the slot/mda/port format.
uplinkB-port
Syntax
uplinkB-port port-id
no uplinkB-port
Context
bof
Platforms
Supported on all 7210 SAS platforms as described in this document
Description
This command configures the secondary port to be used for bootup.
The no form of this command removes all uplinkB parameters from the BOF.
Parameters
- port-id
Specifies the secondary port to be used for boot up in the slot/mda/port format.
uplinkA-route
Syntax
[no] uplinkA-route ip-address/mask next-hop ip-address
Context
bof
Platforms
Supported on all 7210 SAS platforms as described in this document
Description
This command configures an uplinkA static route.
Parameters
- ip-address
Specifies the IP address of the BOF. This address must be unique within the subnet and specified in dotted decimal notation.
- mask
Specifies the subnet mask length when the IP prefix is specified in CIDR notation. When the IP prefix is specified in CIDR notation, a forward slash (/) separates the ip-address from the mask parameter. The mask parameter indicates the number of bits used for the network portion of the IP address; the remainder of the IP address is used to determine the host portion of the IP address.
- next-hop ip-address
Specifies the next-hop IP address used to reach the destination.
uplinkB-route
Syntax
[no] uplinkB-route ip-address/mask next-hop ip-address
Context
bof
Platforms
Supported on all 7210 SAS platforms as described in this document
Description
This command configures an uplinkB static route.
Parameters
- ip-address
Specifies the IP address of the BOF. This address must be unique within the subnet and specified in dotted decimal notation.
- mask
Specifies the subnet mask length when the IP prefix is specified in CIDR notation. When the IP prefix is specified in CIDR notation, a forward slash (/) separates the ip-address from the mask parameter. The mask parameter indicates the number of bits used for the network portion of the IP address; the remainder of the IP address is used to determine the host portion of the IP address.
- next-hop ip-address
Specifies the next-hop IP address used to reach the destination.
uplinkA-speed
Syntax
uplinkA-speed speed
Context
bof
Platforms
Supported on all 7210 SAS platforms as described in this document
Description
This command configures the speed for the uplinkA when auto-negotiation is disabled in the running configuration and the BOF.
If the port is configured to auto-negotiate, this parameter is ignored.
The uplinkA-autoneg command is not valid for 10GE ports. Therefore, whenever the user selects 10GE ports as uplinkA-port, the uplinkA-autoneg command defaults to no uplinkA-autoneg, speed as uplinkA-speed 10000, and duplex as uplinkA-duplex full, as shown in the following output example.
#uplinkA Port Settings:
    uplinkA-port       1/1/26
    no uplinkA-autoneg
    uplinkA-duplex     full
    uplinkA-speed      10000
    uplinkA-address    0
    uplinkA-vlan       0
Default
uplinkA-speed 1000 m/bps
Parameters
- 10
Keyword to set the link to 10 M/bps speed.
- 100
Keyword to set the link to 100 M/bps speed.
- 1000
Keyword to set the link to 1000 M/bps speed.
uplinkB-speed
Syntax
uplinkB-speed speed
Context
bof
Platforms
Supported on all 7210 SAS platforms as described in this document
Description
This command configures the speed for the uplinkB when auto-negotiation is disabled in the running configuration and the BOF.
If the port is configured to auto-negotiate, this parameter is ignored.
The uplinkB-autoneg command is not valid for 10GE ports. Therefore, whenever the user selects 10GE ports as uplinkB port, the uplinkB-autoneg command is defaulted to no uplinkB-autoneg, speed as uplinkB-speed 10000, and duplex as uplinkB-duplex full, as shown in the following output example.
#uplinkB Port Settings:
    uplinkB-port       1/1/26
    no uplinkB-autoneg
    uplinkB-duplex     full
    uplinkB-speed      10000
    uplinkB-address    0
    uplinkB-vlan       0
Default
uplinkB-speed 1000
Parameters
- 10
Keyword to set the link to 10 M/bps speed.
- 100
Keyword to set the link to 100 M/bps speed.
- 1000
Keyword to set the link to 1000 M/bps speed.
uplinkA-vlan
Syntax
uplinkA-vlan 0..4094
no uplinkA-vlan
Context
bof
Platforms
Supported on all 7210 SAS platforms as described in this document
Description
This command specifies a VLAN ID to be used on uplinkA.
The no form of this command is used to send untagged packets on uplinkA.
Parameters
- 0...4094
Specifies the VLAN ID.
uplinkB-vlan
Syntax
uplinkB-vlan 0..4094
no uplinkB-vlan
Context
bof
Platforms
Supported on all 7210 SAS platforms as described in this document
Description
This command specifies a VLAN ID to be used on uplinkB.
The no form of this command is used to send untagged packets on uplinkB.
Parameters
- 0..4094
Specifies the VLAN ID.
DNS configuration commands
dns-domain
Syntax
dns-domain dns-name
no dns-domain
Context
bof
Platforms
Supported on all 7210 SAS platforms as described in this document
Description
This command configures the domain name used when performing DNS address resolution. This is a required parameter if DNS address resolution is required. Only a single domain name can be configured. If multiple domain statements are configured, the last one encountered is used.
The no form of this command removes the domain name from the configuration.
Default
no dns-domain
Parameters
- dns-name
Specifies the DNS domain name, up to 32 characters.
primary-dns
Syntax
primary-dns ip-address
no primary-dns [ip-address]
Context
bof
Platforms
Supported on all 7210 SAS platforms as described in this document
Description
This command configures the primary DNS server used for DNS name resolution. DNS name resolution can be used when executing ping, traceroute, and service-ping, and when defining file URLs. DNS name resolution is not supported when DNS names are embedded in configuration files.
The no form of this command removes the primary DNS server from the configuration.
Default
no primary-dns
Parameters
- ip-address
Specifies the IP address of the primary DNS server.
secondary-dns
Syntax
secondary-dns ip-address
no secondary-dns [ip-address]
Context
bof
Platforms
Supported on all 7210 SAS platforms as described in this document
Description
This command configures the secondary DNS server for DNS name resolution. The secondary DNS server is used only if the primary DNS server does not respond.
DNS name resolution can be used when executing ping, traceroute, and service-ping, and also when defining file URLs. DNS name resolution is not supported when DNS names are embedded in configuration files.
The no form of this command removes the secondary DNS server from the configuration.
Default
no secondary-dns
Parameters
- ip-address
Specifies the IP address of the secondary DNS server.
tertiary-dns
Syntax
tertiary-dns ip-address
no tertiary-dns [ip-address]
Context
bof
Platforms
Supported on all 7210 SAS platforms as described in this document
Description
This command configures the tertiary DNS server for DNS name resolution. The tertiary DNS server is used only if the primary DNS server and the secondary DNS server do not respond.
DNS name resolution can be used when executing ping, traceroute, and service-ping, and also when defining file URLs. DNS name resolution is not supported when DNS names are embedded in configuration files.
The no form of this command removes the tertiary DNS server from the configuration.
Default
no tertiary-dns
Parameters
- ip-address
Specifies the IP address of the tertiary DNS server.
Show commands
bof
Syntax
bof [cflash-id | booted]
Context
show
Platforms
Supported on all 7210 SAS platforms as described in this document
Description
This command displays the BOF executed on last system boot or on the specified device.
If no device is specified, the BOF used in the last system boot displays. If the BOF has been modified since the system boot, a message displays.
Parameters
- cflash-id
Specifies the cflash directory name.
cf1: (7210 SAS-D, 7210 SAS-Dxp)
cf1: | uf1: (7210 SAS-K 2F1C2T, 7210 SAS-K 2F6C4T, and 7210 SAS-K 3SFP+ 8C)
- booted
Keyword to display the boot option file used to boot the system.
Output
The following output is an example of BOF information, and Output fields: BOF describes the output fields.
Sample output*A:ALA# show bof cf1:
===============================================================================
BOF on cf1:
===============================================================================
primary-image ftp://*:*@xx.xxx.xx.xx/./images/auto-boot/solution/bothx.tim
secondary-image ftp://*:*@xx.xxx.xx.xx/./images/auto-boot/solution/bothx.tim
tertiary-image ftp://*:*@xx.xxx.xx.xx/./images/auto-boot/solution/both.tim
primary-dns xxx.xxx.xxx.xxx
dns-domain in.lucent.com
ping 10.135.16.90
#uplinkA Port Settings:
uplinkA-port 1/1/1
uplinkA-address xxx.xxx.x.xx/24
uplinkA-autoneg
uplinkA-duplexfull
uplinkA-speed1000
uplinkA-vlan 0
uplinkA-route xx.xxx.x.x/16 next-hop xxx.xxx.x.x
#uplinkB Port Settings:
uplinkB-port 1/1/2
uplinkB-address 0
uplinkB-autoneg
uplinkB-duplexfull
uplinkB-speed1000
uplinkB-vlan 0
#System Settings:
wait 3
persist on
console-speed 115200
no console-disabled
===============================================================================
*A:ALA#
*A:ALA# show bof booted
===============================================================================
System booted with BOF
===============================================================================
primary-image ftp://*:*@xx.xxx.xx.xx/./images/auto-boot/solution/bothx.tim
secondary-image ftp://*:*@xx.xxx.xx.xx/./images/auto-boot/solution/bothx.tim
tertiary-image ftp://*:*@xx.xxx.xx.xx/./images/auto-boot/solution/both.tim
primary-dns xxx.xxx.xxx.xxx
dns-domain in.lucent.com
ping-address xx.xxx.xx.xx
#uplinkA Port Settings:
uplinkA-port 1/1/1
uplinkA-address xxx.xxx.x.xx/24
uplinkA-autoneg
uplinkA-duplexfull
uplinkA-speed1000
uplinkA-vlan 0
uplinkA-route xx.xxx.x.x/16 next-hop xxx.xxx.x.x
#uplinkB Port Settings:
uplinkB-port 1/1/2
uplinkB-address 0
uplinkA-autoneg
uplinkA-duplexfull
uplinkA-speed1000
uplinkB-vlan 0
#System Settings:
wait 3
persist on
console-speed 115200
no console-disabled
===============================================================================
*A:ALA#
Label |
Description |
|---|---|
primary-image |
The primary location of the directory that contains the runtime images of both CPM and IOM |
primary-config |
The primary location of the file that contains the configuration |
primary-dns |
The primary DNS server for resolution of hostnames to IP addresses |
secondary-image |
The secondary location of the directory that contains the runtime images of both CPM and IOM |
secondary-config |
The secondary location of the file that contains the configuration |
secondary-dns |
The secondary DNS server for resolution of hostnames to IP addresses |
tertiary-image |
The tertiary location of the directory that contains the runtime images of both CPM and IOM |
tertiary-config |
The tertiary location of the file that contains the configuration |
tertiary-dns |
The tertiary DNS server for resolution of hostnames to IP addresses |
persist |
on — Persistent indexes between system reboots is enabled off — Persistent indexes between system reboots is disabled |
wait |
The time configured for the boot to pause while waiting for console input |
autonegotiate |
No autonegotiate — Autonegotiate not enabled autonegotiate — Autonegotiate is enabled |
console speed |
The console port baud rate. |
ping-address |
The IPv4 IP address to be used for ping-test after auto-init |
dns domain |
The domain name used when performing DNS address resolution |
uplinkA-address |
Displays the Uplink-A IP address. |
uplinkA-autoneg |
Displays the Auto-negotiation of the management Ethernet port |
uplinkA-duplex |
Displays Full duplex operation |
uplinkA-speed |
Displays the 1000 M/bps operation |
uplinkA-port |
Displays the primary port to be used for auto-boot. |
uplinkA-route |
Displays the static route associated with uplinkA. |
uplinkA-vlan |
Displays the VLAN ID to be used on uplinkA. |
uplinkB-address |
Displays the uplinkB IP address |
uplinkB-autoneg |
Displays the auto-negotiation of the management Ethernet port |
uplinkB-duplex |
Displays the full duplex operation |
uplinkB-speed |
Displays the 1000 M/bps operation |
uplinkB-port |
Displays the secondary port to be used for auto-init |
uplinkB-route |
Displays the static route associated with uplinkB |
uplinkB-vlan |
Displays the VLAN ID to be used on uplinkB |
console-disabled |
Displays the status of serial port console |
boot-messages
Syntax
boot-messages
Context
show
Platforms
Supported on all 7210 SAS platforms as described in this document
Description
This command displays boot messages generated during the last system boot.
Output
The following output is an example of boot messages.
Sample output===============================================================================
cf1:/bootlog.txt
===============================================================================
Bootlog started for Version V-0.0.I317
Build V-0.0.I317 bootrom/mpc 7xxx
Built on Tue Jan 6 02:23:14 IST 2016 by panosbld in /panosbld/ws/panos/main
?Attempting to load from file cf1:/boot.tim
Version L-0.0.I312, Fri Jan 2 04:26:32 IST 2016 by panosbld in /panosbld/ws/panos/
main
text:(3002475-->12623392) + data:(550940-->2414128)
Starting at 0xb000000...
Total Memory: 512MB Chassis Type: sas Card Type: badami_7210
TiMOS-L-0.0.I312 boot/mpc NOKIA SAS-D 7210 Copyright (c) 2016 Nokia.
All rights reserved. All use subject to applicable license agreements.
Built on Fri Jan 2 04:26:32 IST 2016 by panosbld in /panosbld/ws/panos/main
TiMOS BOOT LOADER
Extended checks enabled with overhead of 36B
Time from clock is THU JAN 08 16:04:05 2016 UTC
Switching serial output to sync mode... done
Looking for cf1:/bof.cfg ... OK, reading
Contents of Boot Options File on cf1:
primary-image ftp://*:*@xxx.xxx.xxx.xx/import/panos_nightly_builds/1.0/B1-
12/STU-sultan/both.tim
primary-config cf1:\config.cfg
#uplinkA Port Settings:
uplinkA-port 1/1/13
uplinkA-autoneg
uplinkA-duplexfull
uplinkA-speed1000
uplinkA-address xx.xxx.xx.xxx/24
uplinkA-vlan null
uplinkA-route xx.xxx.x.x/16 next-hop xx.xxx.xx.x
uplinkA-route xxx.xxx.x.x/16 next-hop xx.xxx.xx.x
#uplinkB Port Settings:
uplinkB-port 1/1/2
uplinkB-address 0
uplinkB-autoneg
uplinkB-duplexfull
uplinkB-speed1000
uplinkB-vlan 0
#System Settings:
wait 3
persist off
console-speed 115200
Hit a key within 1 second to change boot parms...
Configuring Network with uplinkA Port Setting.....
Primary config file present at: cf1:\config.cfg
Primary image location: ftp://*:*@xxx.xxx.xxx.xx/import/panos_nightly_builds/1.0/B1-
12/STU-sultan/both.tim
Initializing uplinkA port using IP addr xx.xxx.xx.xxx.
Loading image ftp://*:*@xxx.xxx.xxx.xx/import/panos_nightly_builds/1.0/B1-12/STU-
sultan/both.tim
Version B-1.0.B1-12, Wed Jan 7 00:58:35 IST 2016 by builder in /builder/ws/panos/
main
text:(27022791-->84574868) + data:(1921023-->10720420)
Executing TiMOS image at 0x100000
Total Memory: 512MB Chassis Type: sas Card Type: badami_7210
TiMOS-B-1.0.B1-12 both/mpc NOKIA 7210 Copyright (c) 2016 Nokia.
All rights reserved. All use subject to applicable license agreements.
Built on Wed Jan 7 00:58:35 IST 2016 by builder in /builder/ws/panos/main
___ ___ ___ ___
/\ \ /\__\ /\ \ /\ \
\:\ \ ___ /::| | /::\ \ /::\ \
\:\ \ /\__\ /:|:| | /:/\:\ \ /:/\ \ \
/::\ \ _\/__/ /:/|:|__|__ /:/ \:\ \ _\:\~\ \ \
/:/\:\__\ /\__\ /:/ |::::\__\ /:/__/ \:\__\ /\ \:\ \ \__\
/:/ \/__/ /:/ / \/__/~~/:/ / \:\ \ /:/ / \:\ \:\ \/__/
/:/ / /:/ / /:/ / \:\ /:/ / \:\ \:\__\
\/__/ \/__/ /:/ / \:\/:/ / \:\/:/ /
/:/ / \::/ / \::/ /
\/__/ \/__/ \/__/
Time from clock is THU JAN 08 16:05:20 2016 UTC
Attempting to exec primary configuration file:
'cf1:\config.cfg' ...
System Configuration
System Security Configuration
Log Configuration
System Security Cpm Hw Filters Configuration
QoS Slope and Queue Policies Configuration
Port Scheduler Policies Configuration
Card Configuration
Port Configuration
Management Router Configuration
Router (Network Side) Configuration
Static Route Configuration
Service Configuration
Router (Service Side) Configuration
Executed 234 lines in 0.1 seconds from file cf1:\config.cfg
INFO: CLI #1008 The SNMP daemon is disabled. To enable SNMP, execute the command 'c
onfig>system>snmp no shutdown'.
TiMOS-B-1.0.B1-12 both/mpc NOKIA SAS-D 7210 Copyright (c) 2016 Nokia.
All rights reserved. All use subject to applicable license agreements.
Built on Wed Jan 7 00:58:35 IST 2016 by builder in /builder/ws/panos/main
Login: