General session functionality
Get a high-level overview of the PFCP protocol and general session related functionality including grouping sessions for a subscriber, QoS, service selection, session state, and lawful intercept.
PFCP protocol
Get a high-level overview of the core protocol of session management.
The core of session management is the PFCP protocol as defined in 3GPP TS 29.244, with BNG-specific extensions defined in BBF TR-459.
PFCP association and path
The PFCP association and path define the connectivity between the cMAG-c and MAG-u.
To send a session to a MAG-u, a PFCP association needs to be established. While establishing this association, the MAG-u and the cMAG-c exchange capabilities, functional features, and parameters; for example, a MAG-u sends functional features such as PPPoE support, IPoE support, and LCP keep-alive offload support. Capability exchange can influence the IE applicability in PFCP session messages.
- PFCP association
A PFCP association must be set up before sessions can be established between the MAG-u and the cMAG-c. Only one association per cMAG-c and MAG-u pair is allowed. The identifiers of the association are the cMAG-c and the MAG-u node IDs, which can be IP addresses or domain names.
- PFCP path
Multiple paths are possible per PFCP association. The identifier of a PFCP path is the pair of IP addresses to communicate between the cMAG-c and the MAG-u. Paths are not negotiated but are learned while using PFCP signaling. Each IP address is called a PFCP entity. Each pair of cMAG-c and MAG-u IP addresses is called a PFCP path.
MAG-u selection
The cMAG-c selects a MAG-u for each session depending on the session type.
The MAG-u selection varies from very static to very dynamic.
See In-band control plane and MAG-u selection for more information about the selection process for fixed access session.
PFCP session state
PFCP sessions require the creation of a forwarding state on the MAG-u device. Session operations allow to manage the forwarding state on the MAG-u.
The forwarding state includes rules (for example, encapsulation and decapsulation), information about routing context forwarding, QoS rules, and requested charging functionality.
The PFCP session establishment procedure creates the initial forwarding state. The path used for the PFCP session establishment procedure is tied to the session.
The following operations are supported for an established session:
- PFCP session modification
The cMAG-c modifies the state or performs a state query (for example, to fetch statistics).
- PFCP session deletion
The cMAG-c removes all state information.
- PFCP session report
The MAG-u sends information unsolicited (for example, to report statistics or a connectivity failure).
In stable conditions, the MAG-u only modifies or deletes the state if instructed by the cMAG-c. If the MAG-u detects a failure, for example, a link failure, it does not delete the state but sends a report and keeps the local state. The MAG-u deletes the state only when the cMAG-c sends a delete request.
PFCP provisioning
The PFCP protocol uses components that must be provisioned and verified using the CLI.
Components for PFCP provisioning
To enable the PFCP protocol, provision and reference the following components in the reference-point configuration:
- IP interface
The IP interface for signaling is provisioned at the infrastructure layer. See the cMAG-c Installation Guide for more information.
- Node ID
The cMAG-c requires an FQDN-based node ID for the PFCP association. By default, the cMAG-c system name, which is set to cmag-c by default, serves as the node ID. Use the following command to configure the system name.
subscriber-management system-nameUse the following command to override the used node ID.
subscriber-management ref-points up mag-c-node-id - PFCP association peer list Use the following command to configure the list of peer MAG-u devices.
subscriber-management ref-points up peer - PFCP profile
Use the commands in the following context to configure PFCP profile options.
subscriber-management profiles pfcp-profileNote: The heartbeat and the retransmit options must be configured with the same values in both the MAG-u and cMAG-c, to prevent the MAG-u and cMAG-c from going out of sync if a link failure occurs. See the 7750 SR and VSR BNG CUPS User Plane Function Guide for more information about the MAG-u configuration.
PFCP provisioning
# info from running /subscriber-management ref-points up
    subscriber-management {
        ref-points {
            up {
                fixed-access {
                    entry-point fixed-access
                    ibcp-triggers {
                        pppoe-discover true
                        ipoe-dhcp true
                        ipoe-dhcpv6 true
                        ipoe-router-solicit true
                    }
                }
                peer up-east {
                    admin-state enable
                    address-resolution {
                        static-ip [
                            192.0.2.11
                        ]
                    }
                }
            }
        }
    }
Verifying PFCP association setup
Use the following command to view the PFCP association establishment for the cMAG-c.
info from state /subscriber-management ref-points upPFCP association reference point peers
# info detail depth 1 from state /subscriber-management ref-points up peer up-east
    subscriber-management {
        ref-points {
            up {
                peer up-east {
                    association-state up
                    setup-time 2025-04-03T15:35:30Z
                    last-change 2025-04-03T15:35:30Z
                    up-state active
                    admin-state enable
                    node-id-type fqdn
                    drain false
                    oper-mag-c-node-id cmag-c
                    apply-state applied
                    up-function-features-3gpp [
                        ip6pl
                        adpdp
                        mnop
                        empu
                        pdiu
                        frrt
                        ftup
                        treu
                    ]
                    up-function-features-bbf [
                        agf-direct
                        b-upf
                        pppoe
                        ipoe
                        lcp-keepalive-offload
                    ]
                    up-function-features-nokia [
                        bulk-audit
                        lac
                        session-subnet-signaling
                        fsg
                        per-l2-access-id-tunnels
                        partial-audit
                    ]
                    fsg {
                    }
                    path 192.0.2.11 {
                        path-state up
                        last-successful-heartbeat 2025-04-03T16:25:30Z
                        ongoing-heartbeat 2025-04-03T16:25:30Z
                        recovery-timestamp 2025-04-03T15:27:21Z
                        last-changed 2025-04-03T15:35:30Z
                    }
                    statistics {
                    }
                    address-resolution {
                        static-ip [
                            192.0.2.11
                        ]
                    }
                }
            }
        }
}Session message priority
To prioritize PFCP session-related messages toward the MAG-u, the cMAG-c uses the message priority field of the PFCP header. The value of the message priority ranges from 0 to 15, with 0 indicating the highest priority. For more information about how the MAG-u enforces the priority, see the 7750 SR and VSR BNG CUPS User Plane Function Guide.
| Bits | ||||||||
|---|---|---|---|---|---|---|---|---|
| Octets | 8 | 7 | 6 | 5 | 4 | 3 | 2 | 1 |
| 1 | Version | Spare | Spare | FO | MP | S=1 | ||
| 2 | Message Type | |||||||
| 3 | Message Length (1st Octet) | |||||||
| 4 | Message Length (2nd Octet) | |||||||
| 5 to 12 | Session Endpoint Identifier | |||||||
| 13 to 15 | Sequence Number | |||||||
| 16 | Message Priority | Spare | ||||||
The MP bit, which can only be set for session-related PFCP messages, indicates whether the message priority field is set. If the MP bit is not set, the message priority field is ignored and the MAG-u determines the priority. The Nokia MAG-u usually uses priority 15 if the MP bit is not set. See the 7750 SR and VSR BNG CUPS User Plane Function Guide for more information.
The message priority field indicates the actual priority of a message. The cMAG-c uses a part of the priority fields to assign priority between different transaction types as part of its overload handling. For example, mid-session session modifications are prioritized over the creation of new sessions, making sure that existing sessions are less likely to be affected than new sessions in the event of overload.
PFCP connectivity failure
To protect against temporary PFCP connectivity failures, cMAG-c supports a headless mode. Following the rules for configuring sessions timers ensures that the headless mode works as expected.
Headless mode
To prevent the removal of sessions with a temporary heartbeat failure, cMAG-c supports a short-lived headless mode to restore connectivity.
PFCP heartbeat messages check the connectivity of a PFCP path. When the heartbeat procedure fails, all state information for the corresponding path is removed and all sessions using that path are terminated. The association remains in place.
subscriber-management profiles pfcp-profile heart-beatsubscriber-management profiles pfcp-profile path-restorationWhen headless mode is enabled, the sessions are not removed when there is a heartbeat failure. Instead, the configured timer starts and heartbeats continue to be sent. Subsequently, one of the following events occurs:
-
The timer expires and all sessions are removed. The association remains in place.
-
The path is restored (a successful heartbeat is completed) but a MAG-u restart is detected and all sessions are removed.
-
The path is restored (a successful heartbeat is completed), the sessions are kept, and a PFCP audit procedure is started to ensure that the MAG-u and cMAG-c states are synchronized.
- To prevent the cMAG-c or MAG-u from
deleting all sessions while the other node keeps all the sessions, Nokia
recommends that the path restoration time is at least twice as large as the sum
of the heart-beat interval plus the total heartbeat
timeout.path restoration time ≥ 2 × (heart-beat interval + total heartbeat timeouttotal heartbeat timeout = heart-beat retry-count N1 × heart-beat timeout T1This ensures that the cMAG-c and MAG-u nodes each run an audit or delete all the sessions in their respective nodes.
- All parameter configurations must be identical between the cMAG-c and MAG-u.
To avoid hanging resources on a MAG-u, the cMAG-c only removes a session after it receives confirmation that the MAG-u has removed the session. The cMAG-c may receive confirmation in the following messages:
- PFCP Session Deletion Response message (most common case)
- PFCP message including a Cause IE that indicates an error (the MAG-u lost the session)
- an indication that the MAG-u restarted and lost all its sessions; for example, a new PFCP Association Setup Request
tools subscriber-management session clearSession timer alignment
Nokia recommends aligning the session timers (signaled to the BNG RG) with the path restoration time. If the session timers are not aligned with the path restoration time, a session may time out autonomously before the headless mode could restore the path.
The following configurations for the session timers guarantee that the headless mode kicks in as expected.
- For DHCP, the DHCP lease time must at least equal the renew time plus the path restoration time. In the default case, where the renew time is half of the lease time, the lease time must be at least twice the path restoration time.
- For all IPv6 enabled sessions, the router lifetime included in RA messages must be at least equal to the maximum advertisement interval plus the path restoration time. In the default case, where the router lifetime is three times the maximum advertisement interval, the maximum advertisement interval must be equal to at least twice the path restoration time.
- For SLAAC, the IPv6 preferred lifetime must be at least equal to the maximum router advertisement interval plus the path restoration time.
- For DHCPv6, the IPv6 preferred lifetime must be at least equal to the renew timer (T1 timer) plus the path restoration time. In the default case, where the renew timer is half of the preferred lifetime, the preferred lifetime must be equal to at least twice the path restoration time.
The parameters can be locally configured or received from an external AAA server.
To configure or display information locally, use the following commands:
- path restoration
time
subscriber-management profiles pfcp-profile path-restoration - DHCP lease
time
subscriber-management authentication-database entry address-assignment dhcpv4-lease-times lease-time - renew
time
subscriber-management authentication-database entry address-assignment dhcpv4-lease-times renew-time - router lifetime in RA
messages
subscriber-management profiles ra-profile options router-lifetime - maximum advertisement
interval
subscriber-management profiles ra-profile advertisement-interval max - IPv6 preferred
lifetime
subscriber-management authentication-database entry address-assignment ipv6-lifetimes preferred-lifetime
Subscribers
The cMAG-c supports bundling a group of sessions for a single subscriber.
Grouping of sessions is useful in cases where a subscription consists of multiple directly connected devices. For example, a subscription may consist of a routed residential gateway for Internet access, VoIP phones, and set-top boxes. The residential gateway bridges traffic for voice and video services to the VoIP phones and to the set-top boxes. The cMAG-c automatically creates a subscriber based on keys it derives from the session types, and allocates an auto-generated subscriber ID to the sessions.
See Subscriber identification for fixed access sessions and for more information about how the subscriber ID is generated.
A subscriber ID alias can be provided via AAA interfaces, but this alias cannot change the scope of a subscriber. For example, if the key of a subscriber contains a Layer 2 circuit (l2-circuit), the AAA subscriber ID alias cannot group two sessions with two different l2-circuit values.
QoS
The cMAG-c enables the appropriate HQoS configuration by sending subscriber profiles and SLA profiles to the MAG-u.
A BNG connection uses HQoS structures, in which there are multiple levels of rate limiting and scheduling. For example, one structure has an aggregate rate per MSAN, a second structure has an aggregate rate per subscriber level, and a third structure has an aggregate rate per session.
The following figure shows an example of an HQoS model.
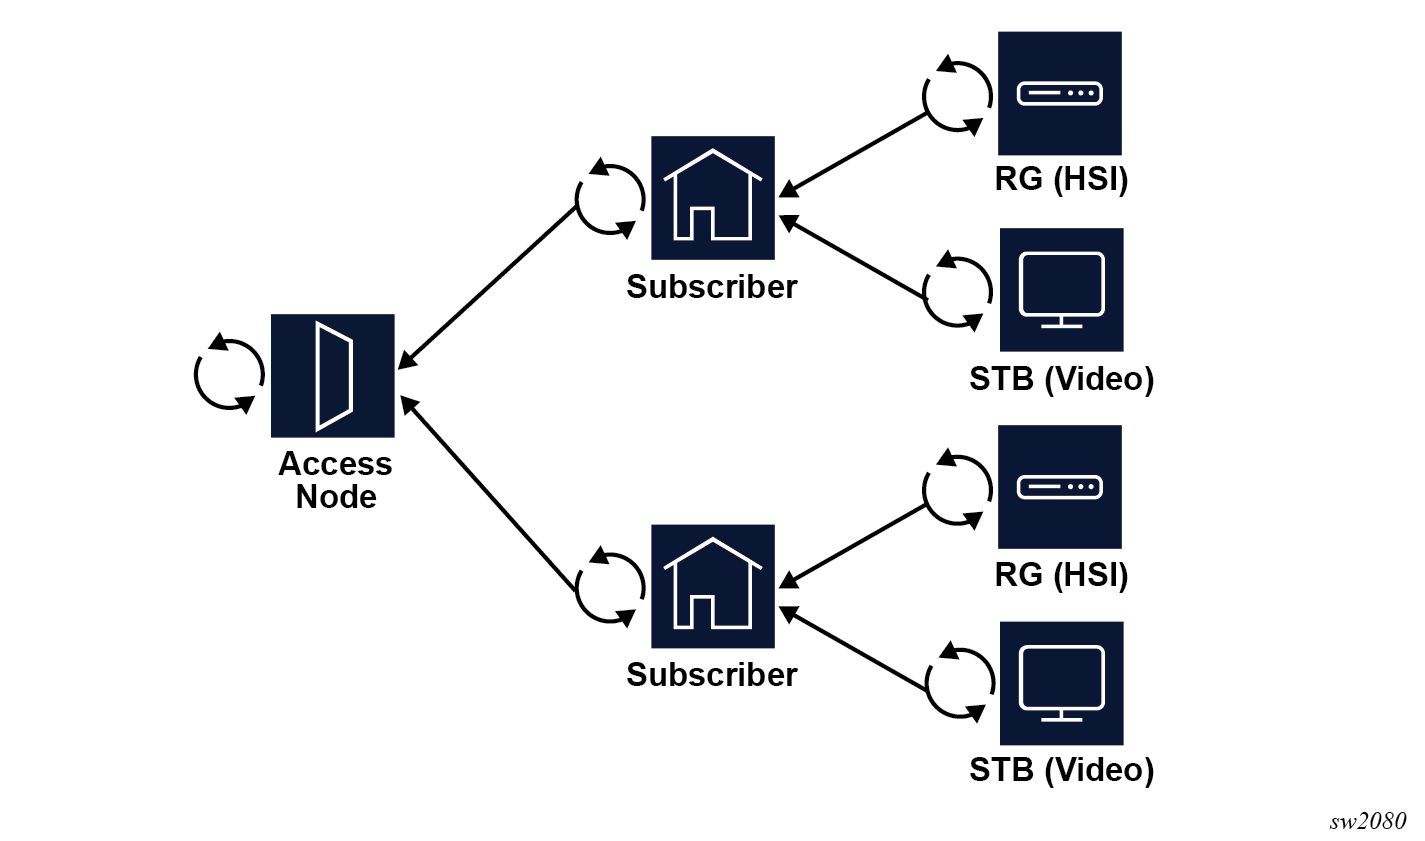
HQoS models can be complex and very hardware specific, the cMAG-c signals the MAG-u profiles to enable the appropriate HQoS configuration. The Nokia cMAG-c signals a subscriber profile and an SLA profile in the PFCP message. The profiles are provisioned during authentication.
The subscriber profile should be kept consistent for all sessions of a subscriber, but the cMAG-c does not enforce consistency. Short-lived inconsistencies are allowed while changing a subscriber profile; for example, when sending a CoA message to all sessions of the subscribers. However, long-lived inconsistencies may lead to unexpected behavior, including reverting to an old subscriber profile.
Service selection
The cMAG-c service model is based on a locally significant service and a network instance.
The cMAG-c service model is based on two concepts:
- A locally significant service defines the service to be delivered; for example, high
speed Internet (HSI), video, or voice services. Each service can be associated with
service-specific parameters, including a default set of IP pool names for address
management. Use the following command to configure
services.
subscriber-management services service - A network instance defines the forwarding context in which the session is installed
on the MAG-u, typically a routing instance. The network instance also serves as the context
for provisioning IP pool details. Use the following command to configure network
instances.
subscriber-management services network-instance
Each service must be associated with a network instance, and network instances can be shared across multiple services. The following example shows three services ("hsi", "voice", and "video"), all using the same network instance "base" but with distinct default IPv4 pools for address assignment.
# info from running /subscriber-management services
    subscriber-management {
        services {
            network-instance base {
                pool hsi {
                    ipv4 {
                        micro-net-length 28
                        prefix 192.168.0.0/24 {
                        }
                    }
                }
                pool video {
                    ipv4 {
                        micro-net-length 28
                        prefix 192.168.1.0/24 {
                        }
                    }
                }
                pool voice {
                    ipv4 {
                        micro-net-length 28
                        prefix 192.168.2.0/24 {
                        }
                    }
                }
            }
            service hsi {
                network-instance base
                address-assignment-defaults {
                    local-dynamic {
                        ipv4-pool hsi
                    }
                }
            }
            service video {
                network-instance base
                address-assignment-defaults {
                    local-dynamic {
                        ipv4-pool video
                    }
                }
            }
            service voice {
                network-instance base
                address-assignment-defaults {
                    local-dynamic {
                        ipv4-pool voice
                    }
                }
            }
        }
    }
Operational commands and debugging
Use the commands in the show, clear, and tools contexts to display cMAG-c sessions and subscribers, remove a session, and debug a failing session setup. Use the call trace feature for advanced debugging.
Removing, debugging, and displaying session information
Use the following command to display information about cMAG-c sessions and subscribers.
show subscriber-management session- The session command displays basic data related to all sessions on the cMAG-c.
- The supported filter options for the session command display the data for specific sets of sessions.
- The detail keyword displays all data relevant to a session in a structured fashion.
subscriber-management statistics# info depth 0 detail from state /subscriber-management statistics
subscriber-management {
statistics {
active-sessions 1
standby-sessions 0
ipoe-sessions 1
pppoe-sessions 0
ipv4-stacks 1
ipv6-stacks 0
ipv6-slaac 0
ipv6-na 0
ipv6-pd 0
}
}show subscriber-management subscriberUse the following state tree to get IBCP statistics .
subscriber-management ref-points up statistics ibcpUse the following command to remove a session from the cMAG-c. When you issue this command, the cMAG-c sends a PFCP Session Deletion Request to the MAG-u.
tools subscriber-management session clearshow subscriber-management log subsystem session-managerSession state storage
For scalability and redundancy, the Nokia cMAG-c distributes the session state functionality across multiple pods. This section provides a high-level overview of how the cMAG-c handles session state in a distributed environment.
To efficiently handle a distributed system where multiple pods operate on the same session state, the cMAG-c employs a stateless model, storing all session state in a database. This database serves as the sole stable state for a session and is maintained in a consistent manner. Multiple types of pods use the database state in different ways:
- session management pods
Session management pods are the only pods that can update (write) session state in the database. They use transactions, including session setup, DHCP lease renewal, charging update, or session removal, to update the session state. At the start of each transaction, a session management pod retrieves the necessary session state from the database and locks the session. At the end of the transaction, the session management pod writes to the database, releases the lock, and removes all local in-memory session state. The lock guarantees that no other session management pod can start transactions for the same session, thereby preventing conflicting state. Because a session management pod removes all local session state at the end of a transaction, any subsequent transaction can be handled by any session management pod in the cMAG-c, without requiring it to be the same pod.
- session orchestration podsSession orchestration pods guarantee that the shared resources are correctly managed by the cMAG-c, primarily to prevent duplicate resource assignments to sessions. Examples of orchestration pods include the following:
- gatekeeper pod
The gatekeeper pod assigns a session to a new or existing subscriber and allocates a unique session and subscriber ID. It also applies session limits, such as per-subscriber, per-UP, or per-Layer 2 access ID limits.
- ODSA pod
The ODSA pod assigns addresses to sessions for local address assignment.
- gatekeeper pod
- other podsA lot of other pods interact with session state in a read-only fashion. Similar to session management pods, these pods do not maintain any session state in long-lived memory, but remove any local state upon completion of a specific work item. Examples include:
- session state pod
The session state pod collects session state directly from the database and reflects it back to the requesting application. This is used, for example, to retrieve data when executing the info from state subscriber-management subscriber command, or its equivalent through external interfaces (Netconf or gNMI).
- timer pod
The timer pod scans the database for expired timers (for example, lease timeout, RADIUS interim update interval) and triggers a session management pod to start a transaction to handle the timer.
- session state pod
Prefix delegation as a framed route
When configured properly, the cMAG-c can signal a PD prefix as a framed route to the MAG-u.
When a PD prefix is allocated to a session, the cMAG-c can be configured to signal the PD prefix as a framed route instead of as an explicit session address to the MAG-u. When the PD prefix is signaled as a framed route, the MAG-u cannot identify that the signaled prefix originated from a DHCPv6 PD lease, and treats it as any other IPv6 framed route.
subscriber-management authentication-database entry address-assignment pd-as-framed-routesubscriber-management authentication-database entry ip-anti-spoofWhen no other IPv6 stack is available, the cMAG-c automatically installs the PD prefix as a regular IP address and not as a framed route on the MAG-u.
Call trace
The cMAG-c supports call trace, an advanced debugging feature that supports tracing of CP packets and events during the lifetime of a session.
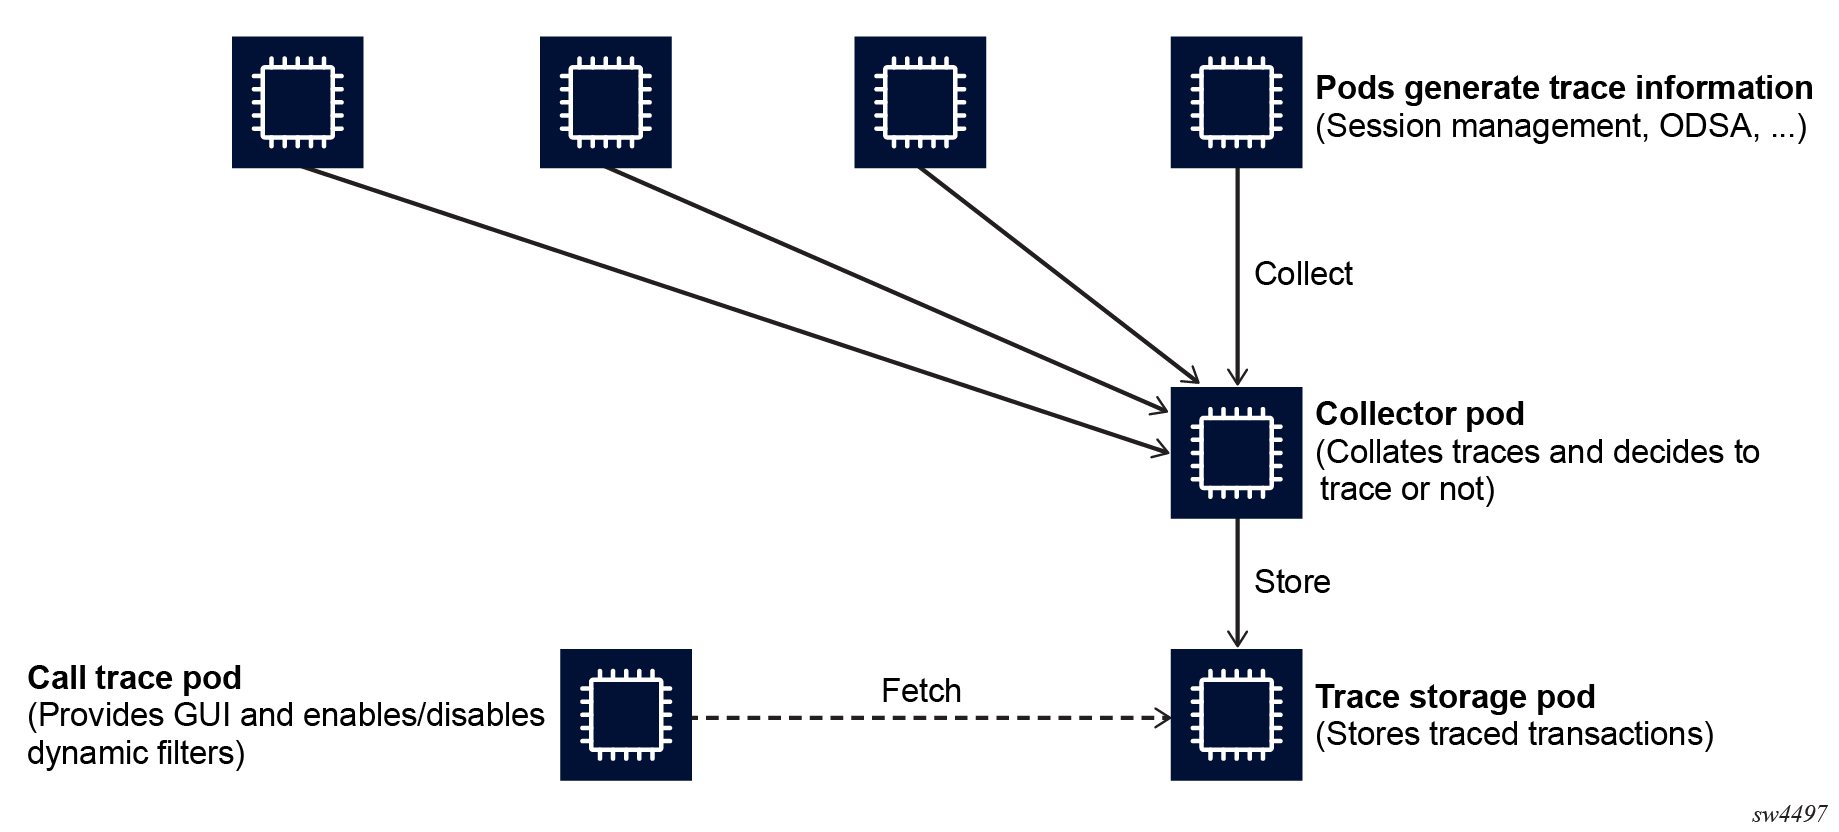
Call trace is an advanced debugging tool that provides detailed inspection of all the transactions of single sessions. It correlates multiple protocols and internal events in a single interface. All the pods that process call trace sessions decide whether a specific packet or event is traced. At a high-level, call trace consists of the following major elements:
- Pods, including the session management, ODSA, and so on, generate trace information.
- One or more collector pods collect the individual trace candidates and correlate them to a single transaction and session. When a transaction finishes, the pod makes the final decision about whether to trace or discard the transaction.
- A trace storage pod (tempo) stores all the traced transactions.
- The call trace pod provides a GUI to inspect the traced transactions and manage the capture filters.
The following figure shows the high-level elements for call tracing.
Always-on tracing
All the pods that participate in the processing of session transactions assess each transaction to determine whether it is subject to tracing. To ensure that every transaction is automatically subject to tracing, the always-on tracing mode is enabled by default. The user can change the configuration of this mode to conserve resources, as needed.
Every pod that participates in processing a session transaction must decide whether the transaction is potentially subject to tracing. The easiest way to accomplish this is to use the default always-on enabled tracing mode. This mode automatically assumes that every transaction is potentially subject to tracing.
Always-on tracing enabled
# info from running /subscriber-management call-trace always-on
    enabled {
        sample-rate 100
    }0
The benefit of always-on tracing is the traces are only evaluated upon finalizing a transaction. This allows advanced tracing capabilities such as the following:
- Trace transactions based on parameters that are not available in each packet, such as a username or subscriber name. See Managing session tracing filters for more information.
-
Trace any transaction that is considered failed, regardless of the point at which the failure occurs. See Enabling automatic tracing based on error conditions for more information.
The disadvantage of always-on tracing is it consumes resources to send transactions to the collector pods. If enough resources are available, Nokia recommends to keep always-on tracing enabled. However, if insufficient resources are available, you can reduce the sampling rate or entirely disable always-on tracing.
Use the following CLI to disable always-on tracing. With this option, only the always-available filters are subject to tracing; see Managing session tracing filters.
Always-on tracing disabled
# info from running /subscriber-management call-trace always-on
    disabled
Use the following CLI to reduce the sampling rate for the always-on configuration. With this option, pods decide randomly whether to send a transaction to a collector, based on the configured sample‑rate percentage. This lowers the resource consumption, although advanced filters, such as described in Managing session tracing filters, may not capture all the matching transactions.
Always-on tracing reduced sampling rate
# info from running /subscriber-management call-trace always-on
    enabled {
        sample-rate 50
    }
Both the sample-rate and always-on disable options only have an effect if a transaction does not match an always-available filter, as described in Managing session tracing filters. If a transaction matches an always-available filter, it is traced regardless of the enabled or disabled state of the always-on configuration.
Packet tracing
You can use the cMAG-c CLI to manage the configuration of the default call trace packet-tracing options.
By default, the cMAG-c captures packets as part of all the traced transactions. You can use the commands in the following context to change the packet-tracing properties.
subscriber-management call-trace packet-tracingThe following are examples of reasons you may want to disable packet capturing for traced transactions, and the properties to use to do so:
-
If you need to lower the resource impact of always-on tracing, use the packet-tracing default-off property. This disables the default packet-tracing functionality, while allowing session filters to explicitly enable packet tracing using the CLI or the GUI tool.
subscriber-management call-trace packet-tracing default-offSee Managing session tracing filters for information about how to configure call trace filters for specific sessions.
-
If you need to manage privacy or regulatory requirements, use the packet-tracing disallowed property. This disables all packet tracing, and prevents individual session filters from enabling it.
subscriber-management call-trace packet-tracing disallowed
Enabling automatic tracing based on error conditions
The cMAG-c provides the ability to configure automatic tracing based on error conditions, when always-on tracing is enabled. For example, it is possible to automatically trace any session transaction that leads to a failure, and to manage the duration of tracing transactions.
Enabling automatic tracing based on any error
When always-on tracing is enabled, it is possible to configure the tracing functionality to automatically trace any session transaction that leads to a failure. To enable tracing based on any error condition, set the any-error property to true.
subscriber-management call-trace any-error trueWhen any-error is enabled, the system traces any transaction that does not lead to an expected result, as internally determined by the cMAG-c; for example, a PFCP or RADIUS communication times out or is rejected.
Any-error tracing configuration
# info from running /subscriber-management call-trace
    any-error true
    always-on {
        enabled {
            sample-rate 100
        }
    }
Configuring automatic tracing based on maximum duration
Maximum transaction duration configuration
# info from running /subscriber-management call-trace
    max-duration 5000
    always-on {
        enabled {
            sample-rate 100
        }
    }
Managing session tracing filters
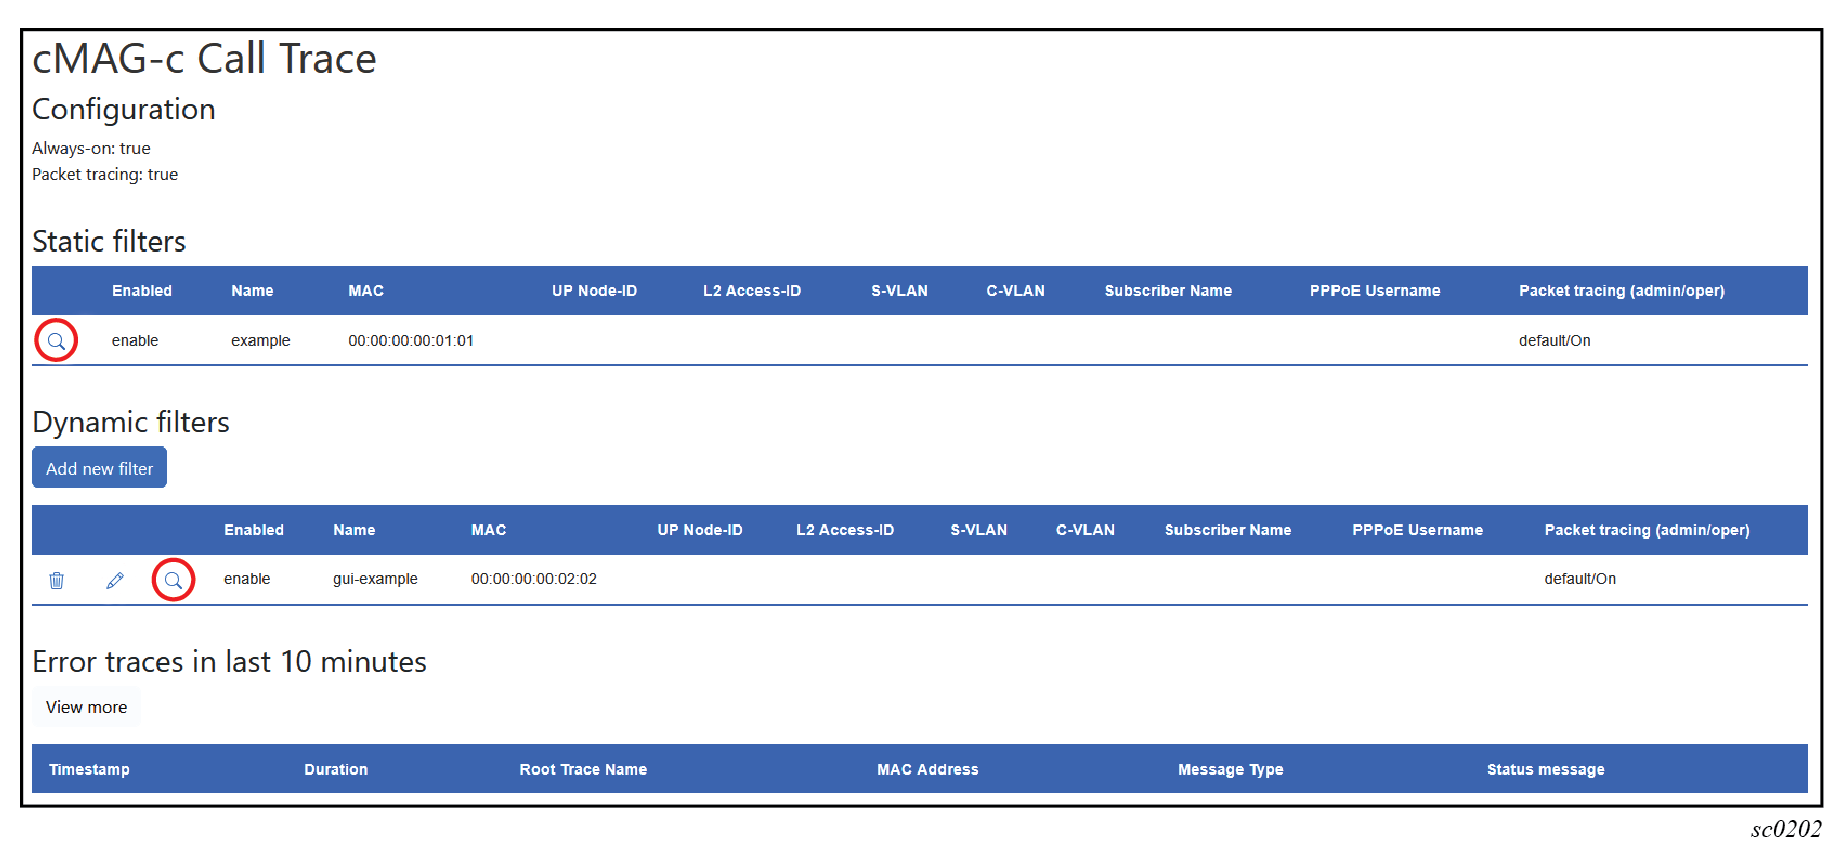
The cMAG-c provides session filters with configurable options for matching the sessions to trace. You can use the CLI or the cMAG-c Call Trace GUI tool to manage filters for session tracing.
It is possible to always trace specific sessions, whether they fail or not. To do this, use the CLI or the GUI tool to enable the applicable filters. Filters provisioned using the CLI are referred to as static filters, while filters provisioned using the GUI tool are referred to as dynamic filters. Static filters cannot be modified using the GUI and dynamic filters cannot be modified using the CLI.
A filter provides the following configurable properties for matching the sessions to trace:
- options that are always available:
- MAC address
- UP node ID
- Layer 2 access ID
- C-VLAN
- S-VLAN
- options that are only available when the always-on property is
enabled:
- subscriber name
- username
The configuration may include multiple options that must all match (logical AND) for a transaction to match the filter. A filter is considered always available only if all its configured options are always available. If even one option requires always-on tracing, the entire filter requires always-on tracing.
To administratively disable a static filter entry without removing it, specify the disable option for the admin-state command.
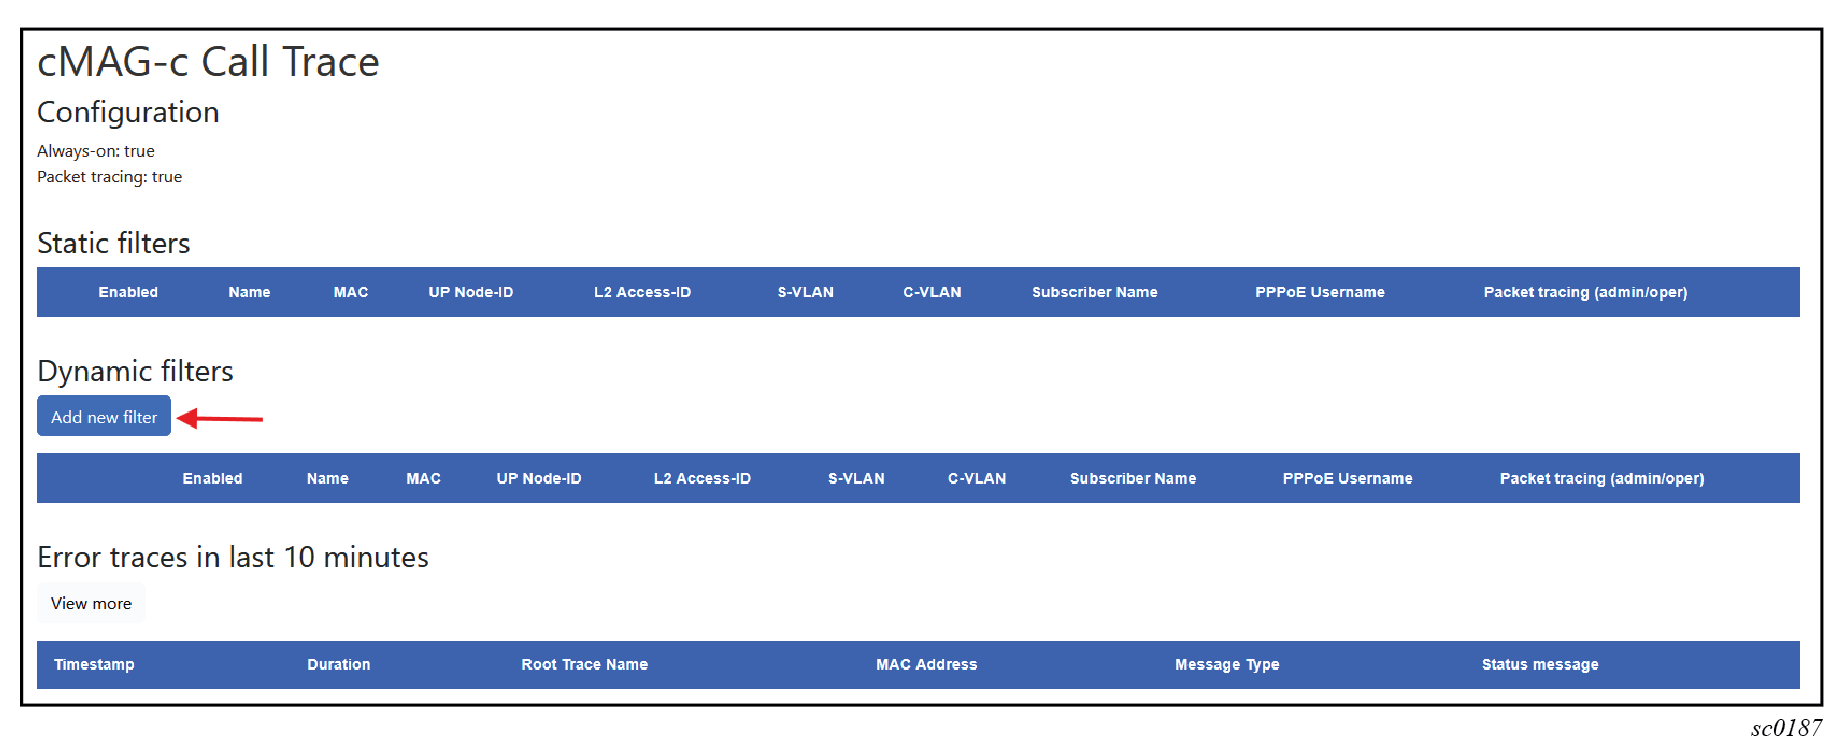
subscriber-management call-trace filter admin-state disableYou can use the GUI tool to administratively disable dynamic filters.
- Navigate to the cMAG-c Call Trace Configuration window in the GUI tool.
- Under Dynamic filters, select the edit icon beside the filter.
- Uncheck the Enabled check box in the Add new filter window; see the following figure.
Managing static filters using the CLI
See Managing session tracing filters to learn about managing specific session filters, if needed.
You can enable, modify, or delete a static call trace filter using the CLI.
-
Create or navigate to a filter entry.
subscriber-management call-trace filter namesubscriber-management call-trace filter example -
Specify the match options under the new filter entry.
The following example shows a configuration to capture transactions for sessions with a specific MAC address.
# info from running /subscriber-management call-trace filter example mac 00:00:00:00:01:01 - Commit the configuration.
- Optional:
If you want to delete a specific filter entry, use the following CLI to remove
it from the configuration.
subscriber-management call-trace delete filter example
Managing dynamic filters using the Call Trace GUI tool
See Managing session tracing filters to learn about managing specific session filters.
You can use the cMAG-c Call Trace GUI tool to create, modify, or delete dynamic call trace session filters.
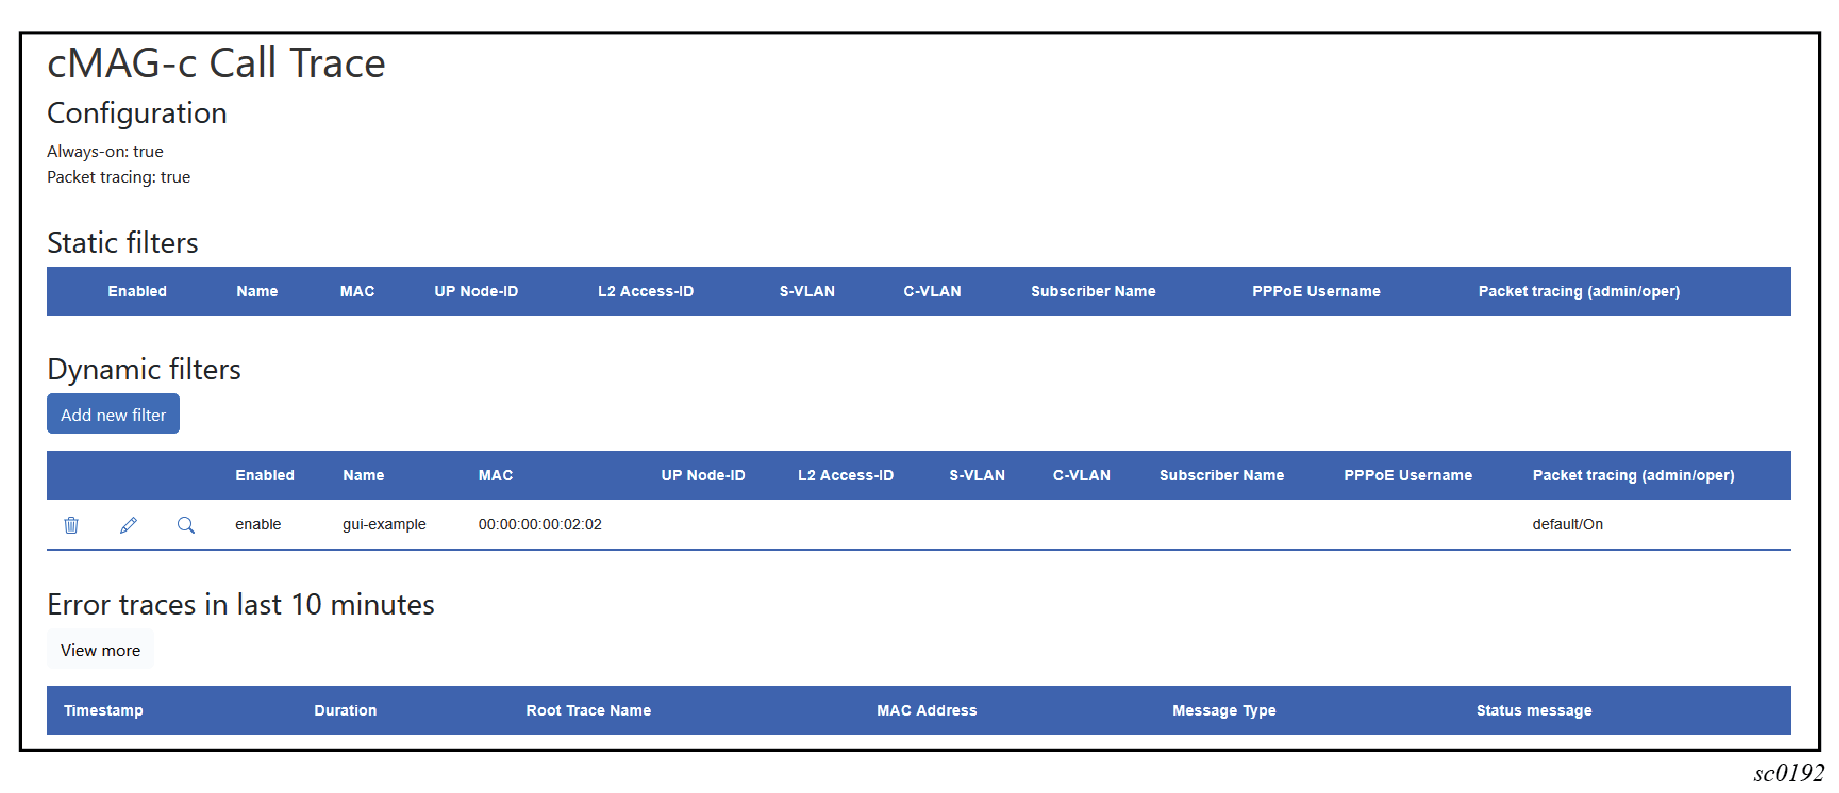
- Navigate to the cMAG-c Call Trace Configuration window in the GUI tool.
-
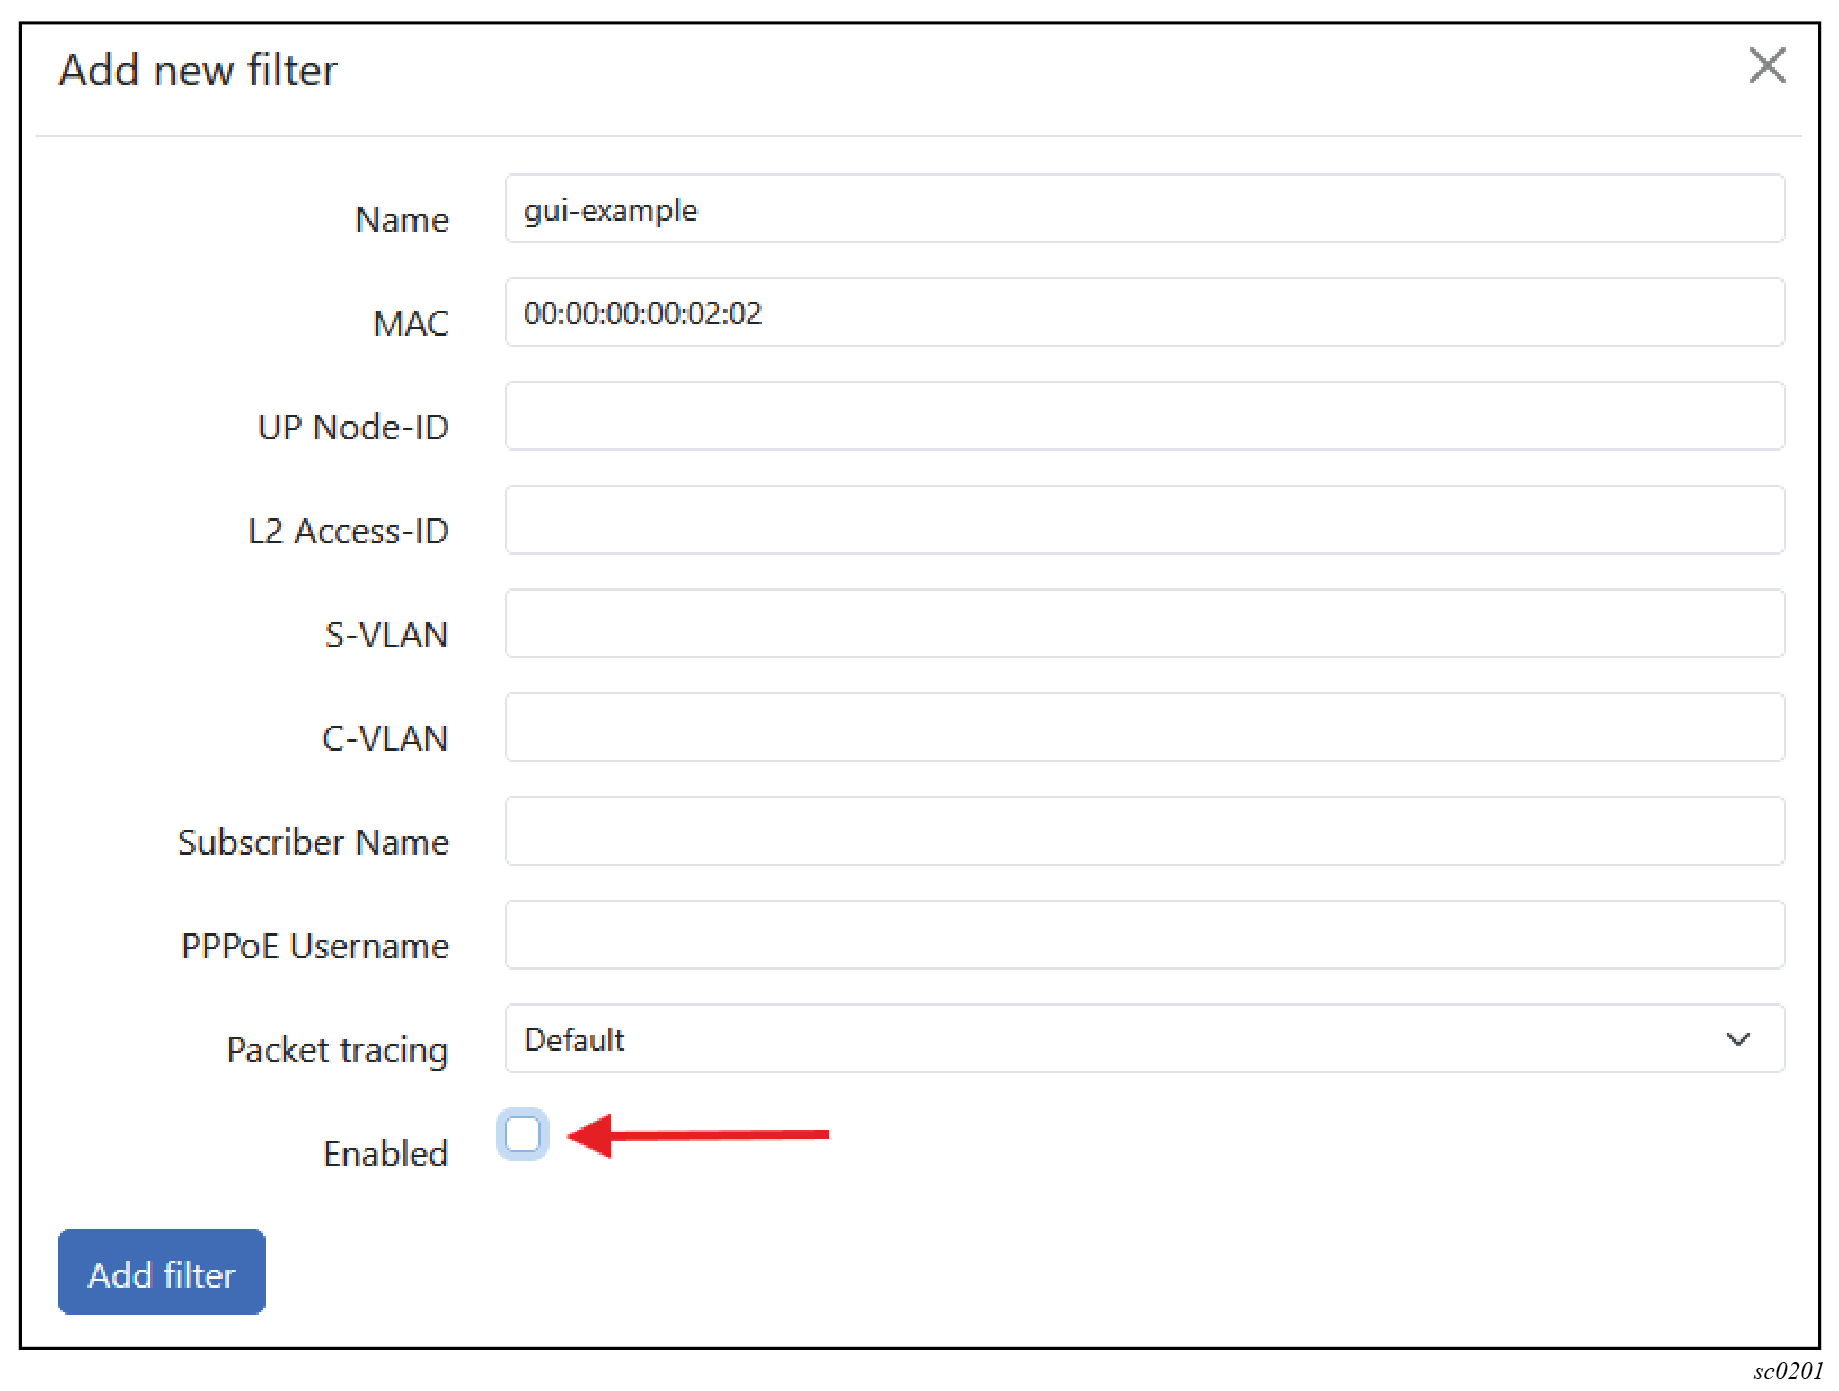
To add a new filter, use the following steps.
-
Under Dynamic filters, click the Add
new filter button.
-
Enter the filter name in the form and at least one filter
parameter.
The subscriber name and username can only be entered if the always-on mode is enabled.
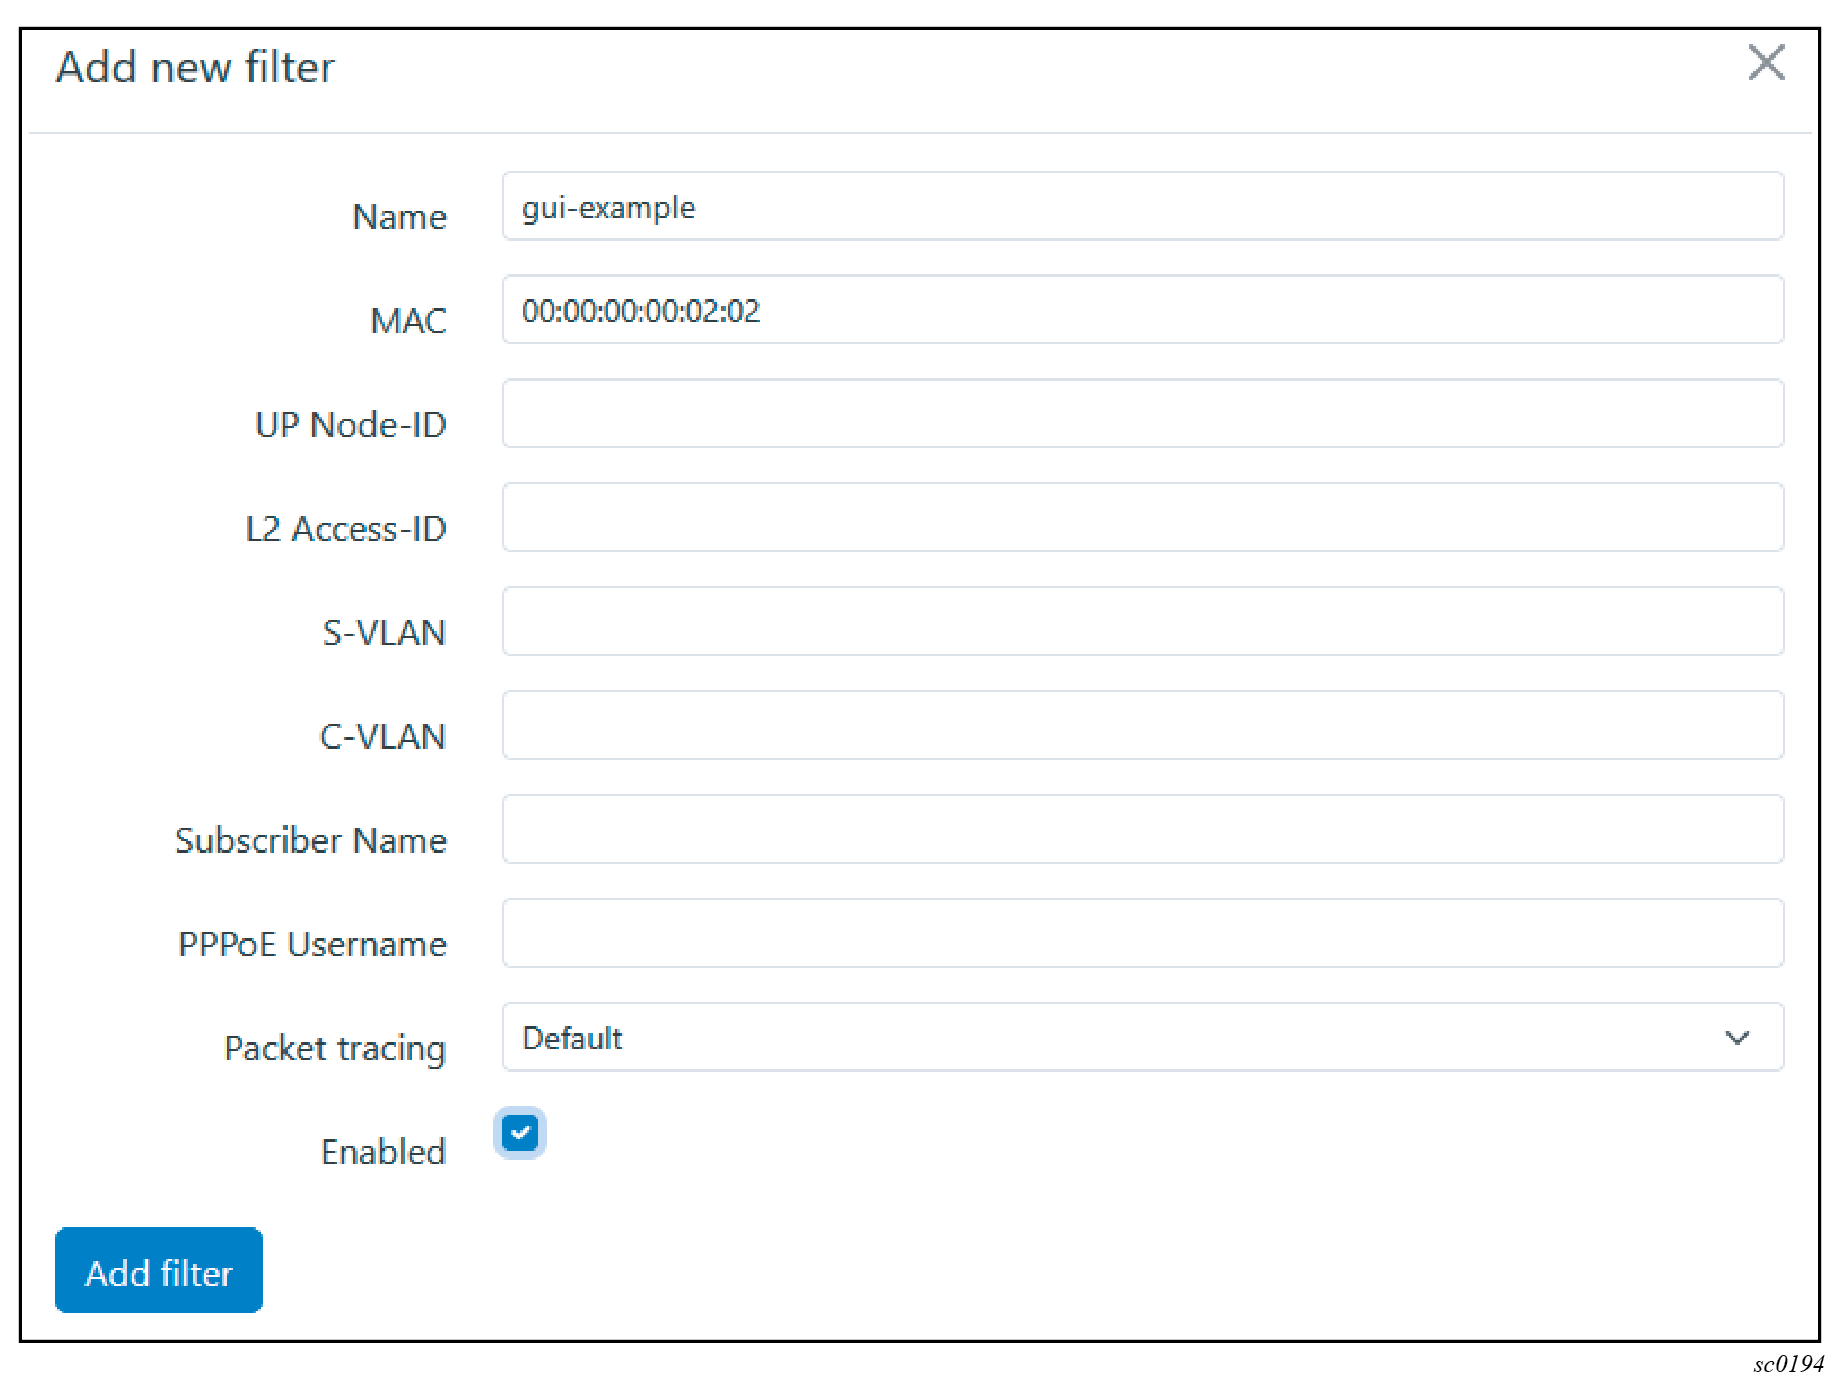
-
Click the Add filter button to create the new
filter entry.
The dynamic filter becomes visible in the list of filter entries.
-
Under Dynamic filters, click the Add
new filter button.
-
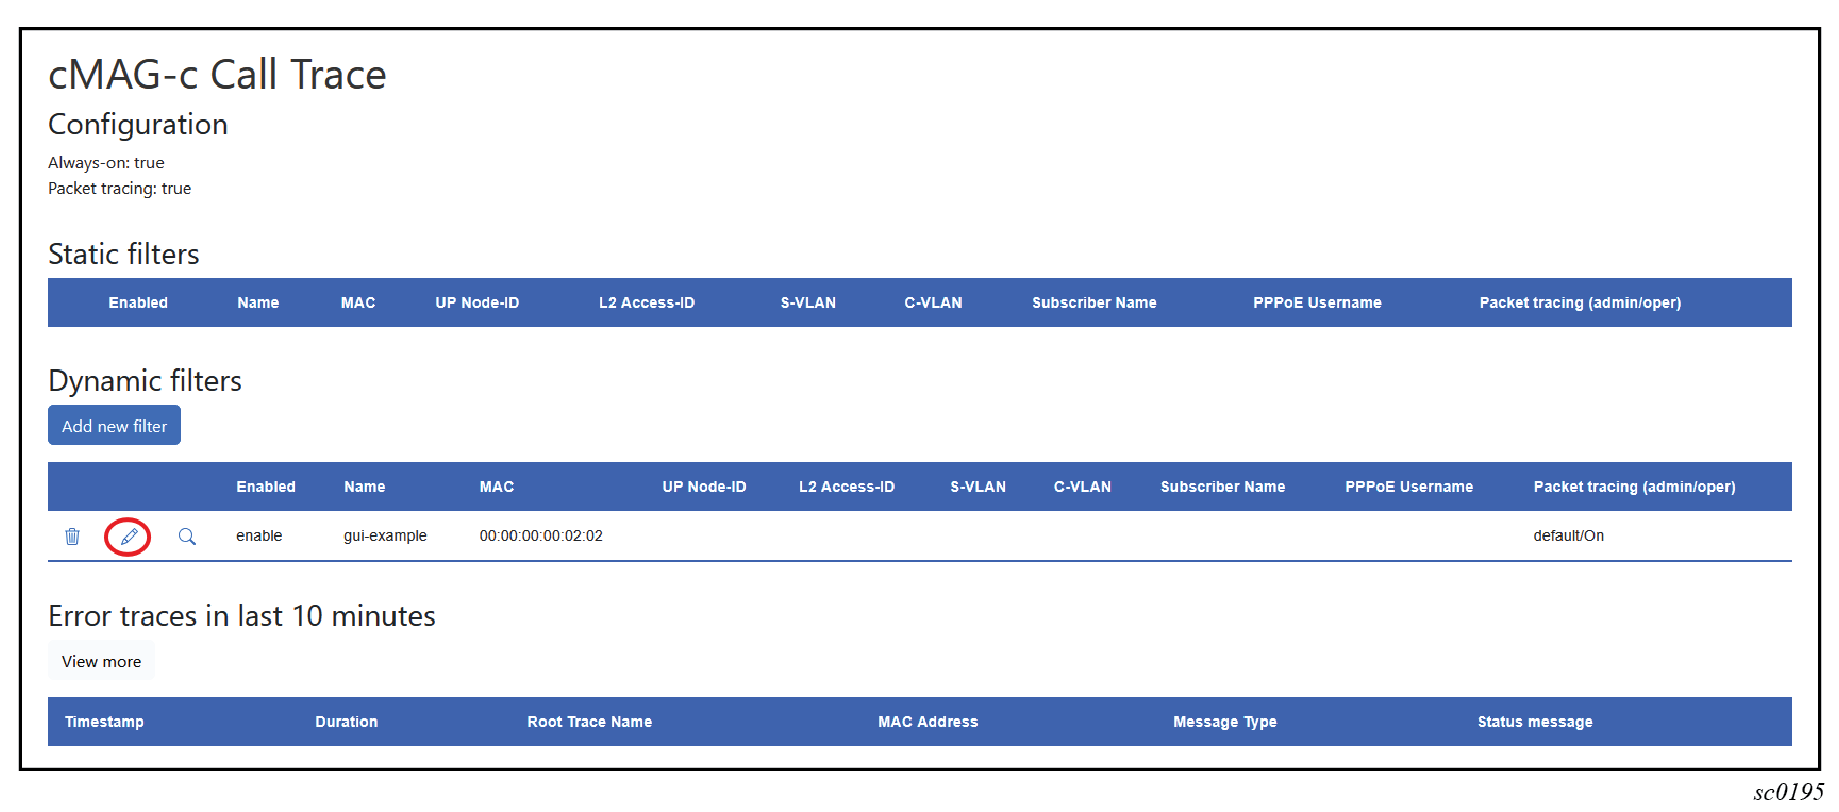
To modify an existing filter, use the following steps:
-
Select the edit icon next to the filter entry.
-
Change the filter information as needed and click the Add
filter button.
-
Select the edit icon next to the filter entry.
-
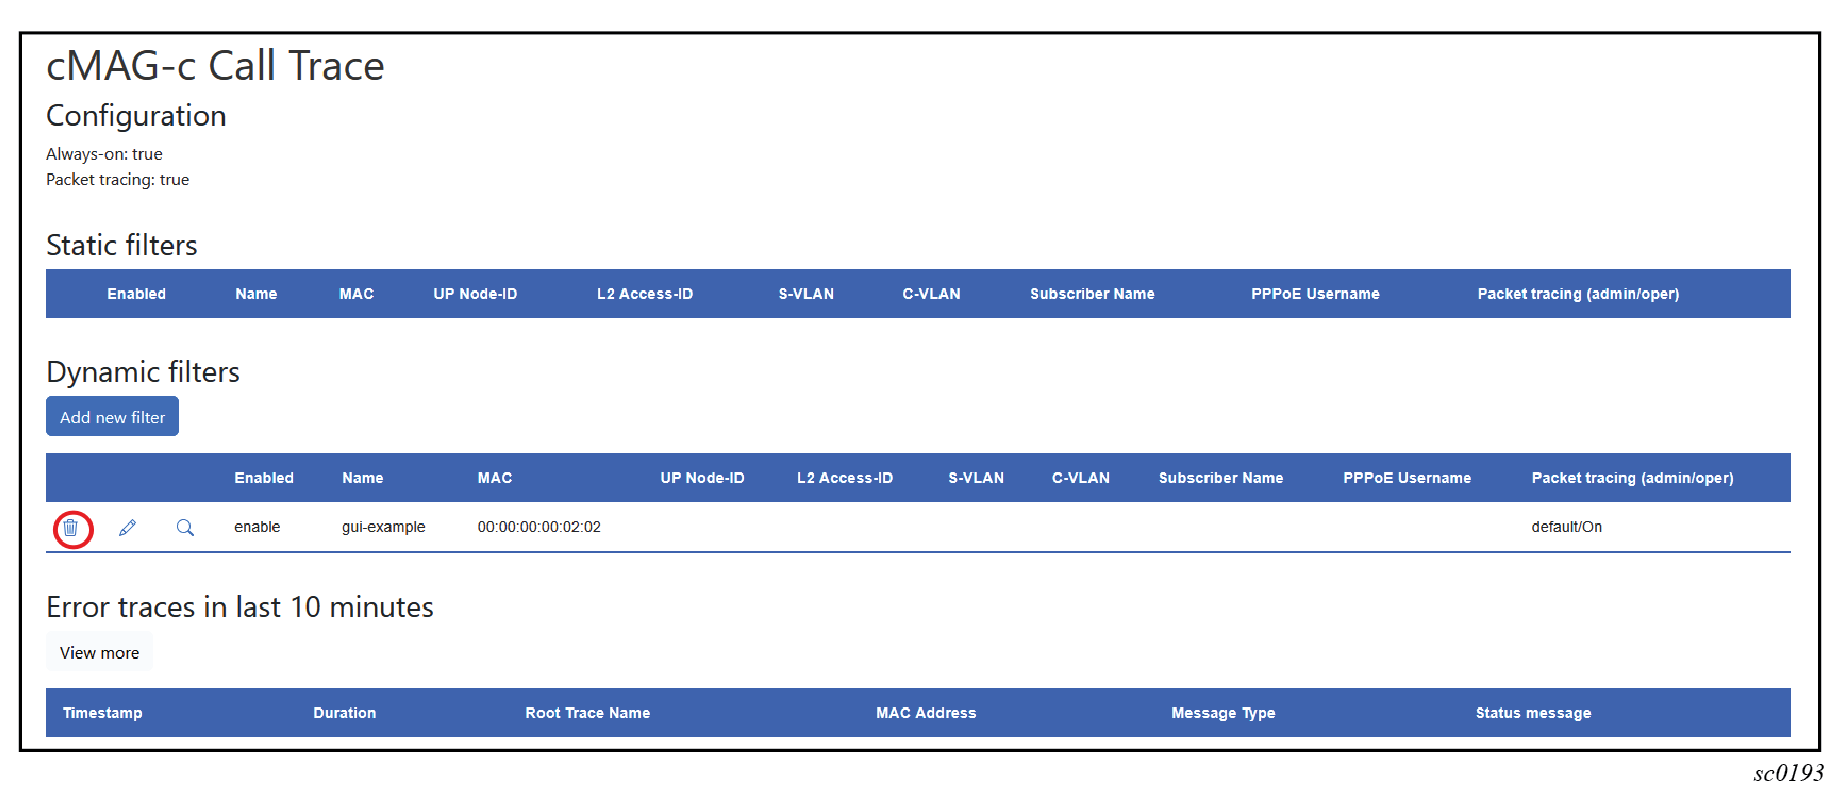
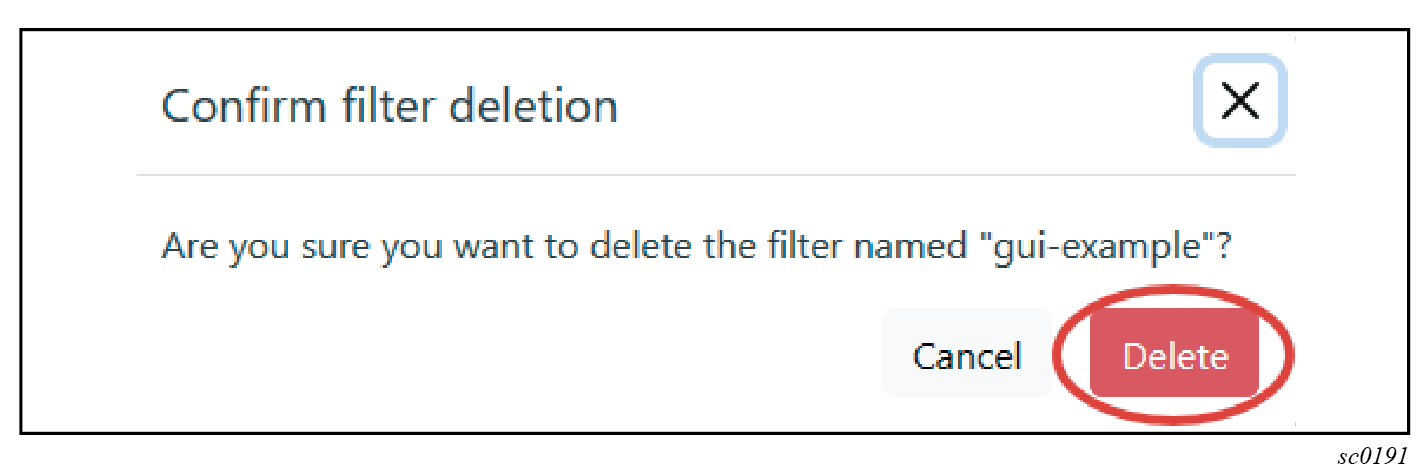
To delete a filter, do the following steps:
-
Select the delete icon beside the filter entry.
-
Select Delete to confirm that you want to
proceed with the deletion.
The following are examples of the conditions when an existing dynamic filter could become inconsistent with the base call trace configuration in CLI:
- The dynamic filter in the GUI is set to enable packet capture, while the CLI configuration is changed to always disallow packet capture.
- The dynamic filter in the GUI specifies a match criterion that requires always-on tracing, while the CLI configuration is changed to disable always-on tracing.
In cases such as these, the cMAG-c automatically disables the filters and no longer captures new transactions. However, the filters are not removed from the system and you can still inspect the previously-captured transactions.
-
Select the delete icon beside the filter entry.
Inspecting call trace captures
Use the Nokia Call Trace GUI tool to inspect the details of call trace captures.
Searching for session traces
Use the cMAG-c Call Trace GUI tool to locate and perform analysis of the call-trace captures for a session.
- Navigate to the Call Trace GUI tool.
-
Select the magnifying glass icon next to the filter to see all traces for the
filter.
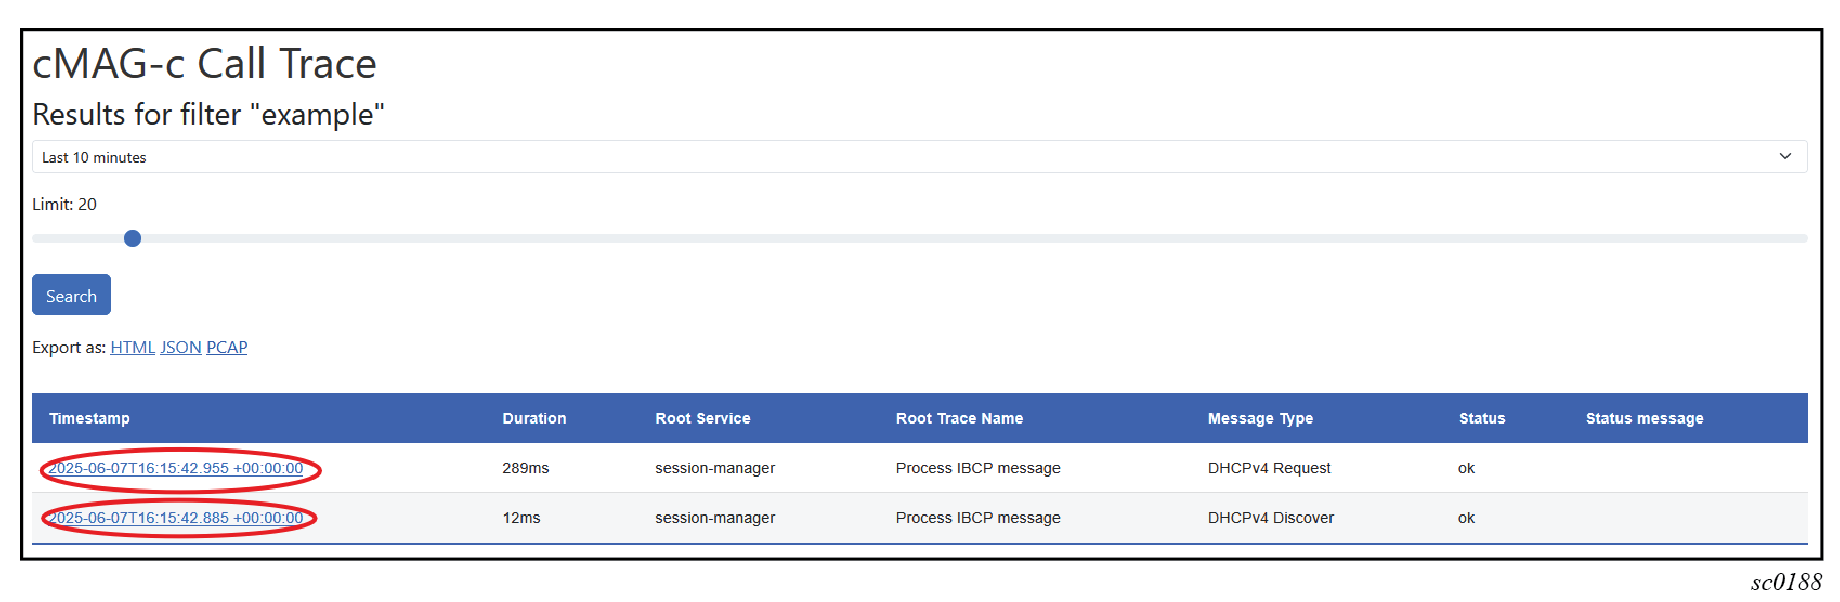
 The GUI tool displays a list of captured transactions for the session with the following information:
- capture timestamp
- duration of the captured transaction
- incoming service that started the capture
- name of the captured procedure
- message type that initiated the transaction
- if the transaction was faulty or not, with an applicable error message if faulty
- Optional:
If you want to display more traces, do one of the following:
- Use the drop-down menu to change the maximum-trace age.
- Use the slider to change the maximum number of traces.
Note: By default, the tool only shows a limited number of recent traces.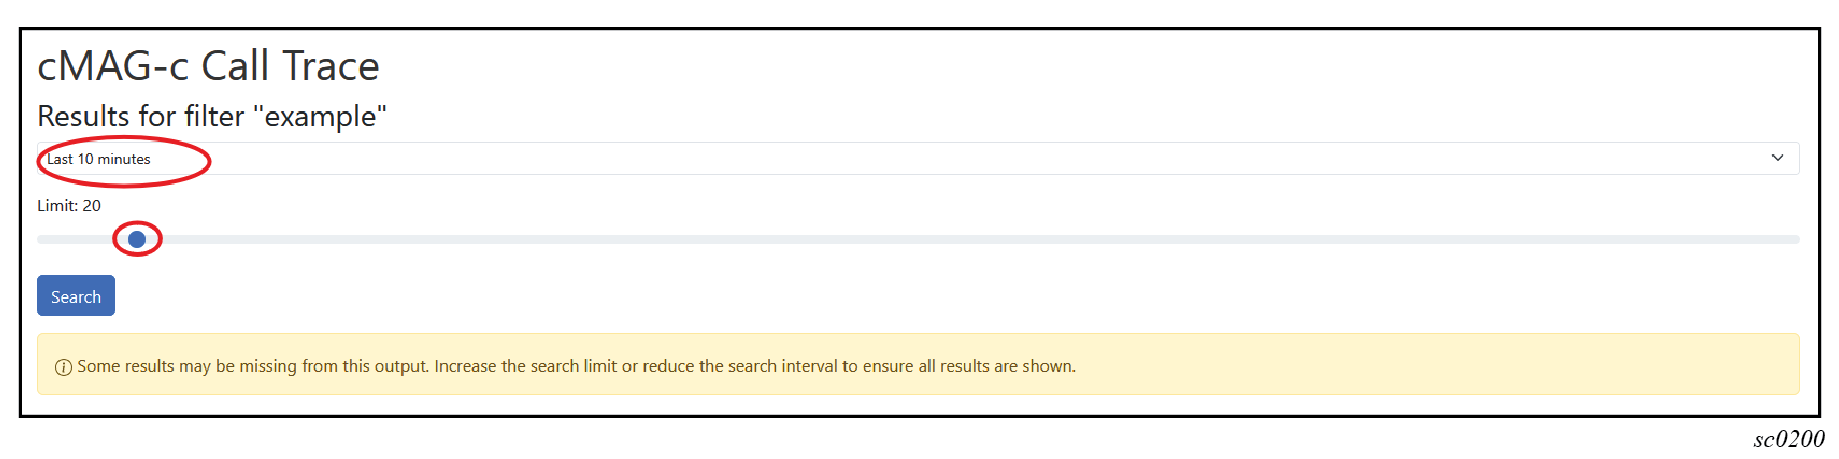
-
From the list of traces, select the timestamp for a specific trace to display
detailed information about it.
The following example shows the details of a specific traced transaction, including packet captures, if enabled; see Enabling automatic tracing based on error conditions.
See Reviewing the details of a trace for more information about the trace details.
Reviewing the details of a trace
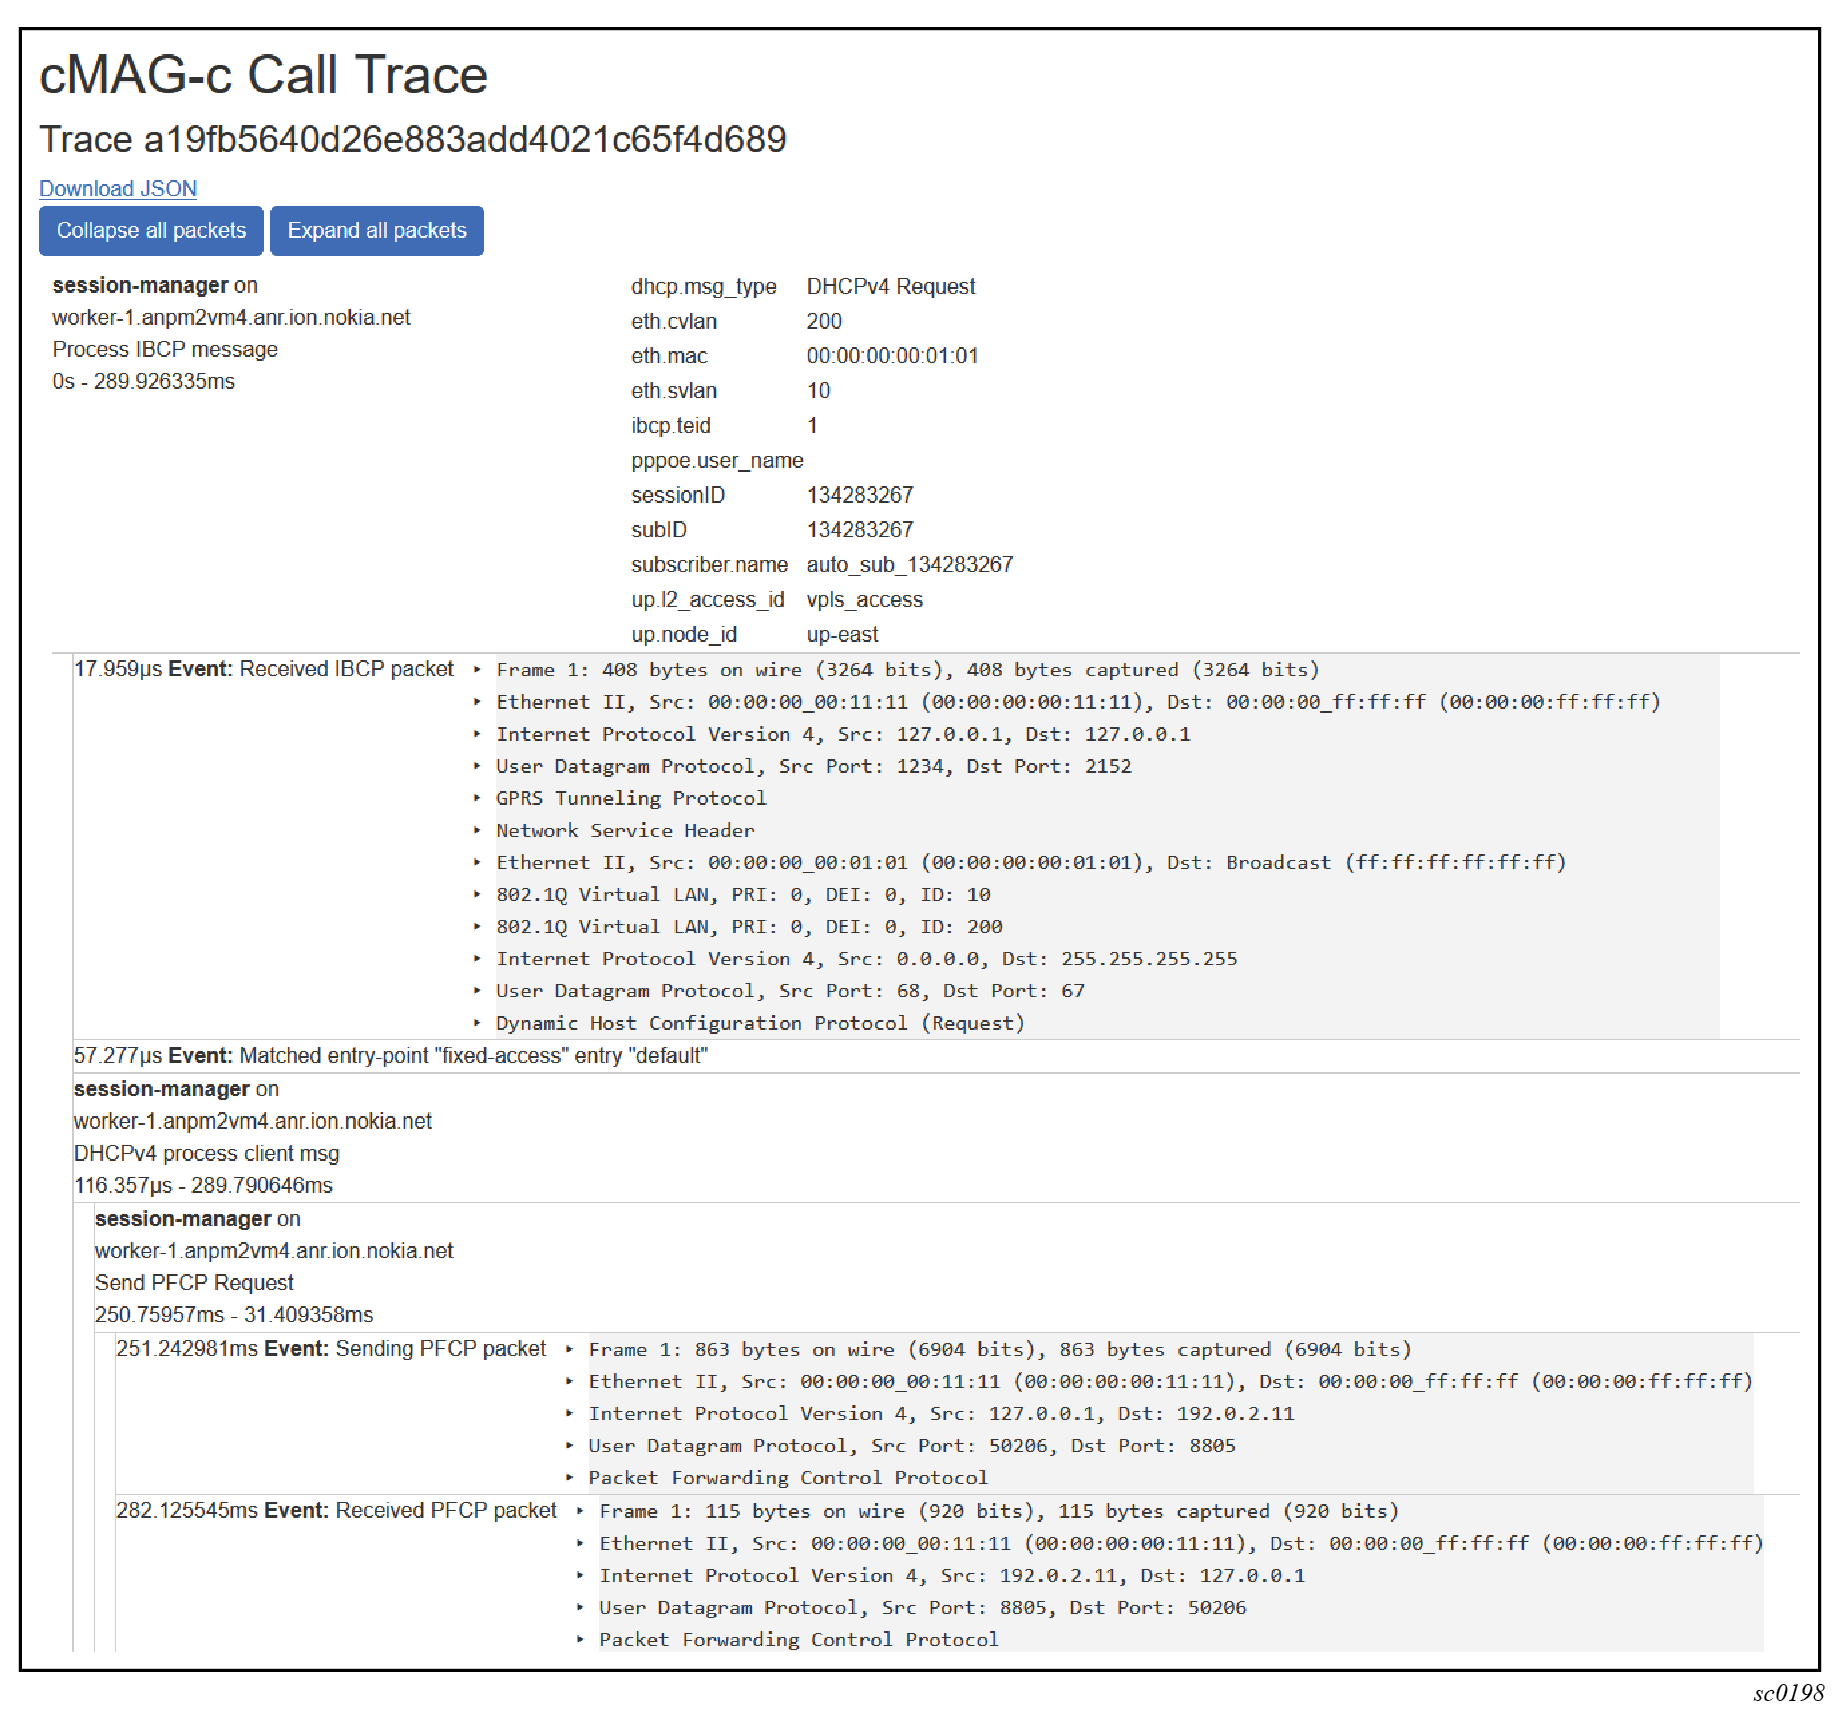
After navigating to a detailed trace as described in Searching for session traces, the detailed view of the trace events is displayed.
The trace details include relevant information for each captured event, such as the following:
- event timestamp within the trace and the optional duration
- the relevant packets for the event
- the pods handling the event
Each trace usually consists of one initial event with a series of sub-events. For example, the trace shown in the following figure has one main event, traced by the session manager, detailing the session data and the captured procedure (IBCP processing). The trace in the figure further consists of multiple sub-events:
- The first event shows the details of a received IBCP packet (DHCP Request).
- The second event shows an entry point lookup was done for an entry named “default”.
- The third event shows further processing of the DHCP request within the session management pod. For illustration purposes, the event shows the first of multiple sub-events. The first sub-event shows handling of a PFCP Session Establishment transaction that also consists of two sub-events, one for sending the outgoing PFCP request message, and one for handling the incoming PFCP response message. Both sub-events also show the PFCP packet details.
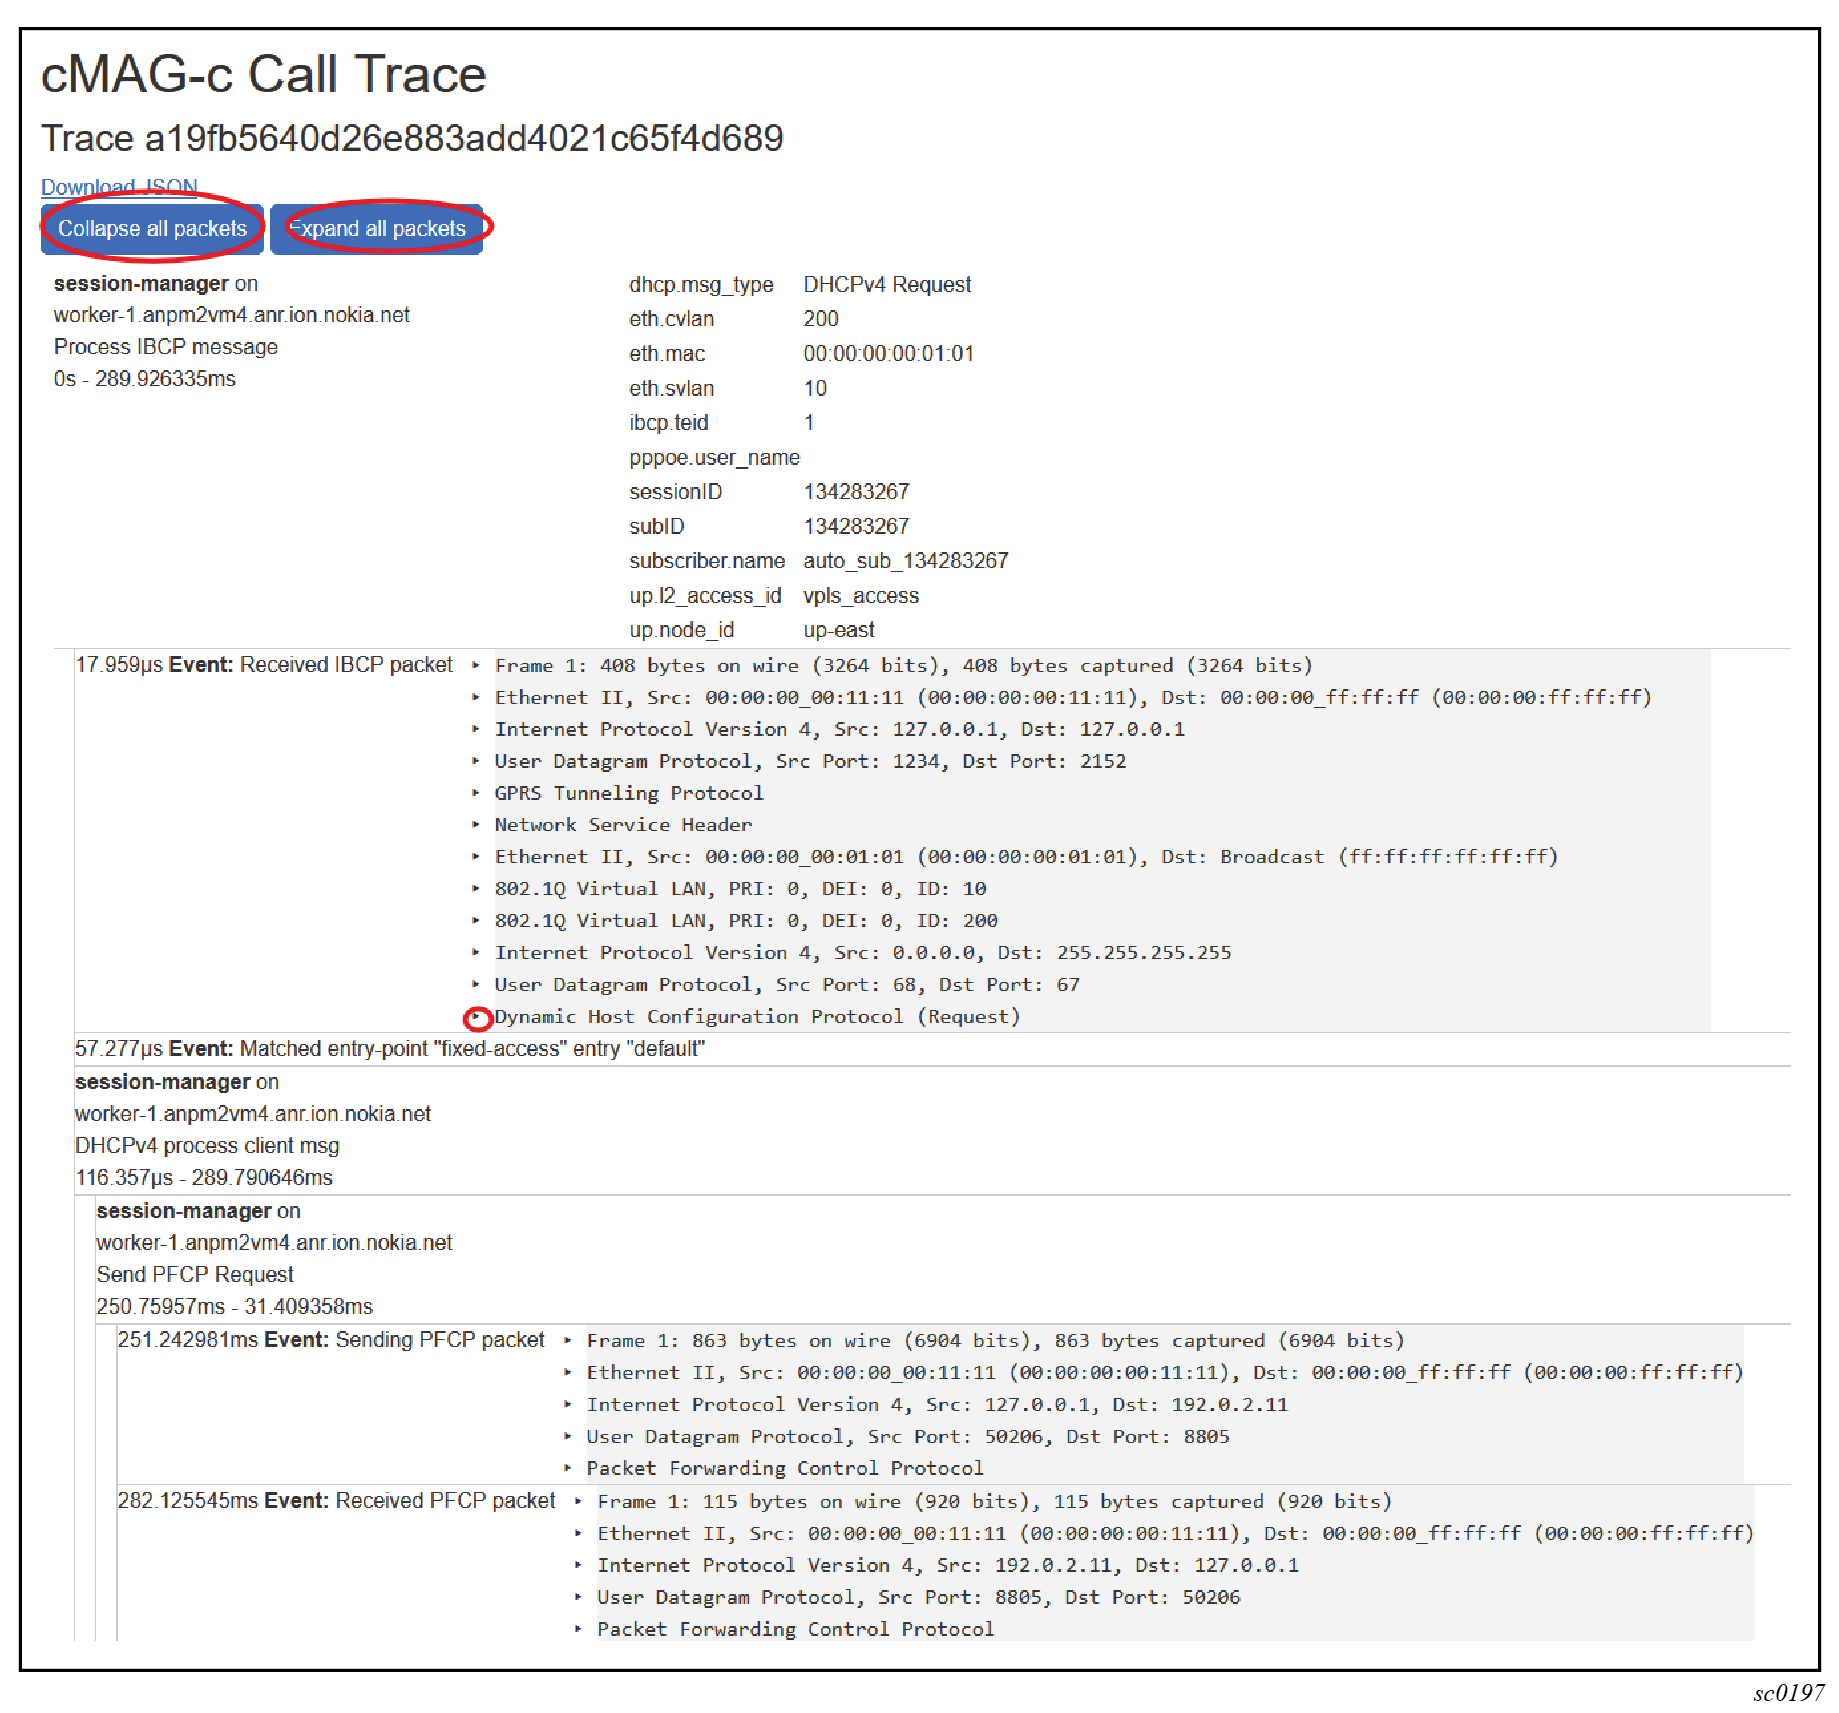
By default, only a summary of each protocol layer in a traced packet is displayed. To expand the details for all the traced packets:
- For a specific layer, select the arrow next to it.
- For all layers of all packets, click the Expand all packets button.
To collapse the details of all layers of all packets, click the Collapse all packets button.