Procedure 11-12: Establish a dedicated multiple point private line UPSR protected GbE service (transparent mode)
 Overview
This procedure provides an example for configuring a dedicated multiple point private line UPSR protected GbE Ethernet service using the Transparent tagging mode.
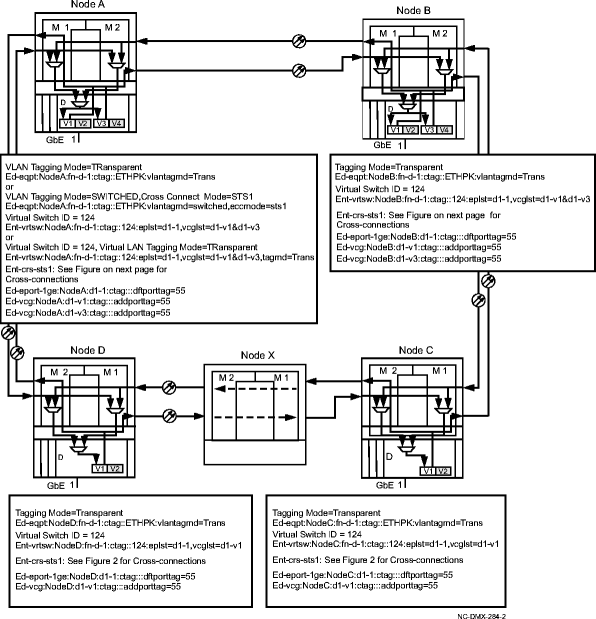
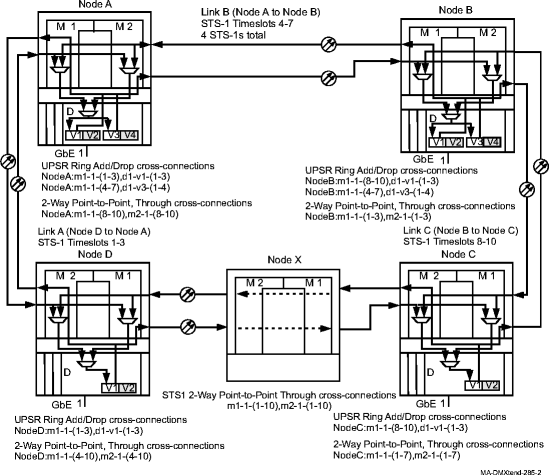
This procedure illustrates a dedicated bandwidth, private line service with per link bandwidth granularity with multiple connections. Although this procedure uses the transparent mode, this configuration could use the 802.1q tagging mode with VLAN assignments. Cross-connections and VCG assignments are the major considerations in this type of configuration. See Figure 11-9, Dedicated multiple point GbE using transparent tagging mode and Figure 11-10, Dedicated multiple point GbE private line cross-connections.
This procedure uses TL1 commands and specific WaveStar® CIT menu selections to illustrate the detailed provisioning parameters. If you prefer, you can use the Data Provisioning Wizard to perform the provisioning in this procedure. From the System View menu, select Configuration → Ethernet Service to invoke the wizard.
Important!
On connected Gigabit Ethernet devices with autonegotiation turned on/enabled, if transmission is interrupted in one direction of transmission on a Gigabit Ethernet device, then transmission will also be disabled in the other direction. For example, if one fiber in a transmit/receive pair is cut, then one-way transmission on the other fiber can be maintained only if autonegotiate is turned off/disabled and the link state is forced good at the transmit source equipment.
 Before you begin
Prior to performing this procedure, refer to Before you begin and Required equipment n this chapter and you must have complete work instructions for this procedure that detail:
Steps
Use this procedure as an example for configuring a dedicated multiple point private line UPSR protected GbE Ethernet service using the Transparent tagging mode.
1 |
Use the WaveStar® CIT to log in to each of the terminating nodes, if not already performed. Reference: Procedure 14-2: Connect Personal Computer (PC) and establish WaveStar® CIT session | ||||||||
2 |
On the System View menu, select Administration → OSI Neighbor Map command and note the NEs connected to Main 1 and Main 2. Access each of the NEs identified and select the Administration → OSI Neighbor Map command and note the NEs connected to Main 1 and Main 2. Repeat the above until the backbone ring can be sketched. Important! If a drawing of the network is not provided with the work instructions, it is recommended that you draw a simple diagram of the ring (indicating node-to-node connections) and list each node's TID. Result: The OSI Neighbor Map window opens. | ||||||||
3 |
Verify that the system configuration is the same as specified on your work instructions. | ||||||||
4 |
From your work instructions, determine the circuit pack, port, and cross-connections to be made at each node associated with the service to be established. Refer to Figure 11-9, Dedicated multiple point GbE using transparent tagging mode and Figure 11-10, Dedicated multiple point GbE private line cross-connections for provisioning at each node. | ||||||||
5 |
At each node in the network, use the View → Cross-Connections command from the System View menu at each node to verify that the new cross-connections are available for assignment at each NE. If any of the new cross-connections are already assigned, you must resolve the problem before continuing with this procedure. | ||||||||
6 |
If the Ethernet circuit pack is already providing service, changing tagging mode will take down any existing service. The existing tagging mode cannot be changed without removing all existing cross-connections and virtual switch provisioning. CONFIGURE TAGGING MODE Determine the existing tagging mode and parameters for the circuit pack being provisioned. Use the TL1 rtrv-eqpt command or select View → Equipment from the System View menu, select the CP, then click Select. Note the VLAN Tagging Mode and other parameter values. The VLAN Tagging Mode for the LNW67/68 circuit packs must be set to TRANS. The VLAN Tagging Mode for the LNW70/LNW170 circuit packs must be set to SWITCHED. | ||||||||
7 |
Select one of the following:
| ||||||||
8 |
Determine if a virtual switch ID has already been assigned to the LAN/WAN ports used for this service. Use the TL1 rtrv-vrtsw command or select the View → Data → Virtual Switch command from the System View menu, select the GbE circuit pack being provisioned, then click Select. Note if a virtual switch ID has been assigned. If a virtual switch ID already exists, you must delete the existing virtual switch ID before changing the tagging mode. | ||||||||
9 |
If a virtual switch already exists, use the TL1 dlt-vrtsw command or select the Configuration → Data → Delete Virtual Switch command from the System View menu, highlight the circuit pack being provisioned, then click Select. Highlight the VRTSW ID being deleted, then click Apply. Read the warning message, then click Yes to execute the command. Click Close to exit. | ||||||||
10 |
Use the TL1 ed-eqpt command or select the Configuration → Equipment command from the System View menu. Select the circuit pack being provisioned, then click Select. | ||||||||
11 |
Verify/Select the tagging mode in the Select VLAN Tagging Mode box. | ||||||||
12 |
Verify/Enter other parameter values (for example, Burst Size, Credit Interval[LNW67/68], Ethernet Cross Connect Mode and Port Configuration [LNW70/LNW170]), as required, then click Apply. Read the warning message, then click OK to make your changes. Click Close to exit. Reference: Procedure 11-10: Provision Ethernet circuit pack parameters | ||||||||
13 |
Once a virtual switch is created and service has been established on the circuit pack, you cannot delete the virtual switch without interrupting service. If the service you are establishing in this procedure is a second service on an existing GbE circuit pack with all LAN/WAN ports in the same virtual switch, then the existing virtual switch ID must be retained or the ports not in service must be removed from the existing virtual switch and added to a new virtual switch ID. ASSIGN VIRTUAL SWITCH ID
| ||||||||
14 |
ESTABLISH SONET CROSS-CONNECTIONS Determine the necessary cross-connections to be made at each terminating and non terminating node in the network. Important! Note that cross-connections at the terminating nodes are add/drop and cross-connections at the non terminating nodes are pass-through. | ||||||||
15 |
One at a time at each node in the network, use the TL1 ent-crs-sts1 command to provision the pass-through and add/drop cross-connections. Or, select Configuration → Cross-Connections from the System View menu to start the Cross-Connection Wizard. Use the Cross-Connection Wizard at each of the nodes in the network to provision the cross-connections.
Note that the sum of the three individual STS-1 links in an OC-12 ring configuration cannot exceed a total of 12 STS-1s. Reference: Procedure 11-15: Make cross-connections for Ethernet service | ||||||||
16 |
From the System View menu, select View → Cross-Connections at each node to verify that the proper connections have been made. | ||||||||
17 |
Important! For LNW70/LNW170 circuit packs, each tributary cross-connected to a VCG must be Enabled before it becomes an active member of the VCG. Select View → Data → Ethernet/Data/VCG Port to verify that VCG Membership has been Enabled in both Input and Ouput Direction. If required, use the TL1 ed-vcgtrib command to enable tributaries, or from the System View menu at each node, select Configuration → Equipment. Expand the details for the circuit pack and VCGs being used. Highlight the tributary (Trib) being enabled then click Select. Select Enabled for the VCG Membership in both the Input and Output Direction. Click Apply, read the warning message, then click Yes to execute the command. Repeat this step for each tributary being enabled. Click Close to exit. When Input VCG Membership (source) (inmbs) is enabled, the VCG tributary is a member of the VCG in the source direction (towards the SONET network). When Output VCG Membership (sink) (outmbs) is enabled, the VCG tributary is a member of the VCG in the sink direction (away from the SONET network). Reference: Procedure 11-25: Provision LCAS, add/enable/remove tributaries | ||||||||
18 |
After all cross-connections are made, click on the Alarm List button on the System View window and verify no alarms are present. | ||||||||
19 |
If alarms are present, look for missing or improperly made cross-connections. Reference: Alcatel-Lucent 1665 Data Multiplexer Extend (DMXtend) Alarm Messages and Trouble Clearing Guide, 365-372-326 | ||||||||
20 |
Important! For LNW70/LNW170 circuit packs, at least one tributary at each end of the circuit must be Enabled in order for the VCG to go in service. If required, after all cross-connections have been made, verify that the WAN (VCG) Ports being used have gone in service at each terminating node. From the System View menu at each terminating node, select View → Data → Ethernet/Data/VCG Port. Result: The View LAN (Ethernet) WAN (VCG) Port window opens. | ||||||||
21 |
Expand the details for the circuit pack being used. Select the required VCG v( ) port, then click Select at the bottom of the window. Verify the VCG AID is correct at the top of the parameter display. | ||||||||
22 |
Click on the VCG Data tab. Under the Fault section of the parameter display, verify the VCG Monitoring Mode is IS (in service). If the VCG Monitoring Mode is IS, proceed to Step 23.
Reference: Alcatel-Lucent 1665 Data Multiplexer Extend (DMXtend) Alarm Messages and Trouble Clearing Guide, 365-372-326 | ||||||||
23 |
CREATE PORT TAGs Use the TL1 ed-eport and ed-vcg commands to assign port tags to the associated LAN ports and VCG WAN ports. Or, select Configuration → Data → Create Port Tag command from the CIT System View menu. Highlight the circuit pack being provisioned, then click Select. Provision the parameters as required. Click Apply, then click Yes to the warning message. Click Close to exit. The Peak Information Rate (PIR) rate limiting feature on the LNW67/LNW68 circuit packs will not be effective in transparent mode if the Ethernet Type (ethertype) parameter for the LAN or WAN VCG ports is provisioned to any value other than FFFF or 8100. | ||||||||
24 |
PROVISION LAN (Ethernet) PORTS Use the TL1 ed-eport command to provision parameters for the LAN port being provisioned. Or, select Configuration → Equipment from the System View menu, expand the details for the circuit pack, highlight the LAN port, then click Select. Provision the parameters as required. Click Apply, then click Yes to execute the command. Repeat for all ports being provisioned. Click Close to exit or continue with the next step. Reference: Procedure 11-8: Provision Ethernet LAN port parameters | ||||||||
25 |
PROVISION WAN (VCG) PORTS Use the TL1 ed-vcg command to provision parameters for the VCG ports, as required. Or, select Configuration → Equipment from the System View menu, expand the details for the circuit pack, highlight the VCG port, then click Select. Provision the parameters as required. Click Apply, then click Yes to execute the command. Repeat for all ports being provisioned. Click Close to exit. Reference: Procedure 11-9: Provision VCG parameters End of steps |
Figure 11-9: Dedicated multiple point GbE using transparent tagging mode

Figure 11-10: Dedicated multiple point GbE private line cross-connections
