| |
|
1 |
You will see the following screen. Read the material and click Wizard to continue with the Initial Software Download Wizard. In this example, the boot code is 7.2; your boot code may be different.

Result:
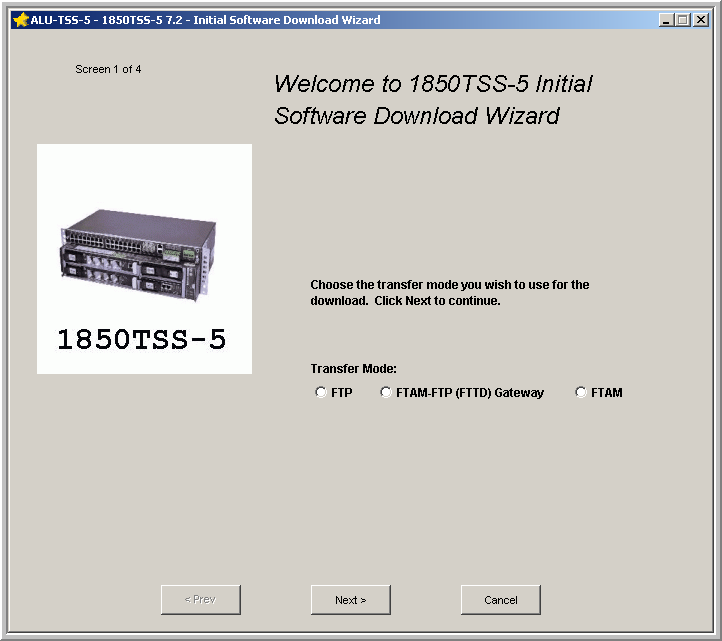
The following welcome screen (Screen 1 of 4) appears.
|
2 |
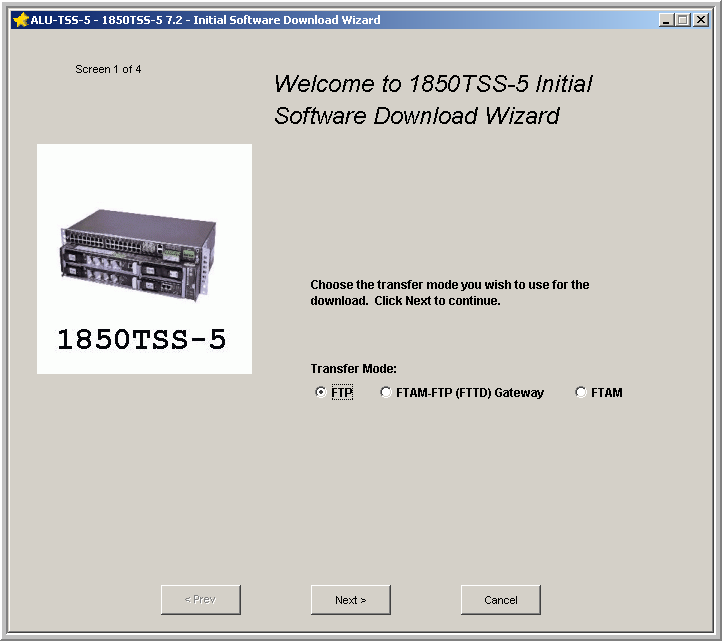
On Screen 1 of 4, read the material, select FTP and click Next.
Result:
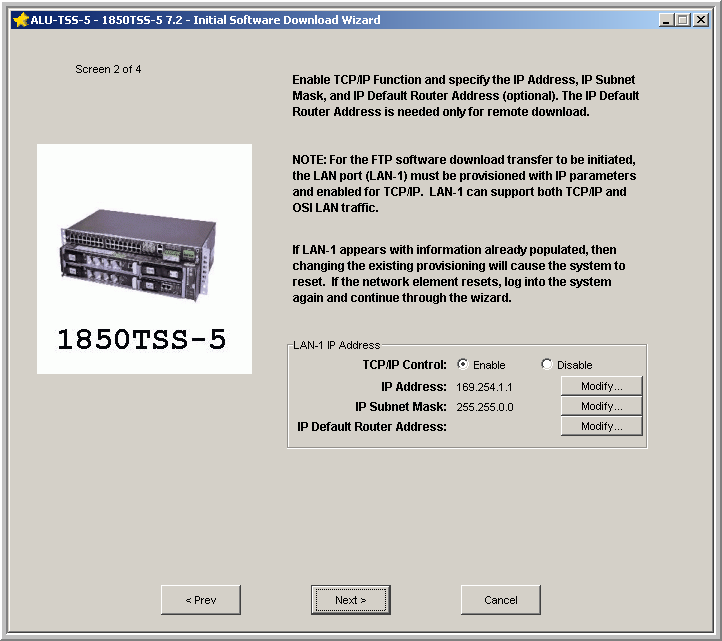
Screen 2 appears.
|
3 |
You will see the IP Address and IP Subnet Mask field populated with the defaults illustrated in Screen 2.
Important!
If TCP/IP Function is enabled, changing an existing IP Address or an existing IP Subnet Mask will cause the shelf to reset and the software download to fail when the provisioning is sent to the system (even if the existing values are the default IP address [169.254.1.1] and subnet mask [255.255.0.0]).
If the port already has information provisioned, DO NOT change the existing provisioning. You must use the IP address provisioned to complete the FTP software download. If you are unable to use the provisioned IP address, proceed to
Procedure 6-3.1: Initial software generic installation using FTAM (5.0 or later boot code).
Click Next.
Note:
LAN-1 is the LAN port on the faceplate of the SYSCTL circuit pack.
Result:
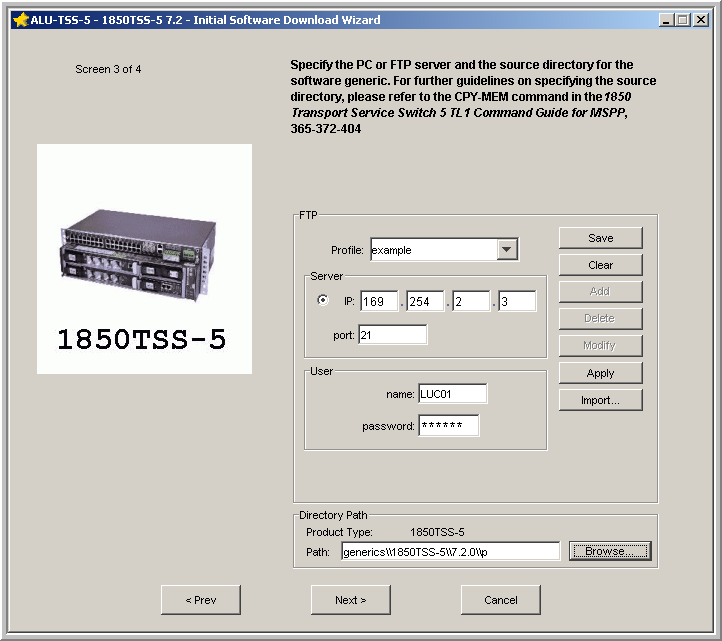
Screen 3 appears.
If the WaveStar® CIT or your PC is your FTP server and you do not know the IP address:
-
Select Run from the Windows Start menu.
-
Type cmd and click OK.
-
Type ipconfig in the resulting command prompt.
-
If there is more than one IP address, determine which connection is used to connect to the NE and record the appropriate IP address.
|
4 |
Follow the directions on Screen 3 to provision the information for your FTP server.
If there is existing FTP profile:
-
Select an existing FTP server from the Profile pull-down menu.
The IP addresses of your FTP server and the LAN port you provisioned on Screen 2 must be in the same subnet, even if you are using the default IP address (169.254.1.1) and subnet mask (255.255.0.0).
Entries to the Profile pull-down menu may be changed using the Modify, Apply, and Save buttons or removed using the Delete button.
-
In the Directory Path panel, enter the current location of the generic to be downloaded in the Path field or use the Browse button (if available) to select the generic. The value of the Path field can be either an absolute path or a relative path that is relative to the FTP server root directory.
-
The absolute path must start with the drive name followed by a colon (:) then the path names; for example: C:/Program Files/Alcatel-Lucent/WaveStar CIT/generics/1850TSS-5/7.2.2/p. If you had an older WaveStar® CIT installed prior to installing the current WaveStar® CIT, your path could start with C:/Program Files/Lucent Technologies/.
-
The relative path must start with the path name; for example: /generics/1850TSS-5/7.2.2/p.
If necessary, replace 7.2.2 with your current release, for example 7.2.3.
If the FTP server is not the WaveStar® CIT, then enter the path starting at the FTP home directory on the server.
-
Click Next.
OR
If you need to enter information for a new profile:
-
In the Server panel, select IP and enter the address of the FTP server. (If the WaveStar® CIT is the FTP server, you can determine its IP address by entering ipconfig from the MS DOS prompt on your PC.)
The IP addresses of your FTP server and the LAN port you provisioned on Screen 2 must be in the same subnet, even if you are using the default IP address (169.254.1.1) and subnet mask (255.255.0.0).
-
If necessary, enter the name (default is blank) of the FTP Server. Defining the name is not required for the download to execute successfully.
-
If necessary, enter the port (default is blank). Defining the port is not required for the download to execute successfully. However, a value of 21 is valid if entered.
-
In the User panel, enter the user name and password for the FTP server. (If you are using the WaveStar® CIT as your FTP server, the default user name/password for the WaveStar® CIT is LUC01/LUC+01, however your user ID/password may be different.)
- If you entered connection information and wish to keep the information for future downloads:
-
Type a new name in the Profile menu.
-
Click Add to add the profile to the list.
-
Click Save to save the list.
-
In the Directory Path panel, enter the current location of the generic to be downloaded in the Path field or use the Browse button (if available) to select the generic. The value of the Path field can be either an absolute path or a relative path that is relative to the FTP server root directory.
-
The absolute path must start with the drive name followed by a colon (:) then the path names; for example: C:/Program Files/Alcatel-Lucent/WaveStar CIT/generics/1850TSS-5/7.2.2/p. If you had an older WaveStar® CIT installed prior to installing the current WaveStar® CIT, your path could start with C:/Program Files/Lucent Technologies/.
-
The relative path must start with the path name; for example: /generics/1850TSS-5/7.2.2/p.
If necessary, replace 7.2.2 with your current release, for example 7.2.3.
If the FTP server is not the WaveStar® CIT, then enter the path starting at the FTP home directory on the server.
-
Click Next.
Result:
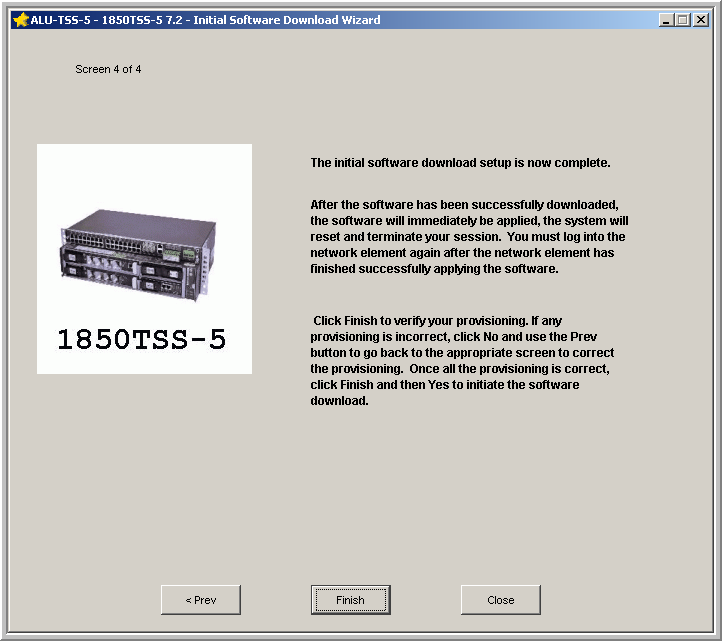
Screen 4 appears.
|
5 |
On Screen 4, click Finish.
Result:
A warning message appears that lists the information you provisioned in the previous screens. Verify that the information is correct and click Yes.
The initial software download is a two-part process, totalling approximately 10 minutes. The first part, download of the software (cpy-mem), takes approximately 5 minutes. The second part, the reset of the shelf and the automatic apply/activation of the downloaded software (apply), takes approximately 5 minutes.
While the transfer is in progress, the following Progress Indicator appears.

If you receive an error stating that FTP is not enabled, click OK. Exit the Initial Software download wizard and proceed to
Procedure 6-3.5: Log in serially and enable FTP and/or OSI on the LAN port.
|
6 |
Do you wish to observe the FTP download progress?
|
7 |
After the download is complete, a completion message appears. Click OK.
Result:
The second part of the initial software download begins, the reset of the shelf and the apply/activation of the downloaded software (apply).
During the automatic reset and the apply, the SYSCTL circuit pack cycles through a series of changes in the LEDs' state:
-
CR/MJ LED extinguishes
-
MN/ABN LED and ACO/TST LED simultaneously light for approximately 12 seconds and then extinguish
-
MN/ABN LED and ACO/TST LED simultaneously light for approximately 8 seconds and then extinguish
-
CR/MJ LED flashes eleven times
-
All LEDs remain extinguished; the reset is complete.
|
8 |
Establish a WaveStar® CIT session and log in to your Alcatel-Lucent 1850 TSS-5 shelf.
Result:
The title bar of the System View and the legal notice should both reflect the current NE software generic, for example 7.2.2.
Reference:
Procedure 6-2: Connect personal computer (PC) and establish WaveStar® CIT session
|
9 |
Were you able to log into the shelf?
|
If... |
Then... |
|
Yes and the Generic Software Version is correct. |
Continue with
Step 10. |
|
Yes and the Generic Software Version is NOT correct. |
Contact your next level of support. |
|
No |
Contact your next level of support. |
|
10 |
Did you have circuit IDs provisioned prior to the replacement?
|
If... |
Then... |
|
Yes and you have a current backup file. |
Proceed to
Note:
When you perform the restore procedure, select RESTORE_CKTID from the Class pull-down menu. This restore option does not reset any device or circuit pack; it is hitless. |
|
Yes but you do not have a current backup file. |
From the System View, select Configuration → Cross-Connections and select "Modify parameters on an existing cross-connection," click Next and follow the Wizard to provision the circuit ID(s). |
|
No |
STOP! End of Procedure. |
End of steps |
 Overview
 Before you begin


