Basic system configuration
The 7705 SAR-Hm series of routers provides basic system configuration support as covered in the following topics:
CLI usage
For general information about CLI usage, see the 7450 ESS, 7750 SR, 7950 XRS, and VSR Classic CLI Command Reference Guide, "Classic CLI overview".
File system management
The 7705 SAR-Hm series routers use the SR OS file system to store files used and generated by the system; for example, image files, configuration files, logging files, and accounting files.
The file commands allow you to copy, create, move, and delete files and directories, navigate to a different directory, and display file or directory contents and the image version. The routers in the 7705 SAR-Hm series use on-board flash memory for storing software images. The file system on the 7705 SAR-Hm series of routers is case sensitive.
For more information about file system management support, see the 7450 ESS, 7750 SR, 7950 XRS, and VSR Basic System Configuration Guide, "File management".
7705 SAR-Hm series file system
The system ships from the factory with the BOF configured with an empty primary-config, and with auto-discover enabled. Files on the integrated flash memory device shows the directory structure and filenames on the integrated flash memory device with the suggested BOF configuration for the primary-config and primary-image files.
The primary-config file is typically located cf3:/config.cfg. Nokia recommends using the directory structure cf3:/TiMOS-SR-m.n.Yz to hold multiple releases. The location and filenames can be changed in the BOF if required.
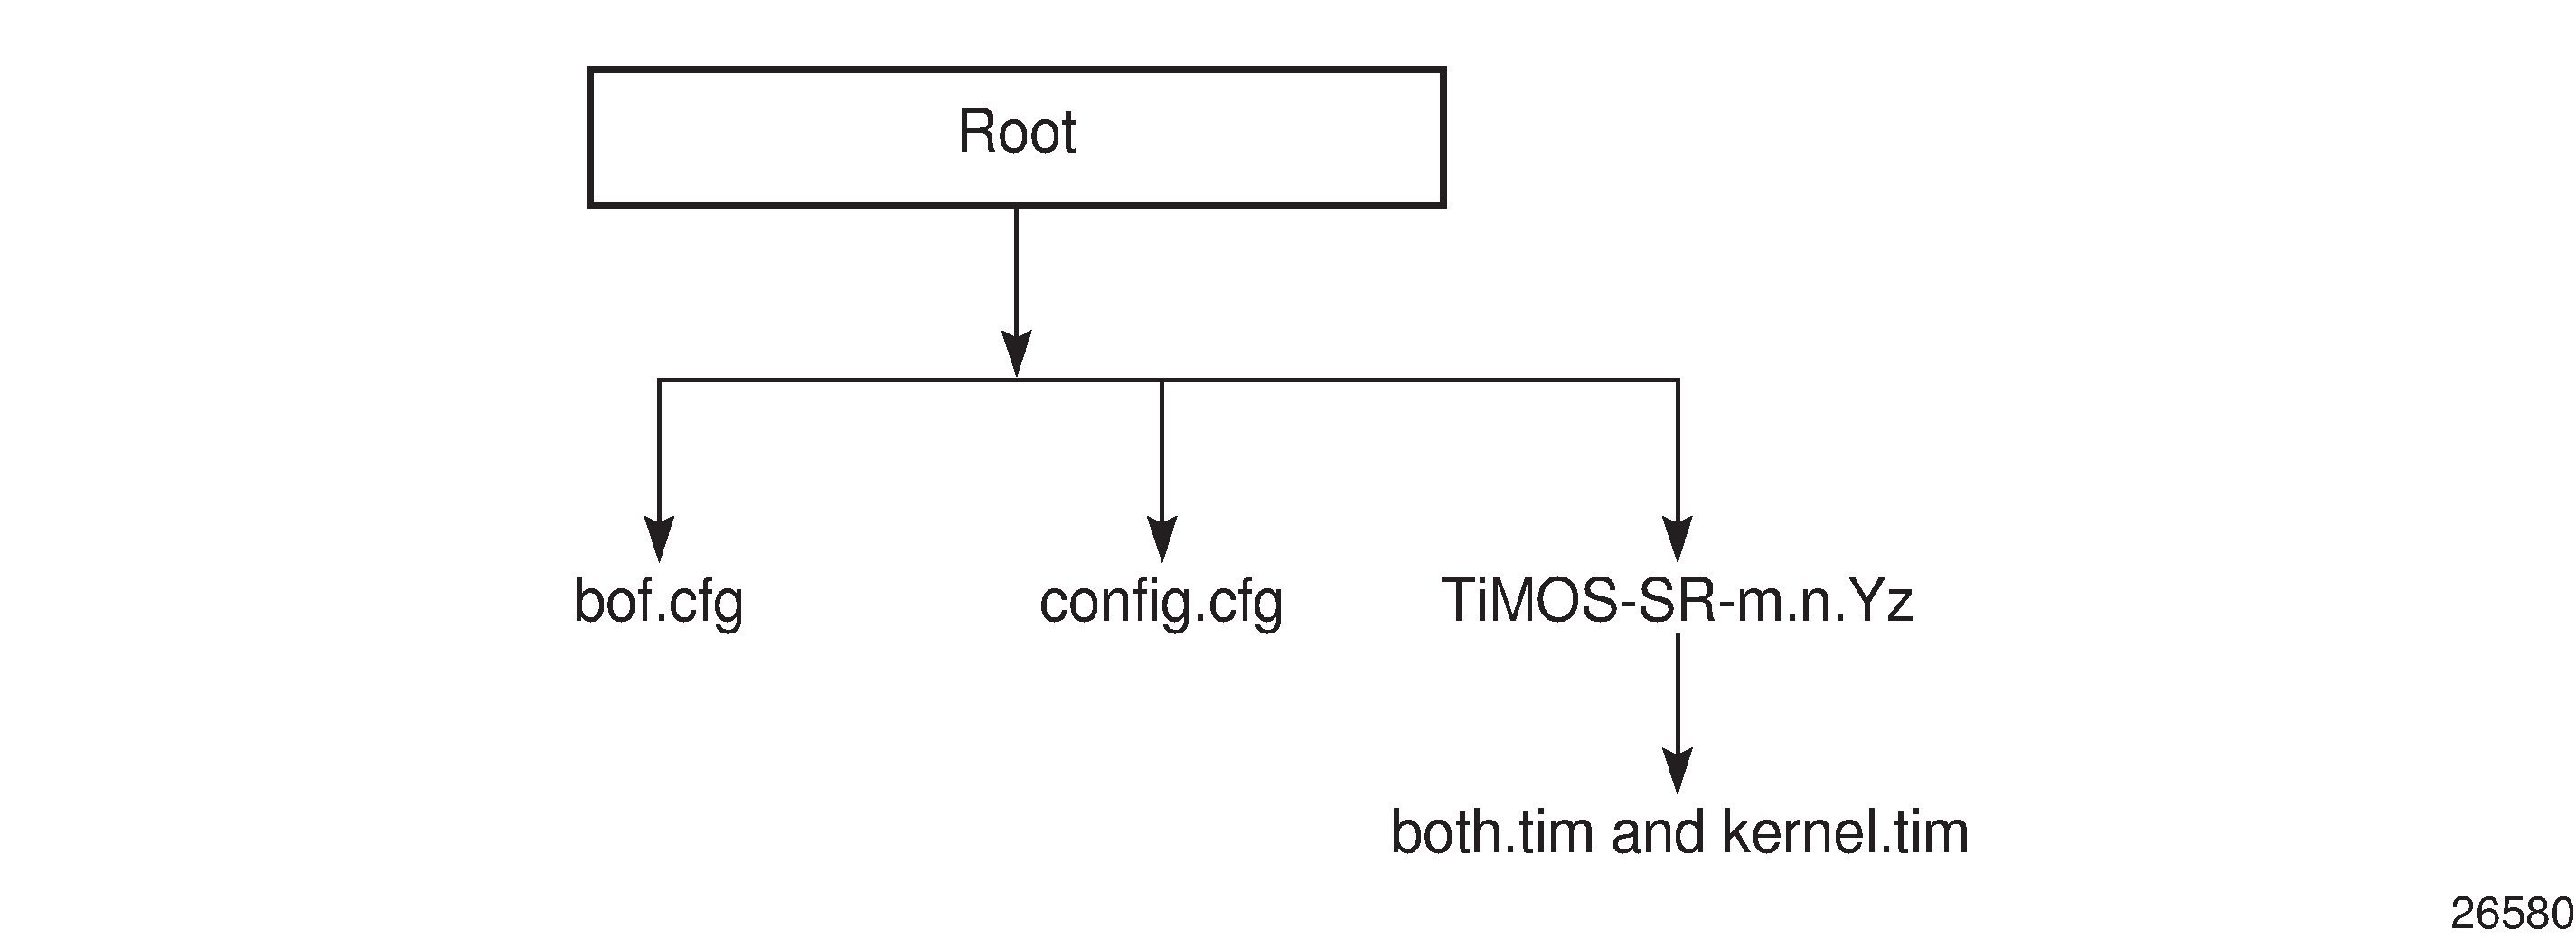
Files on the integrated flash memory device are:
both.tim — application software file
kernel.tim
-
boot.tim
-
vxrom.bin
-
support.bin
-
u-boot.bin
-
fman-ucode.bin
-
mc7475_fw.bin
See the 7705 SAR-Hm and SAR-Hmc Software Release Notes for more information.
See the 7450 ESS, 7750 SR, 7950 XRS, and VSR Basic System Configuration Guide for a full description of the TiMOS file system.
Boot options file
The primary copy of the system software is factory installed on the internal flash drive in directory cf3.
When the node is first powered on, by default the system searches for the bof.cfg file (also known as the BOF file) on the integrated flash. The system reads and executes the system initialization commands configured in the boot option file (BOF).
The BOF in the node is factory configured with Auto Discovery Protocol (ADP-HM) enabled. ADP-Hm starts automatically unless the auto-discover option is disabled.
The default ADP-Hm configuration in the BOF is as follows:
auto-discover private.nokia.nsp.primary.nms
auto-discover private.nokia.nsp.secondary.nms
For example:
*A:Dut-A# show bof
===============================================================================
BOF (Memory)
===============================================================================
    primary-image cf3:/TiMOS-19.10.R1/
 <lines removed...>

    console-speed    115200
    auto-discover    private.nokia.nsp.primary.nms
    auto-discover    private.nokia.nsp.secondary.nms
===============================================================================
*A:Dut-A#
ADP-Hm can be disabled manually by executing the tools>perform>auto-boot terminate command and saving the BOF. See Terminating ADP-Hm for more information.
See the 7450 ESS, 7750 SR, 7950 XRS, and VSR Basic System Configuration Guide, "System Initialization and boot options" for more information about boot options.
ADP-Hm
The Nokia NSP Network Functions Manager - Packet (NSP NFM-P) supports the Auto Discovery Protocol (ADP) process for the node. This process is known as ADP-Hm. The ADP-Hm process provides all initialization and commissioning functions automatically for a newly installed node.
After one or more SIMs have been installed in a 7705 SAR-Hm series node, when the node is powered on for the first time and any required password change has been made (see Prerequisites for ADP-Hm), the ADP-Hm process running on the node configures a cellular port using the SIM in SIM slot 1, establishes connectivity to the NSP NFM-P, and waits for the NFM-P to complete the discovery and configuration of the node.
This section describes the following topics:
See Network Services Platform functional overview for information about NSP NFM-P management functions. See the NSP NFM-P User Guide for more information and procedures to manage the ADP-Hm process.
Prerequisites for ADP-Hm
The prerequisites to allow the ADP-Hm process to automatically discover a 7705 SAR-Hm series router are:
An NSP NFM-P has been procured, installed, and is managing one or more head-end nodes defined for the cellular domain.
A valid SIM card is inserted into SIM slot 1 on the node. For dual SIM operation a second SIM is inserted into SIM slot 2.
For those variants of the 7705 SAR-Hm series node with a unique factory-set password which must be changed at first login, the new password must match the password expected by the NSP NFM-P being used to discover the node during the ADP-Hm process.
The operator has determined whether the one-step or two-step process will be used by the NSP NFM-P and configures it as such.
For each carrier private VPN service associated with each installed SIM, a route exists for the NFM-P from the carrier private VPN service or the private-LTE cellular Evolved Packet Core (EPC) toward the cellular domain head-end node or nodes that have reachability to the NSP NFM-P. These gateway nodes allow new 7705 SAR-Hm nodes running ADP-Hm to reach the NSP NFM-P.
A route for the subnet of the cellular domain nodes exists from the cellular domain head-end node to the new node to be discovered. For initial installation of a cellular domain, IP addresses are typically allocated from a /24 or /18 IP address range and the associated routes can be used. In a dual SIM deployment, there must exist a route for the IP addresses associated with each SIM.
A default Access Point Name (APN) or Virtual Private Network (VPN) service has been procured from the service provider for the SIMs that are installed in the node. If a fixed/static IP address for the IMSI associated with the SIM is required, the address can be allocated in two ways for each SIM:
by direct Home Subscriber Server (HSS) allocation (such as when a mobile carrier assigns IP addresses for the SIM and IMSI).
by a Radius/AAA/DHCP server owned by the enterprise operator. This method uses a process known as deferred IP allocation between the Home Subscriber Server (HSS) and the PGW of the wireless service provider. When the node first connects and authenticates with the HSS of the wireless provider, the default APN associated with the service indicates that the IP allocation is deferred to the enterprise Radius/AAA/DHCP server. After the PGW learns the static IP address from the server, it is sent to the node in the PDP address IE when the default bearer is established.
The PGW to which the node will attach using the SIM in slot 1 is configured with additional Protocol Configuration Options (PCO) for the APN. The PCO must include the following two values:
dns-server-ipv4 primary – for example, config/mobile/pdn/apn/pco/dns-serveripv4 primary
dns-server-ipv4 secondary – for example, config/mobile/pdn/apn/pco/dns-serveripv4/backup
A primary and secondary DNS server (available from a wireless provider or owned by an enterprise operator) are configured to resolve the NSP NFM-P IP primary and backup NSP NFM-P IP addresses.
A SAR-Hm.xml file is loaded on the NSP NFM-P for the cellular domain where the node will reside after discovery. The XML file lists the SIM IMSIs for SIM slot 1 and the node's associated system IP addresses (if specified in the XML file) of each node that needs to be discovered. In a dual SIM deployment, the SIM in slot 2 is not referred to in this XML file. See the NSP NFM-P User Guide for more information about configuring cellular domains and the associated XML files.
The operator has enabled ADP-Hm on the NSP NFM-P for the associated prefix addresses of the nodes to be discovered using ADP-Hm in the cellular domain.
The ADP-Hm process
The following sections describe the three phases of the ADP-Hm process:
Network discovery (phase 1)
When the node boots up initially, it runs the application load, executes the config file (which is empty), and then checks the BOF to determine if ADP-Hm needs to run. If ADP-Hm is enabled, the ADP-Hm process starts and performs the tasks listed below.
The ADP-Hm process initializes the cellular port that uses SIM1 for PDN connectivity using the default PDN profile, which has a blank APN. When the cellular port attempts to connect to the network, it uses this PDN profile. If the carrier requires an APN other than the default in order for the cellular port to connect to the network, the cellular port can learn the correct APN from the network if the carrier supports that capability. If the carrier does not support devices learning the APN but requires an APN other than the default, then the operator must configure a PDN profile at the system level with the correct APN and assign that PDN profile to cellular port 1/1/1. See the 7705 SAR-Hm and SAR-Hmc Interface Configuration Guide for details about configuring a PDN profile and assigning it to a cellular port.
After the cellular port connects to the network, ADP-Hm assigns the name pdn1-sim1 to the PDN router interface. The name of the router interface must not change during the ADP-Hm process. The PDN router interface can operate in one of three modes. ADP-Hm uses the dynamic cellular interface IP mode of operation. See Dynamic cellular interface IPv4 mode for more information.
The ADP-Hm process creates a loopback interface with a default name for the PDN interface (such as "pdn1-loopback"). No IP address is assigned to the loopback because it is operating in dynamic cellular interface IP mode.
The ADP-Hm process uses this loopback interface as the unnumbered interface for the PDN router interface
The following CLI output shows the resulting configuration:
configure router
        interface "pdn1-loopback"
            loopback
            no shutdown
         exit
        interface "pdn1-sim1" pdn
             port 1/1/1
             unnumbered "pdn1-loopback"
             no shutdown
         exit
    exit
exit
If the LTE network authenticates and accepts the new node onto the network, a default bearer is established and the following information is provided to the node for the APN to which the node connects:
the IP address of the cellular interface
the DNS server IP addresses
The configuration is not saved. (Phase 2) NSP NFM-P Discovery begins.
NSP NFM-P discovery (phase 2)
During the NSP NFM-P discovery phase the node sends DNS query messages to the DNS server addresses discovered from the previous phase. The node then learns the IP addresses of the NSP NFP-P and sends SNMP traps toward the NSP NFP-P.
The following NSP NFM-P URL names are set for the auto-discovery command in the BOF by default:
- auto-discover private.nokia.nsp.primary.nms
- auto-discover private.nokia.nsp.secondary.nms
-
another appropriate name, if required
-
an IP address (which eliminates the requirement for a DNS server)
The node sends the DNS query message every 5 seconds until a DNS query response message is received with a valid IP address for the primary and secondary NSP NFM-P.
One IP address is required for the ADP-Hm process to continue to the next phase. If no DNS query response message is received, ADP-Hm will time-out and reboot the node. After reboot, the ADP-Hm process restarts from the beginning of Network Discovery (Phase 1).
After either the NSP NFM-P primary or secondary IP addresses are known by the node, the NSP NFM-P performs the following:
SNMPv2 trap destinations are set to the NSP NFM-P IP addresses. Log 1 is used to set up the trap destinations.
ADP-Hm enables NETCONF (note that SSHv2 is enabled by default on the node). ADP-Hm searches the user database for a user with access to NETCONF. If no user exists, NETCONF access is granted to the default user "admin".
The node initiates an SNMP trap poll that sends a "Hello" notification trap message to the NSP NFM-P every 15 seconds.
The node waits for the NSP NFM-P to process the Hello request and then ADP-Hm starts the NSP NFM-P Configuration (Phase 3).
NSP NFM-P configuration (phase 3)
In the third phase, the NSP NFM-P secures the node and carries out the remaining commissioning steps on the node.
Throughout this phase, the node sends an SNMPv3 trap to the NSP NFM-P every15 seconds until the NSP NFM-P executes the tools>perform>auto-boot complete command.
There are two process options available on the NSP NFM-P during this phase. (See the NSP NFM-P user guides for more information about these options.)
1) One-step process – the NSP NFM-P performs all discovery and configuration activities on the node in one step. This allows ADP-Hm to run at the site location from start to finish. After Phase 3 is complete, the node is fully managed and secured. For more information about the one-step process, see One-step process details.
2) Two-step process – the NSP NFM-P configures critical security parameters on the node in the first step where operators can monitor progress in a DMZ or staging facility. After step one, the node is secured and fully managed by the NFM-P.
The node is transported to the installation site where the operator performs the second step. When the node is installed and powered on, the NSP NFM-P completes the network-level configuration for the node. The NSP NFM-P configures such things as default tunnels and services to the head-end nodes, or optionally adds the node to an existing network group encryption (NGE) domain. For more information about the two-step process, see Two-step process details.
One-step process details
In the one-step process, the node is powered on and ADP-Hm completes the entire discovery and configuration of the node in one step.
The NSP NFM-P uses NETCONF over SSHv2 to configure SNMPv3 parameters, including the users and security encryption and authentication keys for SNMPv3. This information is based on the mediation policy configured for the cellular domain in the NSP NFM-P.
The NSP NFM-P then completes the configuration of the node. The following list summarizes the actions that the NSP NFM-P performs on the node:
Creates a strict security association between the chassis information, IMEI, and the SIM in SIM slot 1. After this association is made, the SIM cannot be inserted into another node and managed by the NSP NFM-P without operator intervention to instruct the NSP NFM-P to create a new association between the SIM and a new chassis.
Configures usernames and passwords, scope of control, and associated profiles.
Configures PDN profiles that are used to connect to the cellular network after ADP-Hm is complete. If dual SIM is enabled for the cellular domain in the NSP NFM-P, then the second cellular port and PDN router interface is configured.
Downloads the required radio firmware version for SIM 1 and if dual SIM is enabled, it downloads the radio firmware version for SIM 2. The NSP NFM-P resets the radio so that SIM 1 uses the latest downloaded version.
Downloads the required software load and resets the node to use the latest version of the software.
Downloads the NGE key-group of the NGE domain associated with the cellular domain if the node is to enter the NGE domain. The PDN router interface is also configured with the key-group needed to enter the NGE domain.
If the cellular mode is Static Cellular Interface IP Mode or Dynamic Cellular Interface IP Mode, the NSP NFM-P performs the following configurations toward the head-end nodes of the cellular domain to establish an in-band management service. (For more information, see the Static cellular interface IPv4 mode, and Dynamic cellular interface IPv4 mode sections in this guide.)
Configures a BGP session to each head-end node in the cellular domain that is associated with the first cellular network. The BGP sessions are configured with the PDN router interface associated with SIM 1.
Configures a BGP session to each head-end in the cellular domain that is associated with the second cellular network when two SIMs are required. The BGP sessions are configured with the PDN router interface associated with SIM 2.
Configures an in-band management VPRN service used by the NSP NFM-P to manage the node in-band over the GRE-IMPLS tunnels over the cellular network. This VPRN service can optionally be NGE encrypted to provide an additional layer of security when managing nodes.
If dual SIM is enabled for the cellular domain, the NSP NFM-P performs a manual SIM switch to enable cellular service using the second SIM. It then confirms that the second cellular network and the in-band management VPRN service are working correctly. After the second SIM is verified, the NSP NFM-P performs another manual SIM switch and enables cellular service using the first SIM, as was used throughout the ADP-Hm process.
The NSP NFM-P is responsible for saving the configuration after the actions listed above are executed, and may save the configuration several times over the course of executing them.
After the above actions are completed, the NSP NFM-P stops the ADP-Hm process by executing tools>perform>auto-boot complete command.
NSP NFM-P then disables ADP-Hm so that the discovery process no longer runs; the NSP NFM-P does so by setting the no auto-discover command in the BOF and by clearing all DNS entries, if multiple entries existed.
The system and alarm status LEDs are set and the node is ready for further services configuration. For a description of how LEDs indicate the node status during the ADP-Hm process, see LED operation during the ADP-Hm process.
Two-step process details
In the two-step process, the node is powered on first in a staging area or DMZ for initial NSP NFM-P security configurations, and then powered on a second time at the final site location to complete the commissioning process. The steps are as follows:
-
The node is powered on for the first time and items 1) to 5) as described in the One-step process details are executed by the NSP NFM-P. The NSP NFM-P then issues the tools>perform>auto-boot complete command to indicate that step one is complete and to stop the ADP-Hm process on the node. The system Status LED on the node turns solid green and the Alarm LED continues to blink, indicating that step one has completed and the node can be powered off and shipped to the site for final installation. For more information, see LED operation during the ADP-Hm process.
-
The node is powered on for the second time. Because the BOF is set to "auto-discover" it sends SNMPv3 traps to the NSP NFM-P to indicate that the ADP-Hm process is resuming. The NSP NFM-P resumes the ADP-Hm process and items 6) to 8) as described in the One-step process details are executed. The NSP NFM-P then saves the configuration and completes the ADP-Hm process. The system Status and Alarm LEDs indicate that ADP-Hm is complete.
The Console during the ADP-Hm process
The Console port can be used to establish a CLI session on a 7705 SAR-Hm series node so that the progress of the ADP process can be monitored. For information about using the Console port to establish a CLI session, see the SAR-Hm and SAR-Hmc Chassis Installation Guide, "Establishing a console connection".
During ADP, the node may reset periodically. The Console session is lost during reset and you must log in to the node again.
You can use the tools>perform>auto-boot command to monitor the ADP process.
In the following example, no ports on the router have been discovered yet.
*A:Dut-A# tools dump auto-boot
===============================================================================
Automated-Provisioning
===============================================================================
Status          : Connecting-To-Network
Failures        : None

Start Time      : TUE MAR 07 17:12:22 2023
End Time        : Never

NMS         (1) : Not Configured
NMS         (2) : Not Configured
-------------------------------------------------------------------------------
Registered Ports
-------------------------------------------------------------------------------
1/1/1                                                        WAITING-FOR-NETWORK
During ADP, show commands can be used to monitor the interface discovery processes. For example, you can use the show port 1/1/1 to verify the status of the cellular port.
A:Dut-A# show port 1/1/1
===============================================================================
Cellular Interface
===============================================================================
Description       : Cellular
Interface         : 1/1/1                IfIndex           : 35684352
Admin State       : up                   Oper State        : up
IMEI              : 00-102700-033329-6
Network Status    : registered-home      Radio Mode        : lte
Band              : 4                    Channel           : 2175
RSSI              : -85 dBm              RSRP              : -84 dBm
Tracking Area Code: 0001                 Cell Identity     : 00000101
-------------------------------------------------------------------------------
SIM Card
-------------------------------------------------------------------------------
SIM Card 1        : installed
Locked            : no                   PIN status        : ready
PIN retries left  : 3                    PUK retries left  : 10
ICCID             : 89442016100100000205 IMSI              : 001001000000020
SIM Card 2        : not installed
-------------------------------------------------------------------------------
Packet Data Network
-------------------------------------------------------------------------------
PDN State         : connected            IP Address        : 10.99.16.53
Primary DNS       : 8.8.8.8              Secondary DNS     : 4.4.4.4
APN               : internet
===============================================================================
===============================================================================
Port Statistics
===============================================================================
                                                   Input                 Output
-------------------------------------------------------------------------------
Packets                                                1                      0
Discards                                               0                      0
Unknown Proto Discards                                 0
LED operation during the ADP-Hm process
The system Status and Alarm LEDs indicate the current status of the node during the ADP-Hm process. LED operations during the ADP-Hm process describes LED operation during the ADP-Hm process.
ADP-Hm status/phase |
Status |
Alarm |
|---|---|---|
Before ADP-Hm starts |
Green (blinking): Indicates that the system is booting up the TiMOS image and running hardware and software diagnostics |
— |
Network discovery |
Green (blinking) |
Amber (one blink followed by a pause). The LTE/3G interface LEDs are also active and provide feedback about the LTE interface (showing link status and signal strength). For more information, see the SAR-Hm and SAR-Hmc Chassis Installation Guide, "7705 SAR-Hm LEDs". |
NSP NFM-P discovery |
Green (blinking) |
Amber (two blinks followed by a pause then repeats). |
NSP NFM-P configuration |
Green (blinking) |
Amber (three blinks followed by a pause, then repeats): This blinking occurs during the one-step or two-step process during the NSP NFM-P configuration phase. |
Green (solid): Indicates that the ADP-Hm process has completed step one of the two-step process and the system is ready to be powered down, installed at its final location and powered back up to complete step two of the two-step process. |
||
ADP-Hm complete |
Green (solid): Indicates one of the following:
|
The Alarm LED displays the current alarm state. For more information, see the SAR-Hm and SAR-Hmc Chassis Installation Guide, "7705 SAR-Hm LEDs". |
Terminating ADP-Hm
ADP can be disabled manually by executing the bof no auto-discover command and saving the BOF.
To terminate ADP-Hm:
-
Perform one of the following:
-
At boot up, the system displays a warning and a prompt about terminating Auto-Discovery. Type y to terminate Auto-Discovery. For example:
WARNING: Auto-discovery is currently running on this system. It is recommended that Auto-Discovery be terminated before making configuration changes using this session; otherwise, any changes made during this process may result in Auto-Discovery failing to complete successfully and/ or lost configuration. Do you wish to terminate Auto-Discovery (y/n?) y -
Use the tools>perform>auto-boot terminate command. For example:
tools# perform auto-boot terminate
-
-
Reboot the node. After reboot, the warning message disappears and auto-discovery is removed from the BOF. For example:
*A:Dut-A# show bof
===============================================================================
BOF (Memory)
===============================================================================
    primary-image cf3:/TiMOS-19.10.R1/

 <lines removed...>

    console-speed    115200
===============================================================================
*A:Dut-A#
Basic system management
For general information about basic system management support, see the following topics in the 7450 ESS, 7750 SR, 7950 XRS, and VSR Basic System Configuration Guide, "System management":
-
System management commands
-
System information
-
System time
-
Time zones
-
NTP
-
-
-
Administrative tasks
-
Saving configurations
-
Specifying post-boot configuration files
-
-
System router instances
-
System configuration process overview
-
General configuration notes
-
Configuring system management features
-
Basic system configuration
-
Common configuration tasks
BOF and configuration file encryption
The 7705 SAR-Hm series of routers provides operators the option to encrypt the BOF and configuration files. For information, see the 7450 ESS, 7750 SR, 7950 XRS, and VSR Basic System Configuration Guide, "BOF and configuration file encryption".
Network Services Platform functional overview
The Nokia Network Services Platform (NSP) is a group of interoperating network management modules that provide comprehensive end-to-end management of a wide range of network domains and topologies.
The Nokia NSP Network Functions Manager - Packet (NSP NFM-P) is used to discover, configure, and manage the nodes and related cellular domains. The NSP NFM-P provides the following specific functions. (See the NSP NFM-P User Guide for more information.)
creates and manages the cellular domains. A cellular domain is a group of nodes where each node in the group connects to the same head-end nodes, shares the same deployment modes of operation, and is part of the same NGE domain. For more information about deployment modes of operation, see the PDN router interfaces section of this guide.
drives the ADP-Hm process for each new node to be discovered in a cellular domain. For static cellular interface IP and dynamic modes of operation, the NSP NFM-P creates a management VPRN service for in-band management of each node.
manually adds or removes nodes to and from cellular domains
supports the XML input lists of the SIM IMSI values that are expected to participate in the cellular domain and initiate the ADP-Hm process within the cellular domain. These lists include the SIM information and optionally, the system IP for node boot-strap process.
creates a security association between the SIM, IMEI, and the chassis identifier for each node being managed such that unexpected changes are flagged as potential security violations to the operator.
supports a configurable NSP NFM-P polling interval for nodes. Configurable polling is intended to minimize traffic between the NSP NFM-P and a large-scale deployment of nodes. To that end, the NSP NFM-P also polls the status of the BGP sessions between head-end nodes and the nodes in the cellular domain in order to monitor the reachability and status of the nodes in the cellular domain.
Debug commands
The 7705 SAR-Hm series of routers supports debug commands that enable detailed debug information for various protocols.
Debug output is generally displayed by configuring a log using from debug-trace.
The currently enabled debug can be seen using the show debug command.
A debug configuration does not persist when the router reboots. The admin debug-save command can be used to save the debug configuration. The resulting file can be exec'ed later as needed.
Individual debug commands are described in the 7450 ESS, 7750 SR, 7950 XRS, and VSR Classic CLI Command Reference Guide.
Tools commands
The 7705 SAR-Hm series of routers supports tools commands. The tools commands provide two primary functions: dump and perform.
The tools dump commands are used to provide additional detailed and enhanced information about various aspects of the router.
The tools perform commands provide the ability to trigger a variety of actions on the router.
Individual tools commands are described in the 7450 ESS, 7750 SR, 7950 XRS, and VSR Clear, Monitor, Show, and Tools CLI Command Reference Guide.