Node management
- bootstrapping and related procedures
- background information about zero-touch provisioning (ZTP)
- how to display information about and interact with nodes using the following
views from the Nodes section from the
Main menu of the EDA UI:
- Resources view
- Deleted Resources view
- Discovered Resources view
Bootstrapping
The Init application generates an initial configuration file for nodes
that require bootstrapping. The input to the Init application is an
Init resource, which specifies which TopoNodes to select and for
which toponodes to create an initial configuration.
The initial configuration file is stored in the artifact server. When nodes connect to NPP, NPP pushes the initial configuration file to the node.
Additionally, the Init application generates the Python provisioning
script for SR Linux and bootstrap files needed for SR OS or other operating systems.
Based on the same selection criteria, a bootstrap file or Python provisioning script is
generated for the selected nodes.
The bootstrap file or Python provisioning script ensures that the node boots into the version specified in the TopoNode. The software and any other artifacts are downloaded to the node during ZTP using HTTP/HTTPS.
By default, if no TopoNode selectors are present in the Init resource,
an initial configuration file is generated for every TopoNode present in EDA.
Management interface IP address assignment
The Init resource allows you to configure the management interface
IP assignment method using DHCP or by defining static IP addresses. For details, see
Enabling DHCP clients and Setting static management IP addresses.
Saving node configuration on commit
To specify whether the node configuration is saved after each commit or not, in the
Init CR include the entry commitSave: true.
The Init script must reflect the commitSave value
in the generated initial configuration.
Preparing for bootstrapping
Ensure that you meet the following requirements:
-
The NodeSecurityProfile resource (for TLS) must be configured to ensure successful onboarding. For details, see Node security profile.
-
A node requires the relevant
EDA-CE licenseresource to be applied. Without this license, the node may not move to the READY state.apiVersion: core.eda.nokia.com/v1 kind: License metadata: name: eda-license namespace: eda-system spec: enabled: true data: "ACoAgOlJq7AABoAU6V6W6XAERezbcYa+ZRZLg8M5IyqMgAABAATAEVEQS1bQkNdLTAuMC4qAAACABIATm9raWEuY29tLOVEQQAAAMAAMQCjorJ+SPKP3if9pcD3OhqlyaWK1VE89JWreOWkyOJcbIWO602C+iwp+FFp8AwAAAADAB4ARWRhIGxpY2Vuc2UgSW50ZXJuYWwgVGVzdAAAAAUAHADl0zNnAAAAAABgKWcAAAAAADohaAAAAADAACQAoKr6XCCQCZj1rWFYik1dGbiqG7TWRK2orh+0sjUKXNYBACkAMDAwMDAwMDAtMDAwMC0wMDAwLTAwMDAtMDAwMDAwMDAwMDAwAAAAAAYADAABAAQAAAAAAMAAMAC/KQqX7Di/m1d0zYz9quIyghaHatF0yDvDgK/fFr011Wa/7FN3LO/OoD3aHg8AXQFkOEh6ejQrTlFyNmVJNTNsVW9SMi9JV2xXd1NqMUF3QVh0eEd6LzhGdlp0WXphTkdOQ1RWRnNCQ3wwZ0p2b21pSDNiZHFTSFBYQ2R6d0xxVlNhM3FZZUZuL1BGMnhoSjN6OS8yS3RlVGpmUngreWFNS1NwZ0p5OE12YlBVbmw2TUFpNHRXR1g4U3R0WXFBN21uVUNhVHp5eXpLOWtXcWgwZVZtR1oyV09RTURML0thaWY1RGMva21tc0NVY042RUdNZUNiTmdvV2RKUFlXZ1o4c2hlaG03b2tsZHdsSDBxMXZWdjhHMjZ4OVUxbTd2ellBN3BDNkFXODJyZ3FsaExWTUJxYm11VDdKSzdPWWhzYVp4Q3h4a2lIbWZ5KytNY3FLVHFBUk1McWhYRzRIb290ME0xK1RaRVZTdUJKNFl5a3pkeHdVV3pGZGRZdjg5Ym5uUHBsdXc9PQAAAAA=" If the deployment uses EDA DHCP for bootstrapping, the
GlobalConfigandUdpProxyCRs may be needed.Following is an example ofFollowing is an example of aGlobalConfigresource:apiVersion: v1 items: - apiVersion: core.eda.nokia.com/v1 kind: GlobalConfig metadata: name: global namespace: eda-system spec: dhcp: domainName: mv1-3.dclab.nuq.ion.nokia.net httpPort: 9200 httpsPort: 9443 ipv4Address: 10.11.12.13 ipv6Address: 3001:cafe:11::2 kind: List metadata: resourceVersion: ""UdpProxyresource:apiVersion: v1 items: - apiVersion: core.eda.nokia.com/v1 kind: UdpProxy metadata: annotations: config.k8s.io/owning-inventory: aeb8a5709fd9a90c89d3d3dcc1d9c3817f2618ae-1732279916926223978 kubectl.kubernetes.io/last-applied-configuration: > {"apiVersion":"core.eda.nokia.com/v1","kind":"UdpProxy","metadata":{"annotations":{"config.k8s.io/owning-inventory":"aeb8a5709fd9a90c89d3d3dcc1d9c3817f2618ae-1732279916926223978"},"name":"eda-dhcp","namespace":"eda-system"},"spec":{"bufferSize":65535,"destHost":"eda-dhcp","destPort":67,"idleTimeout":60,"proxyPort":67}} name: eda-dhcp namespace: eda-system spec: bufferSize: 65535 destHost: eda-dhcp destPort: 67 idleTimeout: 60 proxyPort: 67 - apiVersion: core.eda.nokia.com/v1 kind: UdpProxy metadata: annotations: config.k8s.io/owning-inventory: aeb8a5709fd9a90c89d3d3dcc1d9c3817f2618ae-1732279916926223978 kubectl.kubernetes.io/last-applied-configuration: > {"apiVersion":"core.eda.nokia.com/v1","kind":"UdpProxy","metadata":{"annotations":{"config.k8s.io/owning-inventory":"aeb8a5709fd9a90c89d3d3dcc1d9c3817f2618ae-1732279916926223978"},"name":"eda-dhcp6","namespace":"eda-system"},"spec":{"bufferSize":65535,"destHost":"eda-dhcp6","destPort":547,"idleTimeout":60,"proxyPort":547}} name: eda-dhcp6 namespace: eda-system spec: bufferSize: 65535 destHost: eda-dhcp6 destPort: 547 idleTimeout: 60 proxyPort: 547 kind: List metadata: resourceVersion: ""- The init and relevant images must be downloaded to the artifacts server.
The following resource must be present:
apiVersion: v1
kind: Secret
metadata:
  name: srl-node-cred
  namespace: eda
type: Opaque
data:
  username: YWRtaW4=
  password: Tm9raWFTcmwxIQ==
---
apiVersion: v1
kind: Secret
metadata:
  name: srl-ftp-cred
  namespace: eda
type: Opaque
data:
  username: ZnRwdXNlcg==
  password: U2ghbmluZyR0YXIxIQ==
---
apiVersion: artifacts.eda.nokia.com/v1
kind: Artifact
metadata:
  name: srlinux-24.10.1-492
  namespace: eda
spec:
  repo: images
  filePath: srl.bin
  remoteFileUrl:
    fileUrl: ftp://10.10.10.10/eda/srl_images/srlinux-24.10.1-492.bin
  secret: srl-ftp-cred
---
apiVersion: artifacts.eda.nokia.com/v1
kind: Artifact
metadata:
  name: srlinux-24.10.1-492-md5
  namespace: eda
spec:
  repo: images
  filePath: srl.bin.md5
  remoteFileUrl:
    fileUrl: ftp://10.10.10.10/eda/srl_images/srlinux-24.10.1-492.bin.md5
  secret: srl-ftp-cred
---
apiVersion: artifacts.eda.nokia.com/v1
kind: Artifact
metadata:
  name: sros-iom-24-10-r4
  namespace: eda
spec:
  repo: images
  filePath: iom.tim
  remoteFileUrl:
    fileUrl: ftp://10.10.10.10/fsp/sros_images/24.10.r4/iom.tim
  secret: srl-ftp-cred
---
apiVersion: artifacts.eda.nokia.com/v1
kind: Artifact
metadata:
  name: sros-both-24-10-r4
  namespace: eda
spec:
  repo: images
  filePath: both.tim
  remoteFileUrl:
    fileUrl: ftp://10.10.10.10/fsp/sros_images/24.10.r4/both.tim
  secret: srl-ftp-cred
---
apiVersion: artifacts.eda.nokia.com/v1
kind: Artifact
metadata:
  name: sros-support-24-10-r4
  namespace: eda
spec:
  repo: images
  filePath: support.tim
  remoteFileUrl:
    fileUrl: ftp://10.10.10.10/fsp/sros_images/24.10.r4/support.tim
  secret: srl-ftp-cred
---
apiVersion: artifacts.eda.nokia.com/v1
kind: Artifact
metadata:
  name: sros-cpm-24-10-r4
  namespace: eda
spec:
  repo: images
  filePath: cpm.tim
  remoteFileUrl:
    fileUrl: ftp://10.10.10.10/fsp/sros_images/24.10.r4/cpm.tim
  secret: srl-ftp-cred
---
apiVersion: artifacts.eda.nokia.com/v1
kind: Artifact
metadata:
  name: sros-kernel-24-10-r4
  namespace: eda
spec:
  repo: images
  filePath: kernel.tim
  remoteFileUrl:
    fileUrl: ftp://10.10.10.10/fsp/sros_images/24.10.r4/kernel.tim
  secret: srl-ftp-cred
---
Enabling DHCP clients
To enable the IPv4 and IPv6 DHCP clients on the management interface, in the
Init resource, include the following entries in the mgmt
context:
ipv4DHCP: true
ipv6DHCP: true
mgmt section, by default, both ipv4DHCP and
ipv6DHCP are set to true. Optionally, you can also
set the IP MTU, as shown in the following
example:apiVersion: bootstrap.eda.nokia.com/v1alpha1
kind: Init
metadata:
name: init-config
spec:
nodeSelector:
- 'eda.nokia.com/role=leaf'
- 'eda.nokia.com/role=spine'
- 'eda.nokia.com/role=borderleaf'
- 'eda.nokia.com/role=superspine'
- 'eda.nokia.com/role=backbone'
mgmt:
ipv4DHCP: true
ipv6DHCP: true
ipMTU: 9000ipv4DHCP or ipv6DHCP
parameters are set to true, the settings are not reflected in the DHCP
client-related config in BOF for SR OS.Setting static management IP addresses
To set the management IP address statically, the init script must
use the productionAddress setting from the Toponode
resource as the IPv4 or IPv6 address in the generated configuration.
The init script sets the address as either IPv4 or IPv6 and sets the prefix length.
The table below displays the different combinations of ipv4DHCP,
ipv6DHCP and productionAddress settings and the
corresponding resulting initial configuration.
| Init resource | TopoNode setting | Result |
|---|---|---|
ipv4DHCP: true
|
* | The management interface IPv4 client is enabled in the initial configuration. |
ipv6DHCP: true
|
* | The management interface IPv6 client is enabled in the initial configuration. |
ipv4DHCP: false
|
IPv4 productionAddress is set | The production address is set as the IPv4 address of the management interface in the initial configuration. |
ipv4DHCP: false
|
IPv6 productionAddress is set | The IPv4 address is left unset in the initial configuration and the IPv4 DHCP client is not enabled. |
ipv6DHCP: false
|
IPv4 productionAddress is set | The IPv6 address is left unset in the initial configuration and the IPv6 DHCP client is not enabled. |
ipv6DHCP: false
|
IPv6 productionAddress is set | The production address is set as the IPv6 address of the management interface in the initial configuration. |
ipv4DHCP: false
ipv6DHCP: false
|
productionAddress is not set | Results in an error; add productionAddress to TopoNode or enable a DHCP client. |
Static Routes
Init CR, specify an IP prefix and
a next hop. The Init script adds static routes to the management
network instance. For
example:apiVersion: bootstrap.eda.nokia.com/v1alpha1
kind: Init
metadata:
name: init-config
spec:
nodeSelector:
- 'eda.nokia.com/role=leaf'
- 'eda.nokia.com/role=spine'
- 'eda.nokia.com/role=borderleaf'
- 'eda.nokia.com/role=superspine'
- 'eda.nokia.com/role=backbone'
mgmt:
ipv4DHCP: true
ipv6DHCP: true
ipMTU: 9000
staticRoutes:
- prefix: 10.10.0.0/16
nextHop: 172.16.255.29
- prefix: 2001:10:10::/64
nextHop: "200::"Zero-touch provisioning
Zero Touch Provisioning (ZTP) allows for a device to be installed in a rack, powered on, and without any additional input from an operator, boot up, pull down the software version of its operating system, an initial configuration and any other boot artifacts required for it to be managed.
Most ZTP implementations rely on DHCP to provide an IP address to the DUT and use DHCP options to inform the DUT of the location of any boot artifacts it requires to complete its ZTP process. In SR Linux, the DHCP server provides the URL of a Python provisioning script which is then used by the DUT to perform actions such as software upgrade and applying an initial configuration. In SR OS, the DHCP server provides a URL to a provisioning file which is a text file containing URLs to software images and configuration files.
For devices running SR OS and SR Linux, the devices send a DHCP Discover message with option 61 (client-id) set to the chassis serial number. This setting is used on the DHCP server to associate a DHCP discover message with a specific DUT and allows for the DHCP server to allocate static DHCP leases (IP addresses) and potentially device-specific boot artifacts (Python script or boot file).
- Use of an internal DHCP server (hosted and managed by EDA)
- Use of an external DHCP server (hosted and managed outside of EDA)
To serve the boot artifacts (Python script, boot file, software, or any other files needed during the bootstrapping process), an artifact server must be present in EDA. An intent is used to allow for artifacts to be added to the server, which is then retrieved by the devices during boot.
DHCP server
In deployments that use EDA to handle ZTP in its entirety, a DHCP server is required to provide IP addresses to devices.
When a device issues a DHCP discovery message, the client-id option (61) attribute
includes their chassis serial number. This serial number is used to associate real
devices with node objects in EDA. Additionally, an IP address is assigned to device
via a Target object.
The DHCP server must support the following capabilities:
- Static lease assignment using the client-id (option 61) as the binding between an IP address and a device
- Ability to receive DHCP packets from a DHCP relay (the DHCP relay between the devices and the DHCP server)
- When providing an IP address to the device, the DHCP server must be able to populate option 66 or 67 in the DHCP offer. This option provides HTTPs. The URL points to the ZTP provisioning script or boot file hosted on the artifact server.
- Ability to populate other options as required by the operator, for example:
- Router option 3
- Time Server option 4
- Name Server option 5
- Domain Server option 6
- Log server option 7
- Support both IPv4 and IPv6 IP addressing
Node Resources page
The Node Resources view shows all the nodes known to the EDA system that are associated with a fabric.
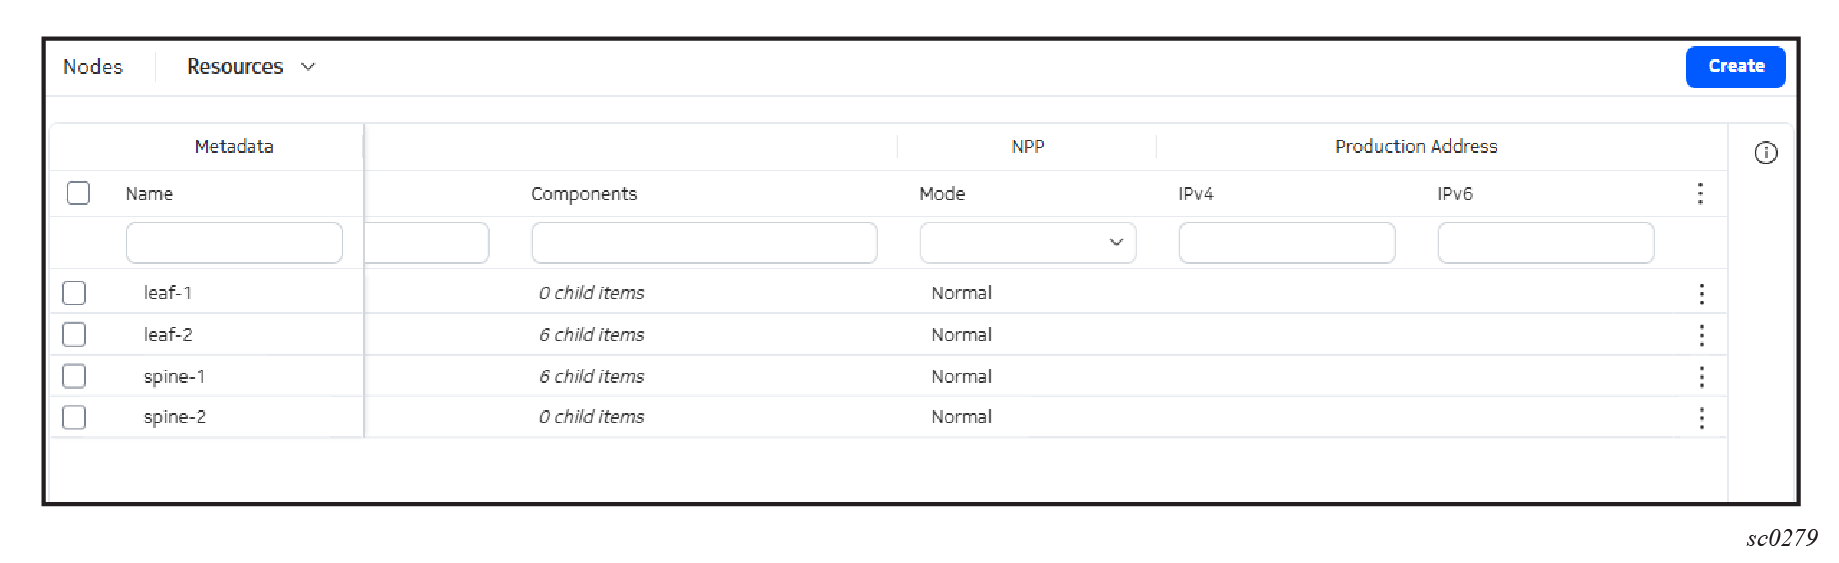
The following table lists the default columns shown in the Node Resources page.
| Column | Description |
|---|---|
| Name | The name of the resource. |
| Namespace | The namespace to which this node belongs. |
| Labels | The labels assigned to this node. |
| Annotations | The annotations assigned to this node. |
| NPP | The current state of the connection between ConfigEngine and NPP. |
| NPP Pod | The NPP pod name. |
| NPP Address | The NPP address and port for this TopoNode. |
| Node | The current state of the connection between NPP and the node, which
can be one of the following:
|
| Node Address | The address and port used to connect to the node. |
| Platform | The operational platform type of this node. |
| Version | The software version of this node. |
| Onboarded | Indicates if the node has been bootstrapped or is reachable using the configured credentials. |
| Operating System | The operating system running on this node. |
| MAC Address | The MAC address associated with this node. |
| Serial Number | The serial number of this node. |
| System Interface | Deprecated - no longer used. |
| License | The reference to a ConfigMap containing a license for the TopoNode. |
| Components | Details about the hardware:
|
| Mode | The mode in which this node is functioning:
|
| Node Profile | The node profile applied to this node. |
| Production address: | The production addresses that this TopoNode uses. |
Working with a node

- View: display details about a selected node,
including status, mode of operation, and so forth.
You can also double-click a node from the list to display the details for a node.
- Edit: edit the settings of a node
- Duplicate: create a new TopoNode based on an existing node
- Delete: delete a node
- Node Configuration: view the node configuration (its CR)
- Under the Workflows options, you can run the
following tasks with the node as the target:
- update the image of the node
- ping the node
- create a help package for tech support
- do a route lookup
- do a route trace
- do an attachment lookup
For more information about these workflows, see Workflow Definition List page.
Creating a TopoNode
-
Create a new node from the Node Resource view using one
of the following options.
- Create a new node by copying the settings of an existing node. Locate the node and click the Table row actions icon at the end of its row. Select Duplicate. In the form that displays, some fields are pre-populated, but you need to provide node-specific information, such as the name, MAC address, serial number, license, and production addresses for the new node.
- Click Create. In the form that displays, the fields are all blank.
-
Configure the metadata for this node.
Provide the following information:
- Name of the node.
- Labels for the node.
- Annotations for the node.
-
Enter the specifications for the TopoNode. If you duplicated a node, verify the
pre-populated settings and modify as needed.
Provide the following information:
- Platform
- Version
- Onboarded
- Operating System
- Node Profile
- MAC Address
- Serial Number (deprecated)
- System Interface
- License
-
In the Components section, click +
Add.
In the form that opens, provide the following information for the node you are provisioning:
- the kind of component
- the type
- the slot in which this component resides
-
Set the production address for this node.
These settings are required if the TopoNode is not bootstrapped by EDA. If left blank, an address is allocated from the management IP pool specified in the referenced NodeProfile resource.
Click the Specification | Production Address toggle to enter the IPv4 and IPv6 production addresses for this node.
-
Specify the operating mode of the node.
The default setting is normal.
Deleted Resources page
The Deleted Resources view displays all of the nodes that have previously been deleted from the system. From here you can view details about the reverted nodes, and if necessary, revert the deletion.

| # | Name | Function |
|---|---|---|
| 1 | Actions menu | Use the Actions menu to perform the following actions on a selected
node:
|
The list of nodes in the Deleted Resources view displays the following columns by default.
| Column | Description |
|---|---|
| Name | The name of the deleted node. |
| Namespace | The namespace to which the deleted node belonged. |
| Transaction ID | The ID of the transaction within EDA that deleted this node. |
| Commit Hash | The commit hash for the commit within EDA that deleted this node. |
| Commit Time | The date and time at which the deletion of this node was committed. |
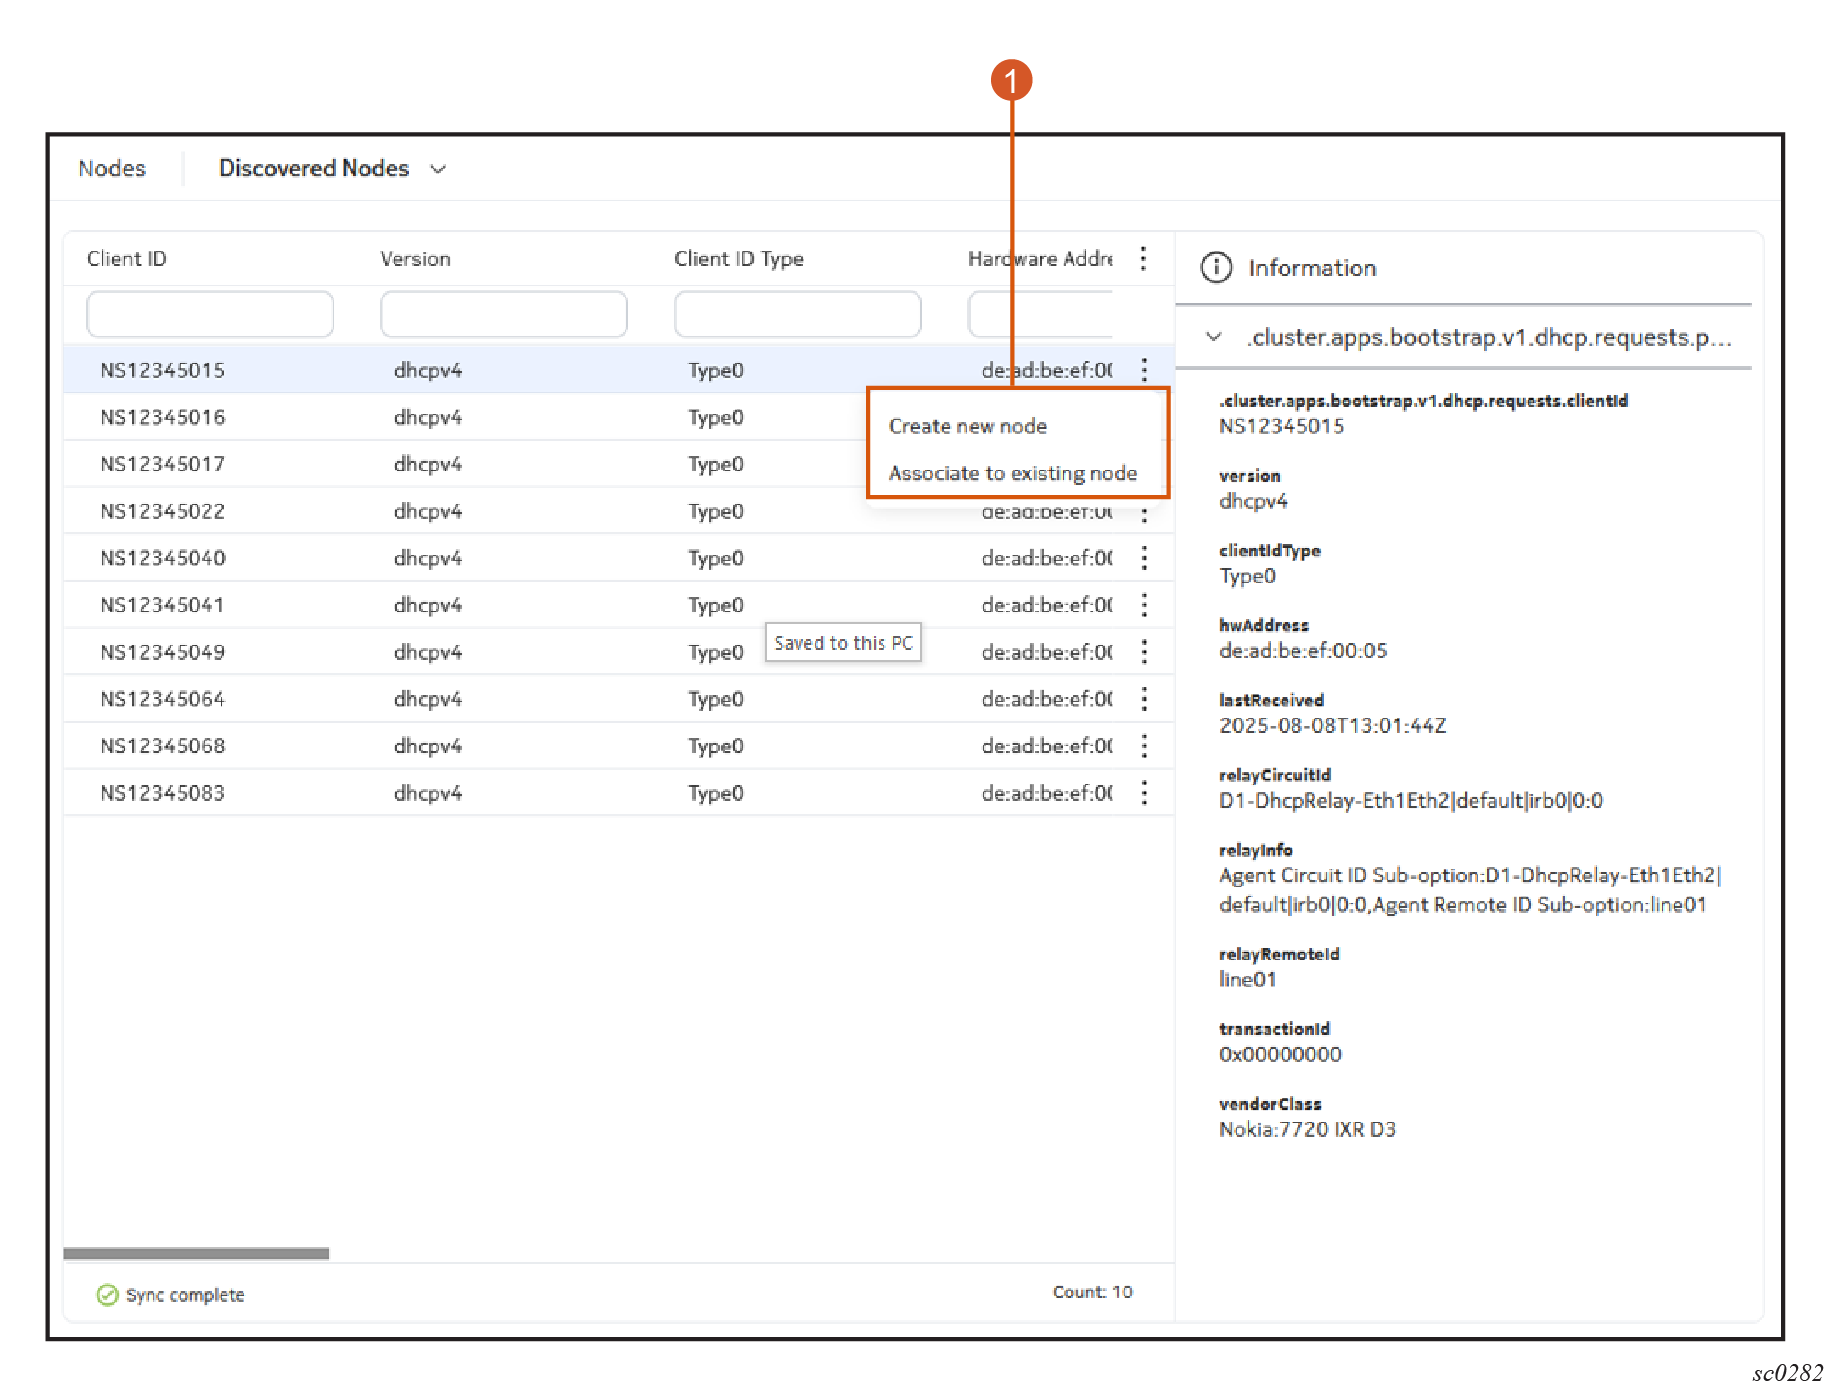
Discovered Nodes page
The Discovered Nodes page contains a list of discovered nodes that have not been assigned to a fabric. When a discovered node is assigned to a fabric, it is removed from the Discovered Nodes list and added to the main list of nodes.
| # | Name | Function |
|---|---|---|
| 1 | Actions menu | Use the Actions menu to perform the following actions on a
selected node:
|
The list of nodes in the Discovered Nodes view displays the following columns by default.
| Column | Description |
|---|---|
| Client ID | Indicates the ID sent by the client. The Client ID may refer to serial numbers, MAC addresses, or any other arbitrary string. |
| Version | Indicates the software version of the selected node. |
| Client ID Type | Indicates a string provided by the client. |
| Hardware Address | The MAC address of the client. |
| IP Address | The IP address of the client. |
| Last Received | Indicates the time at which a packet was last received by the client. |
| Namespace | Indicates the namespace to which the node belongs. |
| Node Name | Indicates the name of the node. |
| Relay Circuit ID | The parsed version of the Relay Info, indicating only the Circuit ID value, if any. |
| Relay Info | A raw dump of options passed by the DHCP, if any. |
| Relay Remote ID | The parsed version of the Relay Info, indicating only the Remote ID value, if any. |
| Transaction ID | The DHCP protocol specific transaction ID. |
| Vendor Class | The vendor class of the client. |
Creating a new node
You can create a new node from scratch or from an existing node.
- At the right side of the Discovered Nodes list, click the Table row actions button.
- Click Create a new node.
-
To create a node from scratch:
-
To create a node from an existing node:
Associating to an existing node
You can associate a selected discovered node to an existing node.
- At the right side of the Discovered Nodes list, click the Table row actions button.
-
Click Associate to existing node.
EDA opens the Associate to existing node page where you can select an available existing node to associate the discovered node to.
-
Click Next.
After a discovered node has been associated with an existing node, the discovered node is removed from the Discovered Nodes list.