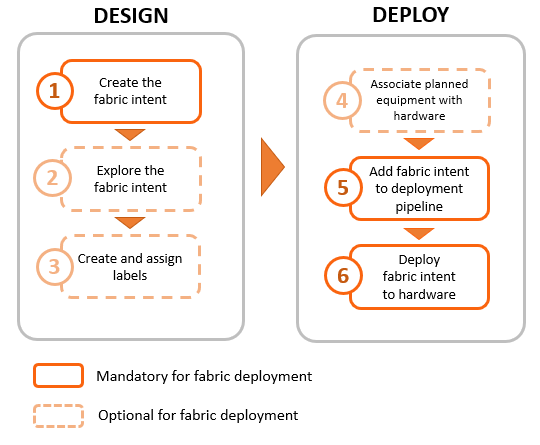
The design-and-deploy workflow
This section describes the workflow for designing, exploring, and deploying a fabric intent.
Before you can create any fabric intents, you must:
- create a region (a logical container for fabrics that manages the deployment of intents), as described in Deployment regions.
- ensure that the software catalog includes the SR Linux image you intend for deployment to all nodes in the fabric, as described in Software and image catalogs.
Create the fabric intent
Fabric intent creation begins with the selection of a Nokia certified template for the type of fabric type you are creating: flexible leaf/spine or backbone. These templates contain optimized topological and configuration data prepared by Nokia engineers, and can greatly speed up the design of otherwise complicated fabrics and their interconnections.
After you select a template and provide some basic parameters, you save the design and, with one click, generate the detailed fabric intent. The intent includes a fabric topology based on your selections, identifies the types of hardware required for each node, includes detailed configuration code for each node, and creates a wiring plan that technicians can use to connect the hardware together.
The Fabric Services System supports the creation of fabrics containing two types of nodes:
- real nodes, if this is a fabric you intend to deploy onto existing or planned real-world hardware.
- virtual nodes, which the system emulates with software in the Digital Sandbox. Such
detailed simulations are useful for exploring, testing, and validating a potential
fabric designs.
The Digital Sandbox is a separate component that requires its own license. For more information, see Digital Sandbox.
For the procedures to design a fabric intent, see:
Explore the fabric intent
After you create a new fabric intent, you can explore the intent to verify that it appears as expected.
The Fabric Services System includes various tools you can use to explore the resulting fabric topology:
- One is the graphical fabric topology display, whose elements and operation are described in Viewing a fabric intent.
- Another is the fabric-as-code view, that shows the precise configuration data for every element of the fabric. The steps to view a fabric intent or an individual node in code view are described in Viewing a fabric intent as code and Viewing the configuration file for a single node.
Create and assign labels
The Fabric Services System supports an extensive labeling system you can use to tag the elements within a fabric intent. These tags are more than just passive information displays; applied systematically, tags can identify groups of logically related entities that can then be the subject of collective operations in the future. Labels and their application to fabric intents are described in Labels.
Associate nodes with hardware
When you are satisfied with the fabric design, you can associate the abstracted, planned nodes in the fabric intent with their real-world counterparts using the hardware serial number. This process is described in Associating individual planned nodes with real-world hardware.
Add the fabric intent to the deployment pipeline
The first step in deploying a completed fabric design is to add it to the region's deployment queue as described in Deploying a fabric intent.
Because a large number of intents may require deployment at any one time, the system uses regions to maintain a fixed queue of pending deployments. This deployment pipeline helps the system manage deployments in an orderly sequence and prevents them from interfering with each other.
Deploy the fabric intent to hardware
Finally, you can go to the region's deployment pipeline and manually trigger the deployment of the fabric. This downloads the necessary configuration files to each of the participating nodes that you associated previously. This process is also described in Deploying a fabric intent.